1.0 Introduction
This article will explain in depth how to get the Classical CD Tagger, a piece of Linux software, running happily on Windows. If you would prefer to read just a short summary of the key 'do this-then this' points, then this companion-piece will be of interest. That short-form article expects you to know a thing or two about Windows, Linux, Cygwin and poking around on the command line when necessary! But this long-form version will cover the same sort of ground with minimal expectations about your competence in things IT! I shall be assuming that you've never really used Cygwin before and will thus describe things at length and use lots of screenshots to make things clear!
Well, that's the plan, anyway!
2.0 Introducing Cygwin
It's been possible for many, many years to run Unix-y programs on Windows by installing Cygwin. Cygwin is a Linux compatibility layer for Windows, much as Wine is a Windows compatibility layer for Linux. You install it, then you can download and compile all sorts of Linux-native programs and have them run 'within' the Cygwin environment, yet still inside your Windows operating system and able to access the files and folders that your Windows PC thinks belong to 'it'.
You might well ask: surely, there are lots of ways of running Linux on Windows? For example, install VirtualBox, define a virtual machine, install Ubuntu (or whatever distro floats your boat!): da-da! Linux on Windows!! Well, sort of. What you'd actually end up with is a complete Linux environment running on top of, but outside of, Windows. A file on your C: drive will be invisible to the Linux environment, because they are two completely separate, distinct environments. Running a VM on Windows also requires a lot of CPU and RAM.
What about the new(ish) Windows Subsystem for Linux (WSL)? Wouldn't that achieve the requirement? Well, it might -but there are already 2 distinct versions of WSL which makes recommending it problematic. Version 1 was very much like Cygwin: it intercepted Linux software's kernel calls in real time and translated them into something the Windows kernel could handle. That resulted in a lightweight, unified environment in which Linux and Windows really did seem to cohabit nicely... but version 2 is a very different beast and is, essentially, a virtual machine running Linux. It does so more transparently than, say, VirtualBox, but the result is basically the same: you still need lots of RAM and lots of CPU.
Cygwin, however, provides a thin, mostly transparent way of running Linux software on Windows, without major virtualization taking place. It's free, like WSL; it's lightweight, like WSL v1, but unlike VirtualBox; it gets the job done. So that's why I'll be showing you how to install Cygwin and get it to run CCDT now.
2.1 Installing Cygwin
So, first visit the Cygwin download page. Click on the link that says, "Install Cygwin by running setup-x86_64.exe": there is also a link to a 32-bit version of Cygwin's setup.exe, but I've not used that and therefore haven't tested it. Stick to the 64-bit version (assuming you are running a 64-bit version of Windows, of course!)
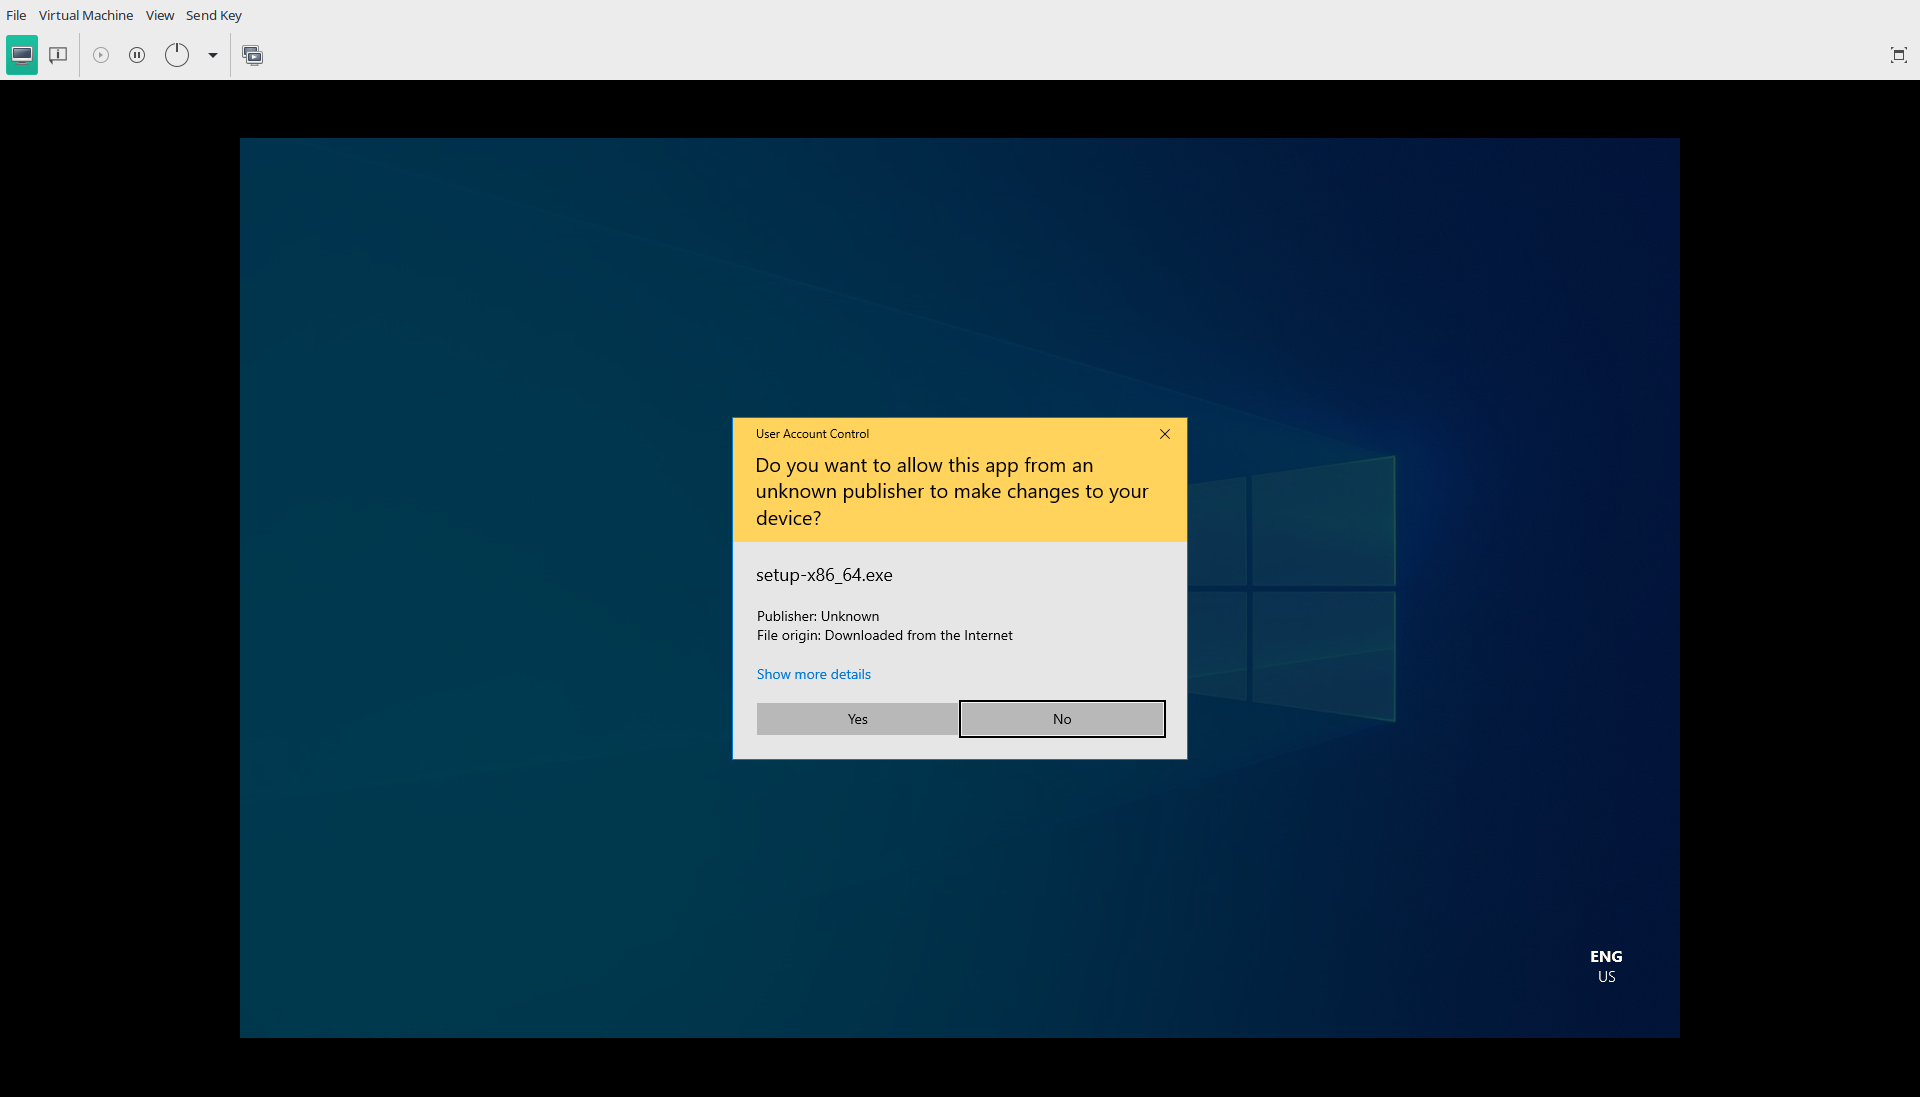
Save the setup-x86_64.exe file somewhere on your Windows' hard drive (I'm going to store it in my Downloads folder for the purposes of what follows). In Windows Explorer, double-click the setup program when it's fully downloaded and confirm you want to run it, if asked. Depending on your Windows version, you may get a pop-up asking if you 'want to allow this app from an unknown publisher to make changes to your device': answer [Yes] if so.
A fairly standard installation wizard then appears:
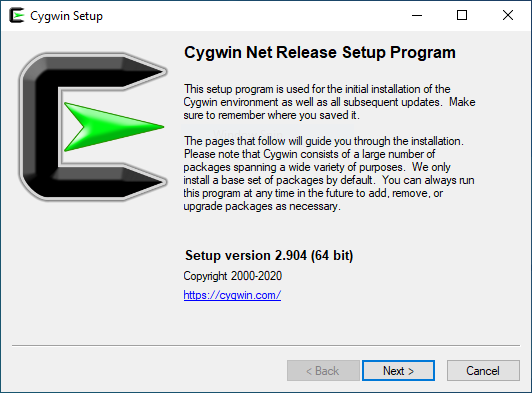
Click [Next] to start things off.
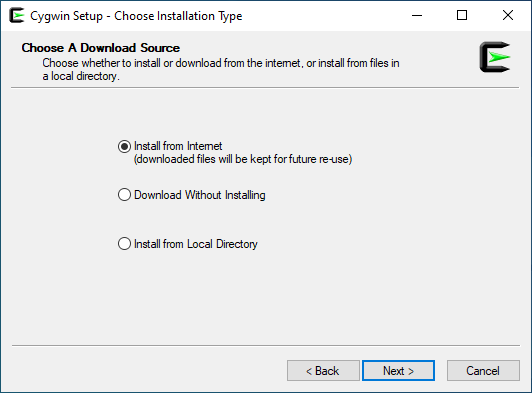
You are first asked where you will source Cygwin's software packages from: if this is your first time running Cygwin, you're going to be pulling everything from the Internet (so a fast Internet connection is very desirable at this point!). That 'from the Internet' option is the default option, so just check it's selected and then click [Next] once more.
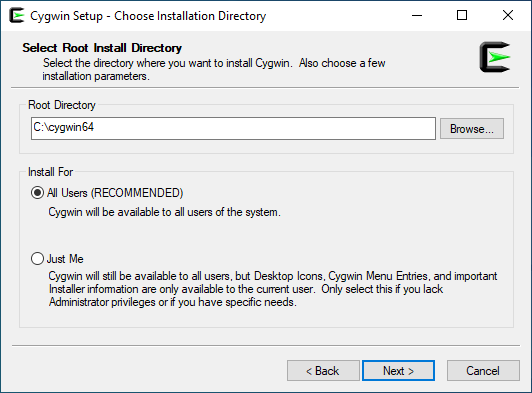
Now you are asked where, on your local PC, you want to store all the software packages that Cygwin will download from the Internet. It will suggest a 'C:\Cygwin64' directory by default and you can accept that, plus all the other option defaults on this screen, without drama. On the next screen, you are asked where to save the packages that you'll shortly be pulling from the Internet:
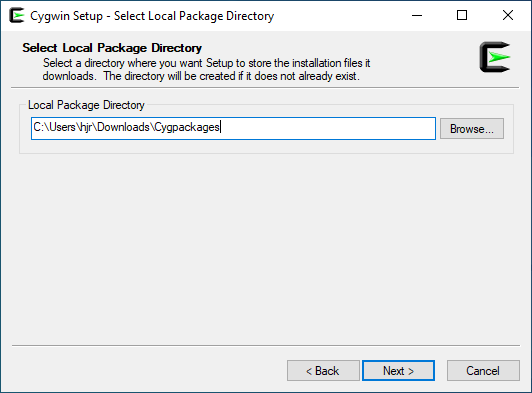
The default suggestion in this case is to tick everything in your Downloads folder. That will work fine, but I tend to want to clear out my own Downloads folder from time to time (it's strictly a temporary thing for me). Thus, I've altered the defaults as shown. The packages will still get stored in Downloads -but within their own folder, so they remain distinct from everything else (and my periodic housecleans of my C: drive will thus not delete things by accident).
If you specify a folder to store things in which doesn't actually exist, you get this prompt when clicking [Next]:
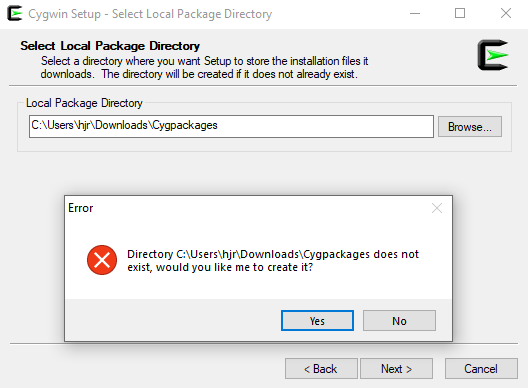
That's the installer realising the altered downloads directory doesn't actually exist, so it has to ask you if it's OK to create it. Go ahead and tell it to do so.
Now, you told Cygwin earlier to download its software from the Internet. It will now therefore ask you how it should connect to the Internet:
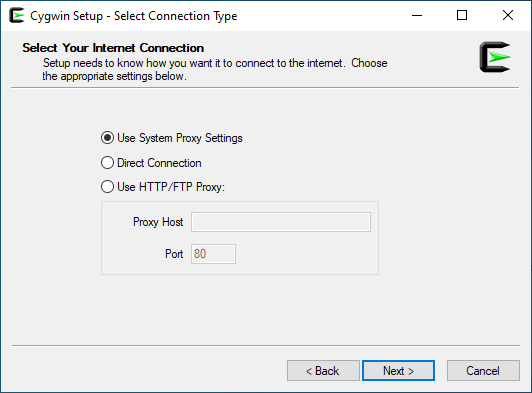
You can probably accept the default option here (to "use system proxy"), because that will either work if you are actually using a proxy server to connect to the Internet, or it will work because you don't use a proxy server at all! Provided your PC is able to connect to the Internet in a browser, say, then the 'System Proxy' option here will work fine for Cygwin's purposes too.
Now Cygwin will fetch a list of 'software mirrors' and offer it to you to select one from as the server you'll use to download the various software packages:
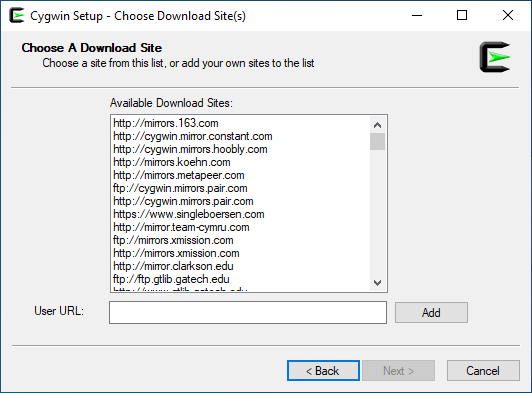
You could scan through this list carefully, if you like, looking for a server that is geographically close to you (to make the software download stage go quickly). Or you can just pick whatever server takes your fancy, if your Internet speeds are fast enough so that you don't need to worry about geographical proximity!
Once a server is selected and you click [Next], a quick download of a catalogue of software will take place and then you'll be presented with this:
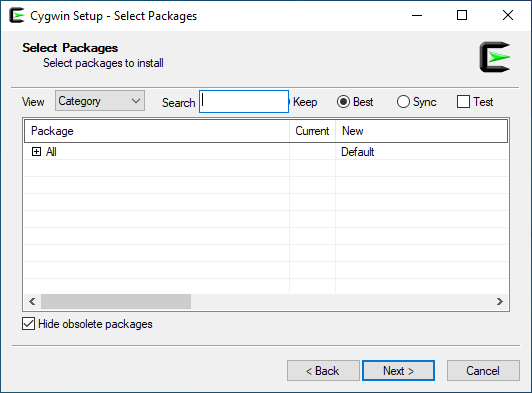
This is where you're meant to select packages to install into the Cygwin environment -but the interface is really clunky and awkward to use, so I'm not going to select anything at all here and will instead just click [Next] -and I suggest you do too! We will need extra software, of course, but I'll show you a much better mechanism for installing it shortly.
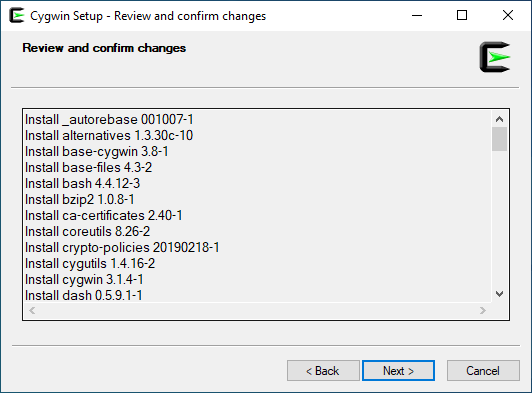
Even though I didn't select extra packages to install, Cygwin still has to install its 'base' build packages, so those are displayed to you now. Just click [Next] to start the installation process.
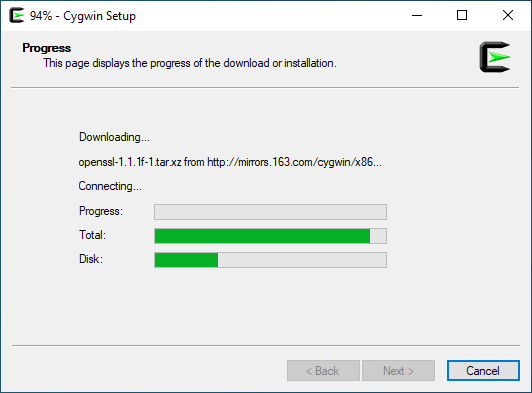
How long you see this dialogue box for will depend entirely on how fast your Internet connection is! The various packages which make up Cygwin are being downloaded and then compiled and installed to create a functional Unix-y environment on top of your Windows PC.
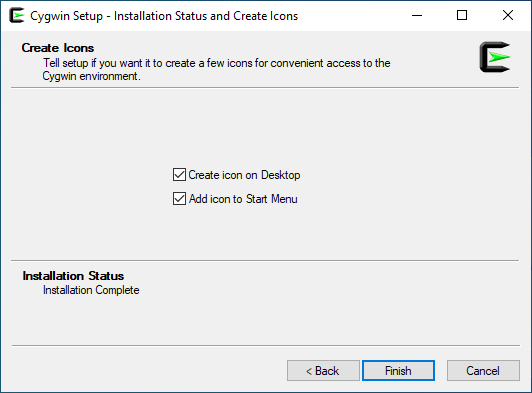
Once the installation process completes, you get this fairly standard dialogue that offers to add icons to your desktop and Start Menu. You can select or deselect them as you prefer, but I think leaving them both switched on makes sense to begin with.
And that's Cygwin installed! You launch it by double-clicking on the icon on your desktop (assuming you asked for one to be created) or by clicking Start -> Cygwin64 Terminal. The results will, in either event, not look entirely impressive!
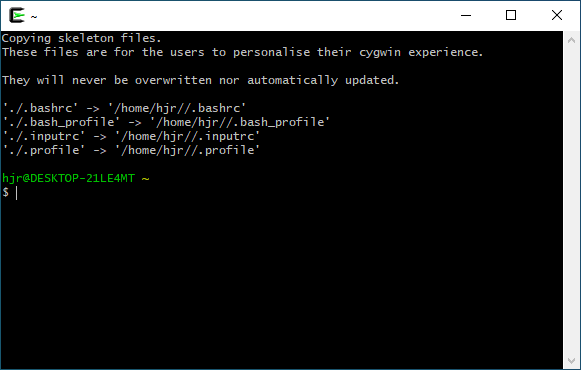
Fundamentally, it's a command prompt type environment: lots of text and no graphics ! You can see that the first time it is run, some shotcuts are created (linking bashrc, bash_profile and so on to more fully-formed directory locations), but that only happens once. After that, you're 'Unix' environment is set up permanently.
You can customise the look-and-feel of it a bit, by clicking on the Cygwin icon in the top-left of the title bar and then selecting 'Options':
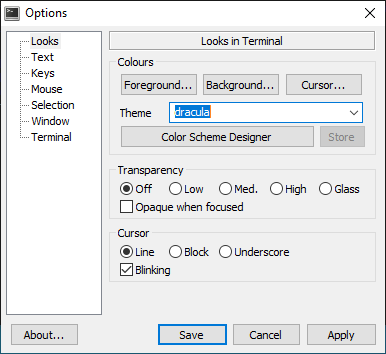
You can see I've elected to use the built-in 'Dracula' theme. I've also clicked on the 'Window' item on the left and set my default size to 132 columns and 34 rows: the default 80 x 24 is a bit small for my tastes. Changes you make to the look/feel and size of the terminal won't actually take effect until you then close and restart Cygwin.
Click around and make yourself comfortable with your new Cygwin environment!
2.2 Understanding Cygwin v. Windows
If you've never used Cygwin before, it can be a bit confusing as to exactly what Cygwin is and does and what relationship it has with the Windows system it's running on. Let's see if I can help explain this a bit for you now.
For starters, open Cygwin and type the following commands:
cd /cygdrive/c
ls
You should see output similar to this:
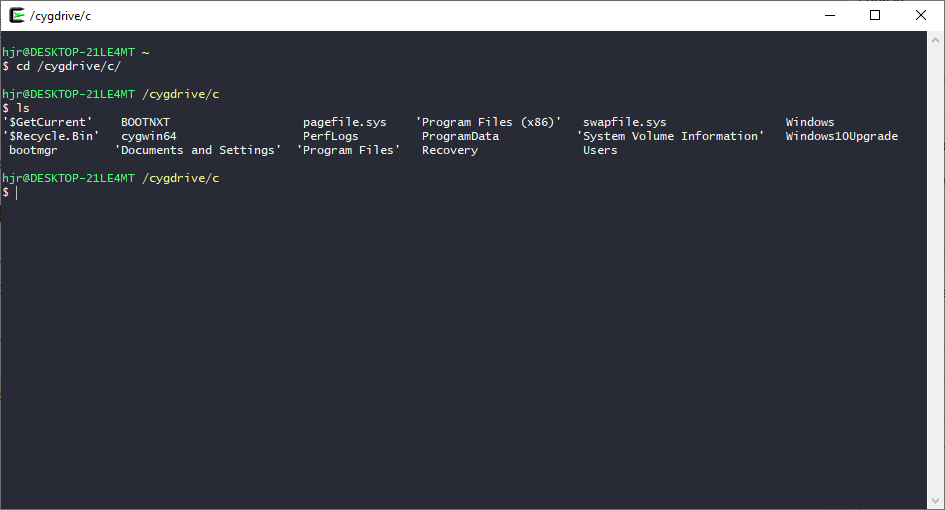
That looks ...er, perhaps a little confusing? Well, if we now open Windows Explorer (Windows' own file manager) and navigate to the root of your C: drive
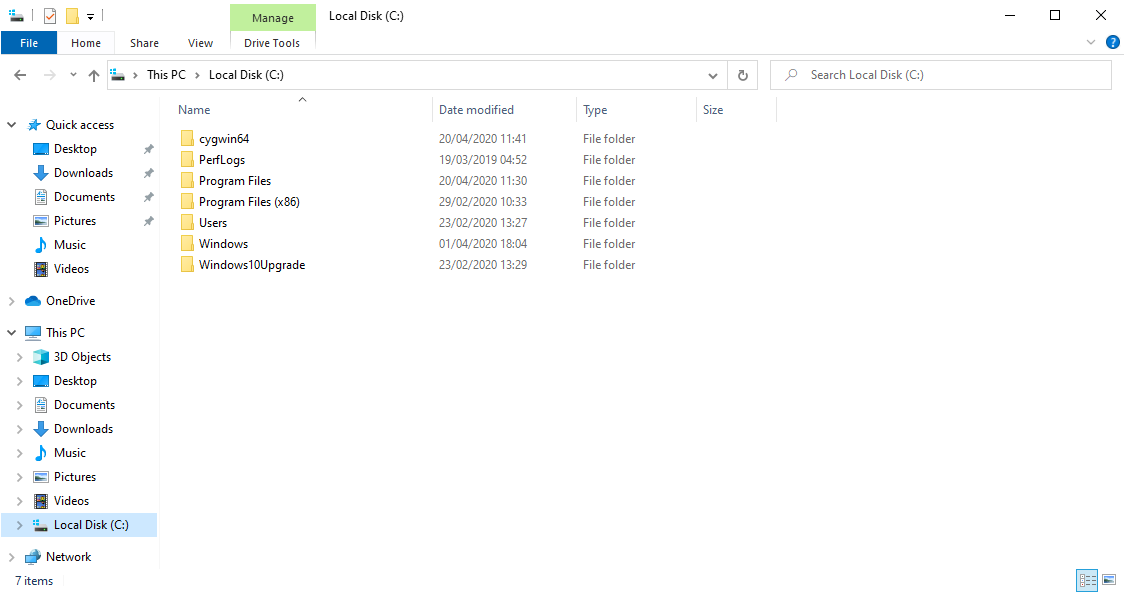
Spot any similarities? Obviously, the displays look wildly different (since Explorer is a GUI program and Cygwin definitely isn't!). But look more closely. Cygwin64 is present in both displays. So are Windows, Users, Program Files and Windows10Upgrade. Sure, Cygwin shows some 'weird' entries such as '$Recyle.Bin' which Explorer doesn't display usually, but all the main suspects are listed by both. In other words, the environments are actually the same: what exists on Windows is visible to Cygwin. The reverse is also true.
Specifically, when you are in Cygwin, everything stored in /cygdrive/c is what you would find in Explorer for the C: drive. And what you see in Cygwin as /home is actually a folder stored within C:\cygwin64\home. You don't really have two separate 'systems' running on the one PC, in other words. What Windows stores, Cygwin sees, though only by sticking '/cygdrive/c' on the front of the path that Windows would know it by. Similarly, anything Cygwin stores can be found by Explorer somewhere in the C:\cygwin\home folder.
This isn't like running a virtual machine, in other words. In VMWare or Virtualbox, what your Linux VM 'sees' is an entirely independent system from the host machine it's running on. But with Cygwin, you're looking at your Windows PC directly, just with forward-slashes not your usual back-slashes!
That's an important point to get under your belt, really. You now have two ways of working on the one PC: one uses Windows commands and conventions; the other uses Linux commands and conventions... but it's the one PC just the same.
2.3 Installing a Package Manager
Once you've got a basic Cygwin installation working, you need to add extra software to it -but as I've already mentioned, the 'official' way of doing that (by using the setup program you've already run) is cumbersome and awkward. So here's how I would do it.
First, open a Windows command prompt and cd to wherever you stored that initial Cygwin setup download. I'm assuming that you stored in your Downloads folder, which is most browsers' default. Once there, run the following command:
setup-x86_64.exe -q -P wget,tar,qawk,bzip2,subversion,nano,lynx
That's just a Windows command to re-run the setup program and to automatically install the programs wget, tae, qawk, bzip2 and so on. Here's me doing that:
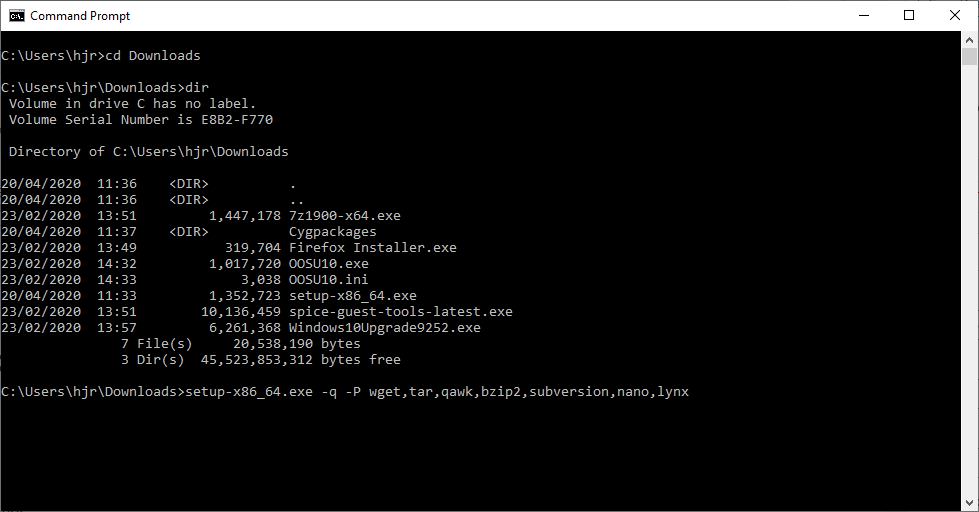
Note again that this is Windows' own command prompt (run by clicking Start, then typing cmd, then pressing [Enter]). I've navigated to the Downloads directory, produced a directory listing (so I can be certain that the setup-x86_64.exe program is still there) and then typed the command I showed you earlier. When you submit that command, this happens:
You should select [Yes] at this point, and then see something like this:

That's the same sort of progress indicator you saw when first installing Cygwin, so you should be reasonably familiar with the way it works. When it has installed all those pieces of software, it should just disappear altogether and you'll be left looking at your original Windows command prompt once more. You can then just close that down, because we won't be needing it again.
Finally, you open up a new Cygwin session and type these commands, one at a time:
lynx -source https://raw.githubusercontent.com/transcode-open/apt-cyg/master/apt-cyg > apt-cyg
install apt-cyg /bin
Here's me doing that:
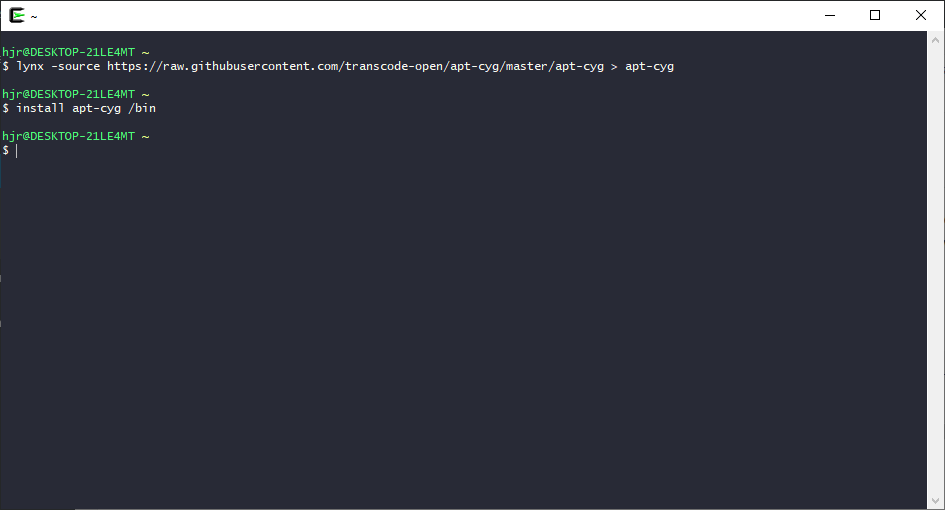
First thing to note, this is a Cygwin session: you can tell that from that 'C-with-a-green-arrow' icon in the top left-hand corner. The second thing to note is that you have now installed a proper package manager on Cygwin: in future, all software can be installed in Cygwin by doing apt-cyg install <package-name>, a one-line command which makes life very easy!
2.4 Installing Required Linux Packages
So now we have a package manager, we need to use it to install all of the following software packages, with the command (issued in a Cygwin session):
apt-cyg install xclip xorg-server flac lame vorbis-tools binutils gcc-core \
git make mingw64-i686-runtime yasm texi2html dos2unix curl xinit
That can all go on one line: I've just broken it up with a continuation character ('\' ) here, for formatting neatness. Here's me doing that:
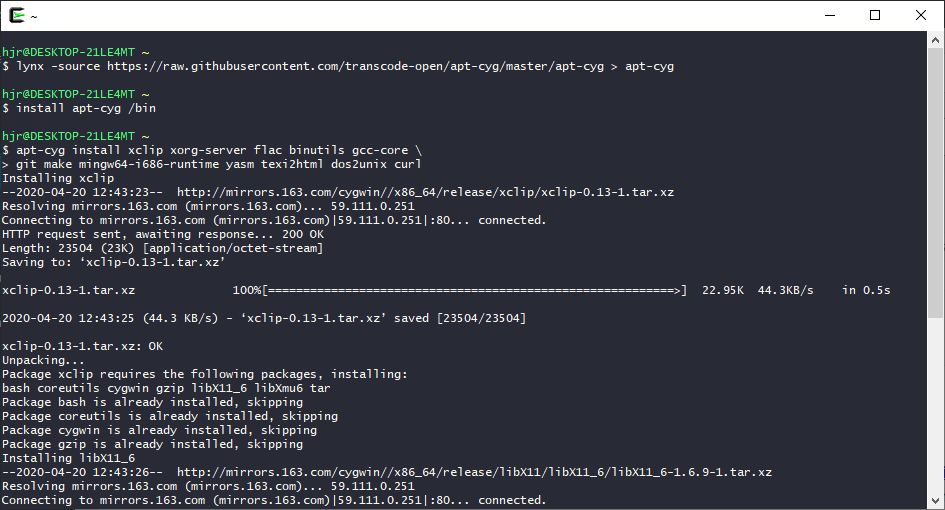
You can see that quite a lot of 'noisy' output is generated by the package manager: most of it can be ignored, provided no catastrophic errors appear in any of it!
The software installation can take quite a few minutes, depending on the speed of your Internet connection. Wait until everything has been declared to be installed correctly before proceeding.
2.5 Installing FFMPEG
There is, unfortunately, one gaping hole in Cygwin's packaged software: it doesn't contain a package for ffmpeg, which is the standard, do-it-all package for audio, video and graphics media manipulation on most Linux distros. Apparently, the Cygwin developers were wary about building an ffmpeg package because of fears of patent infringement. So you can't do an apt-cyg install ffmpeg, but it would be very nice if you could!
We cannot, however, do without ffmpeg. So if you need a package, but none is provided, there's nothing for it but to compile your own package from ffmpeg's source code. This is quite easy to do, but takes an absolute age to do, even on a decently fast PC!
In a Cygwin session, you type all of these commands, one at a time, as follows:
cd
git clone git://source.ffmpeg.org/ffmpeg.git ffmpeg
cd ffmpeg
dos2unix configure
make distclean
./configure --enable-shared --disable-static
make
make install
You will find that the “.configure” command will take a while to return any feedback to the screen (give it several minutes!) and it may end with a warning about not being able to detect libraries correctly: ignore it, as all will be fine in the end. You will also discover, unfortunately, that the “make” command (second from the bottom) will take an extremely long time to complete (over 20 minutes on my i7 laptop). Just be patient and let it complete in its own good time. It will get there in the end.
I wouldn't worry about trying to interpret any of the output that the make command produces. There will be screenful after screenful of it -and it's all mostly complete gobbledygook. Just let it stream away to the screen as it pleases and get on with compiling itself, which it should do without a problem in the end. Don't forget the make install command at the end, which will actually copy the compiled executable into all the right places so it can actually be run.
When the ffmpeg installation has completed, you will have all the software necessary to run the Classical CD Tagger (and the AbsolutelyBaching Flac Checker!) on Windows. There's just one, rather important, configuration issue that needs to be sorted before it's comlpetely safe to use either program.
2.6 Configuring File Security
Left to its own devices, Cygwin tries to use a Linux-like security model for files on a hard disk that is different from that which Windows uses natively. The incompatibilities between the two can cause problems, such as files becoming inaccessible to Windows when accessbile from Cygwin (or vice versa). In the worst case, it can appear to corrupt the metadata in your music files to the point of wiping it all out!
So, to stop that happening, you should configure Cygwin to not use its own security model when mounting the directory that contains your music files. To do that, start with typing the following command in a Cygwin session:
mkdir /music
That creates a 'cygwin' folder called /music which will be the point where you access your Windows-stored music files. Next, type:
nano /etc/fstab
The fstab file stores the details Cygwin needs and uses to understand how to access file systems. By default, it will have just one entry in it:
none /cygdrive cygdrive binary,posix=0,user 0 0
That's Cygwin's directives on how to access the Windows C: drive (you'll remember that what Windows knows as C:\, Cygwin sees as /cygdrive/c, so the instruction on how to mount /cygdrive that you see here is what controls how that translation is handled. Anyway, your job now is to add an additional line after that default one which will control the way Cygwin will access the music files you want to tag with CCDT. That command should read something like:
c:\Users\hjr\Music /music ntfs binary,noacl,posix=0,user 0 0
This says, in order, "here's where my music files are physically stored as far as Windows is concerned; here's where I want you to access them via Cygwin; the physical source is formatted with the NTFS file system; there are various mount options I want you to use when accessing them".
In this example, I'm assuming my music is stored within the ordinary Windows "Music" folder, which is stored on C:\Users. My Windows username is 'hjr', so that means my Windows folder will actually be stored in C:\Users\hjr\Music. Use Windows Explorer to verify that this really is the correct path to that folder -and, obviously, replace my username with your own!
Note that Cygwin does not respond well to directory paths that contain spaces -so, it's best to avoid them if at all possible. Also note that Cygwin is generally case-sensitive, so if it's 'C:\Users', you need to say 'Users' in the fstab file, with a capital U, not 'users' with a lower-case one.
The key part of the fstab entry I've suggested you make is the all-important presence of noacl in the mount options: it is this which switches off Cygwin's Linux approach to security. It will only take full effect once every process using Cygwin has been stopped and re-started: the best way of ensuring that happens is to reboot your Windows PC altogether.
Once your PC comes back from that reboot, you are (finally!) good to go with Cygwin. You will also find all your music files mounted correctly at /music (if you used that specific mount point in the previous example).
3.0 Installing The Classical CD Tagger
Now you have everything ready to run CCDT -apart from CCDT itself!
So let's sort that out now. First, click here to download CCDT to your Windows PC in the usual way. Store it where you usually store your downloads -which, generally, seems to mean your Downloads folder. Remember that, on Windows, that folder is actually C:\Users\<your username>\Downloads.
Now, in your Cygwin environment (that is, within the terminal window that you saw earlier that displays the Cygwin logo in its top-left corner), issue this sequence of commands, one-by-one:
cd /bin
cp /cygdrive/c/Users/hjr/Downloads/ccdt.sh .
chmod +x ccdt.sh
ln -s ccdt.sh ccdt
The first command positions us within the Cygwin /bin directory (where all executables are generally stored in Unix-y environments!). The second command copies the ccdt.sh script from the Windows Download directory where we originally stored it to our current location -i.e, the /bin directory itself. Since /bin is in the PATH for all Cygwin users, we'll be able to run it by merely typing its name: we won't need to type its full path too.
The third command is all-important: it makes the ccdt.sh shell script executable (i.e., capable of being run as a proper program).
The fourth and final command creates a 'symbolic link' between the real ccdt.sh file and the name 'ccdt'. A symbolic link is basically a shortcut or alias: you type the one and you get the results of typing the other. In this case, the command makes it possible to invoke the ccdt.sh script by merely typing 'ccdt', without the ".sh" alias. I find it a more natural way of invoking a program -and, in any case, it saves you three keypresses every time you run the program, so it's worth it in my book!
4.0 Running the Classical CD Tagger
Although CCDT is an entirely text-based program, it actually relies at one point on having access to a clipboard. When you take its Option 2 to say what a piece of music's composition name is, on Linux you are allowed to press Ctrl+Alt+Insert to automatically paste in the current directory's name as the composition name. This assumes that your physical folder structure and names faithfully reflect separate compositions -but, according to the Axioms of Classical Tagging, that's exactly what they are supposed to do, so the assumption is a safe one! If for any reason it's not, then you simply don't use this piece of functionality, so even then, it's not going to do any harm.
Anyway, the point is that whenever you run CCDT, it copies its current directory into the clipboard... and clipboard functionality in Linux is provided by an X Server. We usually think of X servers as being necessary for GUI programs, which you can interact with via mouse clicks; but on this occasion, it happens that an X server is needed to provide one tiny piece of rather important functionality to a very much text-based program!
What this means is that if you only typed ccdt to launch CCDT, you would be missing that key piece of functionality. So instead, here's what you actually do to run CCDT in a Cygwin session:
startxwin &
export DISPLAY=:0.0
ccdt
The first command starts the X server and runs it in the background. It will spew a lot of text messages as it starts to run, but if you press [Enter] a few times, you should eventually return to a standard, clean command line prompt.
The second command tells your Cygwin session to use the X server that's just been launched.
Finally, you can then run CCDT -and it will have access to a virtual clipboard, so that you can paste in the current directory's name when you take option 2. However, whereas in Linux you would press Ctrl+Shift+Insert to do the pasting, in Cygwin you have to press Shift+Insert instead. That's just one of Cygwin's hard-coded features and you can't alter that keypress combination, unfortunately.
Note that you don't have to run startxwin and set a DISPLAY before running CCDT. The program will function perfectly well without those two prior commands. But at the point where you take option 2, you'd have to type the composition name by hand (or use a mouse to copy it from CCDT's 'you are in:' display and then to paste it in). Personally, when the directory names accurately reflect my composition names, I prefer to be able to Shift+Insert to more conveniently use the folder name as my composition name in one hit.
5.0 Using CCDT
So, you will remember that we earlier edited Cygwin's /etc/fstab file to declare that our music folder would be /music and that this would map to a Windows folder somewhere (my example earlier said my Windows Music folder was D:\music\flac\classical). Accordingly, you simply cd within the Cygwin session to a suitable folder and launch CCDT from there. For example:
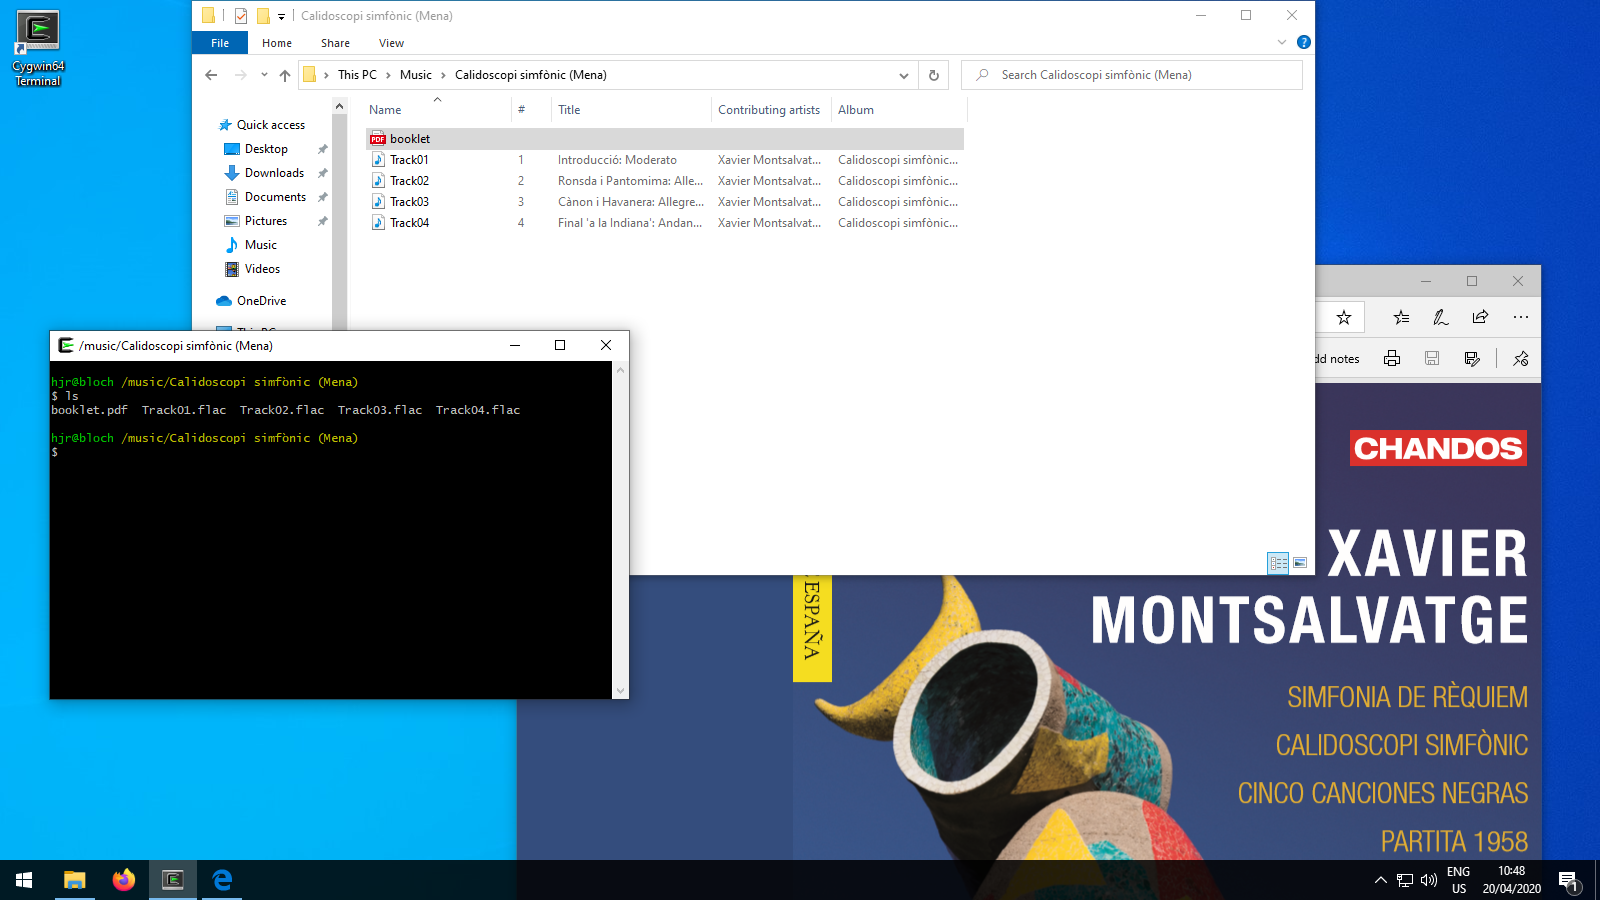
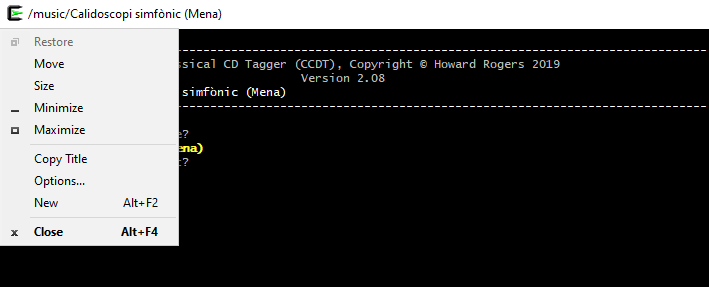
That screenshot might look a little complicated, but it's basically a Windows 10 desktop; I've navigated to my Windows music folder in Explorer -and you can see that 4 tracks are listed, along with a PDF of the CD booklet. That PDF is open in the background, so we know these 4 tracks belong to the Calidoscopi Simfònic by Xavier Montsalvatge. In the foreground, I've opened a Cygwin session and navigated to the same directory in the form of Cygwin's own /music folder. The same files are present there, too. So now I can launch CCDT:

It's now just a question of stepping through the numbered menu options, just as you would in Linux natively.

Not that you can really tell from a static screenshot, I realise: but that's me having taken Option 2 and pressed Shift+Insert to auto-paste in the same folder name as is displayed at the top of the screen on the 'You are in...' line. Since that folder name correctly identifies the composition and the conductor, I might as well use that as my actual 'work name', too. And Shift+Insert gives it to me in one hit, rather than a lot of key presses.
This does bring up one particular issue, though, which I think I should cover now. How do you type foreign characters inside Cygwin? I don't know whether you can see from that last screenshot, but this work's name is ...simfònic. That grave accent on the 'o' should not be optional. Now, of course, on this occasion, the folder name contained it already and I therefore didn't need to type it myself: Shift+Insert put it in there for me. But if I wanted to type foreign characters, how do I do so?
Well, it's actually a lot easier than in Windows itself (which either requires you to memorise the Alt-key numeric shortcuts for the foreign characters, or to laboriously find them and copy them with the Character Map utility). In Linux, we use a 'compose key' to indicate that the next two keypresses should be combined into a foreign character. So, for example, if we combined ` with o, you'd get the character ò. Well, happily, Cygwin can use a compose key, too: but it's not switched on by default! So, click the Cygwin icon in the top-left corner of the terminal session:
From the drop-down menu that then appears, click the Options item:

In the left part of the screen that now appears, click Keys. That brings up the display in the right part of the screen that you see above. Toward the bottom of that, you'll see a panel of radio buttons labelled 'Compose key'. Pick one of those to become your compose key (anything but 'Off', which is the default), and then click [Save] to make the change permanent. In my case, I've made the Alt key my 'compose key'. With that enabled, I can now press Alt, let go, then press two other keys in succession and their output will be combined into one. For example, Alt, =, e will give you the € symbol. Alt, -, l will give you the £ symbol and Alt, ", o will give you the letter ö.
Anyway: here's me coming to the end of using CCDT:

So you can see that CCDT has performed its final 'clean' on the audio files -which, because I provided proper track numbers and titles, have now all been renamed nicely. You can see the new names both in CCDT's own output and also in the Explorer window in the background of this screenshot. Slightly bizarrely, too, that's me playing one of the new tracks in Windows' own Windows Media Player: the display makes it clear that the album art I got CCDT to apply to the tracks is displaying entirely correctly. (It's slightly bizarre because for many years, Windows Media Player wouldn't touch FLAC files with a barge pole. Happily, that got fixed in Windows 10. It's also bizarre because this copy of Windows 10 is running in a KVM Virtual Machine on top of my normal Linux desktop. So I'm running a Windows program to play a FLAC file that was tagged up by a piece of Linux software running in a Linux emulator on Windows that's actually running on top of Linux. The world of indirection has never been so happy!)
6.0 Conclusion
If you like CCDT and the other media tools I've written for Linux, but prefer to run on Windows 10, then all is not lost because, as I hope I've shown you in the foregoing, Cygwin will allow almost any Linux shell script to run on Windows in a near identical fashion to the way it would run on 'proper' Linux. Installing the base Cygwin is standard Windows fare: click [Next] a lot.
Adding the necessary software components to Cygwin is a bit of a fiddle, but once you've got apt-cyg installed, it's plain sailing after that.
It's unfortunate that no package for ffmepg is available for Cygwin, but compiling one from scratch is not difficult, just time-consuming.
It's important to switch off Cygwin's native security model, so that only Windows security is applied to files that Cygwin sessions will want to read and modify, but after that Cygwin will run almost exactly as it would in Linux, provided you remember to run an X Server and set a value for the DISPLAY environment variable before you launch it. Ctrl+Shift+Insert on Linux becomes merely Shift+Insert on Cygwin. Even the business of typing foreign characters is made Linux-easy by switching on Cygwin's native Compose Key functionality.