1. Create a new Jail. Call it 'Wordpress' and then on the network page, assign it a fixed, internal IP address:

2. Start the jail, and launch a shell. Install some essential software:
pkg install -y sudo nano bash curl rsync
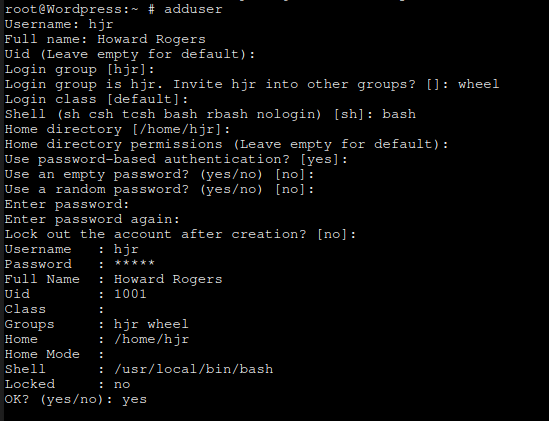
3. Create a non-root user:
adduser
Make the user a member of the wheel group and set his shell to 'bash':
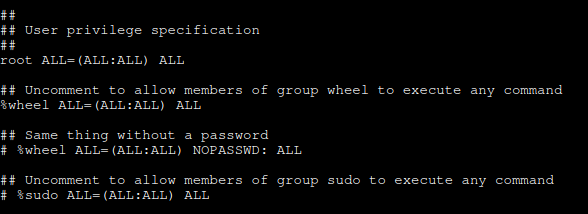
4. Now enable the wheel group members to assume sudo privileges:
visudo
...and find the '%wheel ALL=(ALL:ALL) ALL' line and uncomment it:
5. Ensure SSH is configured to start automatically and is actually started:
sysrc sshd_enable=yes
service sshd start
At this point, you can stop being root inside the Jail's shell and can instead open a terminal prompt on any client PC and ssh into the new server as yourself, issuing all following commands with the 'sudo' prefix.
6. Install, enable and start Apache:
sudo pkg install -y apache24
sudo sysrc apache24_enable=yes
sudo service apache24 start
Ignore the warning about 'Could not reliably determine the server's fully qualified domain name' for now. This will get resolved shortly.
7. Install, enable and start MySQL:
sudo pkg install -y mysql80-client mysql80-server
sudo sysrc mysql_enable=yes
sudo service mysql-server start
Note that this is correct at the time of writing (December 24th, 2023). To check the latest version of mysql, use the command sudo pkg search mysql | grep server: if it lists something with a later version number than '80', install that instead:

Once the program is installed, secure it by running:
sudo mysql_secure_installation
The responses are:
- Would you like to setup VALIDATE PASSWORD component? NO
- Please set the password for root here. MAKE IT COMPLEX AND NOTE IT DOWN SOMEWHERE!
- Remove anonymous users? YES
- Disallow root login remotely? YES
- Remove test database and access to it? YES
- Reload privilege tables now? YES
8. Install, enable and start PHP:
sudo pkg install -y php83-xml php83-gd php83-curl php83-tokenizer php83-zlib php83-zip php83-intl php83-mbstring php83-ftp php83-ctype php83-dom php83-posix php83-filter php83-iconv php83-simplexml php83-sockets php83-xmlreader php83-mysqli php83-pdo_mysql php83 mod_php83
Note that 'php83' is the current version at the time of writing. Do a sudo pkg search php | grep mod_php to see what the latest version number is and if it's higher than 83, install that instead.
Once installed, issue the following commands:
sudo cp /usr/local/etc/php.ini-production /usr/local/etc/php.ini
sudo sysrc php_fpm_enable=yes
sudo service php-fpm start
9. Configure Apache to use PHP:
sudo nano /usr/local/etc/apache24/modules.d/001_mod-php.conf
To the empty, new file, add the following:
<IfModule dir_module>
DirectoryIndex index.php index.html
<FilesMatch "\.php$">
SetHandler application/x-httpd-php
</FilesMatch>
<FilesMatch "\.phps$">
SetHandler application/x-httpd-php-source
</FilesMatch>
</IfModule>
Save the file and then restart Apache:
sudo service apache24 restart
Again, ignore warnings about determining the server's fully-qualified domain name.
Next:
sudo nano /usr/local/etc/apache24/httpd.conf
...and find the line which reads: 'LoadModule rewrite_module libexec/apache24/mod_rewrite.so'. It will probably be the penultimate line in the long block of 'LoadModule' lines. Once found, uncomment it (by removing the '#' which starts the line), so that re-writing is enabled and functional. Once the modified file is saved, again issue the command:
sudo service apache24 restart
10. Create a WordPress database:
sudo -i
mysql -u root -p
create database wordpress;
Once logged in, issue these SQL commands:
CREATE USER 'hjr'@'localhost' IDENTIFIED WITH mysql_native_password BY '<supply-a-password-here';
GRANT ALL PRIVILEGES ON wordpress.* TO 'hjr'@'localhost';
FLUSH PRIVILEGES;
quit;
exit
(Replace 'hjr' with whatever non-root username you prefer, of course).
11. Configure Apache to serve WordPress:
First, create a folder that will eventually contain your WordPress installation and make the non-root user its owner, temporarily:
sudo mkdir -p /usr/local/www/apache24/data/wordpress
sudo chown -R hjr:hjr /usr/local/www/apache24/data/wordpress
Replace 'hjr' with whatever applies in your environment, of course. Next, create a new virtual host file and instruct Apache to load your WordPress site from the directory you've just created.
sudo nano /usr/local/etc/apache24/Includes/wordpress.conf
Into the new file, paste the following
<VirtualHost *:80>
ServerAdmin [email protected]
ServerName absolutelybaching.com
DocumentRoot /usr/local/www/apache24/data/wordpress
<Directory /usr/local/www/apache24/data/wordpress>
AllowOverride All
Require all granted
</Directory>
</VirtualHost>
The ServerAdmin email address and the ServerName entry need to be changed to suit your own circumstances.
Finish off with a restart of the Apache server:
sudo service apache24 restart
11. Download and install WordPress:
Do the following in the /tmp folder, so start off by switching to that directory and downloading the WordPress software as follows:
cd /tmp
curl -O https://wordpress.org/latest.tar.gz
tar xzvf latest.tar.gz
sudo rsync -rtv /tmp/wordpress/ /usr/local/www/apache24/data/wordpress
Now prepare WordPress and set its ownership correctly:
cd /usr/local/www/apache24/data/wordpress
sudo cp wp-config-sample.php wp-config.php
sudo mkdir wp-content/upgrade
sudo chown -R www:www /usr/local/www/apache24/data/wordpress
sudo find /usr/local/www/apache24/data/wordpress -type d -exec chmod 750 {} \;
sudo find /usr/local/www/apache24/data/wordpress -type f -exec chmod 640 {} \;
12. Configure WordPress security:
First, obtain a set of salts and keys:
curl -s https://api.wordpress.org/secret-key/1.1/salt/
Copy and paste the returned values into a text document temporarily. Then:
sudo nano /usr/local/www/apache24/data/wordpress/wp-config.php
Search within the document for the chunk of define ('AUTH_KEY'... and define ('SECURE_AUTH_KEY... statements: there are 8 such salts and keys in a block. Delete the entire block and replace it with the 8 salts and keys you previously pasted into a temporary text document.
Above those salts and keys are entries that define DB_NAME, DB_USER and DB_PASSWORD. Those are all things you set up at Step 10 above, so replace the 'database_name_here', 'username_here' and 'password_here' text values with the actual values that define how WordPress is to be allowed to connect to your MySQL database. In my case:
// ** Database settings - You can get this info from your web host ** //
/** The name of the database for WordPress */
define( 'DB_NAME', 'database_name_here' );
/** Database username */
define( 'DB_USER', 'username_here' );
/** Database password */
define( 'DB_PASSWORD', 'password_here' );
...becomes something like:
// ** Database settings - You can get this info from your web host ** //
/** The name of the database for WordPress */
define( 'DB_NAME', 'wordpress' );
/** Database username */
define( 'DB_USER', 'hjr' );
/** Database password */
define( 'DB_PASSWORD', 'some-password-or-other' );
Save the file when you're done.
13. Complete the WordPress install:
From a web browser on a connected client PC, visit the new server as follows:
http://192.168.137.211
(or whatever the IP address for your new server is). You'll be greeted by the language selection web page for the fresh WordPress installation:
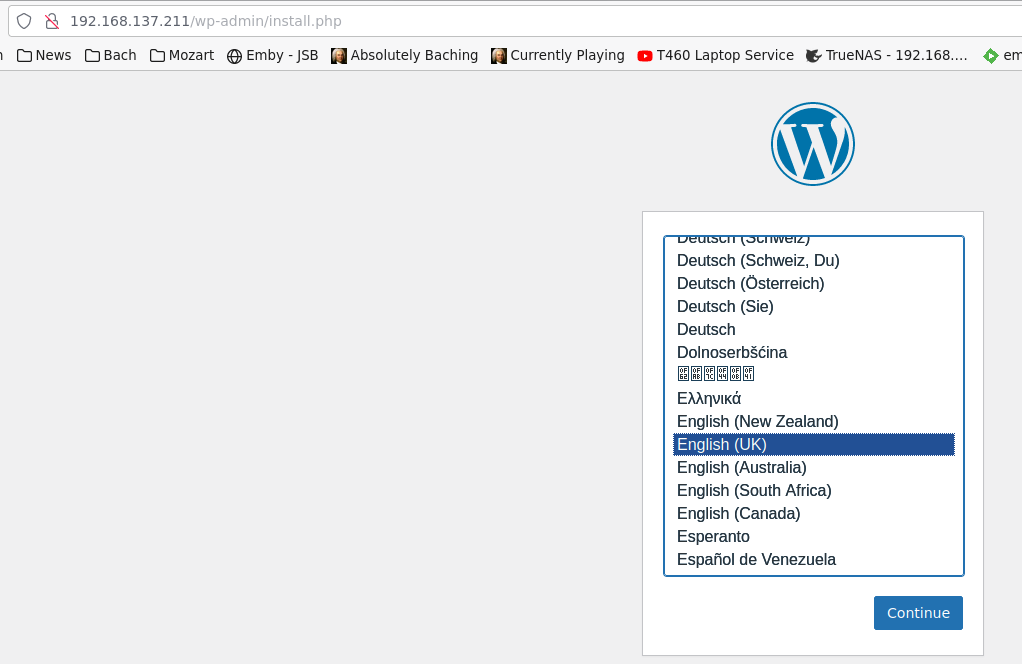
Pick an appropriate language and then click [Continue]:

Specify a title for your site, the WordPress user you want to administer the site as and a new password. Note that this 'hjr' is not the same 'hjr' as owns the WordPress database according to MySQL: the database owner and the website administrator are separate roles (and thus can use separate usernames). I happen to use 'hjr' for both as a convenience for the purposes of documentation, but you don't have to and it's probably best not to do so!
When you click the [Install WordPress] button, there'll be a bit of a pause as things are configured in the database, but eventually you should see:

...which tells you the WordPress website is now setup and running. If you click the 'Log in' link there, you can log in as the site administrative user you just created:

Clicking the [Log in] button there takes you to your website's administrative 'dashboard':

From there, it's all standard WordPress. If you want to see what your brand new and very-much-default website looks like, click the link next to the 'home' icon, in the top-left of the screen, above the word 'Dashboard':
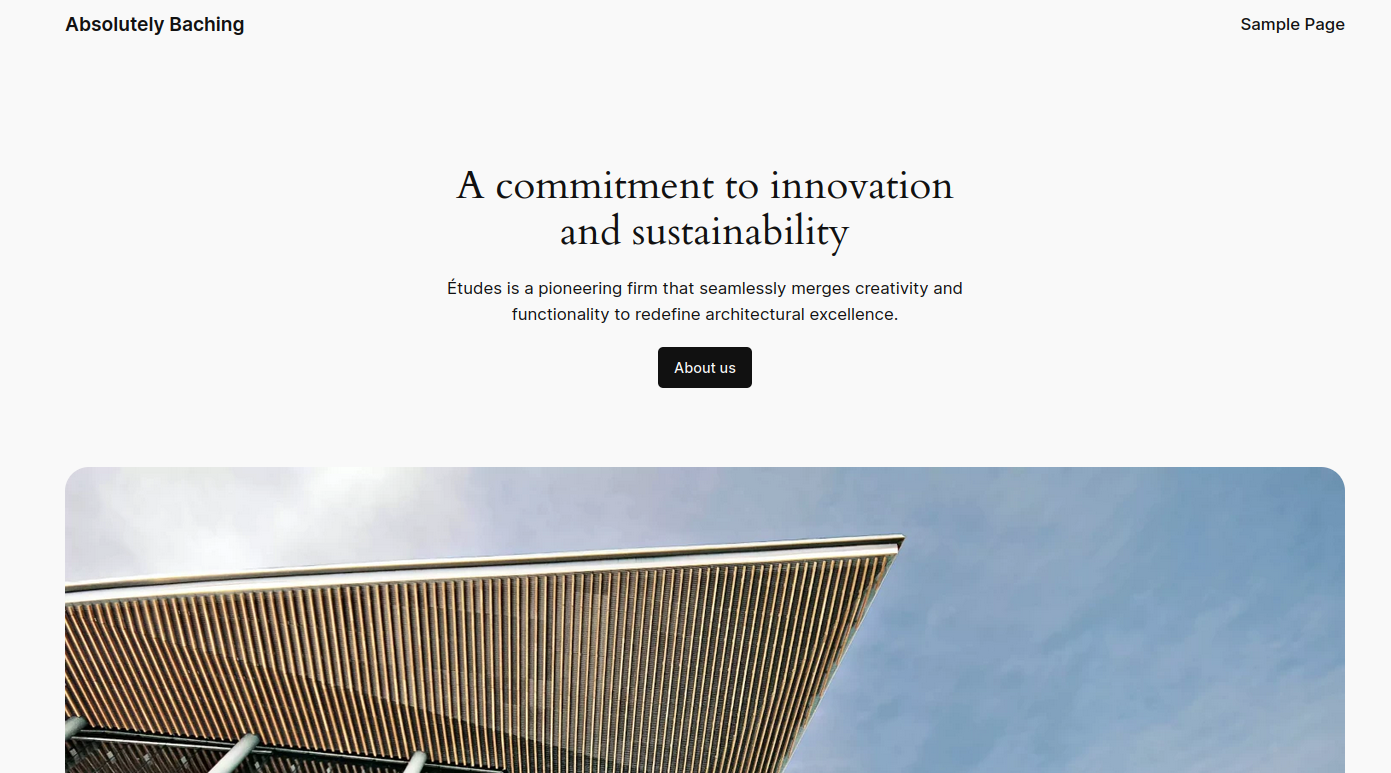
As you can see, the site currently only contains a sample page, a sample post and a sample comment, using the latest default WordPress theme. From here, you have to configure things the way you want them in WordPress itself.
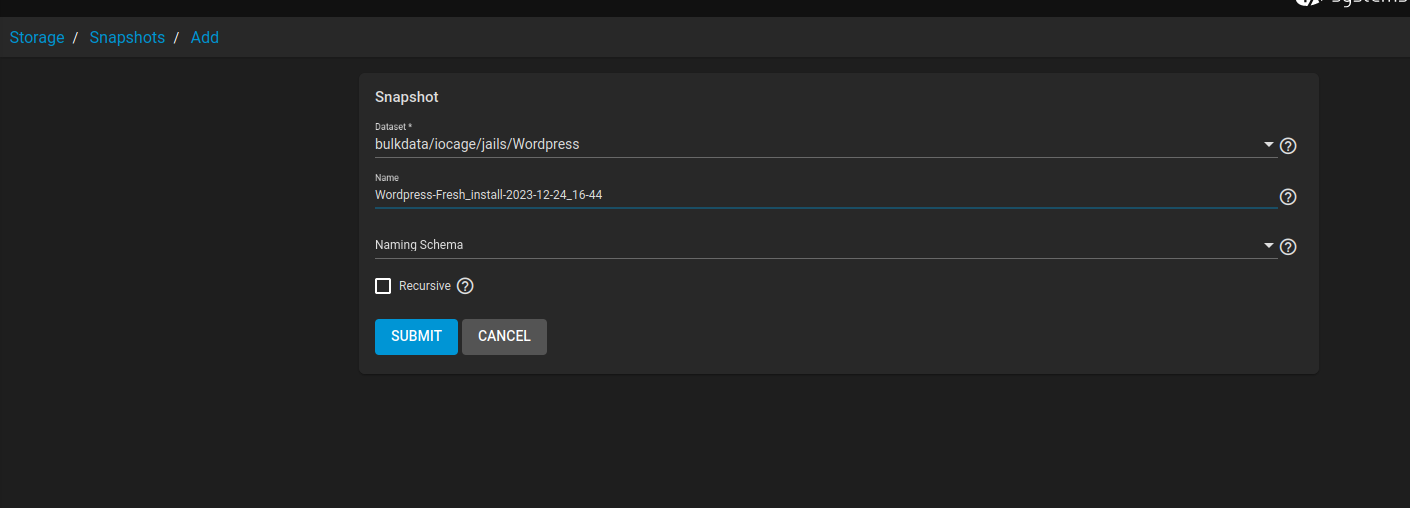
At this point, I'd strongly recommend taking a snapshot of your WordPress jail, so that you have a 'functioning, but default, base-line' to return to if your tweaking, configuration and customisation all goes horribly wrong. In TrueNAS, go to Storage -> Snapshots -> Add and click the 'Dataset' item. Navigate through available storage pools:
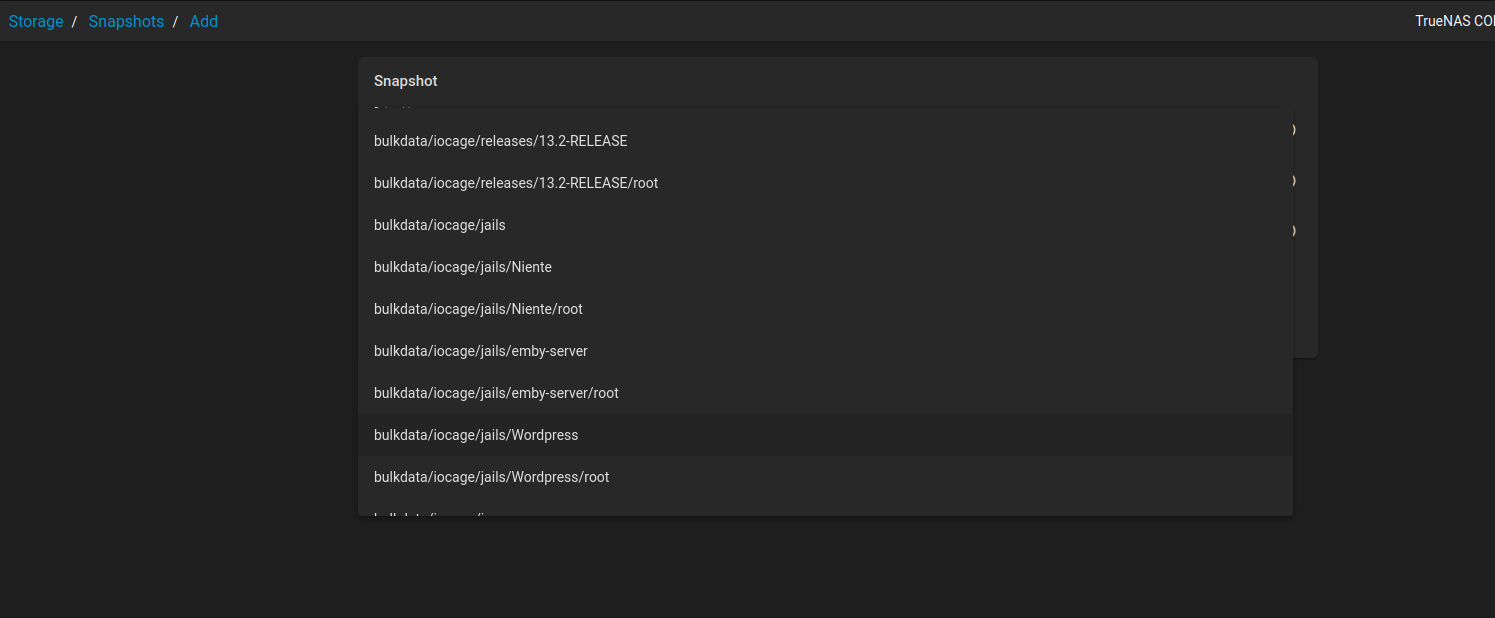
You need to scroll through the list to find the iocage/jails section, and within that, find the item that represents the jail
fill in things as follows: