1.0 Introduction
I was recently asked to produce a set of guides as to how I'd go about ripping various types of classical music CD and the person doing the asking said she was using Windows as her operating system. Which is fair enough and I was happy to oblige with a set of seven articles covering ripping a range of CDs, covering everything from 1 CD containing a single work by a single composer through to a boxed set of Beethoven symphonies, and using free (as in zero-cost) Windows software to do the job: Exact Audio Copy (EAC) and MP3tag.
However: I don't use Windows myself and I prefer my house generally to be kept a Windows-free zone unless exceptional circumstances (like a recalcitrant Other Half) dictate otherwise. So, I wanted to be able to repeat those Windows-only articles... but this time using my favourite operating system: Linux.
Specifically, I've just gone and wiped a spare laptop and installed Manjaro on it, using the XFCE desktop. As far as what's about to happen in these articles, I could have chosen any current Linux distro or desktop environment to use: what to do and how to do it doesn't depend in any way on your choice of distro or your preference for Gnome, Unity, KDE or anything else! I would only ask that before you begin, you make sure that your chosen distro/desktop environment combo is fully updated.
Given it's Linux, I could have used any number of software CD rippers and/or taggers to do the job -and if you prefer to use Asunder or Puddletag to do the jobs, that's fine. But in these articles, I'm going to use my own Classical CD Ripper (CCDR) and the equally unimaginitively-named Classical CD Tagger (CCDT). Both are entirely free to download and are simply Bash scripts that wrap around more fundamental programs like cdparanoia and metaflac. The aim of these articles is not to mandate a particular tool for the job, however, but to explain what outcomes you would want whatever tool you use to achieve.
2.0 The Task
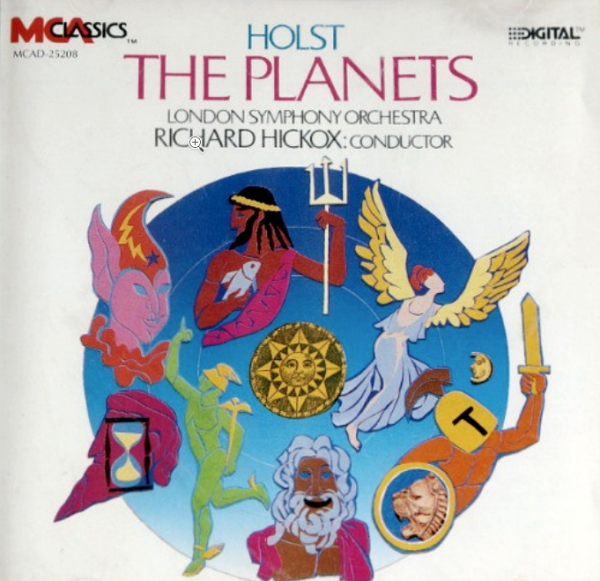
In this short article, I'll show you how I'd rip and tag and store on hard disk this CD:
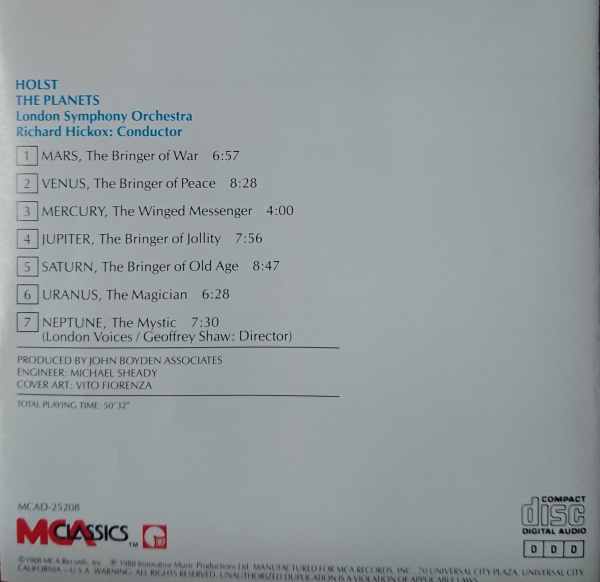
The contents of this CD are as follows:
So this is an example of a single physical CD that contains a single composition by a single composer, though split into 7 different tracks. Here's how I would go about ripping that.
3.0 Installing CCDR
Before we embark on ripping this CD, we need to get some preliminaries out of the way so that our choice of software ripper and tagger will work correctly. There are a handful of software prerequisites that a freshly-installed Linux installation will need (some distros may include them in their default installations anyway, but attempting to install them again won't do any harm). On Manjaro, I'd try to install them as follows
sudo pacman -Sy flac awk wget grep cdparanoia
Pacman -Sy is Manjaro's command to install fresh software packages. On other distros, you may need to use equivalent 'apt-get install' or 'dnf install' commands instead. On Debian and related distros, you will probably be told that the cdrtools package is not available. That's because it's been deprecated and replaced by wodim, so substitute 'wodim' for 'cdrtools' in the above command on those platforms only.
On my freshly-installed Manjaro, every single one of those packages was already installed, so the command was strictly speaking unnecessary, but it wasn't a problem to check it out anyway.
Once the software pre-requisites are installed, it's time to obtain your copy of the Classical CD Ripper shell script. Click on that link and save the file to disk somewhere (I'm going to assume you save it to your Downloads directory). Once it's saved, it's just a text file, so you can right-click in your file manager and open it in whatever text editor you like to review its contents and let yourself be satisfied that it's not going to do anything nasty to your system!
Once the file is saved to disk and you're happy that it doesn't contain anything malicious, issue the following commands:
sudo mv $HOME/Downloads/ccdr.sh /usr/bin
sudo chmod +x /usr/bin/ccdr.sh
sudo ln -s /usr/bin/ccdr.sh /usr/bin/ccdr
That's the equivalent of an installation script. It copies the download from wherever you stored it on disk to the /usr/bin directory (as mentioned, the specific command shown assumes that you downloaded it to your personal Downloads folder); it then makes the script executable; and finally it creates a shortcut to the script called just 'ccdr' so that you don't have to remember the ".sh" suffix every time you want to run it. Some distros might not have a /usr/bin directory; move the file to /bin instead in that case. The key thing is to try to get the script into a directory that is already listed within your PATH environment variable, so that the script can be executed from anywhere without having to spell out the complete path to it.
Once you've 'installed' CCDR in this way, you can immediately run it by opening a terminal session and typing the command ccdr. You should see a response something like this:
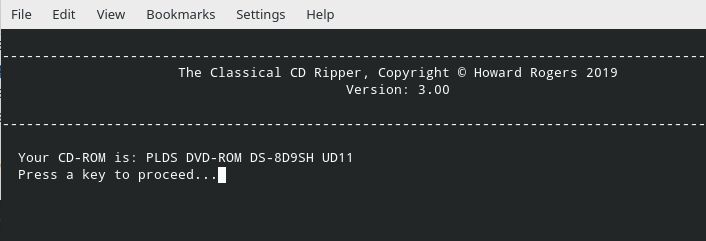
Because the program is text-based, you may need to fiddle with your terminal's 'profile' settings to decrease the font-size or increase the number of columns displayed before the program will display nicely. If you need to do that, just press Ctrl+C to kill the program and re-run it as many times as it takes to get yourself happy with the display.
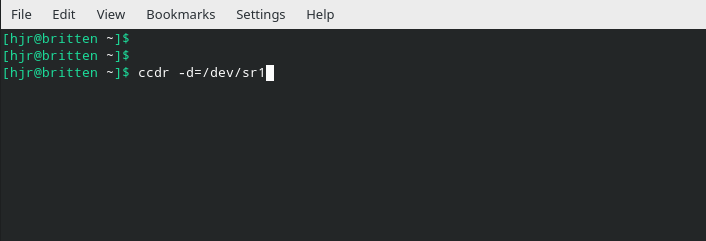
Notice in the above screenshot how the program has spotted a DVD-ROM drive and decided to use that. In fact, however, my PC has two optical drives: one a DVD-ROM and the other a DVD+RW. Why did CCDR decide to use the ROM rather than the +RW? Well, my optical drives are known to my Linux system as /dev/sr0 (the ROM) and /dev/sr1 (the +RW). So, CDDR simply picks the first suitable drive available to it. If you're not happy with that choice, you can direct CCDR to use a specific device with the --device= or -d= run-time switch. For example, if I was insisting that CCDR use my +RW drive, I'd launch it like this:
Be aware that you only have to force the use of a drive (if the default isn't what you want) the first time you run CCDR. It will then remember your instruction for all future runs (unless and until you run it with the --reset=y or -r=y switch, which clears its memory).
During this phase of proceedings, CCDR is identifying your optical drive and comparing it with a list of known "drive offsets". This is a 'feature' of practically all optical drives: you tell it to read (say) block 2407 and it actually goes and reads block 2413. The difference is known as the 'read offset'. If the program didn't know what this offset was, it would mis-read everything by a potentially large number of blocks. This would make your eventual rip inaccurate (though you may not be able to hear the difference: it would still not be a bit-perfect copy of the physical CD's audio signal, though). By determining the read offset and applying it to everything it subsequently does, CCDR is able to make perfectly accurate copies of your audio CDs.
If, for any reason, CCDR doesn't manage to identify your optical drive (perhaps it's an obscure and ancient one!), then it will prompt you to supply an offset of your own choice. You should really try and determine an accurate offset before supplying one, though: search through the AccurateRip database and see if you can find your drive listed there. If you happen to supply a good offset, your rips will still be perfectly accurate -but if you make one up or supply the wrong offset, your rips will not be quite perfect.
In any event, once the program is displaying that it's using the correct drive, you are asked to press a key to proceed. If there is no audio CD in the selected drive at this point, you'll be asked to insert one before anything further can take place:
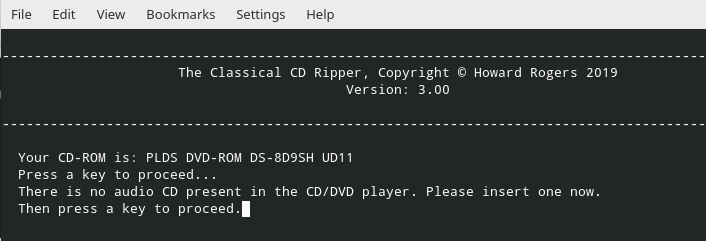
Once you've inserted an audio CD, you can press a key to have it detected by CCDR. As soon as it detects a usable audio CD, it will switch into 'ask lots of questions' mode!
4.0 Performing the Rip
Once CCDR is happy that it can read an audio CD in the selected drive, it will begin to prompt you to describe it, with a series of five 'album-wide' questions:
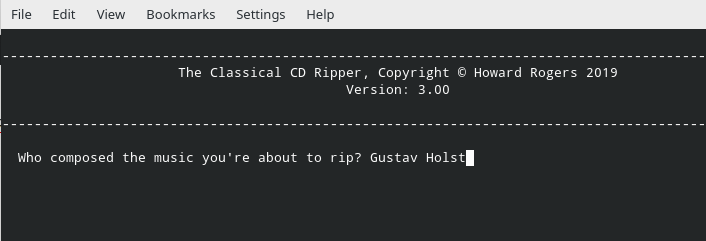
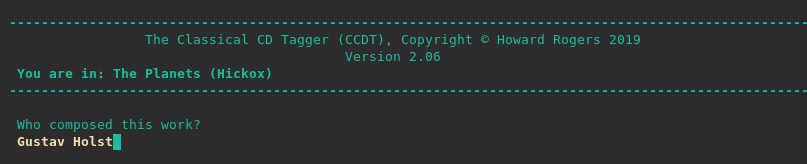
Remembering the CD we're ripping from the start of this article, the prompt to supply a composer is swiftly answered. Remember, this is a single CD containing a single composition by a single composer -so there's no ambiguity about what to type here. Holst wrote the lot, so Gustav Holst it is by way of response. Press [Enter] to proceed when ready.

The program goes on to ask you what the composition on the CD is and who is conducting it. This last answer will act as the 'distinguishing artist' for the rip, so that if you were ripping a CD of a string quartet, for example, which famously does not require a conductor, you might mention the ensemble; if it was a piano concerto, you might prefer to mention the pianist rather than the conductor and so on. In any event, make sure the really distinguishing part of the name comes second. That is, if you were hoping to tag something up as being by the Amadeus Quartet, do not type 'Amadeus Quartet', because then 'Quartet' would be the distinguishing name (and that's not very distinguished!). For something like that, type The Amadeus: then 'Amadeus' will be the distinguishing artist name used. You can always sort this out later in the tagging phase of proceedings, by the way, so don't get too hung up on it now.
You're next asked a couple of other questions:

Just fill in honest answers to the questions that appear. The genre you supply will be used to physically store the ripped audio files on disk, so don't make it a complex, nested one. Remember Axiom 12, too: don't go using "/" or "\" characters in any of your responses to any of these questions, as that will produce bad results!
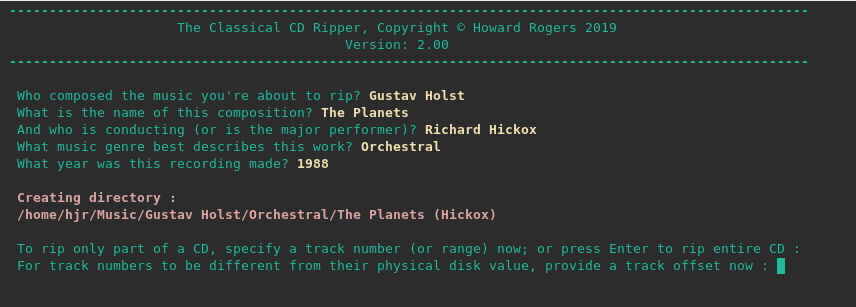
Once you've supplied a recording date and pressed [Enter], the program will respond like this:

The top of the screen now contains a summary of the information provided to date -and you'll notice specifically that it has created a directory into which the audio files about to be ripped will be placed. The root of that directory path is always your home Music directory (so, in my case, that's /home/hjr/Music). Within that 'home' folder, it has created a folder/sub-folder structure that follows the Composer/Genre/Composition format (see Axiom 16!) The 'composition' folder name is actually a compound of the true name of the composition as typed in by you, plus the second name you supplied as the distinguishing artist, in brackets. Thus, in this case, I said "The Planets" and "Richard Hickox", so my folder name is The Planets (Hickox).
Incidentally, if you wanted your ripped files to be stored somewhere other than your $HOME/Music directory, you would have to run CCDR with the --home= or -h= run-time switch. For example, if I'd launched CCDR by typing the command ccdr -h=/music/rips, then the current CD would be ripped to /music/rips/The Planets (Hickox). You always get the composition name + conductor/distinguishing artist sub-folders, in other words, but you can control where those sub-folders are created with the --home or -h switch. If remembering to type the --home or -h switch is a bit much, too, you can optionally set a CCDR_MUSICHOME= environment variable in your .bashrc or .bash_profile script. Make sure that you have read, write and execute permissions on whatever folder(s) you declare to be the music 'home' through either of these methods. If you happen to imply or explicitly declare that a 'home music' folder should exist and it doesn't, it will be created for you. If CCDR finds that it doesn't have the permissions required to create the relevant folders, it will exit with an error.
Having created the destination directory for you, the program now goes on to ask several other questions. The first is whether you want to rip a whole CD or not. In this case, we are ripping everything from the CD, since it contains a single work that needs to be ripped as a whole, so you just press [Enter]. Next, you are asked for a 'track offset':
When you are ripping a complete CD as a single composition, the concept of a track offset doesn't apply, so you can just press [Enter] at this point, too.

You are next asked if you want to eject the CD from the drive once the rip is finished: since you're ripping everything off the CD in one hit, there's probably no point in the drive holding on to the CD afterwards, so I've answered 'y' here -though the default is not to (in which case, you'd have to manually eject it after the rip). You are then asked some rather technical questions to which the default answers are probably sufficient: the MD5 hashes are a text-based representation of the music signal ripped from the CD. Having it appear identical of the same tracks on different CD drives (or different computers) can give you an assurance that the music signal has been ripped accurately. If you don't care about that, then feel free to answer 'n', but the default is to produce them in a small text file, so having them created even when you don't care about them isn't a particularly heavy burden.
The answer to the next question is slightly more important, though:
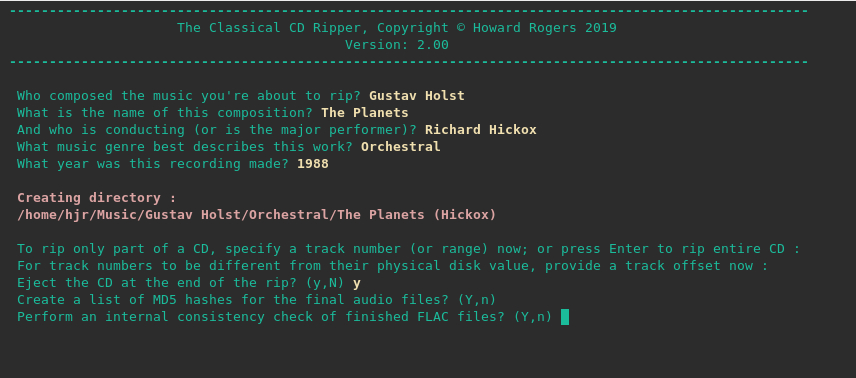
CCDR can perform a check of the final FLAC files produced by the rip: this ensures they don't contain any errors or glitches which could affect their playback quality. The default is to perform this check and I'd suggest you accept it by simply pressing [Enter]. In case you thought the program would never stop asking you questions and would never get around to actually performing a rip, I can give you the good news that that's the last question you'll be asked:

As soon as you press [Enter] on that last question, CCDR invokes the cdparanoia program to perform the actual rip of music from the CD. You can see it doing it a track at a time. The program displays a lot of feedback as it does its work:

The various icons and faces you'll see during this part of proceedings will depend on whether cdparanoia is getting a good rip or not. If it's struggling to deal with a scratched or damaged CD, for example, then you might see face symbols such as 8-| or ;-(. But if you see the happy face 🙂 then everything is going well. When a track has been ripped without error, you'll see a cheeky face :^D ...and that's a sign that the track has been ripped bit-for-bit, perfectly. A comprehensive guide to the various icons and symbols you might see during the ripping process is available at the official cdparanoia website.
Once the entire CD has been ripped, the program will output will look something like this:
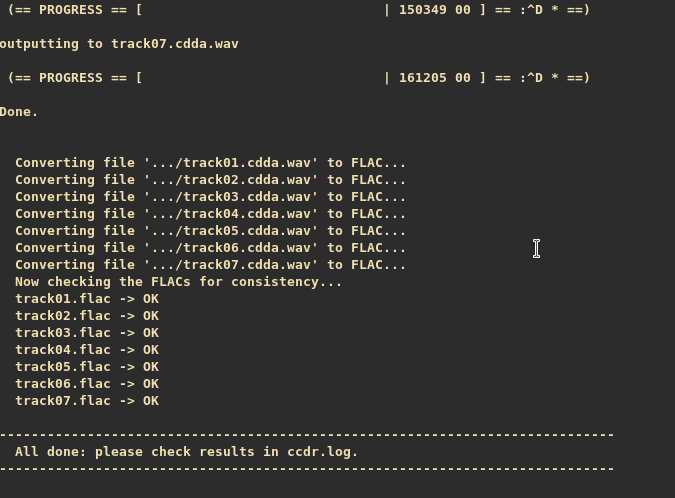
This confirms all tracks have been ripped correctly, converted to FLAC format and that the FLAC files have been checked for internal consistency (if you selected that option, which was a default) and that there's a log file containing further details of the rip, available in the same directory the music files now exist: this is the directory that the program told you about (in red type) before it began ripping the CD. In my case, that's here:
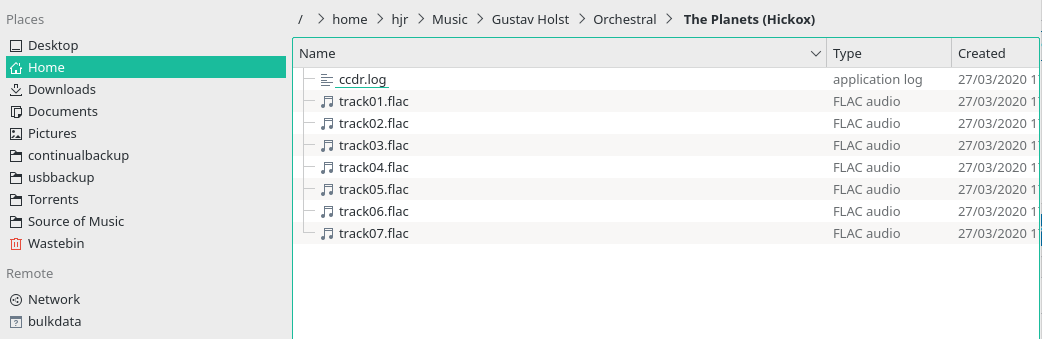
As you can see, the files are all nicely named 'trackxx.flac', and the cddr.log file is present in case you want to open it in your choice of text editor and check its contents (it's not very exciting, but it does list the MD5 hashes -if you opted to compute them- for each track, which can be useful in checking the accuracy of rips of the same CD done on different devices).
Notice, too, how CCDR has created a composer->genre->composition storage hierarchy for you, within your $HOME/Music folder. This is the 'approved' physical hierarchy that is driven from the logical metadata tags you supplied before the rip process started. It conforms with all the known Axioms of Classical Tagging 🙂
In fact, if you were able to open one of these FLAC files in a graphical tagging editor (such as EasyTAG or Puddletag) at this point, you'd be able to see this sort of thing:

This tells you that the ripper software has actually set the Artist, Composer, Genre, Album and Track Number tags for you. It has also added a self-promoting message to the 'Encoded by' tag, so you know what tool was used to rip which tracks in the future! So CDDR actually gets a lot of the tags correct for you, right from the start of proceedings. However, it hasn't set the Comment tag correctly: it knows the conductor is 'Richard Hickox', because you told it that before the rip began, but since it didn't ask about the orchestra involved, that information is still missing. The track title is also very obviously missing. Rather less obviously, but also missing, there's no album art for any of these tracks.
So CCDR does a lot of work for you, above and beyond merely ripping stuff off a CD and onto disk -but it doesn't do a complete job as far as the tagging side of things is concerned. That's why, once your rip is finished, it's time to turn to dedicated tagger software.
5.0 Installing CCDT
Before we can tag the missing bits and pieces for this rip, you need to download and install the Classical CD Tagger (CCDT) script, by clicking this link. Save the ccdt.sh shell script anywhere on your PC's or laptop's hard disk. I'll assume in what follows that you've saved it in your Downloads folder. Just as with CDDR, there are a couple of installation commands to perform to make the script nicely usable anywhere on your system, as follows:
sudo mv $HOME/Downloads/ccdt.sh /usr/bin
sudo chmod +x /usr/bin/ccdt.sh
sudo ln -s /usr/bin/ccdt.sh /usr/bin/ccdt
And that's it: CCDT is now fully ready to run, in a new terminal emulator session. Just open a new terminal and launch it by typing the command ccdt:
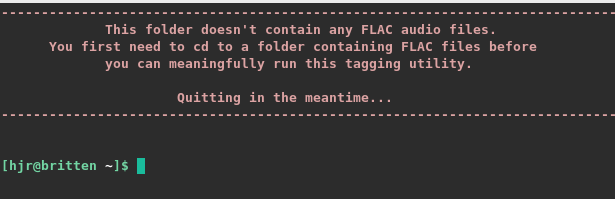
So this is the first (and, really, only) rule to know about running CCDT: it must be invoked from the directory containing the FLAC tracks you want to tag up. If you invoke it in any other location -specifically, any other location that doesn't contain FLAC files of any sort- then the program determines that there's nothing for it to do and accordingly quits. The correct way to invoke CCDT, therefore, is to 'cd...' to the path you know contains your latest ripped music tracks and run it from there. In my case, for example:
cd "$HOME/Music/Gustav Holst/Orchestral/The Planets (Hickox)"
ccdt
Notice the quotes around the path in the first command there? That's to enable the 'cd' command to cope with the spaces and brackets that are used within the full path to my latest rip directory. You can always use tab completion and/or escape characters to cd to the same place without them, if that's your preference. However you get there, though, once you launch ccdt this time, you'll see this:
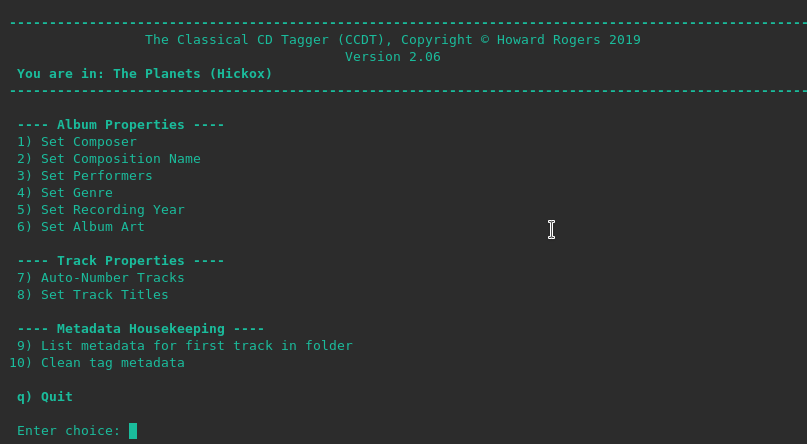
You'll immediately notice that CCDT is another command-line, text-based utility. It provides a series of options, each numbered. The first six allow you to specify any and all album-specific tag information; the next two allow you to specify track-specific data. The other options are there to let you review existing metadata or to 'clean' any existing metadata. Finally, we type 'q' and [Enter] to quit the program altogether.
As a general rule, try to take the options within a section in order.
Do not, for example, set the track titles (option 8) before you set the track numbers (option 7). The program won't stop you if you do, but tagging results may be unsatisfactory if you do, since if you give names to things before you number them, they may get sorted into an alphabetic list that is then numbered incorrectly. In the case of my recording of The Planets, for example, Neptune would get numbered before Saturn, because 'N' comes before 'S'. This would have upset Gustav Holst, so isn't a good thing to do! Assign track numbers before track names, therefore!
Having said that, if you know that a tag is already present in the file (as we know, for example, that the Composer is present in our most recent rip, but the Album Art isn't), you can skip taking those options altogether.
On the other hand, once you start using CCDT a lot, you may find it much simpler to simply walk your way through options 1 to 8, whether you truly need to use them at all. If you re-tag something for which tag information already exists, for example, then the new tag data over-writes the earlier tag. So if you made a mistake when answering the questions CCDR threw your way, for example, CCDT now gives you the chance to correct that. In what follows, I will take this approach: I'll supply all the tag information that CCDT can handle, no matter that a lot of it is already known to be present in the freshly-ripped tracks.
6.0 Performing the Tagging
As we embark on the tagging process with CCDT, remember that you had to travel to a specific directory containing FLAC files to launch it: the Album Properties tags will apply to all FLAC files found in that directory without exception. For us, given that all our files belong to one composition (and thus to one composer), that's not a problem this time. But it would make launching CCDT in a directory that contains tracks composed by different composers something of an impossible challenge! We'll see how we deal with that issue in the other examples in the series. For now and in this article, since all files belong to one composer, we're good to go.
6.1 Composer and Artist
So, with CCDT launched and ready to go, we type 1 and then press [Enter], to set the COMPOSER and ARTIST tags:
As with CCDR, CCDT simply asks a question and you type a response (which then appears in yellow text). If you make a typing error, you can use the backspace or cursor keys to adjust your answer before you submit it -or, you can submit a known-wrong answer and then take the same option again to have another go at typing it in correctly. Each new invocation of a CCDT option overwrites the tag data associated with that option. So if you typed Gostv Hilst here in error, just press [Enter] to submit it, re-type 1 [Enter] to enter the composer option again and then type Gustav Holst accurately. When you press [Enter] to submit the right version, it will over-write the tag data in all the FLAC files in the folder.
6.2 Composition Name
Pressing [Enter] to submit an answer to a question has the effect of (a) writing your answer to the FLAC files in the current directory; and (b) returning you to the main menu. So, with option 1 completed, you can type 2 [Enter] to move on to specifying the 'composition name':
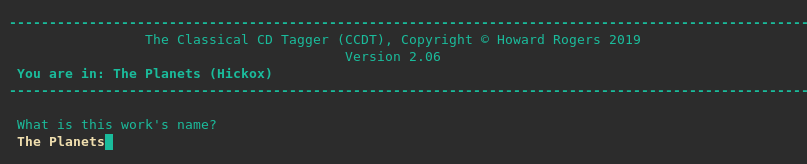
Here, I'm typing the name of the composition (remembering that, strictly speaking, I don't need to as CCDR got this right for us anyway). But I don't have to do lots of typing. Two shortcuts are available. In the first case, you'll notice that towards the top of the screen, the program is telling you that 'you are in: The Planets (Hickox)'. CCDT always displays the name of the current directory (i.e., the folder you traveled to before launching the program). Since it's there in text, you could highlight it with your mouse, right-click to copy and then right-click to paste. This is what I've done here:
Now, you may object that 'The Planets (Hickox)' isn't the 'work name' here: it's the work name plus the conductor's surname! But remember Axiom 5: the Album Name will be the ordinary name of the composition plus a 'distinguishing artist' designator, in brackets, at the end of the tag. So, actually, 'The Planets (Hickox)' is the spot-on correct name for this work -and since CCDT is already offering it (because the physical folder it's running in was named that way by CCDR), it makes sense to copy+paste that in now.
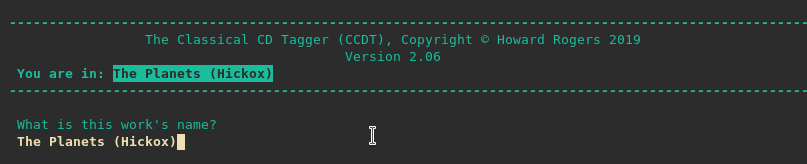
A second short-cut is usually available at this point, though, if you'd rather not fiddle around with selecting things with your mouse and right-clicking lots of times: just type Ctrl+Shift+Insert. That is the universally-known keyboard sequence that means 'paste in whatever is in my clipboard' -and CCDT always copies the name of the current working directory into the clipboard the moment it is first invoked. So type Ctrl+Shift+Insert when asked what the work's name is and you'll get this effect:
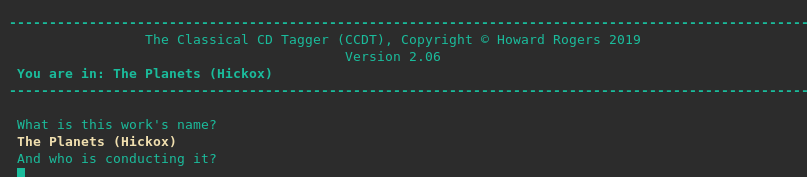
This time, the current directory name has been pasted in one go, no mouse necessary! It has also effectively pressed [Enter] for you, so that the program has gone on to prompt you with its next question -and we'll see how to respond to that next.
6.2.1 Conductor
If you type the name of the composition in, or copy-and-paste it with a mouse, then you'll have to press [Enter] afterwards to make the submission 'stick'. When you do so, you'll be prompted as you've just seen in that last screenshot to supply a conductor. Actually, the prompt is a bit misleading -as it's really the 'distinguishing artist' that's being asked for, which is usually the conductor of the work, but doesn't have to be. If you want to type 'Maria Callas' or 'Joan Sutherland' because they are the distinguished artists taking part in different opera recordings, be my guest. Whatever you type, the last word of it will be wrapped in brackets and added to your earlier response for 'work name' to complete an Axiom 5-approved ALBUM tag.
-
- So, say the work is The Planets Suite. Say the conductor is George Henry Harrison The Third ... and your ALBUM tag will be The Planets Suite (Third).
- Or say the works is The Planets. And the conductor is Hickox. Your ALBUM tag will be The Planets (Hickox).
Now, cunning minds will have worked out that if you'd copied the current working directory in as the work name, using either the mouse-and-right-click or the Ctrl+Shift+Insert approaches, the work name will already contain a distinguishing artist name in brackets... so there is a danger of a double-up!
-
- So say the work is The Planets (Hickox). And the conductor is Richard Henry Hickox. The ALBUM tag would then be.... The Planets (Hickox) (Hickox) ...which would just be silly.
Which leads us to announce the rule: If your 'work name' already contains the name of the distinguishing artist in brackets, you can just press [Enter] when prompted for the conductor's name.
-
- So if the work is The Planets (Hickox) and the conductor is '' (i.e., nothing at all), then the ALBUM tag will be The Planets (Hickox), which is a good album tag!
Putting it even more simply: if you use the mouse to copy the current working directory name, or use Ctrl+Shift+Insert to do the same thing, you can skip supplying the name of a conductor or other distinguishing artist, because (if you've named your working directory correctly, as CCDR did), the distinguishing artist will already be included in the work name.
There's just one other twist to this question. From Axiom 5, we recall that occasionally a year might be needed to distinguish between recordings of the same work by the same conductor. In that case, we may need our ALBUM tag to read something like The Planets (Hickox - 1988). In that case, it's easiest to type in that whole phrase as the composition name and just leave the conductor's name prompt blank. Fortunately, these sorts of edge-cases are rarely encountered.
6.3 The Performers (COMMENTS)
Once you've navigated the slightly tricky waters of naming the work and its distinguishing artist, you can press [Enter] to submit your answer -and you'll return to the main menu. You can then type 3 [Enter] to access the 'name your performers' question:
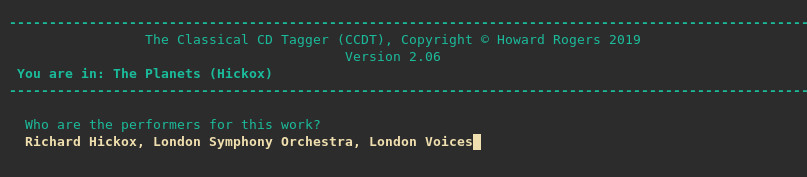
The answer to this question will fill up the COMMENTS tag, so it's free-form text, but ideally in a conductor-orchestra-chorus-soloists order (as per the Axioms article, section 2.9). Just type the performers in as reasonable detail as you prefer and press [Enter] to submit.
Be aware that, as with all CCDT's prompt-and-reply entries, if your reply is a long one, it will be wrapped around onto the next line automatically. The results will probably look quite bad, but if you just keep typing anyway, the final submission will look correct in the COMMENTS tag. So this, for example, looks abysmal but will actually tag correctly:

I am not, by the way, suggesting that you actually tag things this way! I'm merely pointing out that when there are a lot of performers to list (such as in a Verdi opera with a huge cast-list), you are welcome to type as much as you like. The screen will wrap in annoying ways and break lines at apparently inappropriate points, but that's just a visual thing. If you just keep typing, what finally gets submitted to the COMMENTS tag is a long, unbroken string.
6.4 Genre
Once the performers have been submitted, type 4 [Enter] from the main menu to submit a genre for all the files stored in the current working directory:
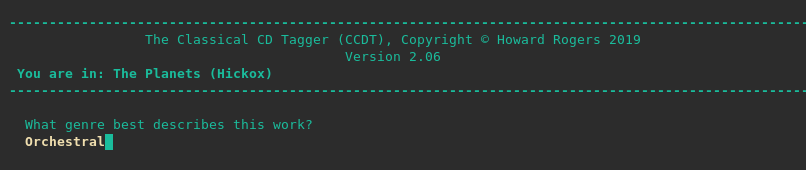
Remember once more that CCDR got the genre tag correct for us during the rip, so there's really no technical reason to re-submit it now. But it's an option, so there's no harm in taking it and re-typing what the correct, general 'genre' is for the work in question. Press [Enter] to submit your reply to the GENRE tag.
6.5 Recording Year
Typing 5 [Enter] at the main menu lets you submit a recording year for the YEAR tag:

You don't have to get very specific here: a recording year is sufficient, with no need to specify a month or day. If you can't find the actual recording date in the CD booklet, you can either use the date indicated with the ℗ symbol ...or just guess. Where a work was recorded over a lengthy period that crosses a year boundary, I tend to put the earliest year in (so, if the recordings took place December 30th 1988 - January 7th 1989, I'd say it was a 1988 recording). But there's no great science involved here, so don't worry about the specifics too much.
6.6 Album Art
Typing 6 [Enter] from the main menu lets you tag up your tracks with appropriate album art:
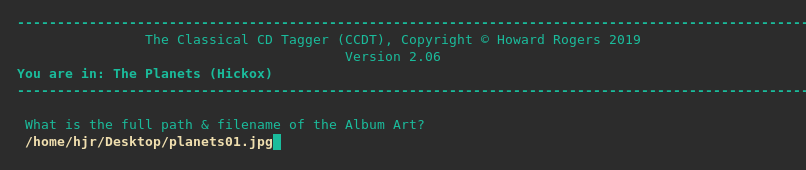
Now, although we're dealing with graphics and JPGs and so on, CCDT is resolutely a text-based program. So there's no graphical way to select the album art: you just, instead, type in a full path to the relevant graphics file on your PC or laptop's hard disk which you want applied to the tracks. The path and filename supplied must be correct, otherwise you'll get this sort of response:

Here, I've accidentally missed off the final 'g' of the file name. Result: an error message and, once you press 'any key to continue' a return to the main menu. If that happens, just type 6 [Enter] again to have another go, until you get path and file name correct.
Although I said a 'full path' was required, you can specify it using relative paths if it's more convenient to do so:
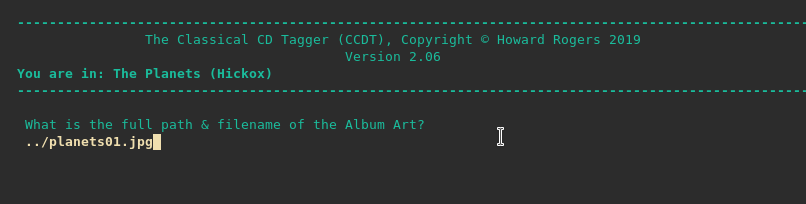
The '..' there means 'go up one directory', so if my graphics file was in the folder above the one I had stored the music files in, that would be entirely acceptable.
Note that environment variables are not acceptable -so something like '$HOME/Desktop/planets01.jpg' would not work. Additionally, tab completion is not functional when specifying the path: you have to type it out exactly and fully, not partially and complete it by pressing TAB.
6.7 Track Numbers
Once the album artwork has been applied to the tracks (and that can take some seconds, if a large piece of album art has to be written to dozens of tracks), you can type 7 [Enter] to enter into the track numbering section of the program:
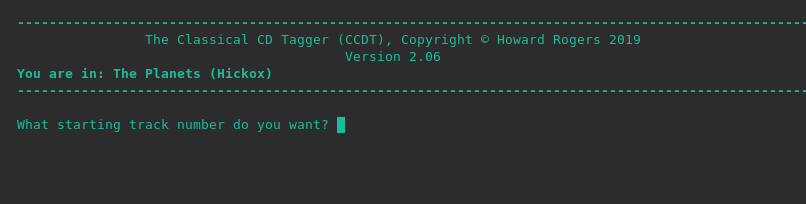
You are asked to supply a starting number; tracks will then be numbered sequentially from that point on. For a single-work, single-cd rip such as this one, the ability to start numbering at any track number other than '1' is not significant. It will become extremely important when we have to tag works than span CDs, however (when the second CD mustn't be allowed to start at track 1, since it merely continues from the end of the 1st CD). It's also very important when we have to tag multiple works that shipped on a single CD (when the second word mustn't have track numbers that start at track 7, just because the first work was a six-track one). For now, you can either type 1 [Enter] here ...or just [Enter] on its own. If you don't supply a starting track number, CCDT will assume you intend to start from track 1 anyway.
Track numbers are applied sequentially to files, with the order of the application being governed by the way the file system ordinarily sorts the existing files. If your files are called "Track01.flac", "Track02.flac" and so on, the ordinary ordering of the file system will be good enough to ensure that "Track01" is given track number 1, "Track02" is given track number 2 and so on. If you re-name your tracks, however, before you apply the track numbers, then the order in which the track numbers is assigned will probably not be what you expect. If you've re-named Track02.flac as Neptune.flac, and Track 01.flac as Saturn.flac, for example, then Neptune will be assigned track number 1, and Saturn will get track number 2, because at the point of track number assignment, N comes before S. For this reason: always assign your track numbers before you name your tracks!
6.8 Track Titles
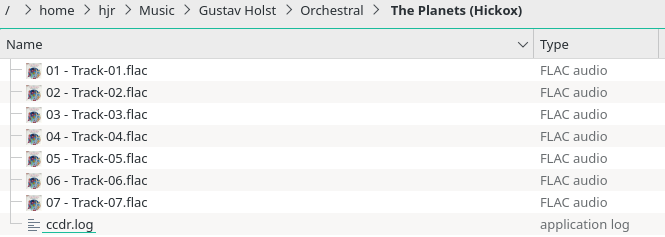
By typing 8 [Enter], you finally get to enter track-specific names for each of the ripped audio files in turn. Your answers will become the TITLE tags of the tracks in question -and also the physical file names of the tracks. So, currently, my ripped files look like this:
You can see from that screenshot, I think, that album art has been applied to each track (the icon used for each file is a tiny representation of the CD cover art that appeared at the top of this article). You can also see that the tracks have had track numbers applied to them. So now I press 8 [Enter] to begin applying the track titles:

Had no track titles been already present in the file, you wouldn't be warned and prompted in this way: you would simply be asked, straight away, what you wanted the track's title to be.
But CCDR already added track title tags to each of the files it ripped (though not very good ones!), so CCDT warns you that an existing tag value is present and shows it to you. If you want to change it to something more meaningful, type 'y'. Any other response will leave the existing TITLE tag unaffected:

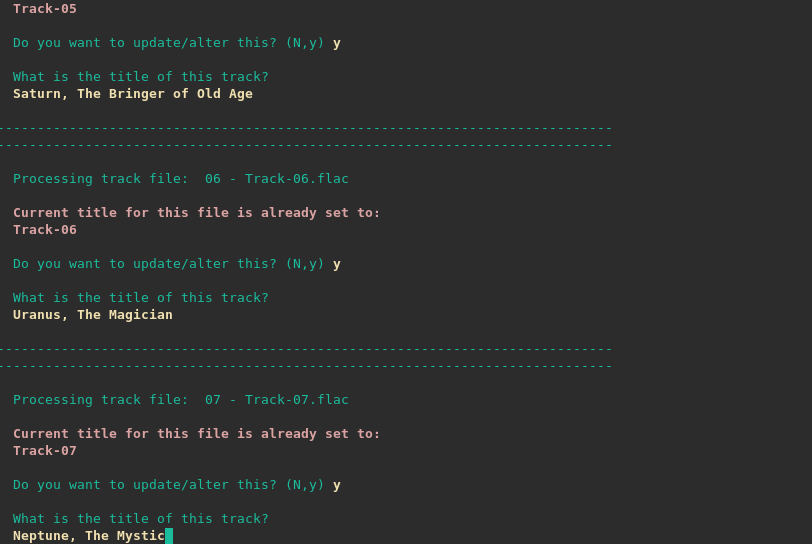
Here, I've typed 'y' and that brings up the prompt to supply a new track title -and I type in whatever the CD booklet tells me should be the proper name for this track. If it was a symphony, I might be supplying titles like Allegro molto; if it was an opera, the titles might be things like Act 1: Overture or O solo mio ...whatever makes this track unique and distinct from any other that makes up the work in question. Here's me finishing up the tagging of the titles on this CD:
Updated to add (16th April, 2020) : Please note that CCDT has just been updated so that if it detects track titles in files which it knows to have been ripped by CCDR, it now will now not ask you if you want to edit or alter them, but will act as if the track title is blank. It will thus just ask you to supply a new track title and will auto-overwrite the generic title supplied by CCDR with whatever you supply. Given that CCDR's track titles are always 'generic' and meaningless, it seemed awkward to have to type 'y' every time you simply wanted to type a proper track title. The screenshots above show the old behaviour of requiring a 'y' response to the 'do you want to update/alter' question.
Updated to add (12th May, 2020) : Further to the above note, it's also now possible -in version 2.10 and above- to set an environment variable called CCDT_AUTORETITLE. If that is set to TRUE, then CCDT will assume you always want to type in a fresh track title, even if one is already present. In this case, you again won't need to keep typing 'y' every time you want to type in a new track title when one is already present. I was re-tagging some downloaded audio tracks which Had All Been Tagged With InitCap Style Track Titles... and it was getting tedious to remember to type 'y' before I could actually start correcting them! Setting an environment variable can either be done dynamically (by typing export CCDT_AUTORETITLE=TRUE immediately before you launch ccdt). Or it can be set permanently by editing your .bashrc or .bash_profile files and adding the line export CCDT_AUTORETITLE=TRUE there, before launching a new terminal session. In either case, there must be no spaces within the parameter=value part of the command and the parameter=value must all be in upper case. Setting "ccdt_autoretitle" won't work, for example; neither will setting the parameter to values of True, true, TruE or 1!
As you can see, it's a simple challenge-response type of process, with just a bit of typing of grammatically-correct titles whenever prompted. When you press [Enter] for the last track, you are immediately returned to the main menu and it's not terribly clear what has happened. But a visit to your friendly file manager will reveal all:
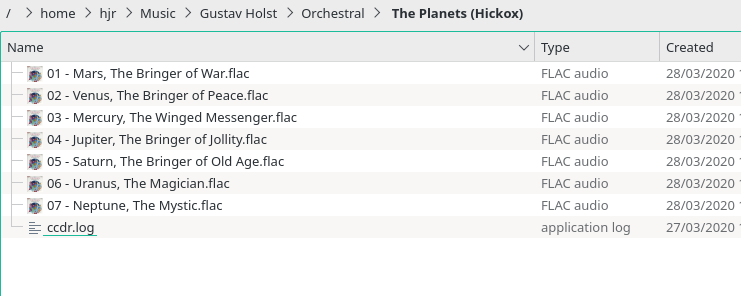
As you have been supplying track titles, so CCDT has been using the information supplied as the basis of renaming the physical files on disk. So the logical tagging is very much driving the physical storage of your music, in accordance with Axiom 16.
7.0 Finishing Up
Now you've reached the end of the tagging parts of the CCDT numbered options. If you've got this far, then your audio files will now be tagged in an Axiom-compliant manner! You're pretty much done at this point: your files are in a suitable composer/genre/album folder structure; the album-level tagging information is complete; the track-specific tags have all been applied.
If you liked, you could check the effects of running CCDT by examining the files in a more traditional graphical tagging program:
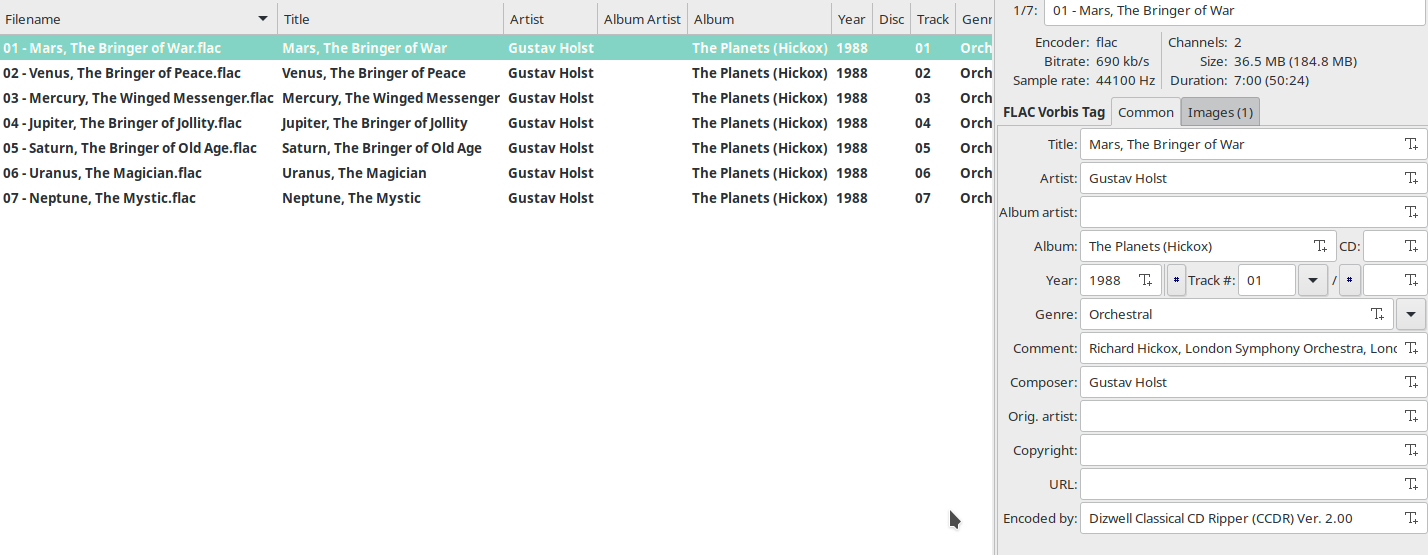
Notice that 'Images(1)' in the left-hand panel tells you all these files have album art supplied; the COMMENT tag is now full and complete of relevant information, rather than just the conductor's name as earlier. Track numbers are now present -and the TITLE tags are also correct.
Within CCDT itself, however, you could also check your work, by taking option 9:
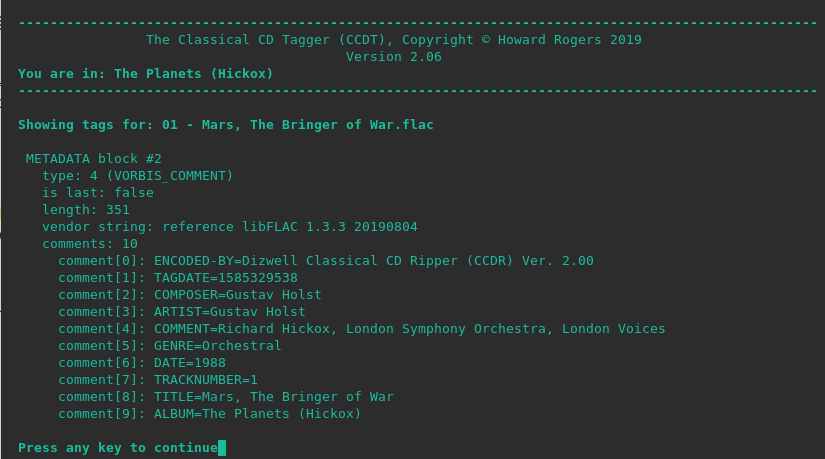
CCDT only reads and displays the metadata from the first track in a directory, but it's indicative of what it's written to all the tracks. It's not the easiest set of data to read and understand, but hopefully, it's enough to let you see that the ARTIST, COMMENT, GENRE, DATE, TITLE and ALBUM tags all have meaningful names before you actually quit the program. If they're not (if you spot a last-minute spelling mistake, for example), you can simply press a key to get back to the main menu and take whatever numbered option is required to have another go at editing that specific tag data.
Once you're happy with the metadata you see presented, you can exit out of CCDT altogether by taking the q option from the main menu. When you do, you will see each of the tracks in turn being listed:
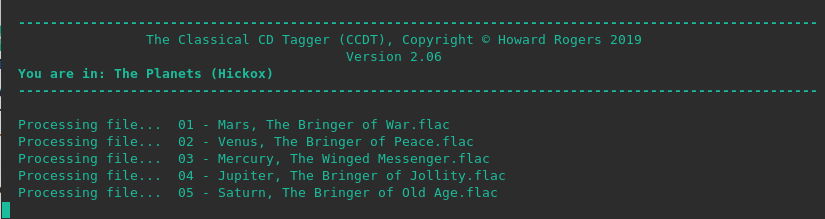
They are listed relatively slowly at this point, and in sequence, because CCDT is performing a final 'clean up' of the tagging metadata. It's therefore quite important to leave CCDT cleanly (by using the quit option), rather than by simply closing the terminal session of hitting Ctrl+C. Those things will indeed end your CCDT session, but they won't invoke the final tag clean-up process.
Once CCDT quits cleanly, you can move your music folders into your permanent music collection and see the impact on your music player/manager:
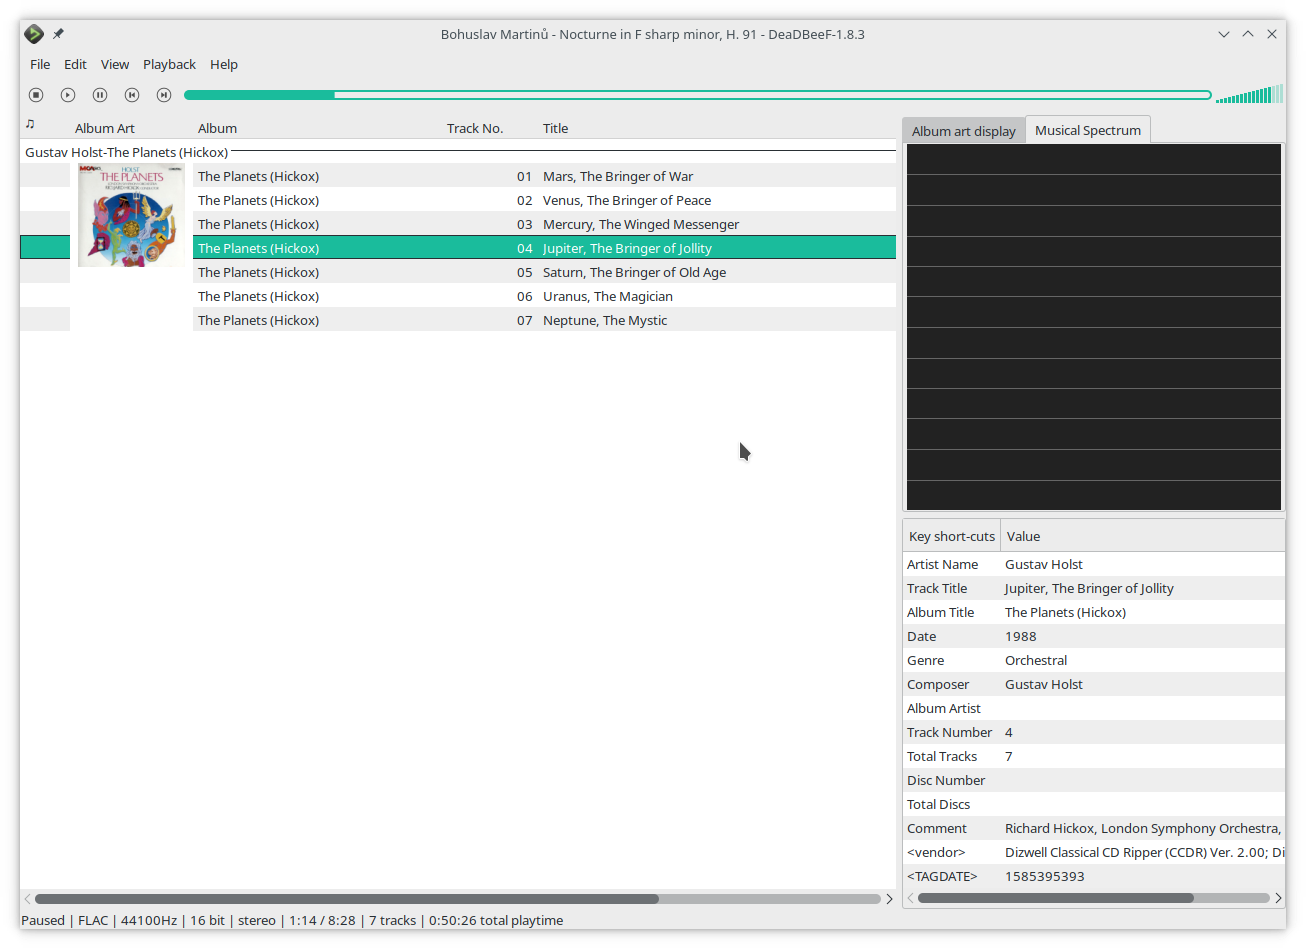
Whichever media player you prefer to use on Linux (the one above is DeadBeef), have a quick visual scan to make sure things are numbered correctly, labelled consistently and look generally OK. I'm happy with the display I see in that last screenshot: this single-CD, single-work, single-composer rip+tag is complete!
8.0 Conclusion
Both CCDR and CCDT work in largely sequential fashion. That is, since they are not GUIs that let you click here-and-there as the mood takes you, they work by prompting you with questions in a fixed order, or by numbered main menu options that strongly encourage taking things in the listed order. This approach is quite methodical -but can feel like a bit of a straightjacket if you're new to it! All I can do is encourage you to persevere: tagging things correctly is, in fact, a task that requires routine, logical and structured approaches to doing things. Doing things free form generally means poor-quality tagging!
I recommend CCDR as your ripper largely because the answers you provide to the questions it asks are automatically used to generate an Axiom-compliant physical storage structure. I similarly recommend CCDT as your tagger because it works within that pre-existing physical structure to provide just the amount of structured data needed to tag your audio files in an Axiom-compliant way!
But whether you use these specific tools or prefer to use other rippers or taggers, the main points to get from this article are that, when ripping a single-work, single-composer, single CD:
- You rip everything to one physical location
- You supply album-wide information (such as ALBUM, COMPOSER, ALBUM ART and COMMENTS tag) to all tracks regardless
- You then supply track-specific information (such as TITLE and TRACK NUMBER tags to each specific track in turn
- You check your results look coherent and consistent in the media player of your choice
If you take that approach carefully and methodically, and keep the various Axioms in mind as you do so, you'll achieve attractive, meaningful tagging without too much difficulty!
Back to the Master Index of the Guides to Ripping and Tagging