1.0 Introduction
In this short article, I'll show you how I'd rip and tag and store on hard disk this CD:
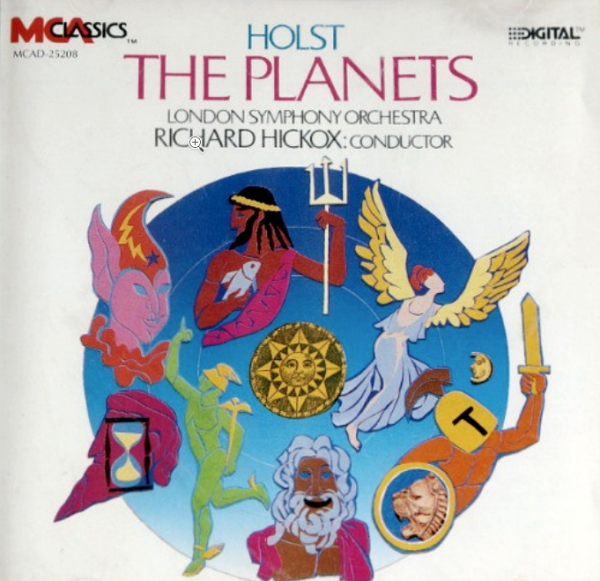
The contents of this CD are as follows:
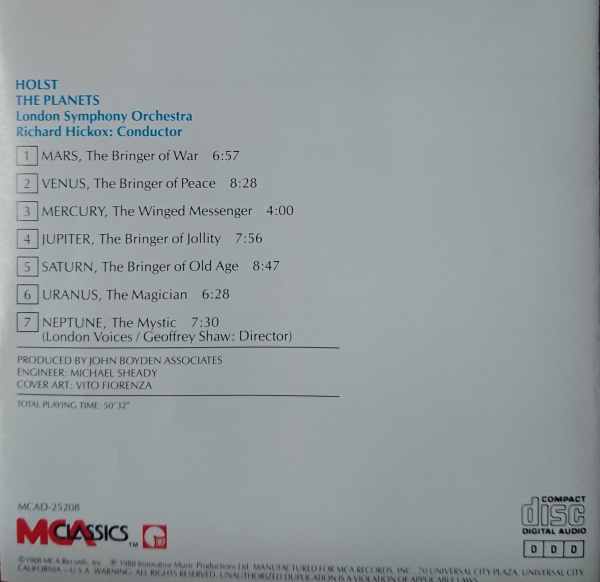
So this is an example of a single physical CD that contains a single composition by a single composer, though split into 7 different tracks. Here's how I would go about ripping that.
1.0 Installing the Ripper
Before we embark on ripping this CD, I just want to make sure we're on the same page as far as the ripping software we're going to use. On Windows, an entirely free program called Exact Audio Copy (EAC) will do the job nicely. Just download it double-click its setup program to start the installation process. During installation, make sure the FLAC option is selected for inclusion:

This will ensure that EAC is able to convert ripped files to FLAC format, which is a bit-for-bit copy of the source CD music signal, with nothing lost or thrown away (unlike the MP3 format, in other words, which removes any part of the audio spectrum it algorithmically determines you won't be able to hear).
At the end of the installation process (which is quick), you'll be asked to run EAC for the first time. When you do so, a first-time wizard will display:
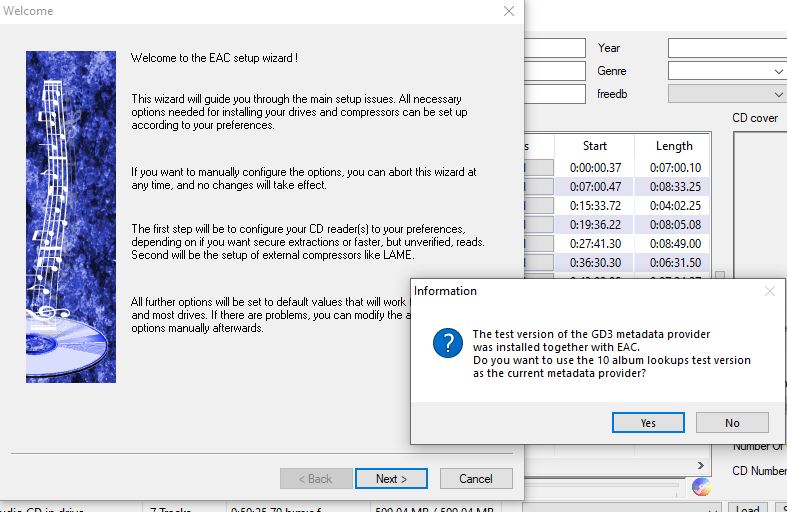
You're initially prompted to enable the 'GD3 metadata provider'. I suppose it's really up to you whether you want to trial a paid-for metadata service (that is, something that will provide album names and track titles automatically), but since every metadata provider on the surface of our planet hasn't the faintest idea how to correctly categorise and catalogue classical music, I'll state without equivocation that fetching any metadata about classical CDs from the Internet is a complete waste of time. So I would definitely want to click 'No' at this prompt!
You then step through the EAC setup wizard. It starts by asking you to select the CD/DVD drive to use for performing rips (if you've only got one, then only one is selected by default). You can probably just click through to select whatever defaults at that point. The next screen shown, however, is pretty important:
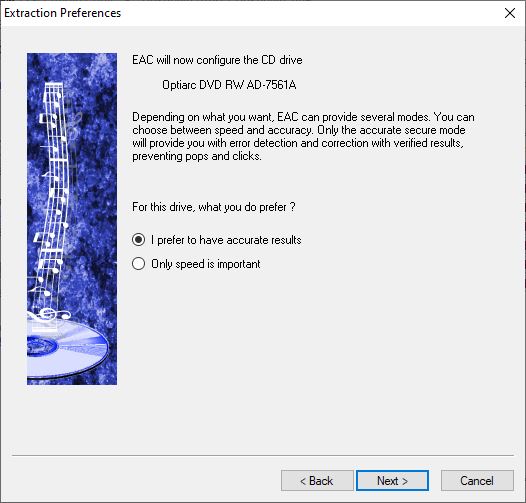
You are asked whether you want accurate rips or fast ones. The answer should always be 'accurate ones': we're dealing with classical music, where clicks and pops in the audio signal won't get masked by thumping bass drum beats or wailing electric guitars. Classical music really requires accuracy in the ripping process -though the catch with that is that if you subsequently present a slightly scratch CD to EAC for ripping, it may spend hours trying to rip it to the required degree of perfection. That's actually worth it, though, in my view.
Next, EAC will give you some technical information about the CD drive you've selected to use for ripping:
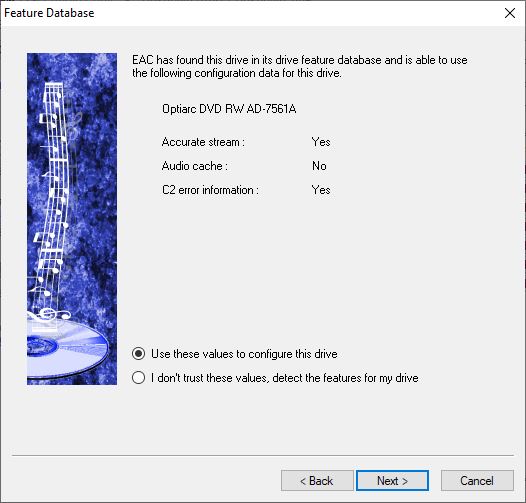
It is conceivable you might know what this screen is on about, especially if your are a technical specialist in digital audio mastering and production... but it's unlikely, I think! I certainly don't, so I just click 'Use these values...' and then 'Next' to move swiftly on.
You can then click [Next] a couple of more times, as mostly textual information is displayed as the program moves on from configuring your CD ripping hardware to making choices about the formats you want to use for your ripped music files. By all means read the text carefully if you like, but the critical screen is this one:

You really do not want to accept the default here, which is to rip to MP3 files. Those are 'lossily encoded': some of the music signal is discarded, resulting in much smaller output files (about a tenth of the original) that probably sound good enough to most ears, but aren't actually a bit-for-bit reproduction of what's on the source CD. Instead, you should change the selection to FLAC, which is a 'lossless' encoding scheme, whereby audio files still get compressed to about half their starting size, but absolutely no part of the audio signal is lost and you really do end up with a bit-for-bit reproduction of your source CD.
Incidentally, classical music listeners tend to be older than non-classical music listeners, and thus their ears tend not to be able to hear the difference between a high-quality MP3 and a FLAC. You could therefore argue that the space-saving but mostly-sounding-the-same MP3s are a better choice than the large-but-perfection-I-can't-hear FLACs. My view on this is two-fold:
- Disk space is cheap. A 1TB hard disk costs about £30 these days. Why you'd choose to lose data from the music signal for the sake of disk space that costs relative peanuts these days, I don't quite understand
- Once my CD is ripped, it gets stored in the loft. I therefore want the files I get off it to be perfect replicas for an inconveniently-accessed physical CD. Thus, I want the 'archival' quality of a FLAC, even if my ears can't tell it apart from a good-quality MP3. Psychologically, I want to know I'm listening to a perfect replica of the CD, not an approximation of it.
Your mileage is, of course, allowed to vary, but I'd be making sure this selection screen looked like this:
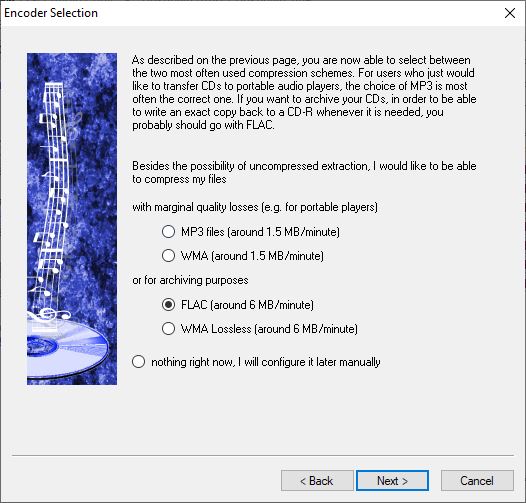
...before I clicked [Next].
One final word about that screen too: don't select the WMA lossless option. Windows Media Audio is a proprietary codec, developed, owned and patented by Microsoft. It therefore doesn't transport well between Windows and non-Microsoft operating systems... and even if you are 100% certain that you will never, ever use anything other than Windows on your PCs, Microsoft have not put a lot of development effort into WMA in the past decade or so, such that I would regard it almost as a dead audio codec. Don't tie your boat to that particular mooring post if you have any concern about portability and things functioning properly in the future. That's my advice, anyway!
Right, moving on:
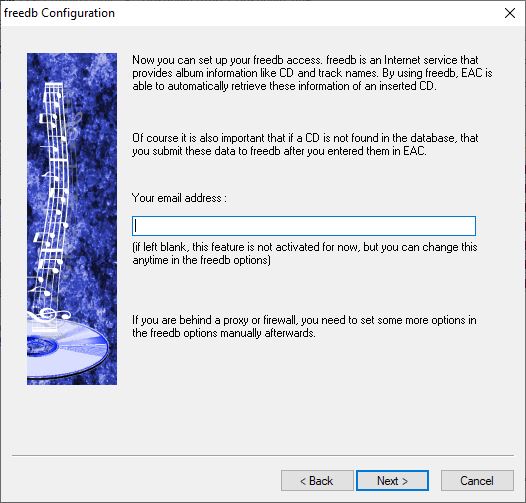
You are next prompted to supply an email address, allowing you to access the free CD metadata that's contained within the freedb online database. You can do this if you like (though if you do, I'd recommend not supplying a real email address you care about: use a disposable, spare one instead). But my earlier advice still stands: online metadata databases are universally rubbish when it comes to classical CDs, so don't use them and don't configure anything that lets a program use them for you either. So I'd leave this blank.
Now, you are asked about a naming scheme:
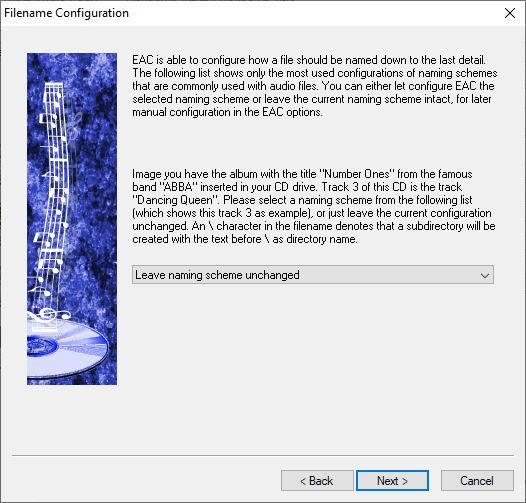
I would just leave this set to the default 'leave the naming scheme unchanged'. You don't want EAC naming things for you in any case, so this won't do any harm. Finally, you get to select the program interface:
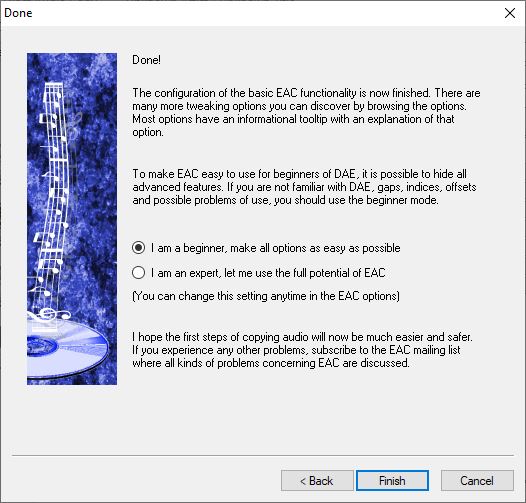
If you are an expert, or feel like being adventurous, be my guest and change the selection to here to the 'show me everything' option. However, I'm writing this article for people who are maybe new to the game of digital audio, so I'm going to leave it set to the 'I am a beginner' option -and so I suggest you do too!
So click [Finish] and you're pretty well done with EAC installation and configuration... with one exception. There is the small matter of telling EAC where to rip music to. By default, it wants to write it to the root of your C: drive, which is rarely a good choice for things to be written! Therefore, click the EAC ->EAC Options menu items and then click on the Directories tab: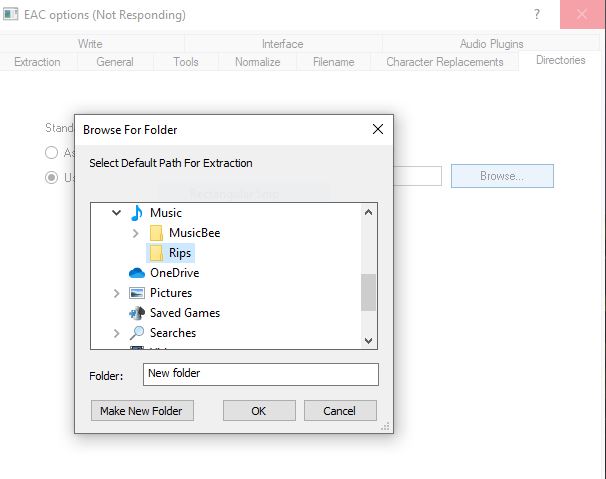
In this screen shot, you can see that I've select the 2nd option in the main screen (to use a specified directory) and then I've used the file/folder navigation tool that appears when you click the [Browse] button on the main screen to navigate to my Music directory. Once there, I click the option to 'Make New Folder' and thus end up creating a Rips sub-directory within the Music folder. My main screen thus ends up looking like this:

The precise directories to use and their names is, of course, a matter for you. The main point here, though, is to make sure that EAC is not allowed to rip directly to your real music collection, mine, for example, is on an M: drive in a /music/flac directory, so ripping to C:\Users\hjr\Music\Rips means EAC cannot possibly, by design or accident, over-write the contents of my real, full music collection. It's important you keep your temporary ripping activities similarly distinct from your permanent music collection. When your ripping directory is set, you're ready to click [OK] and start doing some actual ripping. There are loads of other EAC options you could set, but they're not actually necessary for present purposes and I wouldn't bother.
2.0 Ripping the CD
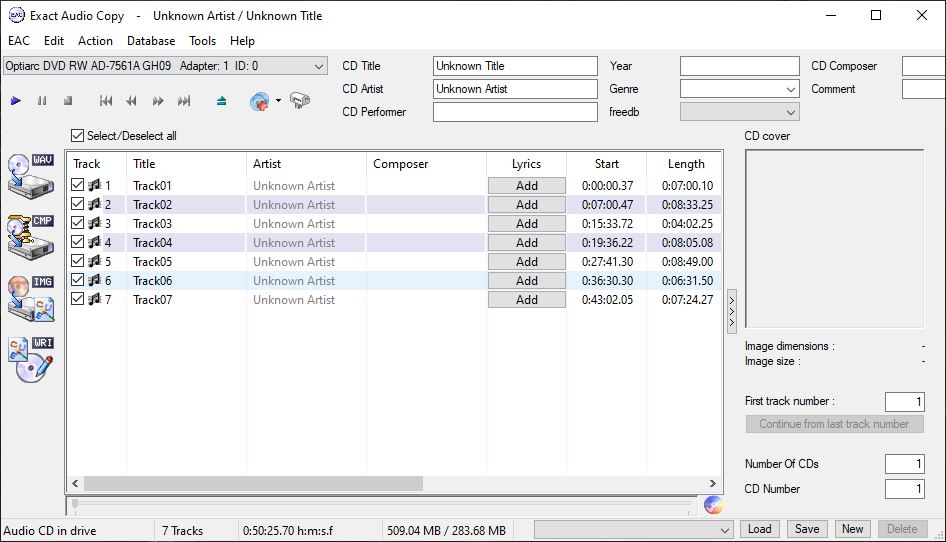
At the risk of stating the obvious, you should now insert a CD into your PC or laptop's CD/DVD drive. If EAC is already running, it should detect the insertion and populate its main screen with details of the number of tracks it has found on the CD:
If it wasn't running when you inserted the CD, run EAC after insertion and the same display should appear in any case.
Now: you will note from that last screenshot that EAC has failed to find out who the 'Artist' is for this 'Album' or any other details about the CD. Either I've managed to configure EAC not to bother fetching metadata from the Internet in the first place, or it has tried to get some but failed. Whatever the reason, a lack of artist/album/track details is a good thing! As previously mentioned, all metadata about classical CDs sourced from the Internet will be wrong, sometimes horribly so. Therefore, fetching it is pointless -and if you stop your ripper trying to do it at all, so much the better. If I hadn't already made it clear before, my simple recommendation is: don't use online sources of metadata; always supply your own. It will be of much better quality... and it will be accurate! If, on the other hand, your ripper software has gone and fetched a lot of metadata, fine: just accept what it has fetched and we'll sort it out later on in the post-rip tagging. Don't go trying to get it right before you rip, as it's likely you won't get every nuance correct.
On the same sort of topic, note that EAC has a menu option called Database -> Edit CD Information, which would allow you to specify your own metadata from scratch. If you want to do this, be my guest: but I wouldn't, because it's a lot easier to tag things up with proper metadata using a dedicated tagging tool post-rip. Use EAC to do what it does brilliantly: rip stuff. Leave tagging things up until later -which is exactly what I shall do here.
So, for now, I'm going to assume you have a big screen full of nothing!
To initiate the rip, click the [CMP] button you see on the left-hand edge of the main program display, which I've highlighted in yellow here: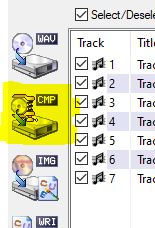
This will immediately trigger a rip -and since you configured EAC immediately post-install to store things as FLACs, the rip will be output as a set of FLAC tracks. If you'd configured to use MP3, of course, then you'll get a set of MP3 tracks output. Check the status of the rip as it progresses:
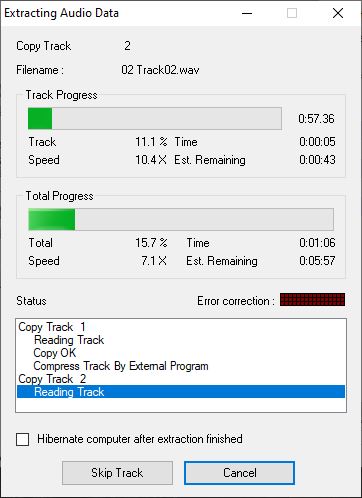
You want to see lots of 'Copy OK' messages, but if you see any errors, the program will try to work around them and hopefully achieve a successful rip anyway. Doing so makes the rip extremely slow, of course, but the results are generally worth it. If it seems that the errors cannot be worked around, maybe try cleaning the CD or ripping it on another computer or laptop: one player may be able to read around a disk flaw where another cannot. Ideally, you want a rip which is completely error-free, of course.
When the rip is complete, you'll see a final message 'Audio Extraction Complete': click [OK] at that point and a 'status and error message' window will appear:
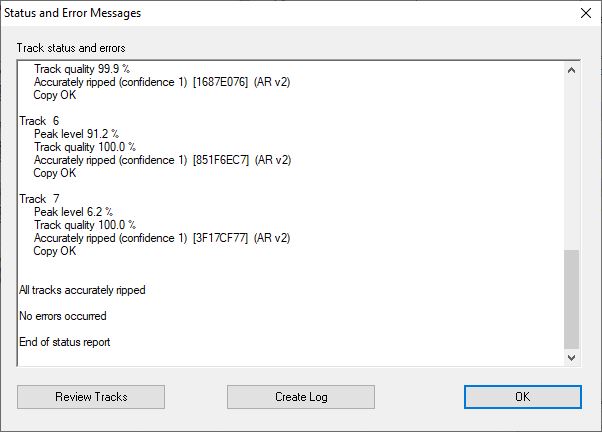
Again, you want a summary report that indicates no problems and everything ripped accurately. Click [OK] to dismiss the report and you'll return to the earlier main screen display, with all the tracks selected. You can close EAC down at this point: it has done its audio extraction job!
3.0 Post-Rip Processing
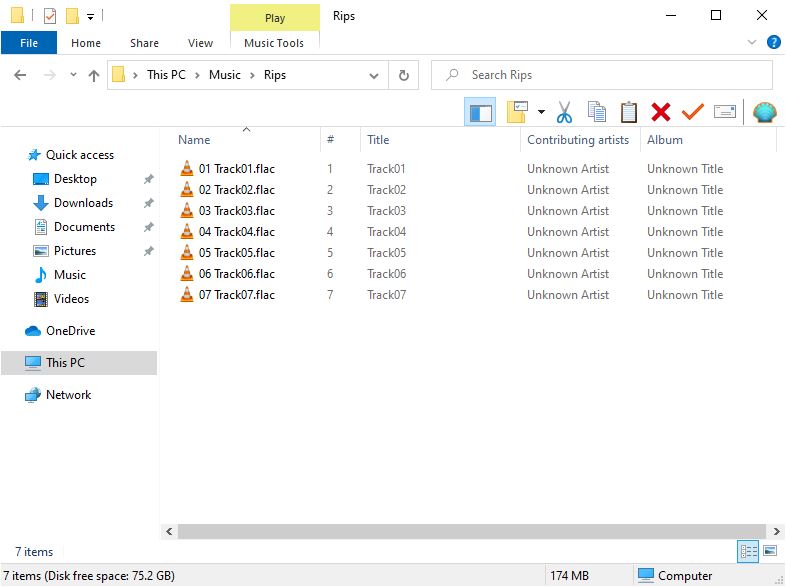
If you now open Windows File Explorer and navigate to your Music/Rips directory (or wherever you chose to make EAC output its audio files), you should see this sort of thing:
Now, since all 7 tracks shown there belong to the one work of musical composition, what we do next is fairly easy: we launch MP3tag. When run, MP3tag tends to remember the directory it was last used in, so you may need to click the File -> Change directory menu options and navigate to where your new ripped audio tracks are stored on disk. Once you get to the write directory, click [Select Folder] and the program should scan the chosen directory and display its contents, like so:
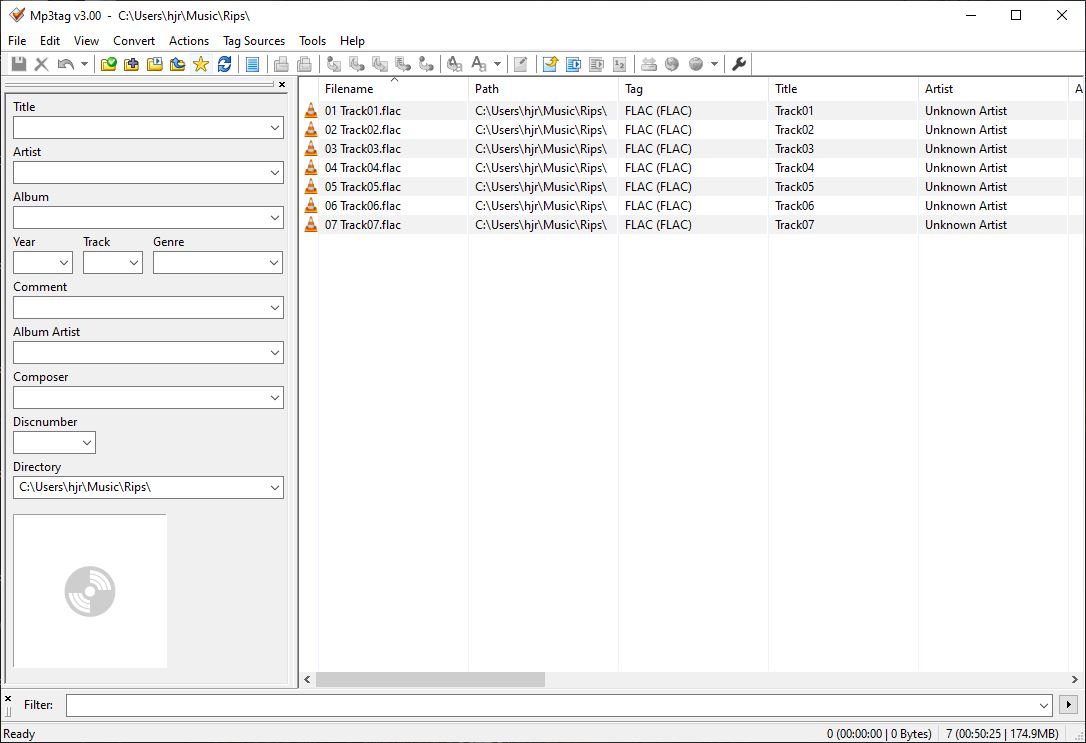
Now, I'll just pause at this point to explain that although your audio files are in FLAC format, and the program you're now using is called MP3tag, there is no incompatibility: MP3tag can tag FLAC files perfectly well, not just MP3 files! I'll also point out that on the left-panel of the MP3tag display are all the 'standard' tags you should set for audio files, plus one or two which I'd consider non-essential or non-standard as far as classical music is concerned. If you don't remember the 'rules' of what sort of information we enter where, have a read of the Axioms of Classical Tagging article, especially Section 2.0.
The approach I use when tagging files is a two-step one:
- Apply common information first
- Apply track-specific information second
In other words, all these tracks belong to the same 'Album' and share the same 'Artist' (i.e., composer). So we should set those commonly-shared things first. But things like track numbers and titles will vary for each track, so we should set those second.
3.1 Setting Common Information
To set the common information, first click in an empty space in the right-hand panel where the audio tracks are displayed and then press Ctrl+A. This will select all tracks and overlay them with a blue tint:
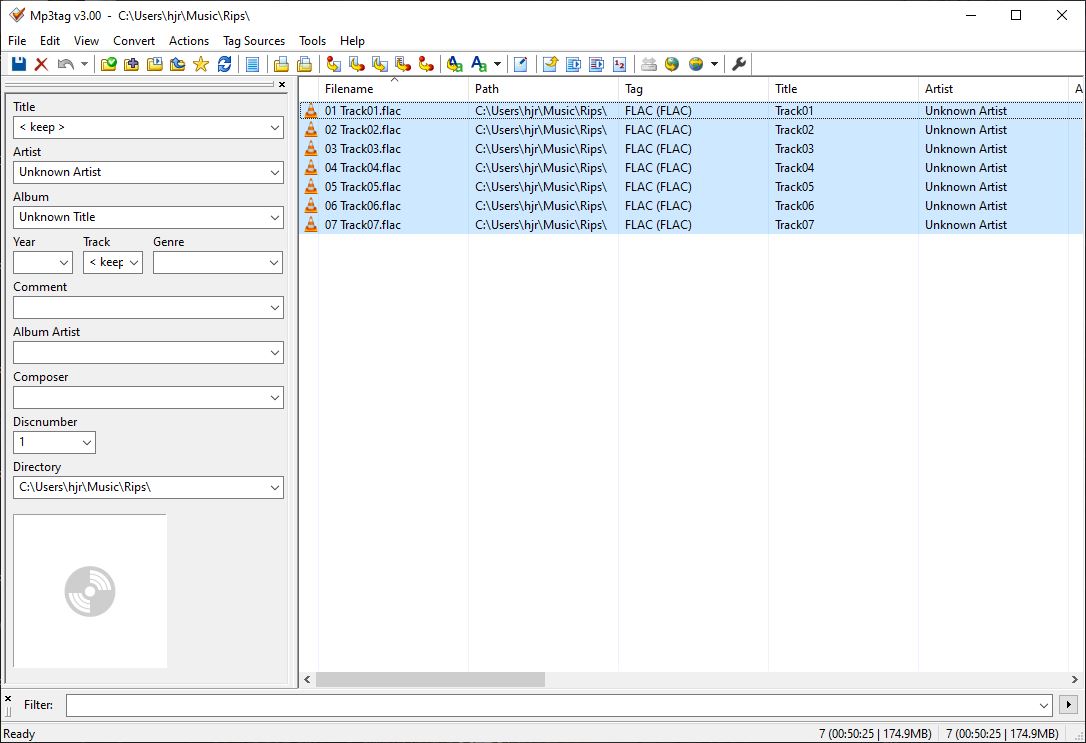
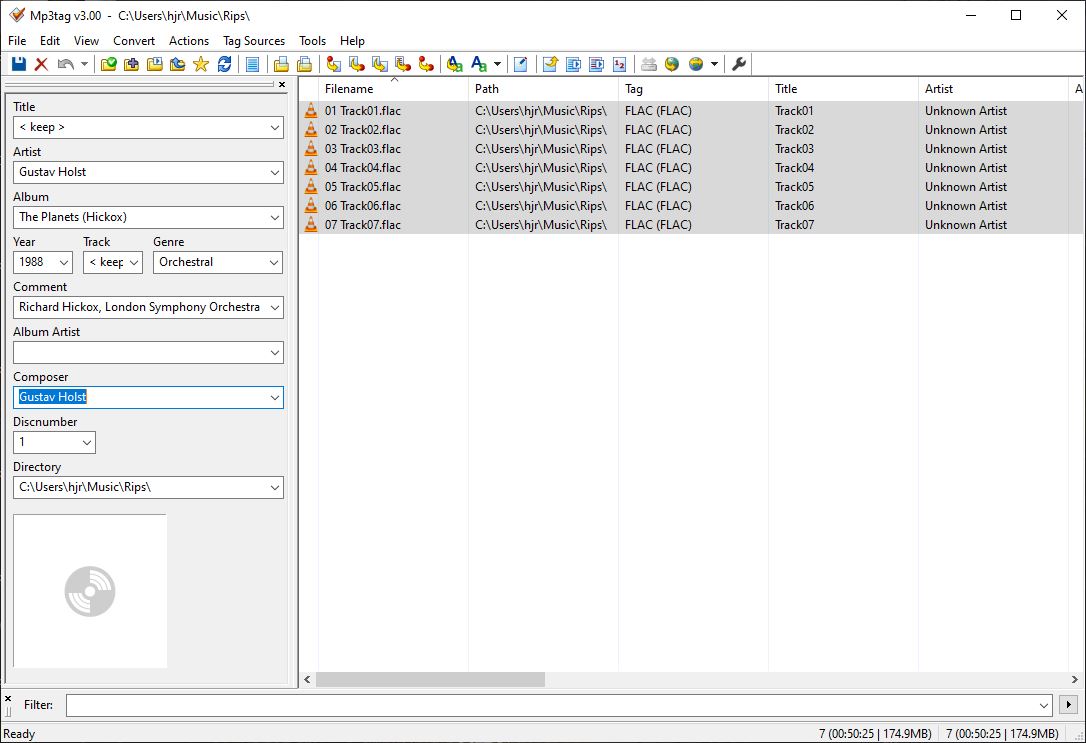
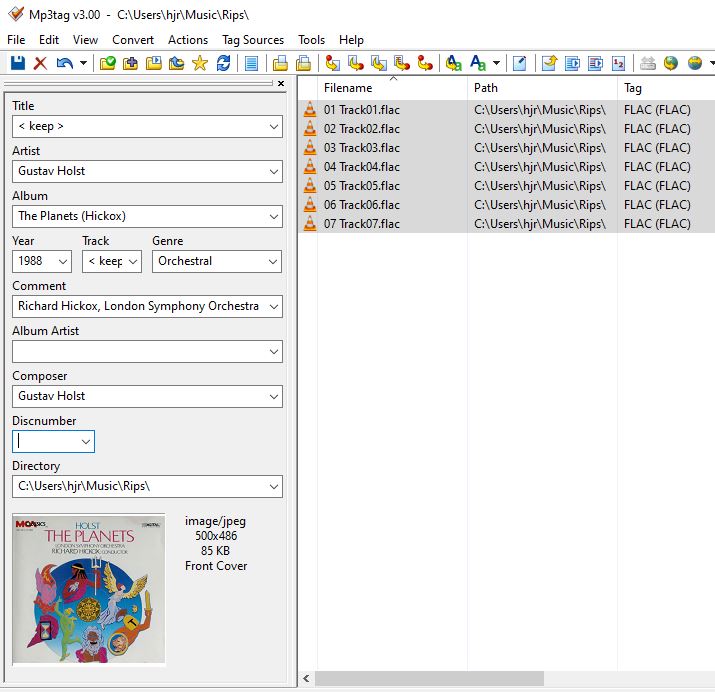
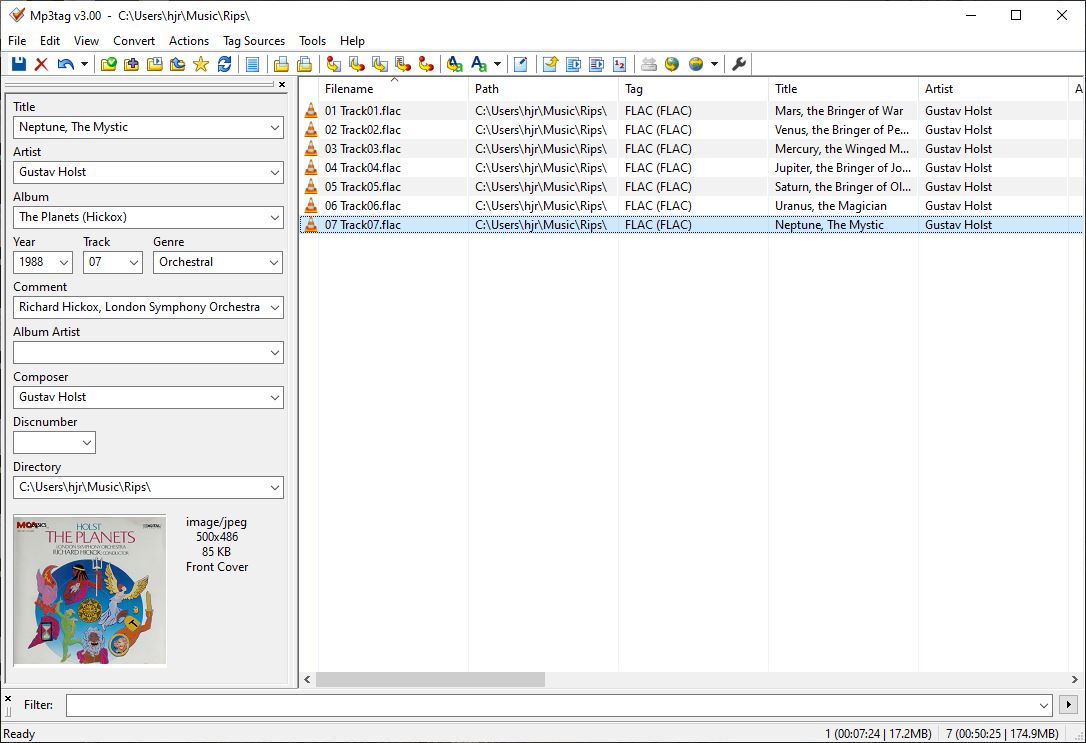
You could also click and drag your mouse pointer across all tracks to achieve the same effect. Either way, once all the tracks are highlighted in blue, move to the left-panel of the main display and fill in the common metadata. In the case of the album mentioned at the start of this article, I've got:
- Artist = Gustav Holst
- Album = The Planets (Hickox)
- Year = 1988
- Genre = Orchestral
- Comment = Richard Hickox, London Symphony Orchestra
- Composer = Gustav Holst
Look carefully at the cover of this CD's booklet and you'll see that we can get most of that without trying to hard. The only difficult bit of information is the year: it's not spelled out in the booklet precisely when the recording was made, but if you squint very hard at the last line of text on the back cover, you'll see © 1988 and ℗ 1988. The "℗" symbol especially is a mark of when copyright in a 'phonogram' sound recording was established -which almost always indicates a year of recording (or close to it: I generally find that if it's ℗1988, the actual date of recording might have been at the tail-end of 1987. But the difference isn't really significant).
So, I fill all that information in to the relevant fields on the left-hand side of the program display:
Before doing anything else, I also note that the 'Discnumber' field is showing '1', which MP3Tag tends to do by default. In the world of digital files on a hard disk, however, the concept of disc number has no meaning -and the Axioms of Classical Tagging say it should never be set. Therefore, click in there and press the backspace key to clear it out:

Finally, just notice that, also as per the Axioms of Classical Tagging, I've entered nothing into the Album Artist field (it has no meaning in a classical music context). The left-hand panel is therefore correctly filled in with all the common information shared by all tracks, and I therefore click the save icon (looks like a floppy disk, first icon on the top row) or click the File -> Save tag menu options. That forces the contents of the left-panel to be physically written into the audio files on disk:
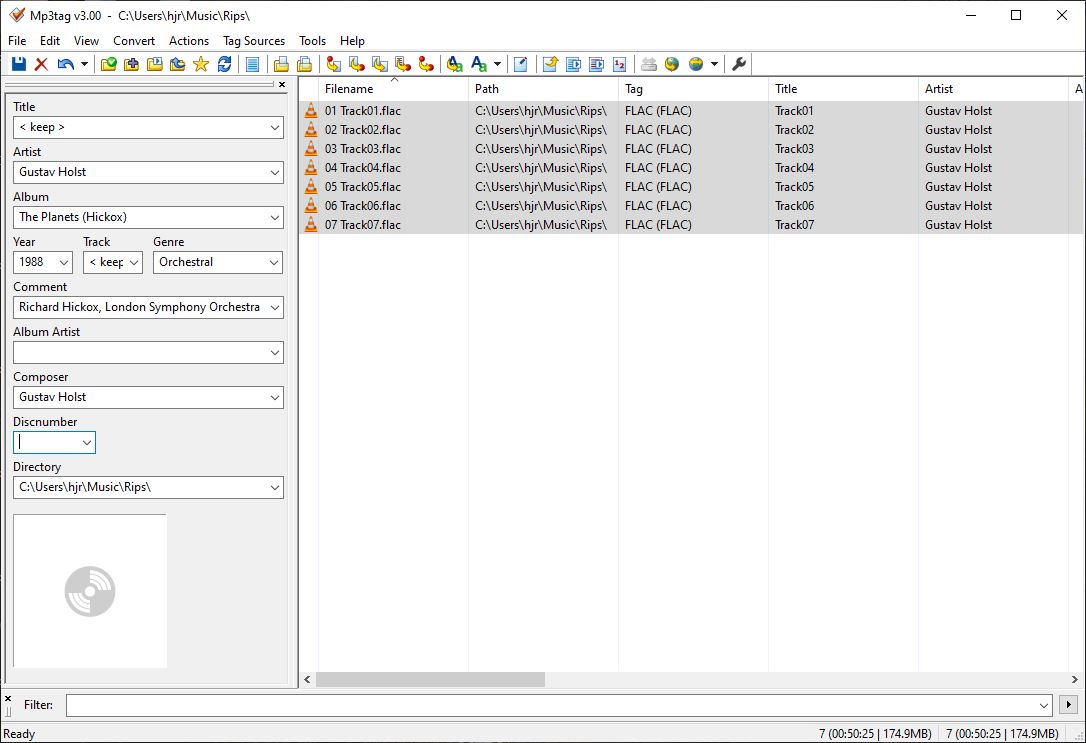
There's not a lot different about this screen post-save than before... but if you look carefully, you can just see that the right-hand part of the MP3tag program window now shows 'Gustav Holst' in the Artist column, rather than the 'Unknown Artist' label that was being displayed there before -so clearly, the contents of those files has indeed been changed.
There's just one more bit of common-tagging we need to do: all these tracks make up the same composition and therefore need to share the same album art. The choice of album art is entirely up to you and doesn't necessarily need to be the artwork that came on the CD you're actually ripping. I mean by this that record companies frequently release and re-release the same recordings on different CDs or CD compilations or boxed sets, so the artwork associated with the recording usually changes over time, too. For example, when I first bought a copy of Britten's Billy Budd on LP, the artwork looked like this:
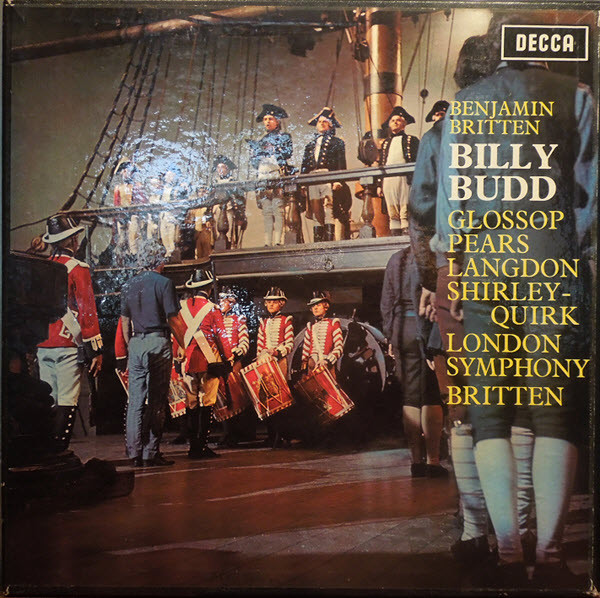
...which I thought brilliant: just by looking at it, you could tell it was something to do with the late 18th century, ships and navy. You knew who the principle singers, orchestra and conductor were... and it was just colourful! When I later bought the CD as a standalone item, Decca had "improved" the artwork to this:
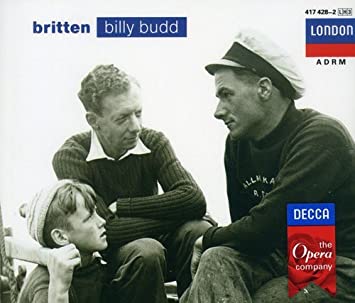
...which is black-and-white, tells you nothing about the performers and shows a photograph whose relevance to the opera it is being associated with is questionable at best (the guy on the right is, in fact, an Aldeburgh fisherman, which is the closest you're going to get to a marine connection of any sort. But he's definitely not in the navy, so why he's there is a bit of a mystery, really!)
Anyway, some years later, you could have bought this multi-CD collection from Decca:
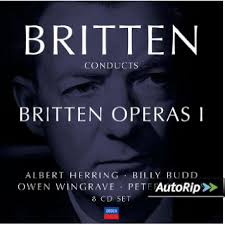
This tells you it's full of works by Benjamin Britten, but that's about it. It has even less relevance to the content of the specific opera than before. And then, for Britten's centenary in 2013, Decca re-released all Britten's recordings in an entirely new boxed set:

So, which of those possible covers would you use to tag a rip of Billy Budd with?! Personally, I had no hesitation, when ripping it from the boxed set shown last, to use the LP artwork I'd first known the opera by, and which -for me- conveys all the necessary information in a colourful, highly concentrated manner.
Anyway: my point is, that you are not restricted to using what the record company supplies on a specific occasion as album art. Use whatever picture conveys the most meaning to you. In this specific case, I shall use the CD front cover that I showed at the start of this article... because it's the easiest to use and because no other possible artwork conveys special or particular meaning to me. So, obtain a scan of that front cover as best as you can: either scan it with a cheap USB scanner; or download it from somewhere. I tend to find Discogs and Allmusic have good sources of online artwork, though you may have to search quite carefully to get the correct picture for a CD:
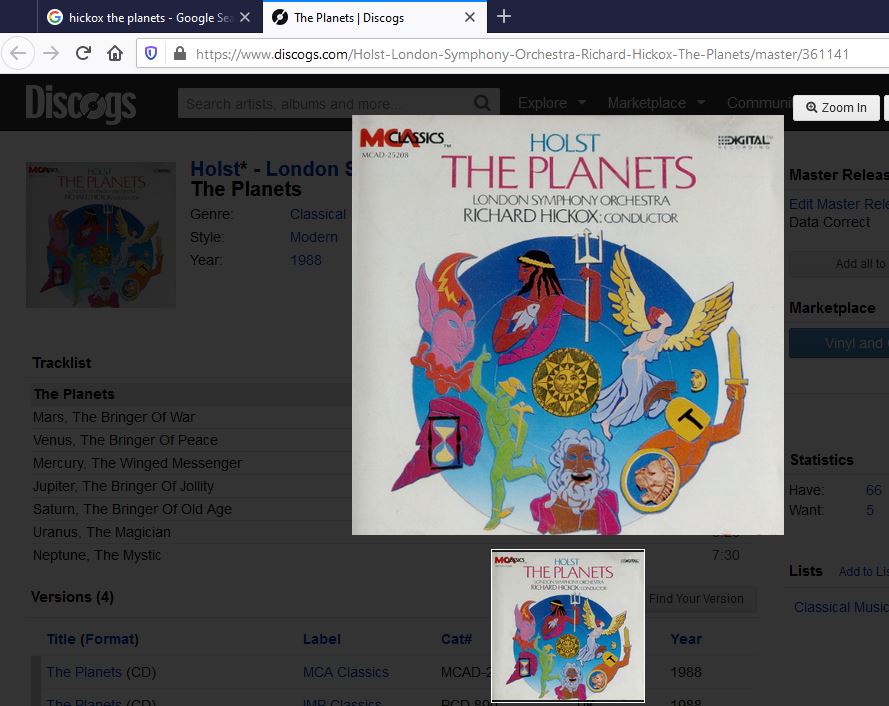
Here, you see I've used Google to search for 'hickox the planets' (Google isn't fussy about punctuation or case!) and then clicked on a Discogs link that appeared. Click on the album art shown in the top-left corner of the Discogs page and it displays in full size in an overlay. Right-click it and select [Save Image As...] and save the album art to your desktop (or anywhere else you want to save it, of course!) Once it's saved, switch back to MP3tag. Make sure all the tracks are still highlighted, then right-click in the big square at the bottom of the left panel (underneath the 'Directory' display). From the context menu that then appears, select [Add cover...]. Navigate to where you've stored the relevant album art, select it and click [Open]. The Album Art field in the left tab will now display your selection:
Though it's now displayed in the main panel, it has not yet been applied to all the selected tracks. For that, click the Save button once more (the floppy disk icon). When you do so, you'll see a pop-up appear that shows that the graphic is being written into each of the audio tracks in turn. It can take a while to complete, depending on how many tracks there are to tag in this way and also on how large the graphics file is that represents the album art. On the whole, it should take no more than a second or two, anyway.
So at this point, your audio tracks are now correctly labelled with common information: information that applies to them all equally. We now move on to tagging things with track-specific information.
3.2 Setting Track-Specific Information
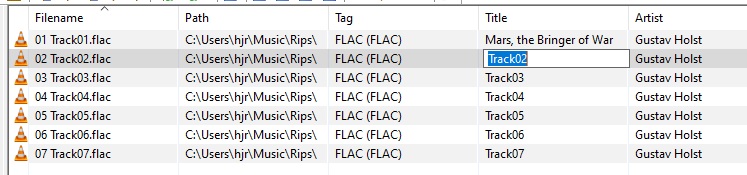
There are only two pieces of track specific information required: the track number (which has to start at 1), and the track title (which are the titles given on the CD back cover for each of the tracks in turn). So, to start with, click on Track 1, so that only it is highlighted in blue. On the left-pane, type '01' in the Track number (it may already be present, but it doesn't hurt to re-type it to make sure). With that typed, switch to the Title field in the left panel and type a grammatically correct track title:
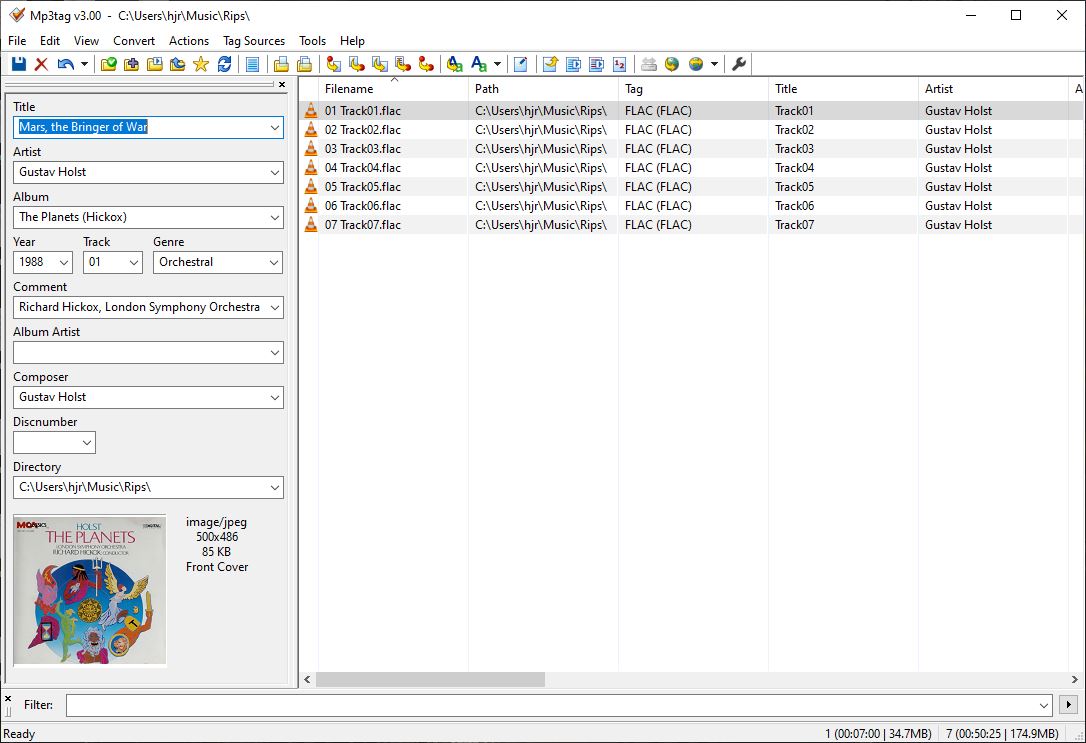
Notice that I have tagged track 1 as 'Mars, the Bringer of War'. Compare that to the CD booklet's back page: MARS, The Bringer of War. You can see that I've proper-cased "Mars" (i.e., it's not all in capitals). And I've removed the 'T' from 'The' and replaced it with lower-case 't'. I retain the capital B and W, however, since "Bringer of War" is used here more-or-less as a proper noun, and thus requires capitalisation.
Out of interest, here's what the original full-score of the work in question:
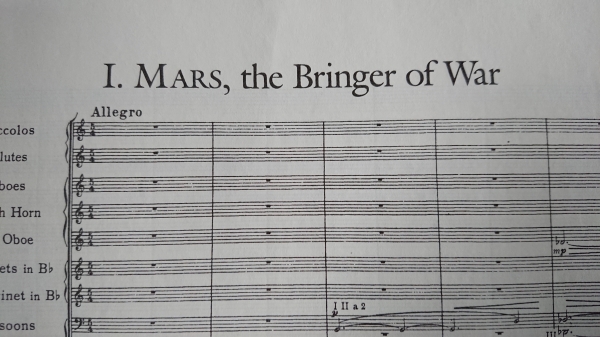
That's the original 1922 score: capital MARS, lower case 't' in 'the'. So the score is in conflict with the record company (since they have 'The', not 'the'). But they agree on "MARS" rather than "Mars". Except... here's the Boosey & Hawkes pocket score for the same work, with a copyright notice dated 1921:
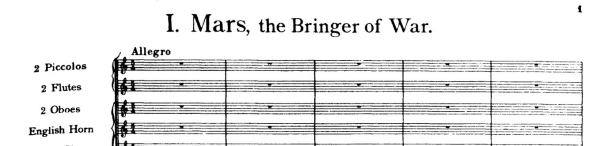
So that's "Mars", not "MARS"!
My point here is: don't take the record company's word for it. Or the music score publisher(s), either! There is no 100% correct way of naming this track using the CD booklet or the original full score, or Boosey & Hawkes' later pocket score. Things will vary. Therefore, don't regard any of them as 'Gospel Truth' about anything. Instead, stick to the commonsense rules of grammar, and you will steer a pretty good path through this thicket of options!
Notice, though, that whilst both my printed scores say "I. Mars" or "I. MARS", I am not following either in including that Roman numeral '1' in my track title. Doing so violates Axiom 7 of the Axioms of Classical Music: I've just numbered the track '1' in the track number tag; I therefore shouldn't include a '1' or a 'I' in the title tag.
Anyway: once you've entered the two pieces of information for track 1, remember to click the save icon to get the new information written into the physical audio file on disk. Hopefully, it's obvious that you could then repeat the process -highlight track, type in track number, type in title, save- for each of the remaining tracks in turn, and I would have no trouble with you doing that, this being merely a 7-track CD and thus not requiring too much back-and-forth clicking and typing. But tagging software often has shortcuts, and I think now would be a good time to explore some of those!
3.2.1 Sequential Track Numbering in Bulk
The first shortcut is getting MP3tag to simply auto-number your track numbers for you. Click in the list of files at the right of the program display, press Ctrl+A to select all the files so that they are all highlighted in blue. Now click Tools -> Auto-numbering wizard from the top menu or click Ctrl+K.
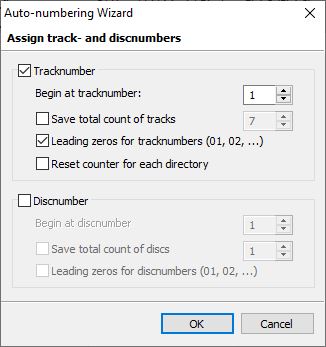
Note how you can start track numbering at any number you like. By default, numbers will start at 1 and increment thereafter -but there's technically nothing to stop you saying 'start at 63'. Note that you can also get the tool to auto-number the Disc Number tag -but this is not something you should do as, in digital music, we don't have disks anymore! However, there is one other checkbox you should switch on: the Leading zeros for tracknumbers is not on by default but should be. As explained in my Axioms article, track numbers should always be padded to two digits, at least, because you will often have a track 10 and 11 which won't always sort correctly if you've numbered the other tracks '1', '2', '3' and so on instead of '01', '02' and '03'.
Anyway: with the '1' and the 'Leading zeros' options selected, click [OK]: you may need to then scroll the track display to the right in order to be able to see the track numbers, but you'll find they've been added to all tracks in one go:

So, the auto-number trick helps you get sequential track numbers, in a correct 2-digit format- applied to lots of tracks in one go. It's a handy shortcut to keep in mind.
3.2.1 In-place Title naming
The second shortcut I'll describe is how you can change the track titles without the fuss of highlighting a track, click in the left panel, typing, saving, then selecting a new track, clicking, typing, saving and so on. Instead, just single-click the Title field shown in the right-hand, main part of the display:
If you accidentally double-click a track title, you may trigger the automatic playing of that track in whatever happens to be your default media player! If that happens, just close it down and try single-clicking again. It might take a bit of practice, but eventually, you'll be able to click on a track title and get it to enter its 'edit mode' as you see has happened to my second track in the screenshot above. Once it's in that mode, just start typing the track title and when you've typed it completely, just press [Enter]: the edit to the track title you just made will be automatically saved in the physical file and (the important bit, really) you'll automatically be stepped onto the next track in title edit mode too. So you can now just type the remaining track titles, press [Enter] after each one and keep going until the end. Your hands stay entirely on the keyboard at all times: there's no need to switch to the mouse and back. There's also no need to remember to save after each edit. So, all in all, this method of in-place title editing is much faster than the one-at-a-time approach I used when tagging up the Mars track earlier.
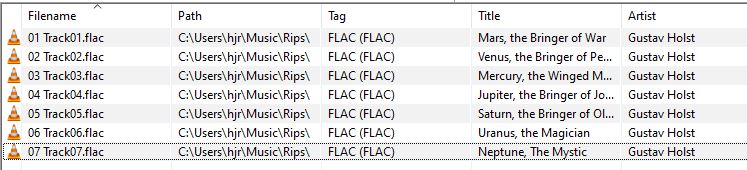
Your track titles should end up looking like this:
I just want to add a short word about the last track, Neptune. If you look back at the start of this article, you'll see that the CD booklet back cover adds an attribution to this track: "(London Voices/Geoffrey Shaw: Director). I have not mentioned this anywhere in my tagging so far. Were I to do so, I would include details of the closing chorus in the Comments field which I would apply to all tracks, even though the choir only conclude the Neptune track. In other words, my Comments tag, assigned when I was setting 'common tags' to all the tracks, back in Section 3.1, would have read "Richard Hickox, London Symphony Orchestra, London Voices". I'm afraid Geoffrey Shaw wouldn't have got a mention, because he's only the choir's artistic director: he wasn't conducting anything on this recording, as far as I know.
Some will argue with this approach: surely, if the choir only sings in the last track, the Comments for that tag alone should mention the choir? It's a plausible argument -but not a persuasive one for me, because it's making tagging far too detailed for my catalogue's purposes. When am I ever going to sit down and think, "I'd like to hear something the London Voices recorded!" and thus need to search my catalogue for them? Frankly, never. So I'd either mention them once as being part of a recording of the entire work, or I wouldn't mention them at all (it's only an off-stage wordless chorus in the dying minutes of the last track of the suite, after all).
Anyway, my point is that ultimately what you tag and how you tag it comes down to how you intend to query your catalogue in the end. If you happen to be a member of the London Voices, you may well want to make sure that they get a mention in the Comments tag! But even if that were so, I would strongly recommend that you then mention them for all tracks, not just the last one, because this is, after all, a single work of art that is being catalogued as a single 'composition' or 'album'. Start varying the performers depending on what track each one of them was or was not singing or playing the zither or what have you and you will spend an eternity tagging and very little time will be left to start listening!
With that slight digression out of the way: you are almost finished with MP3tag and with the business of tagging your music files. There's just one not-so-minor detail to get right!
3.3 File Naming
Perhaps you can see the problem in this screenshot:
Spot all those lovely track titles towards the right of the screenshot... and compare it with the nasty names still associated with the physical audio files on disk. This won't do: the physical files on disk need to be named, and indeed stored in a directory hierarchy, that correctly mirrors the logical metadata we've applied to the files by filling in the tag information. In other words, if I've titled something 'Mars, the Bringer of War' and track number '01', I want that file to be physically named "01 - Mars, the Bringer of War" (possibly: different file systems might baulk at that comma in the file name, so bits of tag punctuation may need to disappear from physical file names, but the general principle is good). Fortunately, we can get MP3tag (and most other tag software will do the same sort of thing) to rename all our files based on the tag data we've supplied.
First, make sure all tracks are selected and highlighted in blue (so, click in a blank part of the right-hand pane and press Ctrl+A).
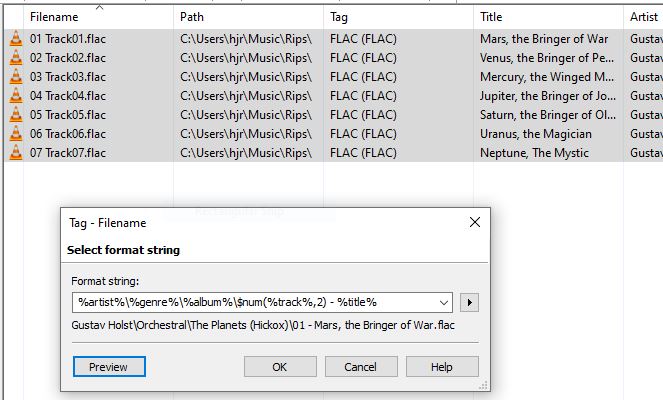
Next, click the Convert -> Tag - Filename menu options (or press Alt+1). A dialog box will appear with slightly complex-looking contents:
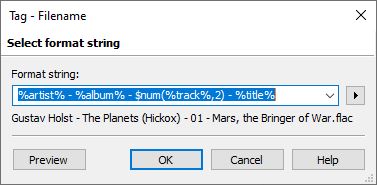
What this screen is saying is, firstly, that each tag we filled in can be referenced by a 'variable' containing percentage signs. That is, you typed in a track title -we can refer to that by using the variable %title%; you mentioned an artist - we can refer to that as the variable %artist%. And so on. So, by default, this dialog box is proposing to rename our files so that they are names artist - album - track number padded to 2 digits - title. So, my first track would end up being called Gustav Holst - The Planets (Hickox) - 01 - Mars, the Bringer of War.flac.
This is actually not a dreadful suggestion -except that it's a proposal to store three levels of detail into a single-level file name. In other words, we've got a composer, a composition, and a 'movement' within that composition: those are three distinct entities, and it just isn't good data management practice to 'flatten' that separateness into a single level. Good data practice would be to realise that we have a hierarchy happening here: there will be a few composers, each may have many compositions, each composition may be comprised of lots and lots of tracks (or 'movements'). That's a hierarchical progression from the general to the highly specific -and whenever you see such a progression, you should instinctively think that at each step through that progression, there should be a separate physical storage container.
In other words, as I move from composer to composition, I'd want to see a folder for composer and within that a separate sub-folder from composition. The files making up that composition would thus be stored two levels deep. As per the proposal above, I'd want Gustav Holst\The Planets (Hickox)\01 - Mars, the Bringer of War.flac. The elements of the tagging hierarchy are thus made tangible, as physical folders on a file system.
This is a really important point, primarily because it means that if you can get to your music easily in a media player that is reading your tags, you'll be able to easily get to it in nothing more than a file browser, too, because the physical storage structures it uses were derived from the tags the media player uses.
So: let us have a file system hierarchy derived from tags! But in doing so, I want to add one further level in that hierarchy. What I'm really after is this:
Gustav Holst
     |
	 |
	 --> Orchestral
	         |
			 |
			 --> The Planets (Hickox)
			            |
						|
						--> 01 - Mars, the Bringer of War.flac
						--> 02 - Venus, the Bringer of Peace.flac
...and so on. In other words: I'm introducing the contents of the genre tag into the mix. That's simply because someone like Johann Sebastian Bach composed well over 1000 works in his lifetime. In a simple composer -> composition -> tracks hierarchy, there'd be 1000+ folders within the Johann Sebastian Bach folder. That would be far too many folders to manage comfortably or to visually scan easily. By adding this extra level of hierarchy, I effectively break up the Bach works into chunks that are individually much smaller than the whole (into cantatas, concertos, orchestral works, oratorios and so on).
So how can we use this MP3tag tag-filename utility to automatically generate this storage hierarchy for us? Easy: you just separate the various components sourced from tags by a "\" character, because '\' on Windows means "create new subfolder". If you were doing the same sort of thing on Linux, you'd use the "/" character instead, because Linux file systems use forward slashes where Windows uses backwards ones, but the principle is exactly the same on either platform.
So, summing all of that up, to get the physical storage hierarchy I want, I would need that 'Format string' in the previous screenshot to read like this:
%artist%\%genre%\%album%\$num(%track%,2) - %title%
It's almost the same as what the dialog box starts with, but it now mentions the 'genre' tag, where previously it does not; and the the various tags are separated not by hyphens, but by back-slashes. Type that into the dialog box, then, and you'll see this:
Remember that, at this point, my hard disk storage looks like this:
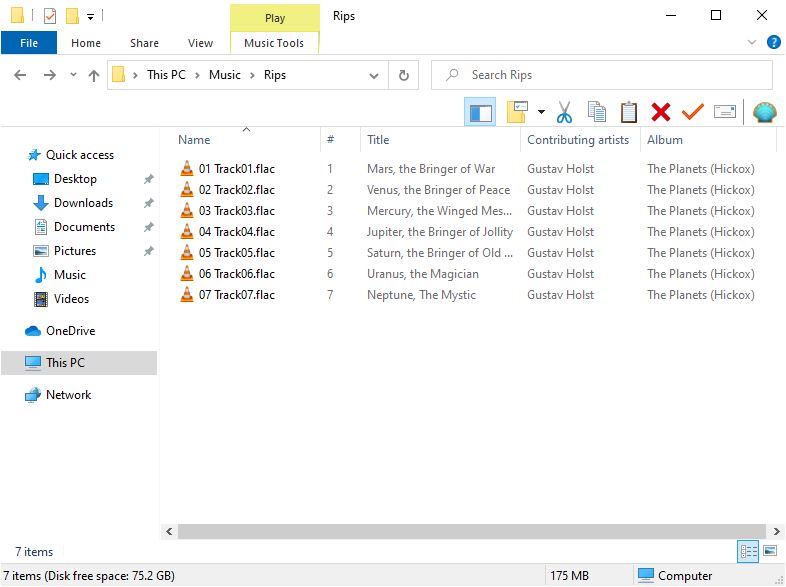
Everything is in my Music/Rips directory and the tag information is present, but the file names are just 'Track01.flac' and so on. So now it's time to press the [OK] button on the MP3tag tag->filename dialog: brace yourself at this point, because there's no going back, so make sure you typed things correctly!
Almost immediately, MP3tag itself will tell you something has changed:
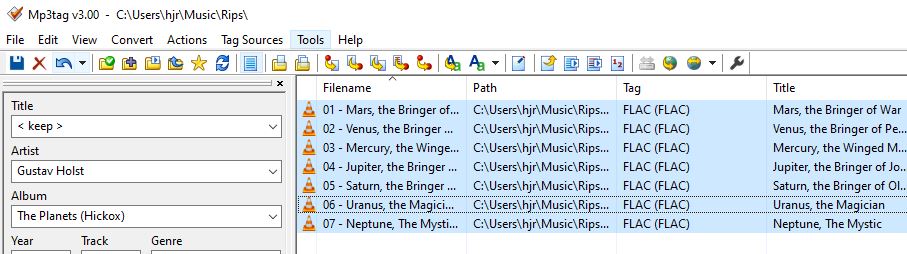
You can see the 'Filename' column now shows meaningful file names, not just 'Track01.flac'-style names. But the most significant difference will only be visible if you go back to the Windows file manager and take a look:

That's me still sitting in my Music/Rips folder... but the audio tracks have disappeared! (You are allowed to have a weird feeling in your stomach the first time you do this: it can be fearful, thinking your music has been lost! But you get used to it after a while!) In their place is a folder, called 'Gustav Holst'. Hmm... double-click that to enter it and you'll find yourself looking at an 'Orchestral' sub-folder. Double-click that to enter it, and you'll be looking at a 'The Planets (Hickox) sub-folder. And finally, double-click that to see this:
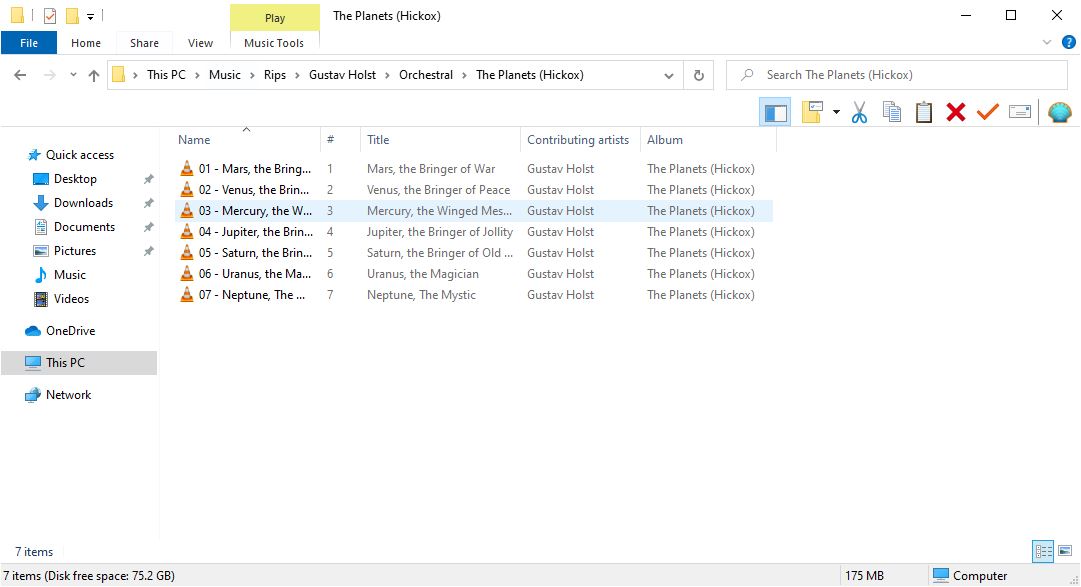
So there are the audio files after all (phew!). They weren't deleted or destroyed, just moved into a nested, multi-folder structure that physically reflects the composer -> genre -> composition hierarchy which you added to those files by tagging them up correctly. This is a powerful piece of functionality: it makes it easy for your physical storage strategy to be driven by, and accurately mirror, the logical tags you assign to your music files.
4.0 Wrapping Up
At this point, MP3tag has done what we need it to do, so you can close it down. All that really now remains is to check that the resulting rip appears correctly in my media player:
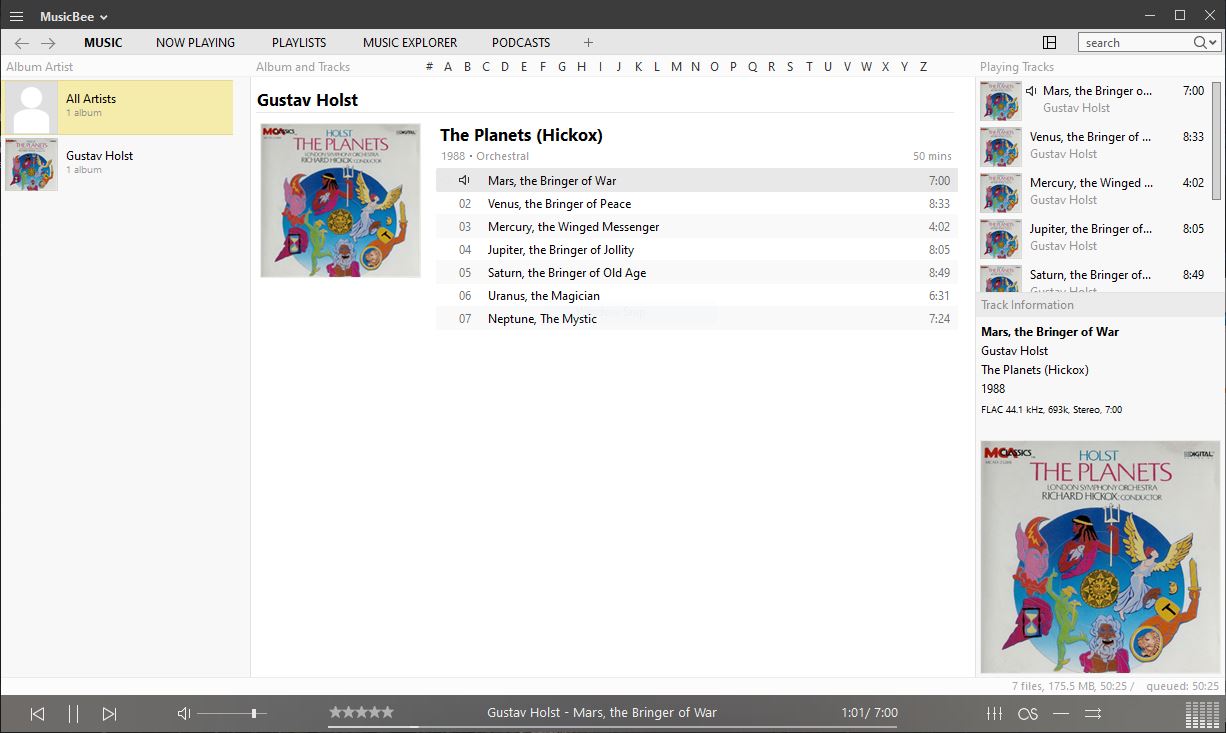
I thiink that looks reasonably attractive, and all the right bits are displayed where I need them to be. I'd be happy with that rip. I should recommend at this point that you actually play the rip before you file it away in your permanent catalogue of music: you would be surprised how many rips of mine that I thought were all good turned out to have pops, clicks or other weirdnesses associated with them. Test your rips with your ears before final filing, basically!
Once your ears are happy, you can move the newly-ripped composition (some might call it 'album'!) into your permanent store of music, and into the correct place within that permanent store. What I mean by that is that, in my case, my permanent store of music isn't even housed on the same laptop I'm using to do my CD rip (because it's a big server in the loft!):
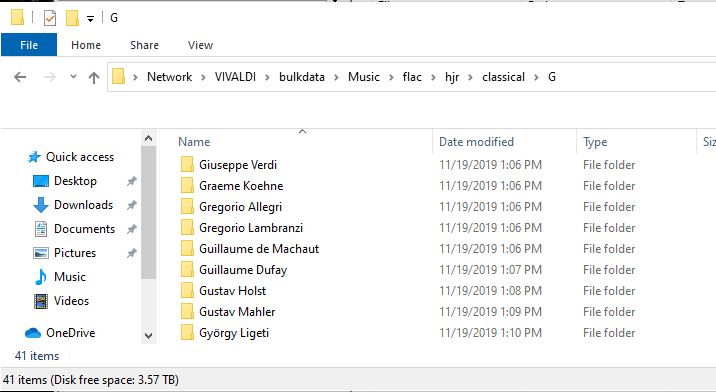
See how I have a server called VIVALDI, which has a number of sub-folders, organised in hierarchy that goes from the very general to the very specific. Whilst I have a 'bulkdata' folder which stores all sorts of data, I rapidly narrow that down to just music, then just classical music, and finally just classical music having been written by composers whose names start with 'G'. Your storage hierarchy might well be different from that, but the same general principle (going from the broad to the narrow, the general to the specific) should probably apply for maximising the efficiency with which you can retrieve data physically.
Anyway: you can see I already have a directory for Gustav Holst within my 'G' composers. I also happen to have an Orchestral folder, within the Holst one. So, to move my new rip into the existing folder structure, I can just copy my laptop's The Planets (Hickox) folder and drop it into the network's Gustav Holst\Orchestral folder, like so:
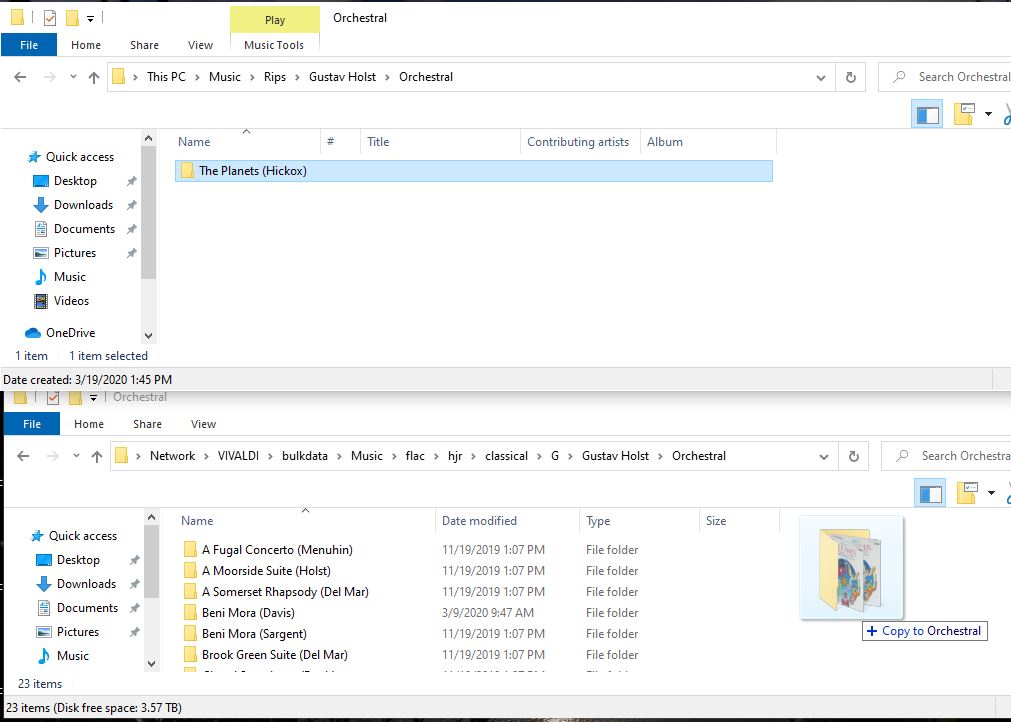
In this case, in other words, because I already had the correct artist and genre on the network store, I only need to copy across the album bit of the storage hierarchy on my ripping PC. Had I never heard of Holst before, however, he would obviously be missing from the network's store of composer folders -and in that case, I could copy the entire artist/genre/album hierarchy across from my laptop. If I had met Holst before, but owned nothing orchestral by him, I would copy just the genre/album across. In short, use whatever bits of the storage hierarchy MP3tag created for you when ripping as the source of the file copy to the permanent store, depending on what elements of that hierarchy are missing from the permanent store.
5.0 Conclusion
You'd have thought that ripping a single CD containing a single work by a single composer would be trivially easy to do -and in some senses, spelling things out, step by step, as I've done here, makes the process look and sound a lot more complex than it really is! So it's not really as difficult to do as it seems, but there are some crucial points that arise, nonetheless, despite the overall simplicity of the task.
First: let your ripper rip and your tagger tag. Most rippers will offer to let you tag up your music at the point of the rip, but it's my strong recommendation that you should not take it up on the offer! Rippers are far less flexible than proper tagging software and have a tendency to fetch dodgy metadata from the Internet. If the ripper adds no metadata at all to your music files (as was the case in this example), that's actually a bonus, not a problem
Second: get common metadata right before track-specific metadata. You don't have to do it that way round, of course, but the point is really to keep clear in your head that there are two realms of metadata that we apply to our music files and it helps to keep them distinct in your head.
Third: don't be dictated to by record companies! They get things wrong (i.e., what they claim are the track titles might not actually be what the composer wrote) and when they do state things (such as 'this is the album art'), they are usually only stating it temporarily (i.e., 'the next time we re-release this same recording, we're going to use different album art'!) So don't feel obliged to regard the physical CD in your possession as the source of all truth and the only arbiter of what metadata you should provide in tags. It's your music catalogue, not the record companies'.
Fourth: don't get sidetracked on little details. I don't know whether I should have mentioned the London Voices in the above example or not. My feeling is not, because that last, wordless chorus doesn't amount to a substantial part of the entire composition. But whether I should or should not have, I definitely shouldn't have said they were on track 7, but not on tracks 1 to 6. That level of specificity is really seldom required.
Fifth: use your tagger well! I mean by this that tagging packages usually offer extensive functionality to allow you to not only get the logical metadata (tags) correct -such as the track auto-numbering facility I used in this example- but to also get the physical storage right, driving it from those metadata tags. Lots of people tend to use their tagger software to get the tags right and don't even realise that they don't have to rename all their files by hand, let alone store them in an appropriate hierarchical folder/sub-folder structure by hand. Usually, the tagger software will do both jobs for you, perfectly well.
Finally: your physical storage hierarchy is important for ready access to your music from the filesystem. In the example I used here, I ended up copying my rip into a physical storage hierarchy that neatly mirrored the way I'd tagged the files: Composer -> Genre -> Album. The more fundamental point is, however, that your tags shouldn't fight your physical storage structure, but should mirror it. That way, you'd be able to navigate directly to a specific composition from the file manager as you would in a dedicated media player.
All of these points are of generic relevance, no matter what the CD is that you're ripping. If you learn them now, when faced with a simple one CD, one composer, one work ripping job, you'll be in good shape to deal with more complex ripping scenarios!
Back to the Master Index of the Guides to Ripping and Tagging