 1.0 Introduction
Giocoso is my own digital music-playing software. It was always intended for local installation: the PC you install it on is assumed to be the PC you'll run it on and play music on. Giocoso's installation script is pretty careful, after all, to install icons, launchers and fonts that a local PC would need to be able to launch and run the program properly.
The irony is, however, that this is not how I run it myself!
I prefer my music-playing to be done on a little, silent PC sitting in a cupboard in the corner of my listening room. It is attached to a DAC which is then attached to an amplifier, which in turn is attached to some large speakers: it's a dedicated music-playing PC, in other words. I certainly give it instructions on what to play from my desktop PC (or my mobile phone), but apart from barking orders at the little music PC, my desktop PC takes no further part in the music-playing business itself! In slightly more technical terms, my local PC (which I shall call 'Britten' in this article) connects to the music PC (which I shall call 'Schumann' henceforth) over the home network, via ssh. The purpose of this article is to explain how I do that at all, and then to elaborate a little and explain how I do it efficiently and effectively.
2.0 Running Giocoso Remotely, Displaying Locally
2.1 Passwordless SSH Connections
SSH is the abbreviated name for the 'Secure Shell Protocol', which is a way of securely connecting to remote PCs over an unsecured network and, once connecting, executing commands on that remote PC as though you were physically, directly present on it. Almost all Linux distros will ship with ssh installed by default, but if you needed to install it, the package is usually called openssh-client (and, of course, on the remote PC, you'd have to install openssh-server, since the remote PC is acting as a 'server' of music-playing services across the network). Just use your distro's standard package manager to install it. On Debian, for example, I'd type sudo apt install openssh-client. The specific package name may vary across distros, but it will be similar to this on all: consult your distro's documentation for the specifics.
You use it, in its most basic form, by launching a local terminal session and typing the command:
ssh username@remotePC
The "remotePC" bit of that can be an IP address or a machine name, if the name can be resolved into an IP address by a DNS server or a local hosts file. The "username" bit is the account you want to log onto the remote PC as: it can be anything you need it to be, but in my house, I keep things simple: I have a username 'hjr' on Britten, and I make sure the same username exists on Schumann. Whatever username you use, however, you'll need to configure passwordless ssh connections to the remote PC, otherwise you'll be forever nagged to supply a password when trying to connect. That's a four-step process, as follows:
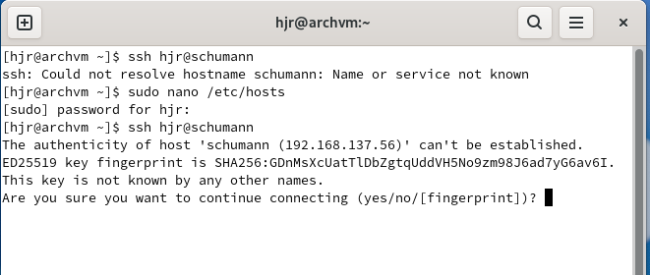
First: Make a standard ssh connection to the remote PC for the first time. In my case, I had to manually add an entry for the remote PC into my /etc/hosts file before the command could understand where I wanted to connect to:
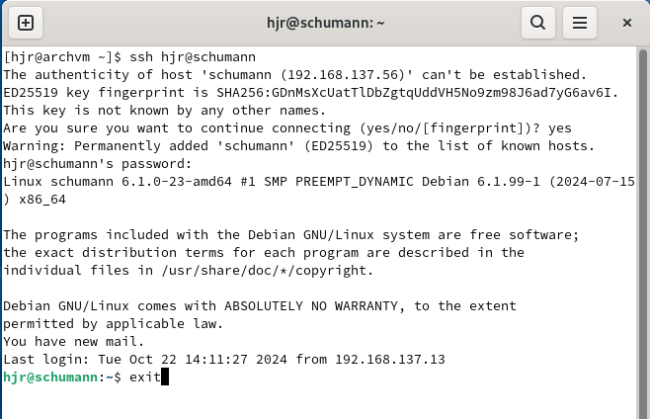
Once my hosts file was correct, however, the ssh command worked -except that, as this is the very first time this PC has connected to the remote PC, I'm met with a challenge-response question: this is a new PC, whose authenticity can't be guaranteed, so are you sure you want to connect to it? The answer is, of course, 'yes', which you have to type in full. Once you agree to connect, the new remote PC is added to your local list of 'known hosts' and a connection will be established:
As you can see, this connection isn't really of much use to me, so the only thing I do once it's been made is to type the command exit, which disconnects me and returns me to the terminal running entirely on the local PC:
This first connection is just to establish that (a) the remote hostname can be resolved and reached over the network; and (b) the remote host is a known host for your local PC to connect to.
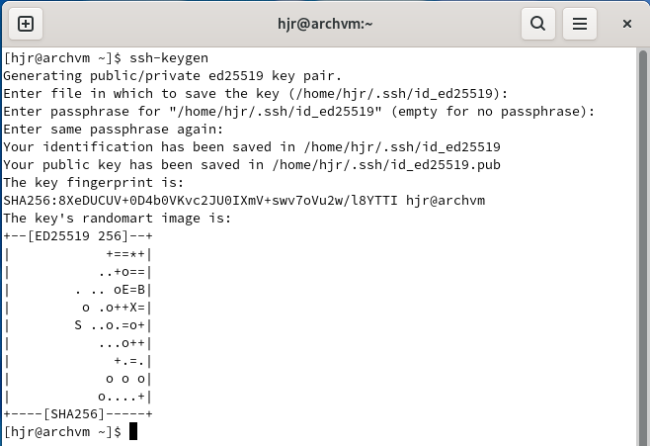
Second: On the local PC, create an 'ssh key' by issuing the command ssh-keygen. This will prompt you with three questions: just press [Enter] at each prompt to accept whatever the default answer might be. You will need to know the name of the file that the keygen program stores the new encryption keys in: this is visible in the program's display, if you hunt for it carefully enough:
Here, you see me press [Enter] when prompted for 'Enter file...', 'Enter passphrase...' and 'Enter same passphrase again...'. Some encryption magic is displayed, but is not really practically relevant. The important line to read on this screen is the third line down: for the 'Enter file in which to save the key', the default proposed answer was /home/hjr/.ssh/id_ed25519 for me: your own environments will yield obviously different results. Make a note of this file name or, even better, select it in the terminal and copy it to the clipboard.
Third: On the local PC, use the ssh-copy-id utility to copy your encryption key to the remote PC, using the syntax:
ssh-copy-id -i <path and name of encryption key file> username@remotepc
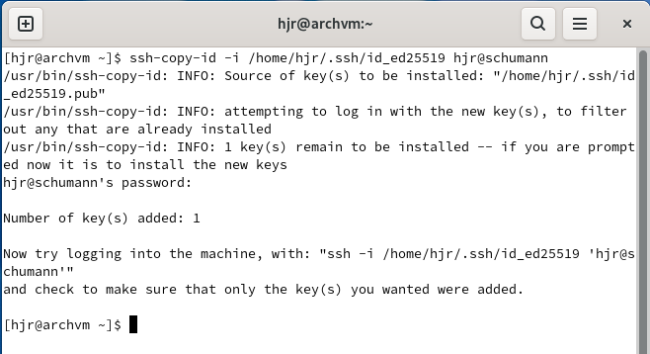
In my case, that looks like this:
Notice that the bit after the '-i' switch is the exact same path and filename noted on the ssh-keygen screen earlier. If you copied the path/name combo to the clipboard back then, you can just paste it right into the new command now. Otherwise, type it out by hand! In either case, you can see me being prompted to supply my password to connect to the remote PC and once I do that successfully, I'm told "1 key has been added". You'll note I also get dumped back to the command line on my local PC. Sometimes, you may have to type 'exit' on the remote PC to get back to the local command line, but on this occasion it's happened automatically.
Fourth: With all that palaver out of the way, from the local PC's command line, just try a simple SSH connection:
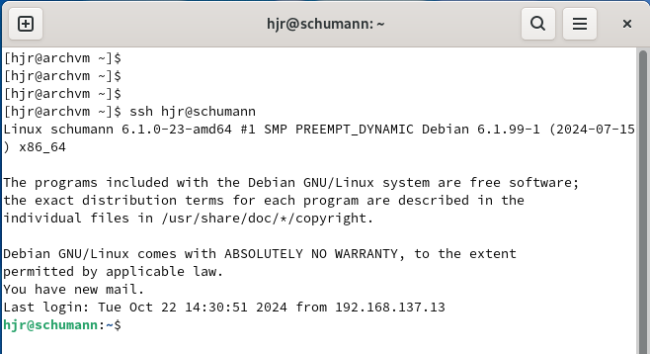
If you look closely at this screenshot, you'll see I start on a PC called 'archvm' and end up connected to the remote PC 'schumann', so the connection worked... but at no point in all the text shown here will you see me being prompted for a password! This is what password-less ssh looks like: it's a secure way of connecting to a remote PC (because you have to have access to the local PC, which is itself password protected, before you can make the connection). It's actually a safer way to connect to a remote PC that using a username/password combo, because at no point is the password being typed and passed across the network, where it could theoretically be intercepted. Anyway: it's also a much more convenient way of connecting to my music PC, because I can create scripts or shortcuts that will now be able to make that connection without me being involved in typing things interactively before it to can complete successfully.
2.2 Making a remote connection and running Giocoso
So, the basic way of running Giocoso remotely, but displaying itself locally, is to open a terminal, run an SSH connection command and then manually launch Giocoso by typing the 'giocoso' command.
Before I type anything at all, my terminal displays this:
I now type:
ssh hjr@schumann
My local terminal's prompt changes to displays this:
...indicating that this terminal session is now really running 'on' the remote PC, even though I'm looking at it on my local PC's monitor. Also note that the terminal window's title bar displays the name of the machine it's effectively running on, in case the main terminal prompt isn't visible. Commands I type here are therefore literally executed on the remote PC. It's thus trivial to type:
giocoso
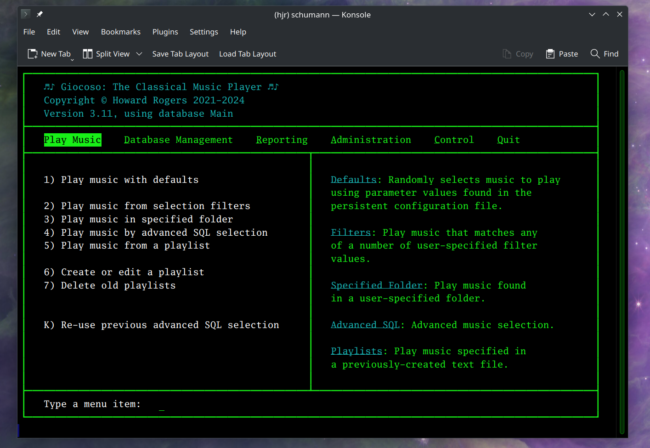
...and see this:
...which is Giocoso running on the remote PC: now the main terminal display is busy displaying Giocoso's stuff, the only way to know this is Giocoso-running-on-remote-PC is to inspect the window's title bar. That it says 'schumann' and not 'britten' tells you all you need to know.
This is what I call the 'basic mode' of running Giocoso locally, because it involves you manually launching things from within a manually-created ssh session. It's not ideal, because you have to type stuff to create the SSH connection (even passwordlessly) and then type more stuff to make anything happen on the remote PC... but it's at least functional and is a nice way to start getting familiar with how to run Giocoso on one PC whilst controlling it from another.
But we can improve things! Read on...
3.0 Automating Running Things Remotely
Basic mode running of Giocoso is fine and I've used it for years ...but it lacks a certain finesse. What I really wanted to be able to do was have Giocoso automatically launched when I connected to the remote PC via ssh. That is, if I ssh to a remote PC, I'd like the remote PC to immediately run something (in my case, Giocoso) without me having to manually tell it to do so.
In general terms, in other words, how do you make a remote PC run something (anything, really) merely by virtue of you connecting to it?
The basic way of doing that is to add some extra components to your ssh connection string. Instead of vanilla 'ssh hjr@schumann', for example, you can do things like this:
ssh hjr@schumann df -h
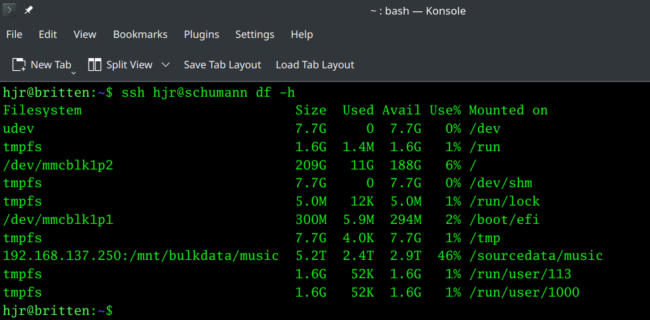
That is, you just add the remote command you want onto the basic connection string. In this case, I've chosen to add the 'disk free in human units' command, so I get this response:
Note how the command produces an output and then my terminal prompt returns and it's the prompt from my local terminal. That is, the last line displayed here says 'hjr@britten', not 'hjr@schumann'. When this sort of ssh syntax is used, the connection to the remote PC is made, the command is executed on the remote PC, and then the connection is dropped immediately and automatically.
You might think this is not quite what we'd want to happen with Giocoso: we need Giocoso to run for as long as it takes to play lots of music, not hang up the connection the moment it's launched! In fact, this isn't a problem: the remote connection is dropped only when the specified remote command completes execution... and Giocoso doesn't terminate until you explicitly tell it to 'Quit', so this immediate 'drop connection' simply won't happen for it. Unfortunately, something else will happen if I try to run Giocoso like this:
ssh hjr@schumann /usr/bin/giocoso3.sh
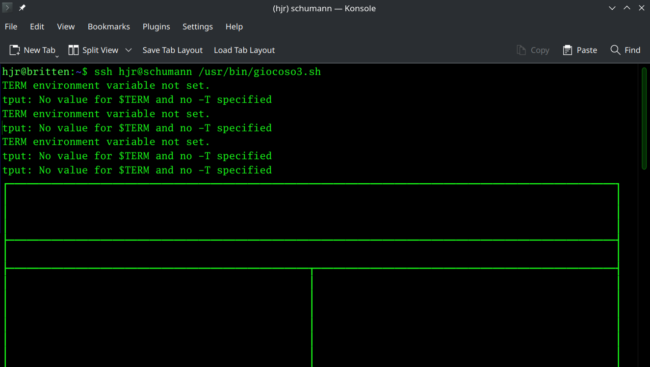
Issuing that command on my local PC, I see this response:
I'm spelling out the full path to the Giocoso executable just to be on the safe side: it's not technically necessary, but it avoids any possible ambiguity. The problem is more that the display is badly garbled and, whilst Giocoso is gamely attempting to draw its main menu, it's clearly not happy, with lots of messages about 'no value for $TERM' causing mayhem.
The issue here is that SSH sessions don't pick up a terminal type when they're first made. In the connection described above in Section 1, this isn't an issue: you log on as a user at the remote PC and pick up that user's usual TERM environment settings. When you connect in this 'immediately run a command' mode, however, the TERM is not set and thus programs that rely on knowing what sort of terminal they're running in (such as Giocoso!) will produce garbled output, much as you see above.
The fix is to adjust the basic ssh command once more:
ssh -t hjr@schumann /usr/bin/giocoso3.sh
The extra '-t' switch forces a 'pseudo-terminal allocation', meaning that the /usr/bin/giocoso3.sh program will be executed within the context of an assumed Xterm terminal type (which Giocoso will find acceptable). The result of issuing this revised command is much better:
This time, Giocoso is able to display its menus and program interface correctly -though you might notice a distinct lack of the Mgiocoso window that, in version 3.11 and above, is supposed to be auto-launched whenever Giocoso starts running. On some platforms, however, even now things won't appear quite right:
The biggest issue here is the invisibility of any text over on the left hand-side of the program display. That large white panel is supposed to contain lots of menu options, but the text is white on a white background!
We'll deal with the issue of the missing Mgiocoso and the problem of background and font colours shortly. For now, let's cheer the fact that it's possible to make the remote PC do something (even if not very well!) merely by virtue of connecting to it. It's progress.
4.0 Making A Launcher
So now we know how to connect to a remote PC and launch a program automatically... but I'm still having to launch a terminal on my local PC, then type something, and then submit it before anything happens. Wouldn't it be nicer if I could just click a program launcher on my local desktop and have all that issuing of commands done for me?!
Well, you can. What you need is a launcher or widget that is configured to run Xterm -and then we can add to that basic command extra bits that tell the Xterm to run ssh and launch Giocoso remotely. The instructions to do this vary wildly depending on what desktop environment you run. If you use Gnome, jump down to Section 5 below. What follows now is how you do it if you're (very sensibly!) running KDE.
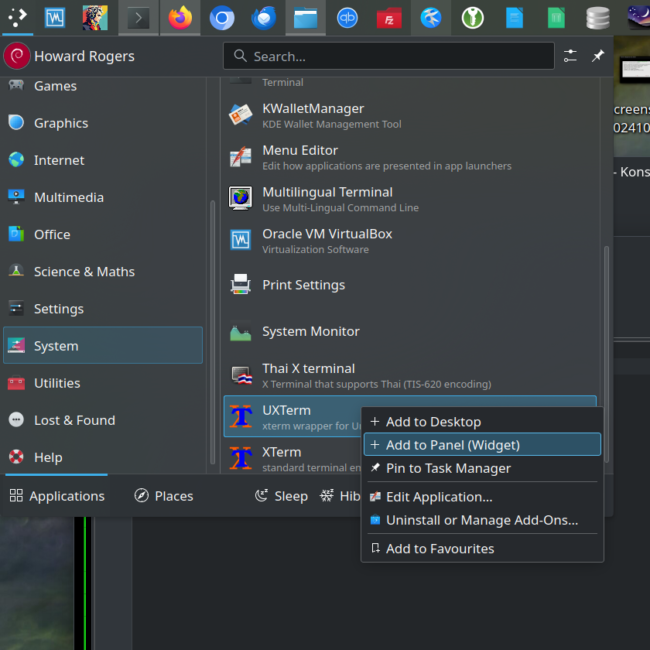
Keeping things simple, therefore: to start with you just need to find the system launcher for Xterm (or UXterm, which is a Unicode-aware variant) and pin that to your array of program launchers. You'll usually find the Xterm launcher in the System menu. Once found, just right-click it and 'add it to Panel' as a launcher widget, like so:
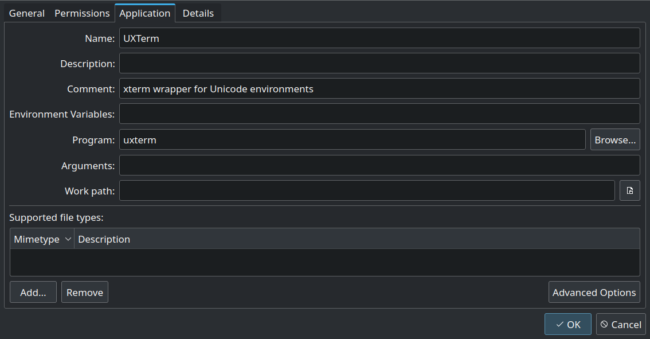
That creates a new launcher icon in my quick-launch panel. If I right-click it and select 'Properties', I can then switch to the 'Application' tab and see what this new launcher will do when clicked:
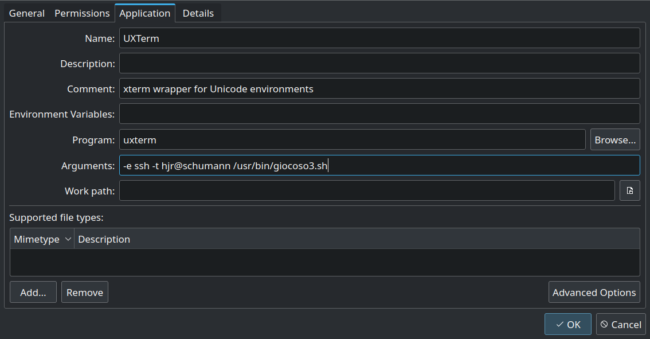
At the moment, it simply launches the 'uxterm' program. If we adjust that so that the launcher runs ssh within that new xterm, we'd end up with something like:
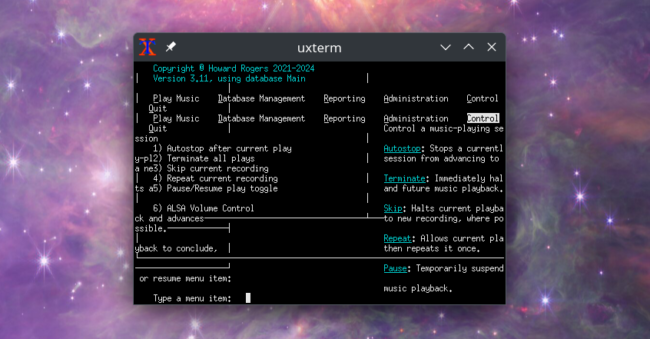
That is, the program launched is still uxterm, but it is now supplied with various 'arguments', and those arguments are to 'execute' (-e) the ssh command, with the -t switch, connection string, and instruction to launch Giocoso, as before. Save that and then click the launcher to run it... and you'll get this result:
...which is to say, the xterm that is launched is tiny and cannot display Giocoso correctly! Its choice of display font is also ghastly. Something more is thus required!
To fix these display issues, we need more arguments to supply to Xterm itself. In this case, the command begins to look pretty dreadful:
-T 'Giocoso - A Digital Music Player' -xrm 'xterm*iconHint: /home/hjr/.local/share/giocoso3/art/giocosoico.xpm' -bg black -fg green -geometry 103x28 -fa 'Luxi Mono:style=Regular' -fs 12 -ti 340 -tn xterm-256color
...which says to give the launched Xterm window a title )the -T switch) of 'Giocoso - A Digital Music Player'. It then says to use a locally-installed graphics file to give the terminal a nice icon in its title bar (instead of the default 'red X and blue T' you see in the previous screenshot): note that this implies I must have also installed Giocoso on my local PC, otherwise that particular path wouldn't exist. It says to make the background black, the foreground green, to size the window at 103x28 and to use the locally-installed Luxi Mono font in 12pt size. Notice how this syntactical mess goes about the business of ensuring that the background and foreground are set to colours that won't result in white text on a white background, as we had back at the end of Section 3 above.
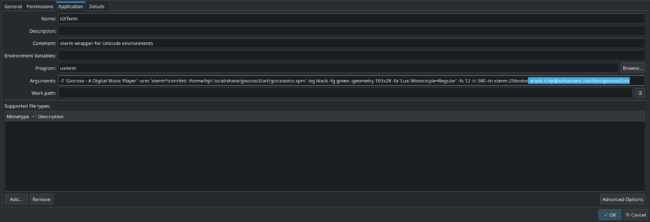
If you stick all of that before the '-e' parameter in the existing launcher arguments, you'd end up with this monstrosity:
It looks ugly, because that's the way Xterm parameters are, I'm afraid! But, I've highlighted the basic command we already know runs Giocoso remotely: you can see this new ugliness is just plonked down directly in front of it. The result when we save it and then click on the launcher is:
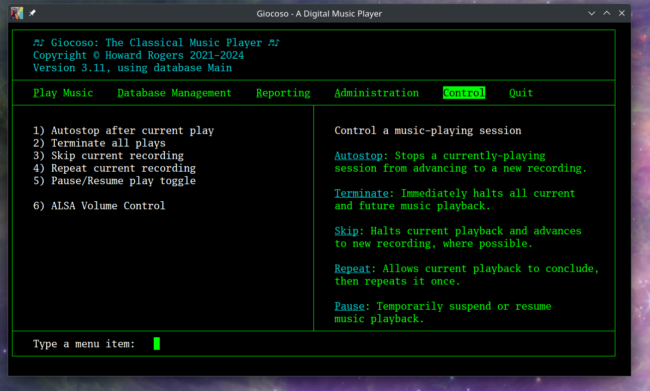
It works! The screen is properly sized, it's got a nice Giocoso logo in its top left-hand corner and it will actually play music!
There's just one problem remaining: where's the Mgiocoso Control Panel window? Why hasn't Giocoso launched that automatically, as I've configured Giocoso to do? This isn't exactly a new issue, of course: we saw the same problem back at the end of Section 3 above. Nevertheless, it's time we fixed it!
The reason this happens is that Giocoso is being launched directly within the Xterm that the new program launcher is, er... launching; but Mgiocoso is being launched within an Xterm that Giocoso itself is launching... and that second Xterm doesn't know how to display itself on my local PC's desktop. Or rather, it knows... but doesn't have permission to draw itself on my local PC's desktop. A remote program that wants to display things on my local PC's desktop has to have permissions to do that -and whilst Giocoso does, because I myself launched it, Mgiocoso doesn't, because it wasn't me doing the launching of it directly. Fortunately, there's a way around this, called trusted X forwarding: you grant one Xterm session the rights to spawn other Xterm sessions that themselves have rights to draw on my local desktop. By default, ssh connections do not enable X forwarding. If we want our remote Giocoso to be able to launch a remote Mgiocoso window, we need to explicitly enable X forwarding... and that's done by adding a '-Y' to the sea of switches in the existing Xterm's arguments, like so:
It might be hard to spot, but whereas earlier we had
-e ssh -t hjr@schumann /usr/bin/giocoso3.sh
...at the end of that long list of arguments, now we have:
-e ssh -Y -t hjr@schumann /usr/bin/giocoso3.sh
...and the extra '-Y' is the new bit adding X forwarding capability to the launcher.
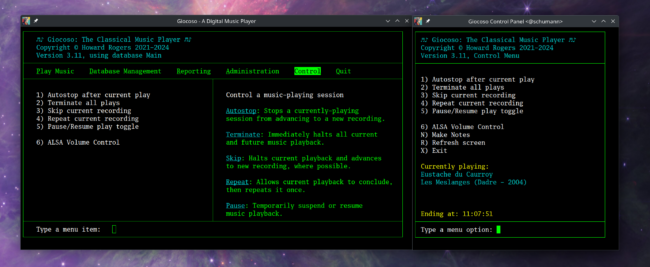
Save the modified launcher properties and then click the launcher to run it and, this time, we get this result:
...and now we have properly-sized, properly-font'ed, properly-icon'ed Giocoso and Mgiocoso windows. Success! (One word of warning: the X protocol can be quite slow: there's a lot of screen drawing instructions being passed across a network connection that might not be the fastest thing in the world. There can thus be an appreciable delay between the first Giocoso window opening and the subsidiary Mgiocoso one appearing. Give it time, therefore: it should appear eventually).
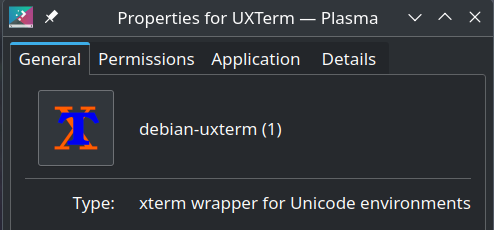
The only thing left to do is to change the launcher icon I see on my local PC's desktop. Currently, it's the default, ugly Xterm one:
That 'XT' icon, third in from the left, has to go! To do that, right-click the launcher and select 'properties'. On the 'General' tab, the launcher icon is clickable:
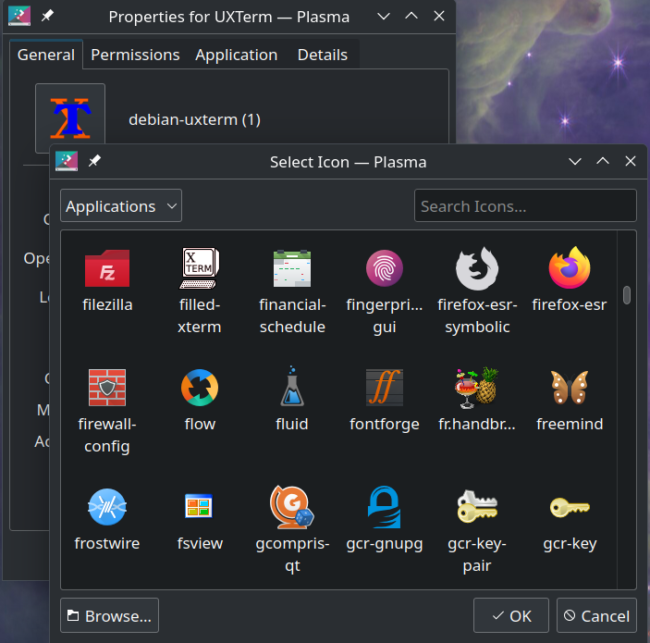
Click it and you'll see a selection of system icons to choose from:
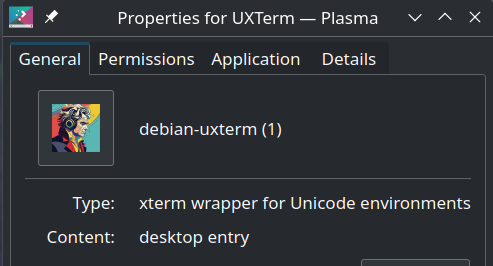
You might find an icon you like by scrolling through these system-wide icons, but you won't find Giocoso's 'official' icon amongst them. For that, you'll have to click the [Browse] button and navigate to $HOME/.local/share/giocoso3/art and select the giocosoico.svg file that's found there. (Note: this again means you'll have to have installed Giocoso locally as well as on the remote PC). Select that file and click [Open] and the launcher properties window will now look like this:
...meaning that the new icon has been applied. Click [OK] to accept the change and your program launcher should now look like this:
At which point, the third icon in from the left now looks familiar!
Finally, I now have a local, attractive program launcher that will launch Giocoso on a completely different PC and yet display its output and associated control panel on my desktop. Problem solved!
5.0 Doing it in Gnome
All the above instructions specifically relate to when you use KDE on your local Desktop. If, instead, you're using Gnome, things are rather different.
Open a terminal and type:
gnome-text-editor giocosolauncher.desktop
In the new document that this creates, type this:
[Desktop Entry]
Name=Giocoso
Exec=xterm -T 'Giocoso - A Digital Music Player' -xrm 'xterm*iconHint: /home/hjr/.local/share/giocoso3/art/giocosoico.xpm' -bg black -fg green -geometry 103x28 -fa 'Luxi Mono:style=Regular' -fs 12 -ti 340 -tn xterm-256color -e ssh -Y -t hjr@schumann /usr/bin/giocoso3.sh
Icon=/home/hjr/.local/share/giocoso3/art/giocosoico.svg
Terminal=false
Type=Application
Encoding=UTF-8
Category=Utility
Note that the 'Icon=' line again assumes that you have installed Giocoso locally, so that the correct icon for the launcher can be applied. That line also contains a reference to '/home/hjr', which is obviously my home folder: you need to substitute in your own username at that point, to get the correct path for your environment.
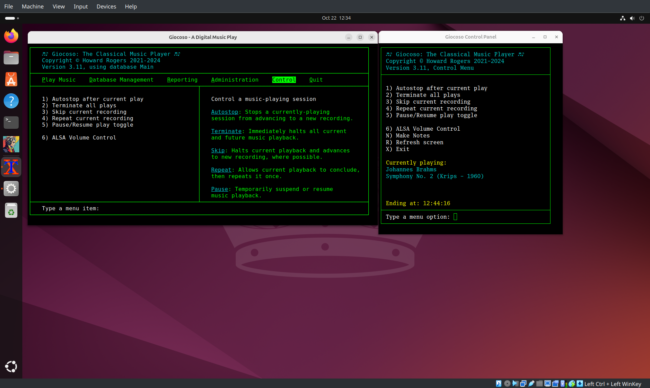
Save the document. That creates a launcher, though precisely where it creates it depends on your distro! If you're running Fedora, it creates a launcher icon in the main collection of programs, which can be right-clicked and pinned to the Dash launcher. If you're running Ubuntu, however, a launcher icon will actually appear on your literal desktop, which you'll need to right-click and select 'Allow Launching' before it can actually be used.
On Ubuntu, too, you can't pin the new desktop launcher to the Dash without doing it manually:
cp ~/Desktop/giocosolauncher.desktop ~/.local/share/applications/giocosolauncher.desktop
...and the same launcher will now appear in the 'Dash' panel to the left of the screen.
Note that I cannot get the 'iconHint' line of the launcher file (which also contains a reference to a specific user's home folder, and thus needs adjusting to match what works for you) to make any difference to the Xterm Window icons that appear in the Dash when Giocoso is actually running remotely. The result is thus something like this on Ubuntu:
I notice a different font/window size between the Giocoso and Mgiocoso windows, too: this is likely because all the instructions I've written here tell Xterm to display using the Luxi Mono font ...and that might not be installed on your local PC. If that's true for you, you can download the Luxi Mono font manually and then use your distro's standard font installation tools to install at least the luximr.ttf one manually. You can install all four TTF files if you like, but the 'r' (for 'Regular') is the one you need for all the things mentioned in this article to work.
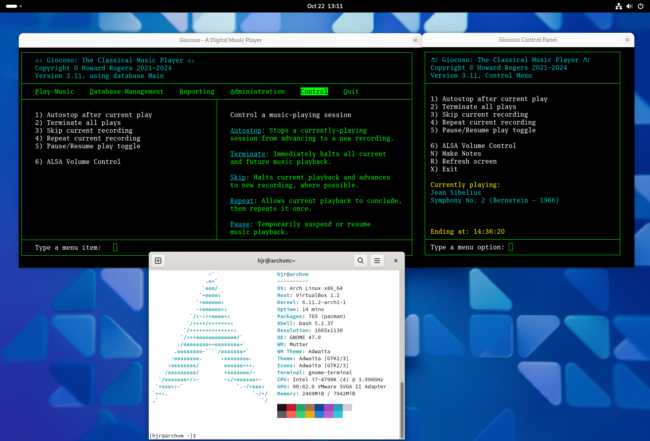
Here's a Gnome-on-Arch desktop where the Luxi font was installed by hand:
You'll note the Giocoso and Mgiocoso windows are the same height and are using the same (and correct!) font.
6.0 What About XFCE?
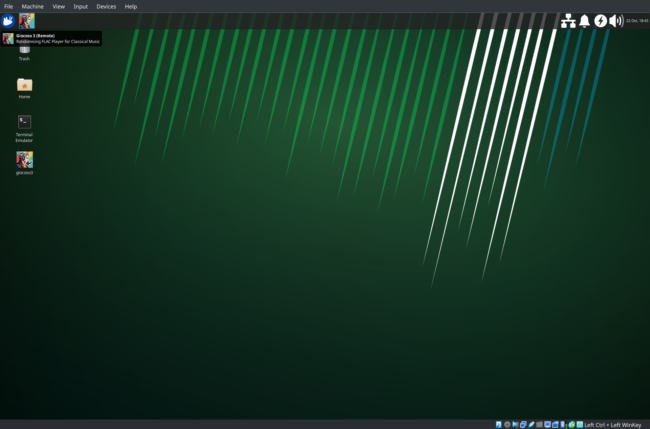
I seldom use XFCE myself, so you may have to excuse the naivete of the following instructions! I found the simplest way to create a custom launcher for XFCE was to drag the desktop launcher for locally-run Giocoso that will be sitting on your local PC's desktop up to the top panel. That creates a copy of the launcher which you can then customise. For example:
The icon on the main desktop labelled 'giocoso3' is the one created by the local install of Giocoso. I simply dragged that up to the top bar or panel and let go of the mouse. The OS responded with this question:
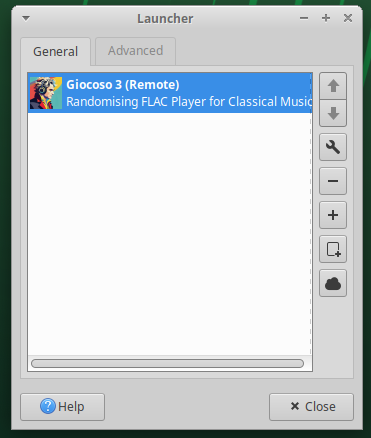
Click on the "Create Launcher" option when prompted and the (local) Giocoso launcher will be copied to the panel. Once it's there, right-click it and select the [Properties] option:
From the column of buttons on the left of this dialog, select the one resembling a spanner:
I've stretched this panel out so that the entirety of the 'Command' option can be seen in one go: hopefully, you'll recognise it from the above discussion about KDE and Gnome launchers. The command you initially see will be the one to run Giocoso locally: your job is simply to replace it with the command you see here, which launches Xterm with a nice title, a nice icon, foreground and background colours set, in an appropriate size, and then gets it to run an ssh connection to Schumann, invoking Giocoso when it gets there.
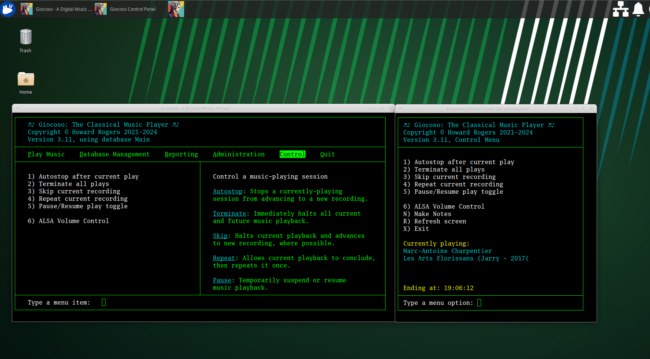
Click [Save] when the alterations to the Command field have been made. Click the panel launcher when you're ready and you should see something like this:
Once again, be patient for the appearance of the Mgiocoso subsidiary window: mine takes around 30 seconds to appear after the main Giocoso one has appeared in practically zero time -though running in a virtual machine may have something to do with that.
7.0 Window Positioning
The bare parameter "-geometry 103x28" we have used so far defines the size of the Xterm window the launcher will create. It doesn't, however, specify where the terminal window will be displayed on your screen. For that, you need to add two additional numbers to the parameter, specifying the x-axis and y-axis offsets where the window will appear. For these purposes +0 is 'top' and -0 is 'bottom'. So, if you want the window to appear in the very top-left of the screen, that's top X and top Y: you'd add "+0+0" to the basic geometry parameter: you'd thus specify "-geometry 103x28+0+0". For reference, -0-0 means 'lower right', -0+0 means 'upper right' and +0-0 means 'lower left'. The basic rule is that the first number is the 'X axis offset' and the second is the 'Y axis offset'.
If you want to position the window somewhere along the x axis and down the y, so the thing appears maybe appears about a third of the way down in both directions, you're going to have to experiment with different numbers -and the numbers will be different, depending on whether your screen supports 1080p or some other resolution. My screen has a resolution of 3840x2160, for example: if I specified -geometry 103x28-+800-600 I'd end up with my xterm window positioned about a third of the way in from the left, and the bottom of the window appearing about a quarter of the way up from the bottom of my screen: repeat those same numbers on a 1920x1080 screen, however, and the xterm will appear in the top right-hand corner, because the size of the screen interacting with the requested size of the window prevents those numbers meaning much. To achieve roughly the same positioning on this much smaller screen, you'd have to type something more like '-geometry 103x28+400-200'.
The point is, it's difficult to get xterm windows to position themselves precisely! You'll have to experiment with what suits you best: for me, the top left-hand corner is generally fine, so I stick with "+0+0'.
8.0 Correcting a termination 'feature'!
I wanted to finish things off by mentioning a curious "feature" that happens whenever I run Giocoso remotely in an xterm session: closing the window leaves the music playing! I'm talking about clicking the 'X' button in the window's title area:
If you were running Giocoso locally, in Konsole or Gnome Terminal or some equivalent terminal application, clicking that 'Close' button whilst music was playing causes all music playback to immediately stop (as you'd probably hope would be the case). When you're running Giocoso remotely, via xterm, however, then closing the window certainly shuts down Giocoso, but it leaves the music playing in the background, which gets annoying really fast! There's a technical reason for this: xterm cannot kill processes it launches via a "-e" switch, so this is very much a feature of running things remotely, not a bug (sadly)!
The fix (or more properly, the workaround) is to add one more term to the 'arguments' bit of your application launcher. Right now, you have something like this:
xterm -T 'Giocoso - A Digital Music Player' -xrm 'xterm*iconHint: /home/hjr/.local/share/giocoso3/art/giocosoico.xpm' -bg black -fg green -geometry 103x28+0+0 -fa 'Luxi Mono:style=Regular' -fs 12 -ti 340 -tn xterm-256color -e ssh -Y -t hjr@schumann /usr/bin/giocoso3.sh
Which says "launch xterm, give the window a title, give the window a nice icon, make it black background and green foreground, make it 103 columns wide, 28 lines deep, use the Luxi Mono font in size 12, make the terminal be of type 340, with the ability to display 256 colours and, finally, execute the command 'ssh -Y etc etc etc'.
Phew. To that word-salad, you must add an extra term, which I've coloured in blue below:
xterm -T 'Giocoso - A Digital Music Player' -xrm 'xterm*iconHint: /home/hjr/.local/share/giocoso3/art/giocosoico.xpm' -bg black -fg green -geometry 103x28+0+0 -fa 'Luxi Mono:style=Regular' -fs 12 -ti 340 -tn xterm-256color -e 'trap "" HUP; ssh -Y -t hjr@schumann /usr/bin/giocoso3.sh'
There's a bit of extra 'trap' command going on there, and everything after the "-e" bit has been wrapped in single quotes. What does this new code achieve? Well, bluntly, it means clicking the 'X' button now doesn't do anything! By disabling the close button, you are now forced to close Giocoso in a 'clean' manner: that means using the Mgiocoso 'Terminate' option, which then gets you the ability to Ctrl+C within the main Giocoso window, or take the 'Quit' option in the Giocoso main menu: either of those techniques will correctly close the program and, of course, music playback will have been stopped by virtue of you using Giocoso's (or Mgiocoso's) own control options to stop the music beforehand.
It's not particularly cool that you have to finagle things this way: I'd much prefer closing an Xterm window correctly quit Giocoso and all its associated processes in one hit -but you can't, so denying you the use of the button that causes the problem in the first place is the best I can offer.
9.0 Conclusion
To sum up, then: you'll need to install Giocoso on both the local PC and the remote one. You'll also need the Luxi Mono font to be installed on both PCs (unless you prefer to use a different font entirely). You'll additionally need to make sure you can connect with ssh to the remote PC in a password-less manner. With those basic requirements out of the way, you can create launchers on your local PC that launch xterm (or uxterm) and tell it to use certain fonts, icons and colours when it's running. You also tell xterm to ssh to the remote PC and there launch Giocoso. If X Forwarding has been enabled, too, you'll see the remote PC both launching Giocoso and Mgiocoso automatically, drawing the data from both programs on your local PC's desktop.
The commands get ugly really quickly, but for a little bit of typing horrors once, you get quite an effective way of being able to manage a dedicated music PC from the comfort of your desktop!
Good luck 🙂
