1.0 Introduction
My computer does a lot of work for me when I am fast asleep. It copies its music files to various servers, so that I have multiple backups of them should disaster (or a fat fingered bit of typing) strike. It periodically checks my music files, to make sure they aren't suffering from bit-rot or other forms of internal corruption. Periodically, too, it uploads certain files to the Internet, so I can access them on my phone or elsewhere.
All these tasks are, of course, scheduled in a crontab. So, for example:

The trouble with crontab, however, is that if scheduled jobs are run successfully, how do you know? Conversely, if they fail when run for some reason or other, how do you know that there's a problem?
The answer is: get cron to email you the results of its work. Which, of course, invites the question: how do you go about doing that?
Well, I'm glad you asked! In this short article, I'll show you what I did to get my laptop to email me every time one of its crontab jobs is executed.
2.0 Disabling existing mail handling agents
For cron to be able to email you something, there first needs to be an email handling agent on your PC or laptop. Quite a lot of Linux distros ship with mail handling agents already installed -such as Sendmail or Postfix. These are waaaay too complicated to use for such a simple task as I'm attempting to implement here, though, so the first thing we need to do is make sure that, if either of those two programs are already present on your system, they are not used to handle email!
At a command prompt, type these commands:
sudo systemctl stop postfix
sudo systemctl stop sendmail
If those commands result in an error, such as 'Unit sendmail.service not loaded', then you're fine: that piece of software isn't present on your system and you don't need to do anything further. If there is no such error, though, then one or other of these software packages were running on your system -and although you've just stopped them from running for the present, you further need to make sure they don't run again in the future. You do that by issuing these commands:
sudo systemctl disable postfix
sudo systemctl disable sendmail
For the record, on a fresh Kubuntu 20.04 installation, neither of these packages was already present and I therefore didn't actually need to stop or disable them -but your mileage on other distros may vary!
3.0 Installing and configuring SSMTP
Instead of complex Postfix and Sendmail, we're going to use the Simple Simple Mail Transfer Protocol program -otherwise and hereafter called SSMTP. That is seldom present on a Linux distro by default, so you'll probably have to install it. You can do it from the command prompt like so:
sudo apt-get install ssmtp
That's an Ubuntu-style installation command. Use whatever equivalent applies on your distro of choice. On Manjaro, for example, and similar Arch-based distros, you'll have to install it from the Arch User Repository (AUR), so that involves issuing a command such as pamac build ssmtp.
Once it's installed, SSMTP will need to be configured. This involves editing some text files as the root user. So, to start with:
sudo -i
nano /etc/ssmtp/ssmtp.conf
There will be some pre-existing content in this file, but I'd suggest you simply clear it all out (which, in nano, is most easily done by pressing Ctrl+K repeatedly until the file is blank). Once the file is empty, you now type in the following 11 lines of configuration:
[email protected]
mailhub=smtp.gmail.com:587
rewriteDomain=gmail.com
hostname=bloch.dizwell.home
FromLineOverride=Yes
TLS_CA_FILE=/etc/ssl/certs/ca-certificates.crt
UseTLS=Yes
UseSTARTTLS=Yes
[email protected]
AuthPass=$passW0rd$
AuthMethod=LOGIN
This configuration is appropriate for getting your PC to send an email to Google's gmail (which you'll then configure in due course to forward on to your actual email account, assuming they are different). In the above, wherever I've typed [email protected], you type your actual Gmail email address. Your hostname setting will also need to match what your PC or laptop actually uses as a hostname: bloch.dizwell.home is just the name of my personal laptop and therefore won't (I assume!) apply to you.
The last three entries are most important: it's where you repeat what your genuine Gmail account username is and what it's actual password is (please tell me you don't really use passwords like the $passW0rd$ example shown here! That would be broken into in a heartbeat if it was real!)
Once all those lines have been put into the file, save it.
3.1 Certificate Generation
There was one line in that configuration file which was telling a lie! The one starting TLS_CA_FILE= says where a security certificate can be found, and I said it could be found at "/etc/ssl/certs/ca-certificates.crt". The lie was that the file doesn't actually exist yet... but now is the time where you create it, so that the line finally tells the truth. At a command prompt, you type:
sudo -i
cd
openssl req -x509 -newkey rsa:2048 -keyout key.pem -out /etc/ssl/certs/ca-certificates.crt
In other words, as root, you use the openssl program to create a key of the right name and in the right directory to match what you'd previously told SSMTP would be the case. When you issue this command, you'll be prompted for a 'PEM pass phrase': just leave it blank. This will produce a series of error messages, but they can be ignored.
3.2 Set some Aliases
Finally, you need to edit one more SSMTP configuration file, so that email appears to be sent from appropriate user accounts. At a command prompt, type:
sudo -i
nano /etc/ssmtp/revaliases
There will be some comments already present at the top of the file: you can just leave those alone. Scroll to the end of the file and type in two lines as follows:
root:[email protected]:smtp.gmail.com:587
hjr:[email protected]:smtp.gmail.com:587
What these two lines do is say 'if a cron job is running under the root account, then make its emails look as if they're coming from [email protected]'; and 'if a cron job is running under the hjr account, then do likewise'.
I only need two lines because I genuinely do have separate crontabs for my personal account and for the root account. If you only ever had a crontab for the root account, for example, then you'd never need a second line for a 'user' account like my 'hjr' one here. I hope it's obvious, too, that if you do need to set up an alias for a non-root account, you should use your own personal account name, not "hjr"!
One final point: if you actually have your own, private email account (say it's called "[email protected]"),and you only use Gmail as a forwarding mail agent, then rather than use the gmail account name at this point, you could instead use '[email protected]' in this alias file. This means your computer will send a mail to Gmail appearing to come from '[email protected]'. When it forwards it to your 'real' email account, that will be the 'from' address the email will appear to come from. You won't ever know that it went via gmail.
4.0 Configuring Gmail
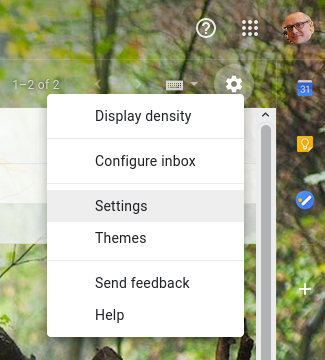
Things are almost ready to work... but Gmail will not like to be used as a mere mail relay without a little bit of configuration on your part. The main requirement for this sort of thing is to ensure that you lower Gmail's security levels to allow 'access from less secure apps'. You do that by logging on to your gmail account and clicking on the cog-wheel at the top-right of your email, and selecting Settings:
From the screen that is then displayed, select Accounts and Import. On that page, click the Other Google Account Settings option, three down from the top. On the page that is then displayed, click the Security item on the left, and scroll down the right-side of the page until you see this:
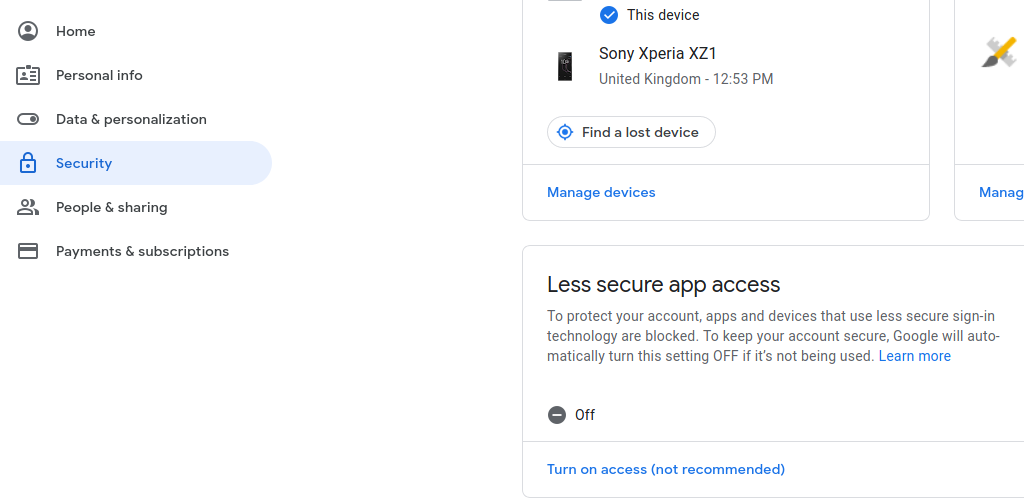
As you can see, there's a section about 'less secure app access', and it will probably be off by default. It will need to be turned on -by clicking that Turn on access (not recommended) link in blue:

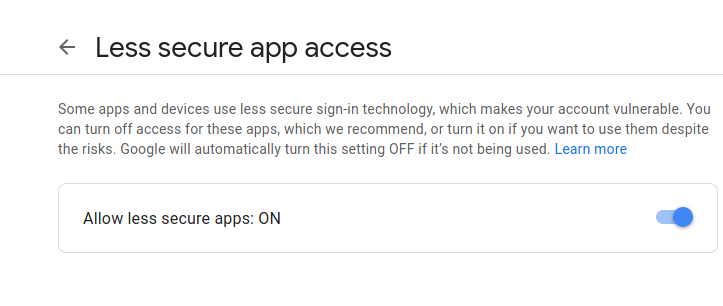
You will finally need to click on that slider control to actually turn on less secure access.
You will get an alarming-sounding 'Critical Security' email alert from Google at this point: it really doesn't like letting people use simple login technology to access their accounts -for, hopefully, very good and obvious reasons. But without this reduction in security, SSMTP won't be able to log in to your Gmail account and won't therefore be able to send email via it. For this reason, I would strongly suggest creating a new, separate Gmail account that you use only to forward mail from Cron. That way, your "real" Gmail account won't be using diluted security, but your 'cron Gmail account' will be. SSMTP will therefore work, but all those emails your bank sends you containing sensitive information won't be less secure than before.
If you actually use Gmail as your main email tool, then you don't need to do anything else. But I don't: I read my email from a completely different account that uses a domain I own. So although I've configured SSMTP to send mail to Gmail, I won't ever get to read it unless I also configure Gmail to forward email to another account:
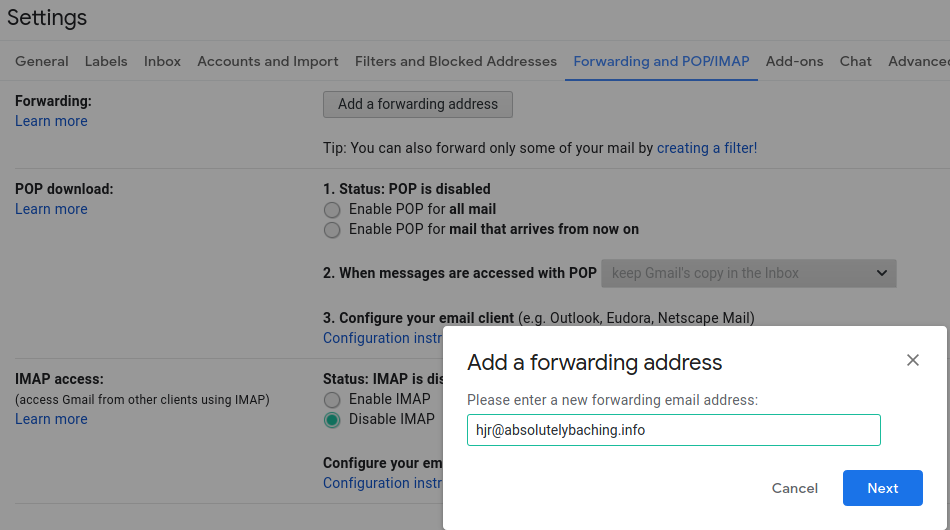
Back in the original Gmail settings page, there's a link to Forwarding and POP/IMAP. Click on that and you can then click on the Add a forwarding address button. As you can see above, clicking that brings up a simple dialogue where you type the email address you actually want your cron alerts to be sent to. In this case, therefore, my laptop is going to send email to Gmail, and Gmail is then going to forward that to an [email protected] email account. My main PC's email client (which happens to be Thunderbird) is already configured to retrieve email from that account, so no further configuration on my part is required.
As I say, if the Gmail account cron is sending to happens to be one you regularly access for 'ordinary' email too, then this extra forwarding configuration is not required.
5.0 Testing Things
So all the pieces are now in place. Your PC or laptop knows to use SSMTP as its mail transport agent. It has been configured so that it knows how to find Gmail's SMTP servers and how to log on to them. You've made sure that Gmail itself will be happy to have a 'less secure app' access it in this way. Potentially, too, you've arranged for Gmail to forward anything it gets from cron to your 'real' email address.
All that now remains is to test that your PC or laptop really can send email via Gmail. To do that, open a command prompt once more and type:
echo -e "Subject: My first email\n\nThis is a test message" | sendmail [email protected]
Again, replace that last '[email protected]' with your actual email address!
What you should see is a bit of a pause on the sending laptop, after which control will simply return to the next line in the command prompt window. Nothing terribly obvious will have occurred. But if you check your email at this point, you should soon see this:

So here you see me receiving an email with the subject 'My first email' and the body text 'This is a test message' -clearly, those things can only have come from the command I showed you previously. At this point you know that your PC or Laptop can send you email via Gmail. There's only one thing remaining to do: configure Cron to send you emails.
6.0 Configuring Cron
Cron can be configured to send emails every time a cron job is completed by the simple expedient of sticking the line:
...right at the top of the file, as the first line of it. You will, of course, need to put it in as the first line in any crontab you want to be alerted about -so if root runs cron jobs as well as you, you'd need to put it in as the first line of two, entirely separate crontabs.
After that, you just save the modified crontab and ...wait for a cronjob to happen!
Note that you can get more selective about mail-outs than this. By sticking a MAILTO parameter at the top of the file, you're telling cron to send emails for every subsequent job that gets scheduled. But you can have different mailto parameters for different jobs. So, you could do something like
[email protected]
0 20 * * * /usr/bin/grep
[email protected]
0 21 * * * /usr/bin/ls -ltr
...and that would mean the results of the grep job got sent to one email, whilst the ls job got sent to the other. For jobs you didn't want to be notified about, therefore, it's easy enough to see that you could set MAILTO to a non-functional email address... or even to nothing at all:
[email protected]
0 20 * * * /usr/bin/grep
MAILTO=
0 21 * * * /usr/bin/ls -ltr
...and now the ls job won't send anything to anywhere. Be warned, however, that the last MAILTO is the one that applies to all subsequent jobs, unless a new MAILTO is specified. So
[email protected]
0 20 * * * /usr/bin/grep
MAILTO=
0 21 * * * /usr/bin/ls -ltr
0 22 * * * /usr/bin/ps -ef | grep smon
...would mean that the new ps job doesn't email a report out either, since the last MAILTO before it is specified is the blank one.
An alternative way of stopping jobs sending emails, without 'unsetting' the MAILTO parameter is to turn off a job's ability to output anything: cron only emails about jobs that would usually output something. So if you turn a job into something that produces no output, then no email will be sent for that job, regardless of whether MAILTO is set or not. For example:
[email protected]
0 20 * * * /usr/bin/grep
0 21 * * * /usr/bin/ls -ltr >/dev/null 2>&1
By directing the output of the ls job to /dev/null, and by directing any errors to the same place with the '2>&1' bit of syntax, you've now ensured that the ls command can't produce any actual output. So even though the top MAILTO command applies to the ls job, the ls job will never trigger the sending of an email.
The short summary of this is that careful ordering of jobs within a crontab, and judicious use of MAILTO, can make email management more effective than it might otherwise be; but as a last resort, you can simply switch off email sending by some jobs but not others, if you need to, by using the redirect to /dev/null.
Be warned that some cronjobs could output huge amounts of verbose feedback -these would all get emailed to you, too. For example, my crontab had this entry:
0 20 * * FRI /usr/bin/rsync -avh --delete --no-o --no-g /music/ [email protected]:/bulkdata/Music
It's an instruction to copy my entire local /music directory to an equivalent directory on a server called 'vivaldi'. Unfortunately, my music collection consists of over 60,000 separate audio files... so that is potentially a lot of work for rsync to do in the first place. But it would result in an even bigger email, with every single file mentioned in it! I didn't realise this the first time it fired off, so I wasn't expecting the 10MB+ email that finally turned up in my inbox 🙂
The fix is to make sure you control the verbosity of the programs you run in your crontab. In my case, all I had to do was this:
0 20 * * FRI /usr/bin/rsync -avh --stats --delete --no-o --no-g /music/ [email protected]:/bulkdata/Music
The "--stats" parameter means that rsync only generally outputs a few summary statistics about all that it copied, not a file-by-file detailed output. The emails got a lot smaller after I added that one little parameter to the original command!
7.0 Conclusion
It's important that you know which of your scheduled jobs run and their success or failure in doing what you've asked them to do. You can always log their work in local files on the PC or laptop's hard drive, of course -but if you're using multiple computers and servers and laptops, then that's a lot of logging on, navigating to the right folder and reading the right log file! It's much more convenient to have the results come to you, via email -and by installing SSMTP, a little bit of configuring, and an appropriate setting of Gmail's security settings, it's not hard to make that happen.
Of course, I now have about 30 emails to read on my phone whenever I wake up! But that's still an improvement on having to access each log manually, one by one, on each computer (some of which are not readily accessible anyway!)