 1.0 What is CCDT?
If you've ripped an Audio CD using the Classical CD Ripper (CCDR), then you already possess FLAC files on your hard disk that have been tagged with metadata describing the Composer, the name of the composition involved and its genre: those 'core' tags are part of CCDR's fundamental functionality.
But CCDR won't have been able to write meaningful metadata into the track name, performer(s) and Album Art tags: so, all your ripped music will be called things like “track01.flac” without a lot to distinguish it from the “track01.flac” that was ripped earlier for the other Symphony or Concerto on that CD of yours.
CCDT therefore steps into the picture in order to be able to complete the set of tag metadata that completely describes a piece of classical music.
I should say, too, that you can use CCDT independently of CCDR: you may have bought some FLAC downloads from a reputable site and despaired at the metadata tags that come pre-applied to the purchased music. If so, CCDT lets you correct that sort of thing, no matter that CCDR was not involved in the original creation of the files at all.
2.0 What does CCDT do?
CCDT runs entirely as a command-line tool, from a terminal session window. It will prompt you to supply Track titles, Performers and Album Art metadata. You can supply just one of those three things; any choice of two of them; or all three in one sitting, as you prefer.
Whatever you type in, it writes as Vorbis Comments -the correct form of tag for a FLAC file (we don't believe in ripping classical music to MP3 files, which need ID3 tags to store their metadata).
It won't fetch any data from the Internet (since it's always wrong as far as classical music is concerned). What you type in, typos and all, is what gets stored in the relevant tags.
3.0 Obtaining CCDT
Installing CCDT is a simple process of issuing the following commands:
wget https://absolutelybaching.com/abc_installer
bash abc_installer --ccdt
The first command downloads a generic installer script. The second command is an instruction to run that installer script, specifying (with a double-hyphen parameter) that it's CCDT you want to install. You will be prompted at one point for your sudo password, without which the installer cannot install the software in the /usr/bin folder correctly.
Once you’ve ‘installed’ CCDT in this way, you can run the Classical CD Tagger by simply typing the command:
ccdt
However, you can only run CCDT in this way after you have navigated at the command prompt to a folder that contains FLAC files, otherwise, there's nothing for it to do and it will quit immediately with a large warning message in bright red text!
The program will also check two other things: 1) are any FLAC files present in the directory actually writeable. If not, it will throw another bright-red warning and quit. By definition a piece of tagging software needs to write tags to audio files! and 2) if will check that a few pieces of prerequisite software are present and throw an error and quit if not. Part of the error message displayed will be a command you can issue on most platforms to install the missing software:

That's the script working on Ubuntu: it knows that a 'sudo apt install' is the correct way to install software on that distro. On other distros, it will do its best to give you the correct installation information. A particular quirk arises on Fedora, however:
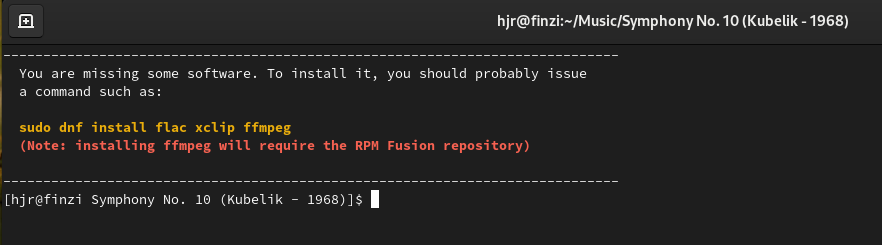
The ffmpeg package is not included in any of Fedora's standard repositories for fear of patent infringement, so in order to be able to install it, you need to first enable the RPM Fusion software repository, which can be done by issuing these two commands:
sudo dnf install https://download1.rpmfusion.org/free/fedora/rpmfusion-free-release-$(rpm -E %fedora).noarch.rpm
sudo dnf install https://download1.rpmfusion.org/nonfree/fedora/rpmfusion-nonfree-release-$(rpm -E %fedora).noarch.rpm
Once those repositories are enabled, the software installation command shown in yellow/orange in the above screenshot will work without problem. Fortunately, Fedora is the only distro I am familiar with on a daily basis that this applies to.
Once you're in a directory containing writeable FLACs and all software prerequisites have been determined to be present, launching CCDT (by typing ccdt, remember!), will result in this sort of numbered main menu display:
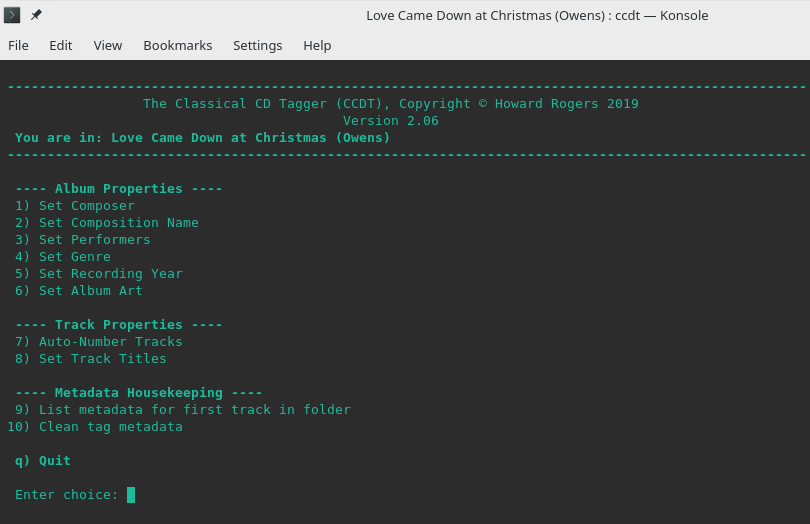
You use CCDT by taking each of the numbered options in turn. You don't have to take all options if they're not necessary, but you should try to take any options you do want to use in ascending numeric order. For example, you may already have COMPOSER, ALBUM and GENRE tags set by your ripping software, so you now only need to set Performer, Recording Year and Album Art: in that case, take options 3, 5 and 6 in that order.
Each option you take will prompt you to supply some information; once you supply it, it will immediately apply it to all FLAC files found in the folder you launched the program from. Once it has completed writing to the files, it will return you automatically to the main menu, from where you can take further options (or re-take the same option(s) you've already taken if you've made any mistakes first time round).
It is important that when you have tagged up all tracks correctly, you should quit CCDT cleanly, by taking the 'q' option from the main menu. The 'q' option applies a final clean and tag consistency check to your FLAC files, so without a clean exit, these final processes don't occur.
CCDT will remember answers from one run to the next. If you run it once, say the performers were "X and Y", then 'X and Y' will be remembered as the performers and suggested as the performers the next time you run CCDT. If the performers of your second album are different from the first, then you just ignore the suggestion and type in the correct performer names afresh. If the suggestion is correct, however, then you just press [Enter] to accept the suggestion. Remembering previous runs in this way, and being able to re-use them in subsequent runs, makes the application of similar data across multiple 'virtual albums' very easy. When you have 1 CD containing 3 symphonies all performed by the same conductor and orchestra, for example, the first symphony will require quite a bit of fresh typing -but the 2nd and 3rd will need hardly any typing at all.
4.0 Worked Examples
For a complete set of worked examples using CCDT to tag a variety of CDs in different configurations, see this page and read each of the ‘For Linux Users’ articles in turn.
5.0 Later Enhancements
In Version 3.05, CCDT acquired the ability to invoke the Composition-At-Once (CAO) utility (assuming you've installed it), via an Option 11 menu item that only appears once you've previously taken all options 1 to 8. CAO cannot successfully combine per-track FLACs into a per-composition FLAC until all required metadata is present in the individual tracks -that's why the option to invoke CAO only appears once all the metadata tagging options have been taken.
In Version 3.10, this sort of extra functionality was taken a couple of steps further. First, CCDT now detects whether the environment parameters CCDT_AUTOMAXV and/or CCDT_AUTOCAO have been set (to a value of '1' in each case). If either of them is, and assuming that CAO and/or The Absolutely Baching Volume Maximiser (MAXV) have been installed separately, then merely by quitting CCDT itself (i.e., taking the 'q' option from the main menu) the relevant utilities are invoked.
Since CAO can be invoked by quitting in version 3.10 and above, the old Option 11 from the main menu trick to invoke it manually is no longer needed, and that menu option accordingly disappears.
Instead, if you want to invoke CAO now, you simply set CCDT_AUTOCAO=1 in your .bashrc or .bash_profile and, provided you've at least supplied a Composition Name (option 2), and so long as at least 2 tracks exist, CAO will be auto-invoked for you. If you don't want CAO invoked automatically, simply don't set CCDT_AUTOCAO at all, or set it explicitly to 0 in your .bashrc or equivalent environmental configuration file. You can obviously invoke CAO yourself, manually, outside of CCDT if you prefer to do it that way, too.
There never was a menu option to invoke MAXV, so setting CCDT_AUTOMAXV=1 in your .bashrc (or equivalent) is entirely new functionality in version 3.10. If that parameter is set to 1 before CCDT is invoked, then when you take the 'q' menu item, MAXV automatically runs ...and if it detects a volume boost is possible, it asks if you want to apply it. You can decline that offer, if you prefer, in which case MAXV quits without having done anything. If you accept the volume boost, it's applied and then the original files are automatically deleted, leaving only the volume-boosted files behind. If you don't like this approach, you can of course set CCDT_AUTOMAX=0 (or not set it at all) and then invoke MAXV separately from CCDT if you want to keep things under firm manual control.
A small, but somewhat related, feature was added to Version 3.12: the bit-depth and sample-rate of a FLAC can now be appended to the physical file name by CCDT automatically, provided the 'q'uit option is taken, and provided that CCDT was first invoked with the new --namebits run-time switch. For example, if you are using CCDT to tag up a FLAC ripped from an ordinary CD, you'd run CCDT with this command from within the folder containing that FLAC:
ccdt --namebits
...and when you take the 'q' option, you might see the resulting file get named:
01 - Overture in C-16-41000.flac
The '16' in the file name tells you the file contains audio encoded with 16 bits per sample. The '44100' tells you that there are 44,100 audio samples taken every second. Those two numbers thus identify this as 'ordinary CD quality audio'.
Run CCDT the same way in a variety of different folders, however, and you might end up with file names such as:
01 - Allegro molto-24-88200.flac
01 - Allegro con brio-24-192000.flac
01 - Lento-16-48000.flac
...and so on. All three examples have sample rates above 'standard CD audio'. The first two files were probably ripped from an SACD; the third might have come from an ordinary CD using slightly above-normal sampling rates. Similarly, the first two files use 24 bits per sample, which again mark these as 'hi-res' audio files, probably sourced from an SACD rip.
If you prefer not to tinker with physical file names this way, simply leave off the '--namebits' flag when running CCDT and the program's behaviour will be as it always was: file names constructed solely from the TRACK NUMBER and TITLE metadata tags. But if you start mixing your audio sources, and maybe indulge in some high resolution audio purchases, then maybe the ability to spot 'hires' from 'ordinary' audio files merely from their file names will be of some use.
Finally, in Version 3.14, I added the ability to invoke CCDT with the --namereplace option. This is explained at some length here. The short version is that the 'namereplace' flag tells CCDT that you automatically want to replace any existing track names that may already be embedded in the existing FLAC metadata, so you won't be prompted to do so on a track-by-track basis. It is, however, also an indication that you want to see the current TITLE metadata displayed per track. That way, you can potentially see and copy good bits of existing metadata whilst creating new and better versions of it!
Taking all these enhancements into account, I add these lines to the end of my own .bashrc:
export CCDT_AUTOCAO=1
export CCDT_AUTOMAXV=1
alias ccdt='ccdt --namebits --namereplace'
With these settings, I have automatic CAO and MAXV enabled, and when I run the command 'ccdt' on its own, I'm actually invoking CCDT with the namebits and namereplace options, so I get automatic bit-depth information in my final file names, and CCDT automatically assumes I will want to replace existing trackname metadata, but will display the existing metadata to me anyway.
6.0 Housekeeping and Legal Stuff
Author
CCDT was devised and written by Howard Rogers ([email protected]).
License
CCDT is copyright © Howard Rogers 2019-2022, but is made available freely under the GPL v2.0 only. That license may be downloaded here.
Bugs Tracking, Feature Requests, Comments
There is no formal mechanism for reporting and tracking bugs, feature requests or general comments. But you are very welcome to email your comments to [email protected].