1.0 Convert between Audio Formats
Semplice's Audio Processing menu, Option 2 allows you to convert from nine input formats to six possible output formats, three of which are lossless and three of which are lossy. A common use for this functionality is to non-destructively convert a bunch of FLACs into a much smaller bunch of MP3s for use on an SD card to be played in the car on a long journey, for example. Another use I have for this capability is to convert the ISOs that are produced by ripping an SACD into a bunch of FLACs that I can actually listen to with the Giocoso music player.
2.0 Configuration Options
The three lossy output formats are provided to allow you to generate music files which are much smaller than FLACs would be, but still have acceptable audio quality (or, at least, acceptable for noisy environments, such as cars, trains and planes!) All lossy codecs can be configured to be aggressive or conservative about their lossiness, however. That is, you can generally switch on something that makes them favour smaller file sizes over audio quality, or vice versa. Semplice is configured by default to output at "average" audio quality, regardless of which lossy output codec is selected, that is about the middle ground in the fight between file size and audio fidelity: this is controlled by the configuration parameter (see the Miscellaneous menu, Option 1) Lossy codec quality setting (1-9):
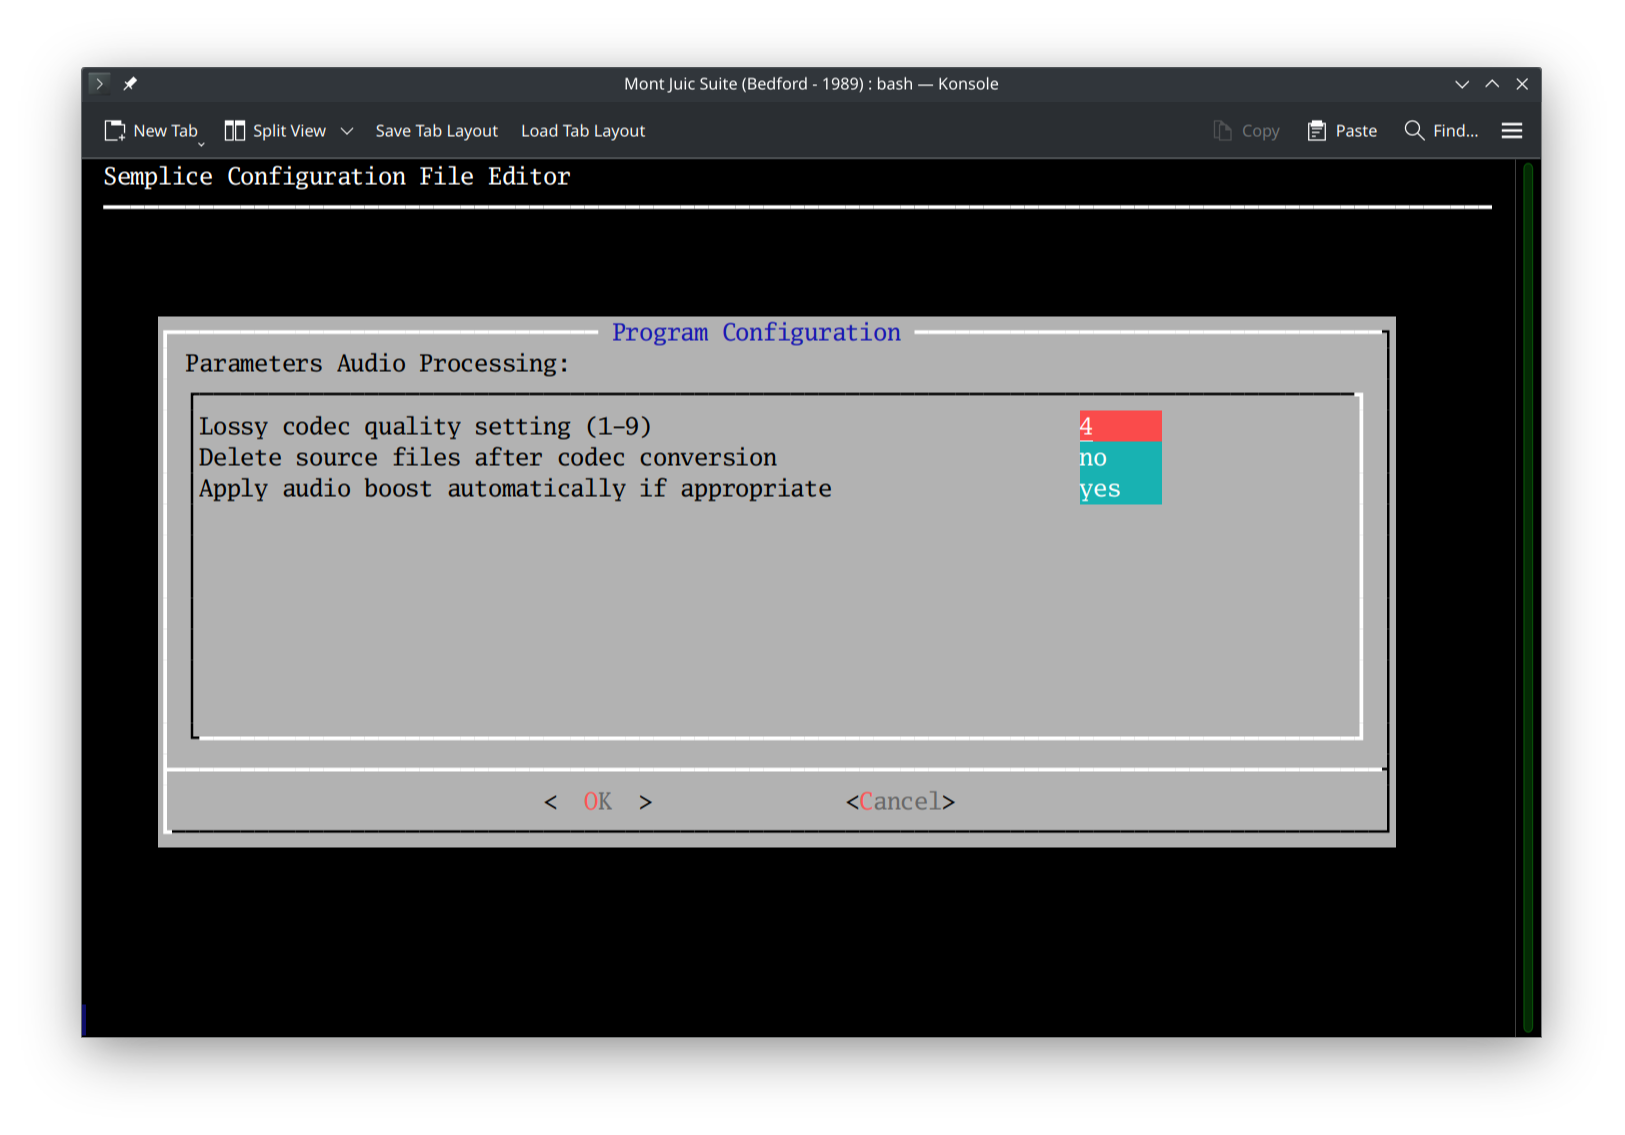 The default value of '4' shown here is about the mid-way point of a 1 to 9 quality scale. Be warned, however, that the quality scale works differently for MP3s than it does for OGGs or WMAs. In the world of MP3, for example, a quality setting of 9 will result in dreadful audio, but tiny files; whereas a quality setting of 1 will result in near-CD quality audio, but much larger file sizes. On the other hand, the rules are entirely reversed for OGGs and WMAs: for them, a quality of 9 will sound great, and 1 will sound horrible. This weird reversal of 'quality scale' is why Semplice defaults to a setting of 4, which is about in the middle of all lossy codec's quality settings and so applies more-or-less equally to them all. Start altering the quality one way of another, however, and you need to be aware in which direction you're shifting it and what results it will have on your favourite codec outputs!
You will note from the above screenshot, too, that a second configuration parameter affects the way Semplice converts audio: should it Delete the source files after conversion or not? The default answer here is "no": it means that, once the audio conversion process has finished, both the original files and their converted equivalents will be present on disk, for you to sort out manually at your leisure. If you set this parameter to 'yes', however, then the source files are automatically deleted after conversion, leaving only the newly-converted outputs. Note, though, that if this parameter is set to 'yes', converting ISOs to anything at all does not result in the deletion of the ISO: ISOs are entire SACD images, so deleting them is a big event... and so big, that sorting them out is always left for you to do yourself!
3.0 Converting Audio
The audio conversion process only works on a folder full of audio files of one sort or another: as usual, either launch Semplice from within such a folder, or tap the W key after launching the program to select a working folder that contains such files. Tapping the Audio Processing menu, Option 2 then brings up a variant of the following screen:
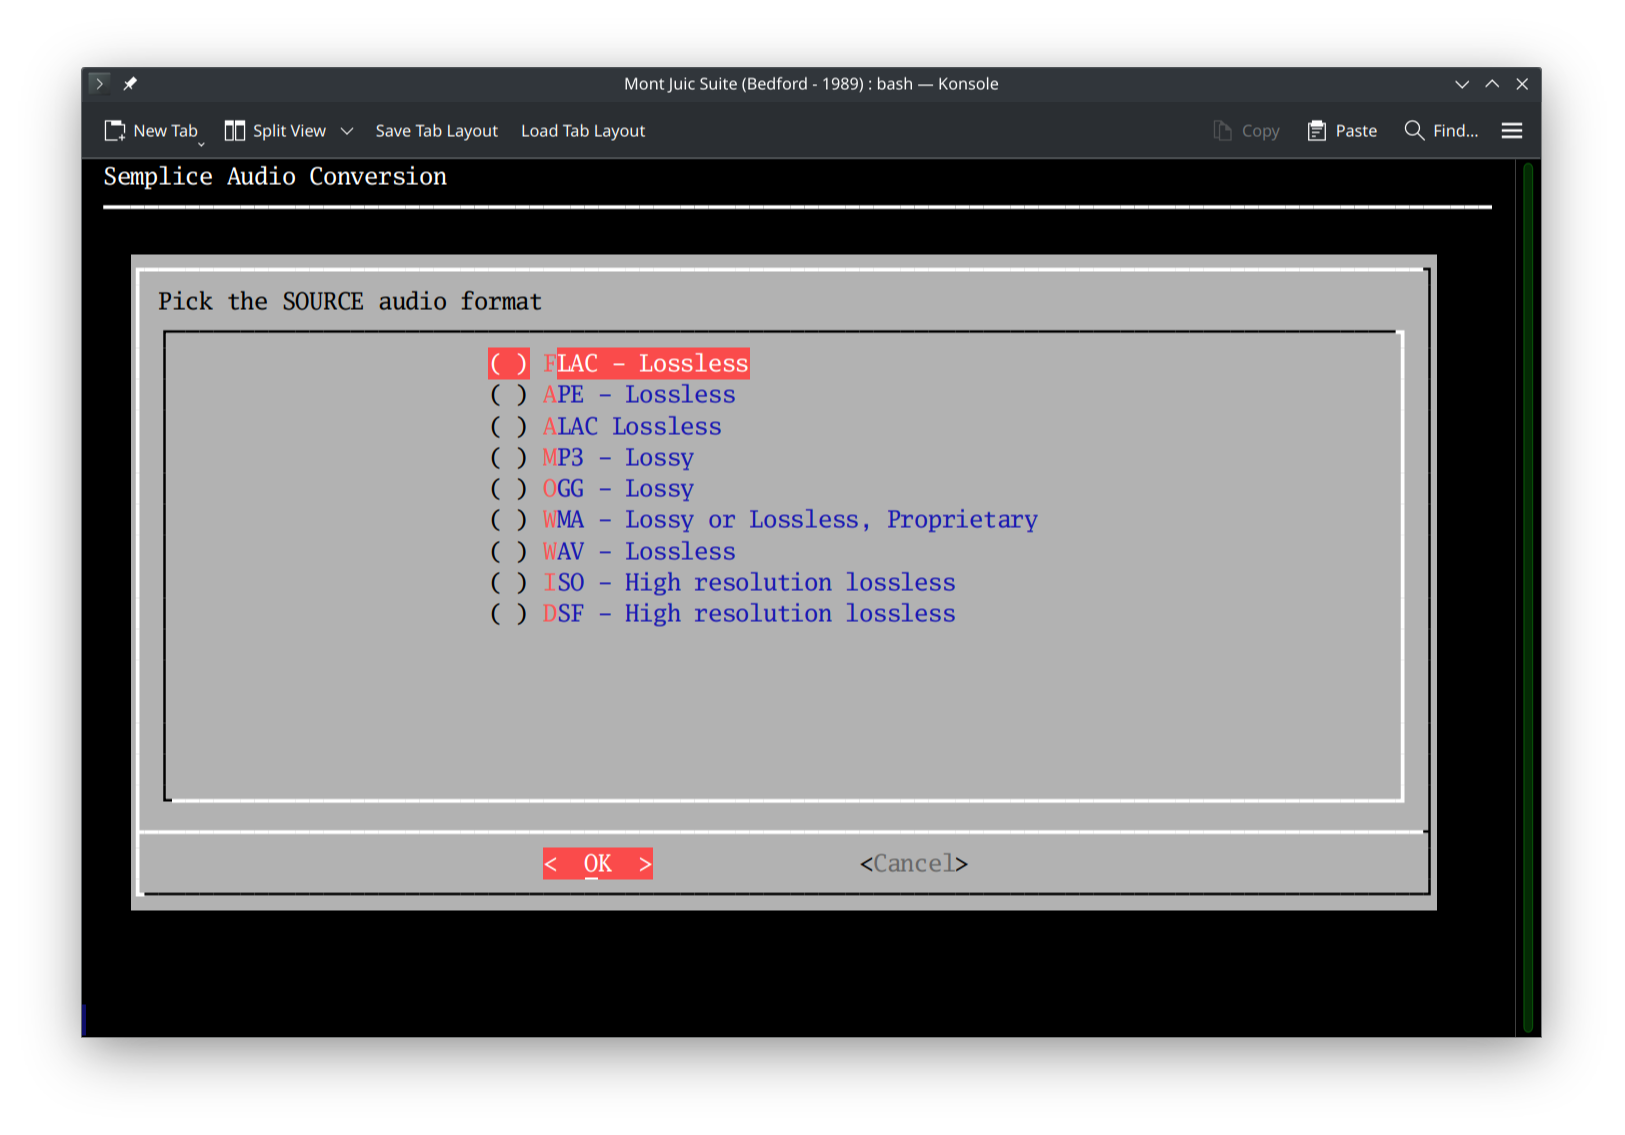
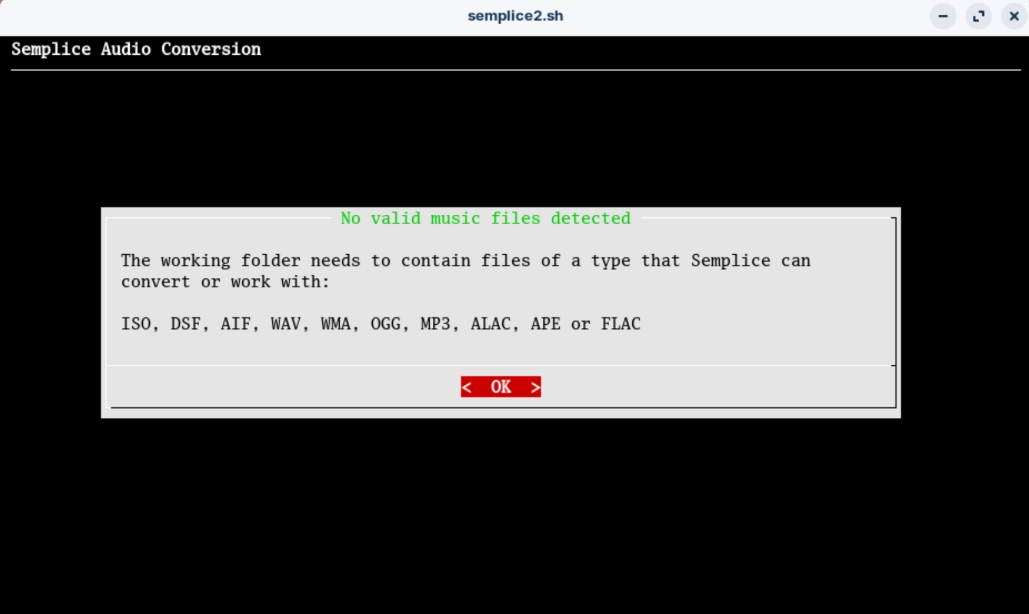
Here, up to nine possible input formats are listed, along with a note of their nature (e.g., that FLACs are lossless, but OGGs are not, and so on). I say 'up to nine' because actually the list contents are dynamic: what you see at this point will depend entirely on the contents of your working folder. If your working folder contains (say) FLACs, OGGs and MP3s, then only those three selections will be available at this point. If your working folder contains zero files of a type that Semplice can work with, you'll see this error message:
Also be aware that working with ISOs requires the installation of the sacd external program. The installation of this helper program is is something Semplice aims to automate as part of its own installation -but if it failed to install it for some reason, though ISO will still be detected in the working folder and thus displayed on the input format selection list, the program will eventually error out when you go to pick an output format, with the error message mentioning the need to install sacd manually. If that happens to you, the instructions for manually installing sacd on various Linux distros are listed below (see Section 4.0). Most new Semplice installs will get the sacd installation correct, however, so you shouldn't need to get down and dirty in those thick weeds!
Anyway, your job is simply to up- and down-arrow until an appropriate input format is highlighted and then to hit the [Spacebar] to select it: an asterisk will appear in the brackets to indicate a format has been selected. You can arrow onto another format and hit the [Spacebar] again to change the selection, but only one audio format can be selected at a time. If you are happy with your selection, you can just press [Enter] to confirm it (or click on the [OK] button). If you select the [Cancel] button, you'll be returned to the Audio Processing menu with nothing at all having been modified on your hard disk.
Pressing [Enter] (or clicking [OK]) triggers the display of this screen:
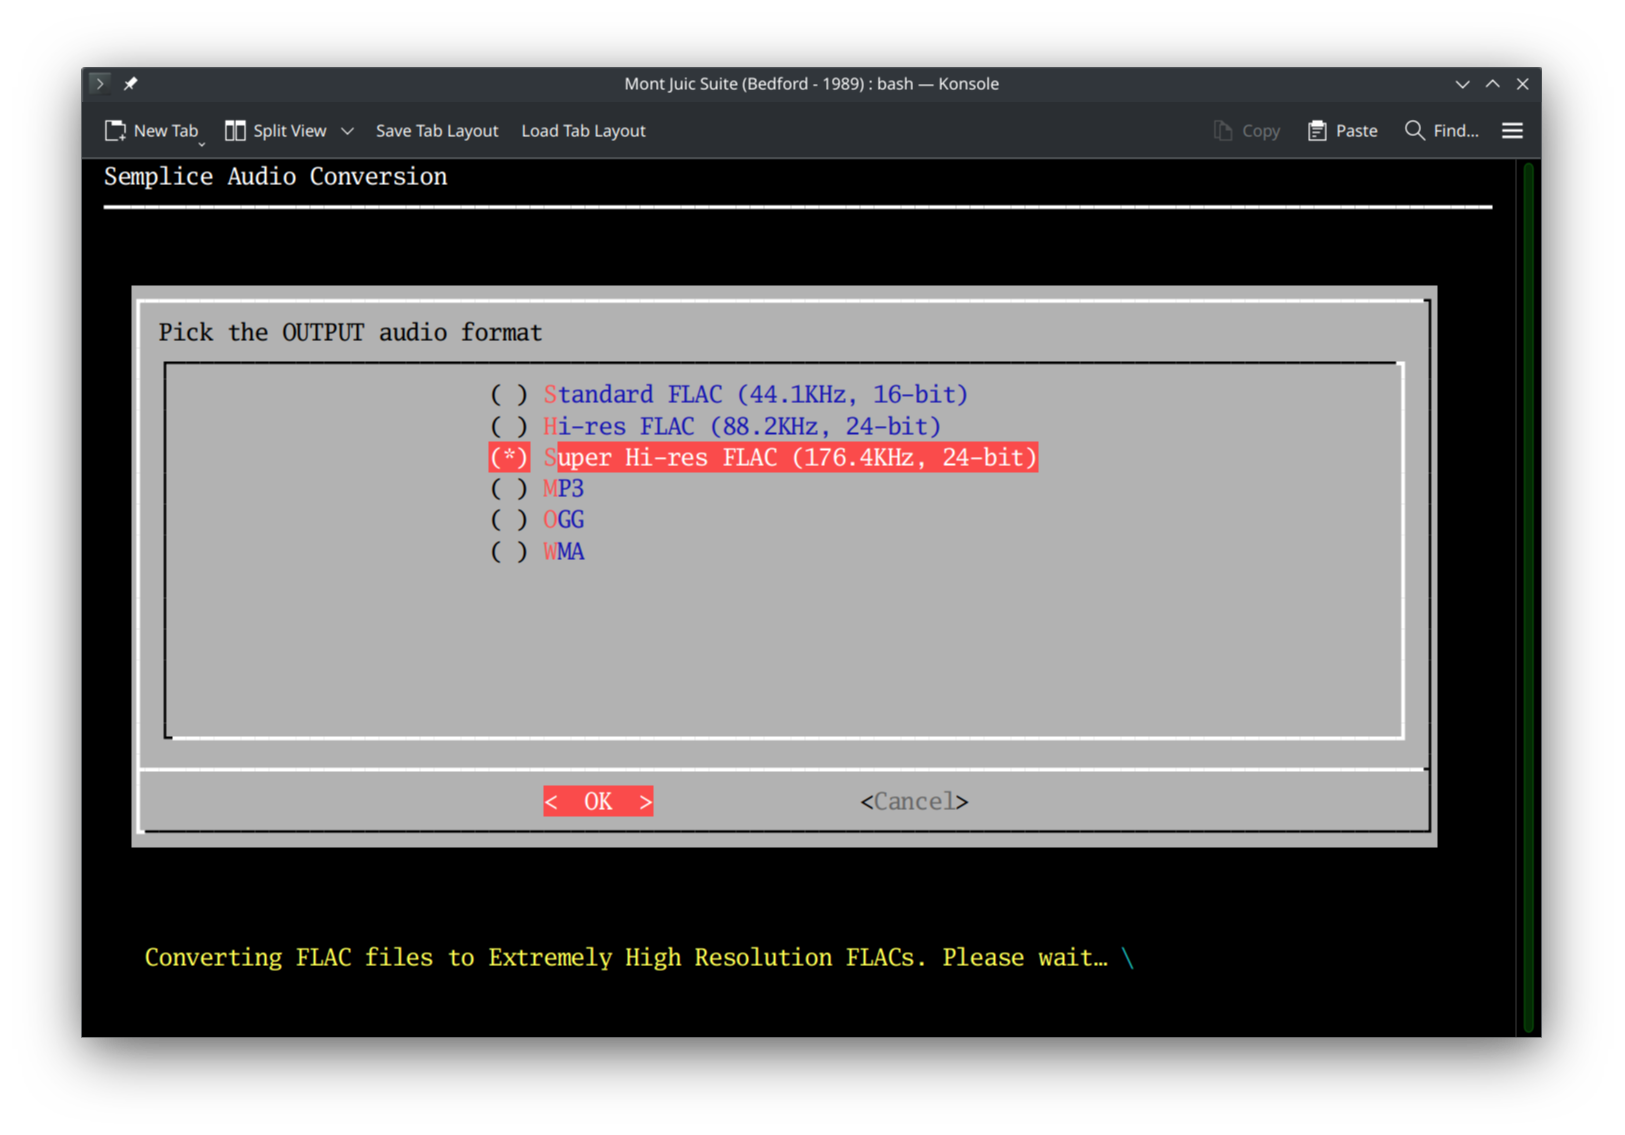
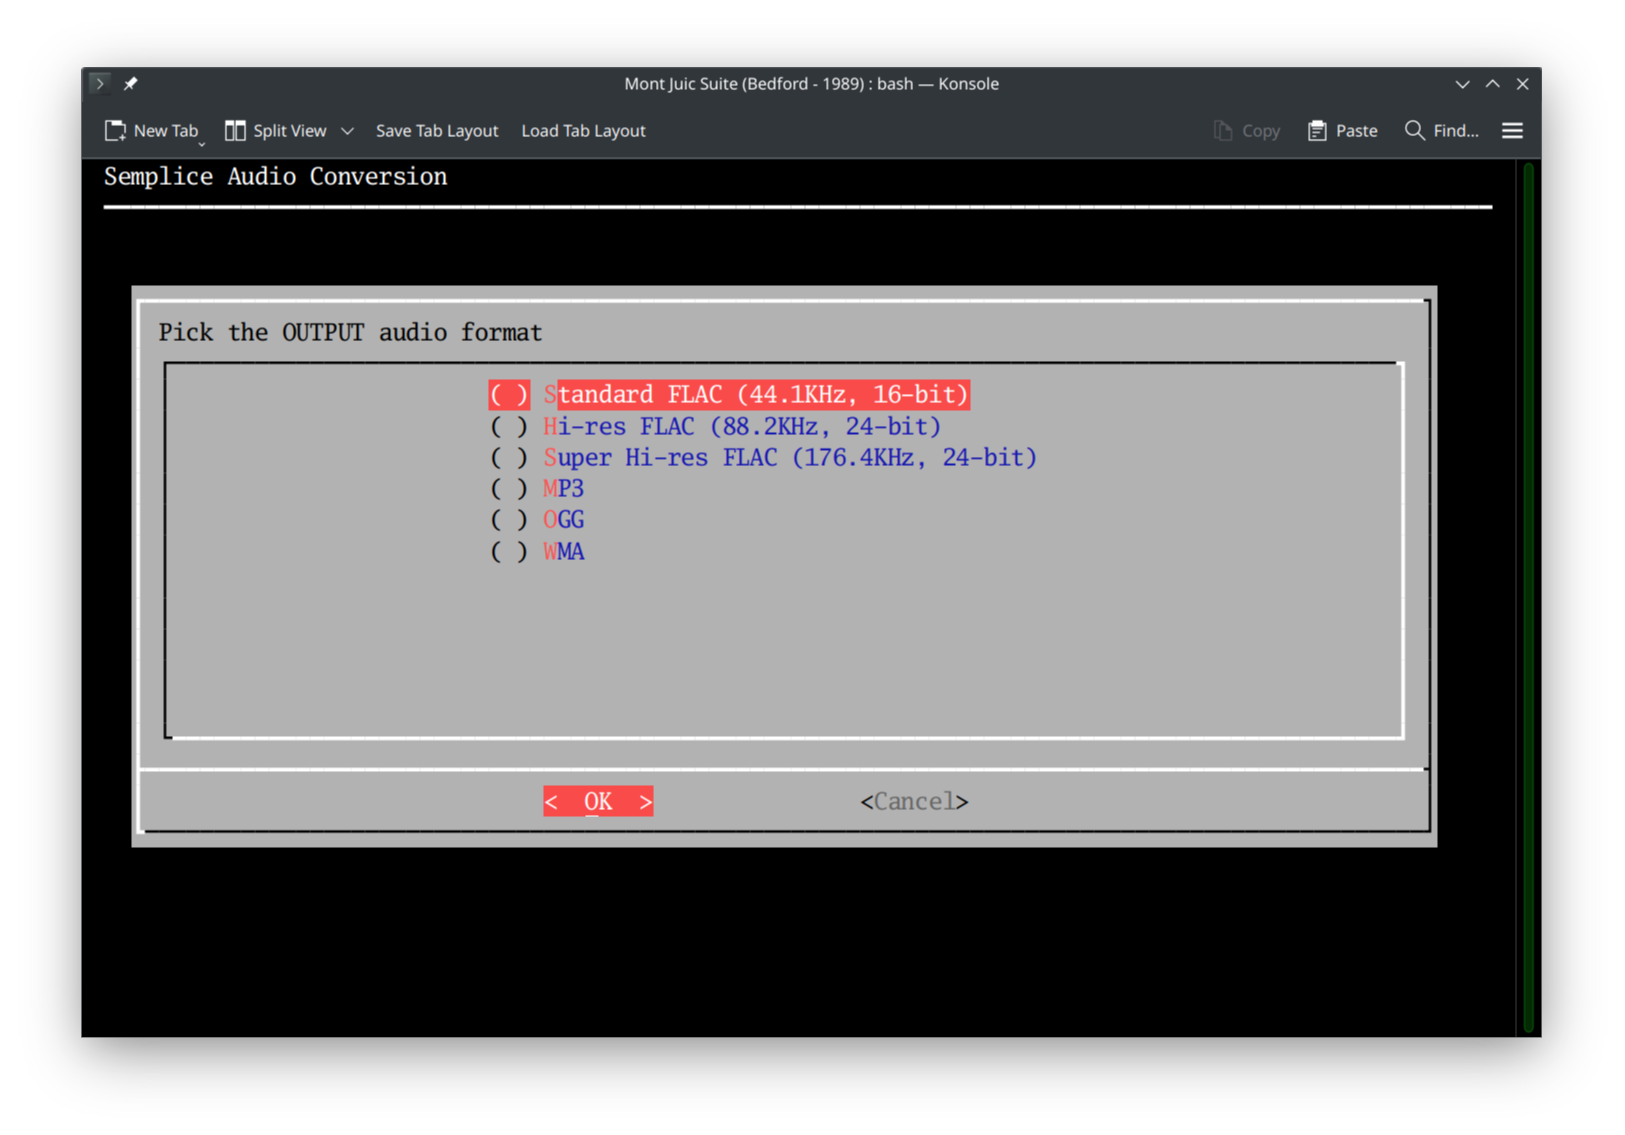 Here you select the output format -that is, the codec you want to use to encode your converted files. Four distinct codecs are provided, though FLAC is offered in three flavours so that there are six possible options displayed. Only the three FLAC options are lossless codecs; MP3, OGG and WMA are all lossy codecs. As I mentioned in the Introduction section of this article, the Hi-Res and Super Hi-Res FLAC options are there for audiophiles with more disk space then sense: you cannot hear the difference between either of those formats and the Standard FLAC option, given the same input file, but files produced by using them will be somewhere between 4 and 8 times bigger than the standard FLAC equivalent would be. It remains, however, your choice: if you want to go bit-bonkers, be my guest! Note that Semplice Version 2 offers "only" 176.4kHz "Super Hi-Res FLACs" output: version 1 erroneously allowed for 192kHz FLACs. The reason for the difference is dithering: the software Semplice uses to extract audio data from an SACD ISO is written to output 176,400Hz signals at its maximum setting: converting that to a 192,000Hz signal would introduce sample errors or mismatches which would probably be inaudible, but it's best not to put the issue to the test! Meanwhile, 88200 and 176400 are both integer multiples of the base 44100 sampling rate of ordinary CDs, so no sample mismatch arises when converting up or down. Moreover, SACDs tend to use DSD or Direct Stream Digital, which is a 1-bit pulse density modulated signal sampled at 2,822,400 Hz ...and 2822400 is again an integer multiple of 44100 (x64, in fact). So, once again, it makes sense to stick to multiples of 44,100 for all high resolution audio formats, which Semplice Version 2 now does.
Once you've selected an output format, press [Enter] or click [OK], the conversion process will immediately begin:
You'll see a confirmation message at the bottom of the screen, reminding you of your choices of input and output formats, along with a spinner indicating the passage of time and work being done. To help speed up these conversions, Semplice always converts in a parallel-processing mode, with multiple threads -up to the number of CPU cores your PC has available to it- all being put to use simultaneously. After the conversion is complete, you'll simply be returned to the Audio Processing menu.
What you'll see in your file manager will depend on whether you switched on the 'Delete source files' configuration parameter. If you didn't (and let the default apply), you'd see something like this:
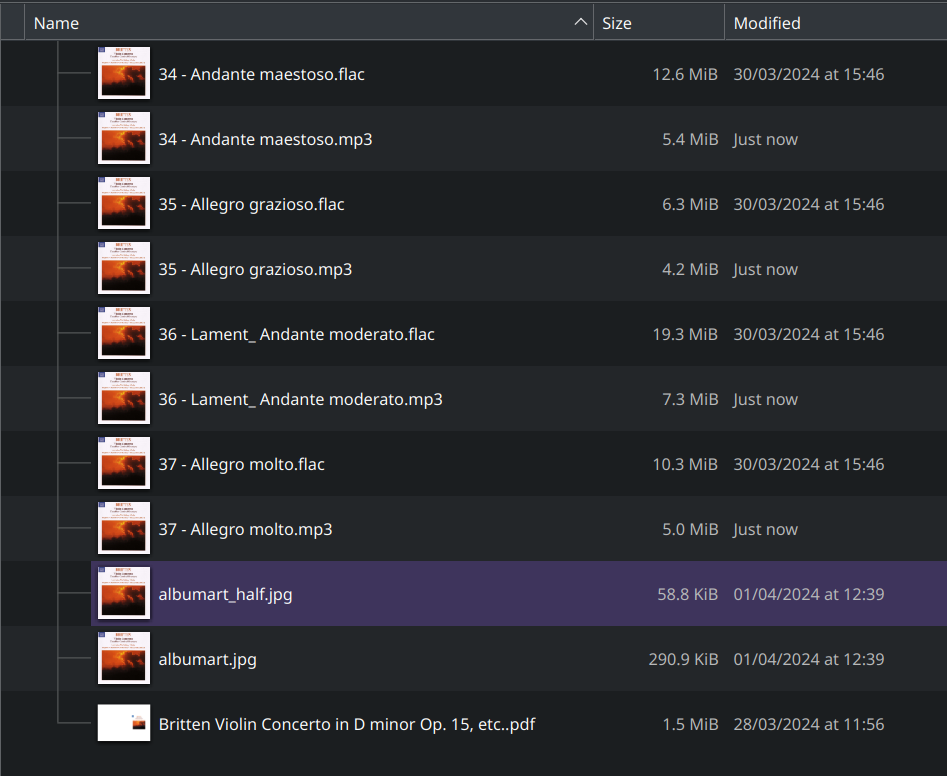
You'll notice that there are four FLACs here, along with four 'just now' created MP3s: the source and output files co-exist on disk without drama, and the conversion process has been entirely non-destructive to the originals. You'll notice too, I hope, that the MP3s seem to have embedded album art. If you were to inspect one of them with a tool such as kid3, for example, you'd actually see it's better than that:
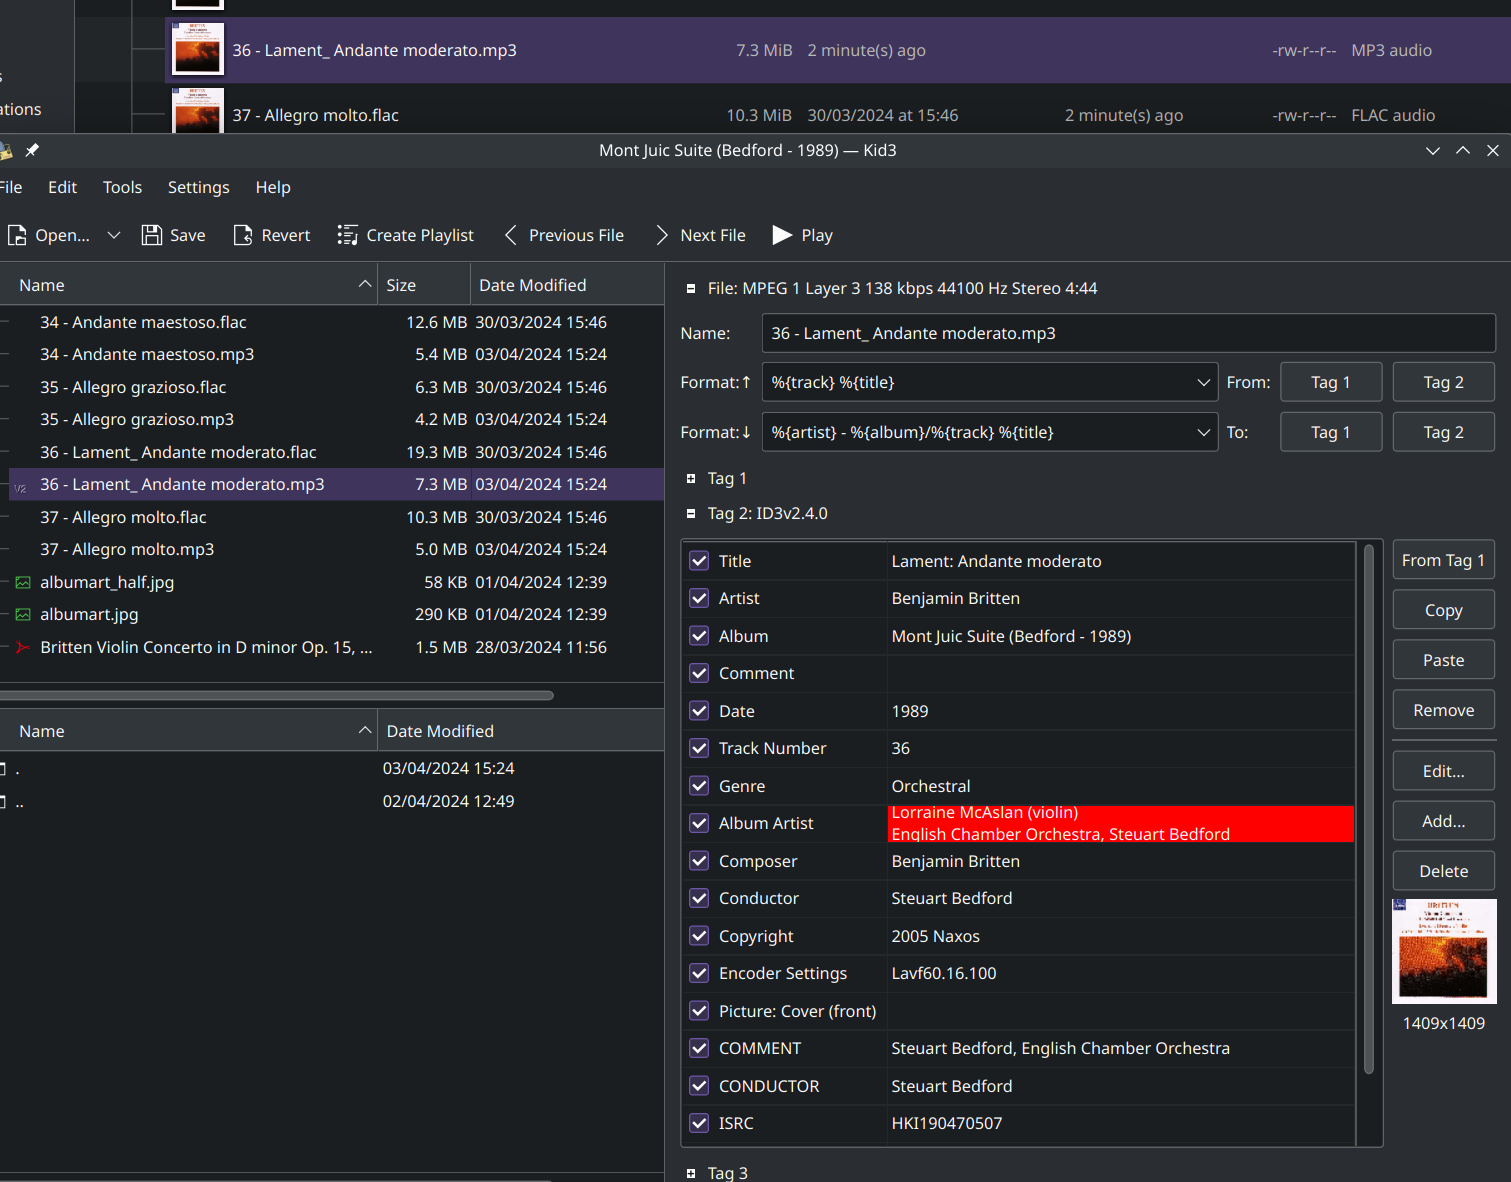
That's to say: if the source files were tagged, the output files will be similarly tagged too. There's no particular guarantee about this, though, as it depends on the vagaries of the codecs involved. Here, for example, I converted FLACs into WMAs:
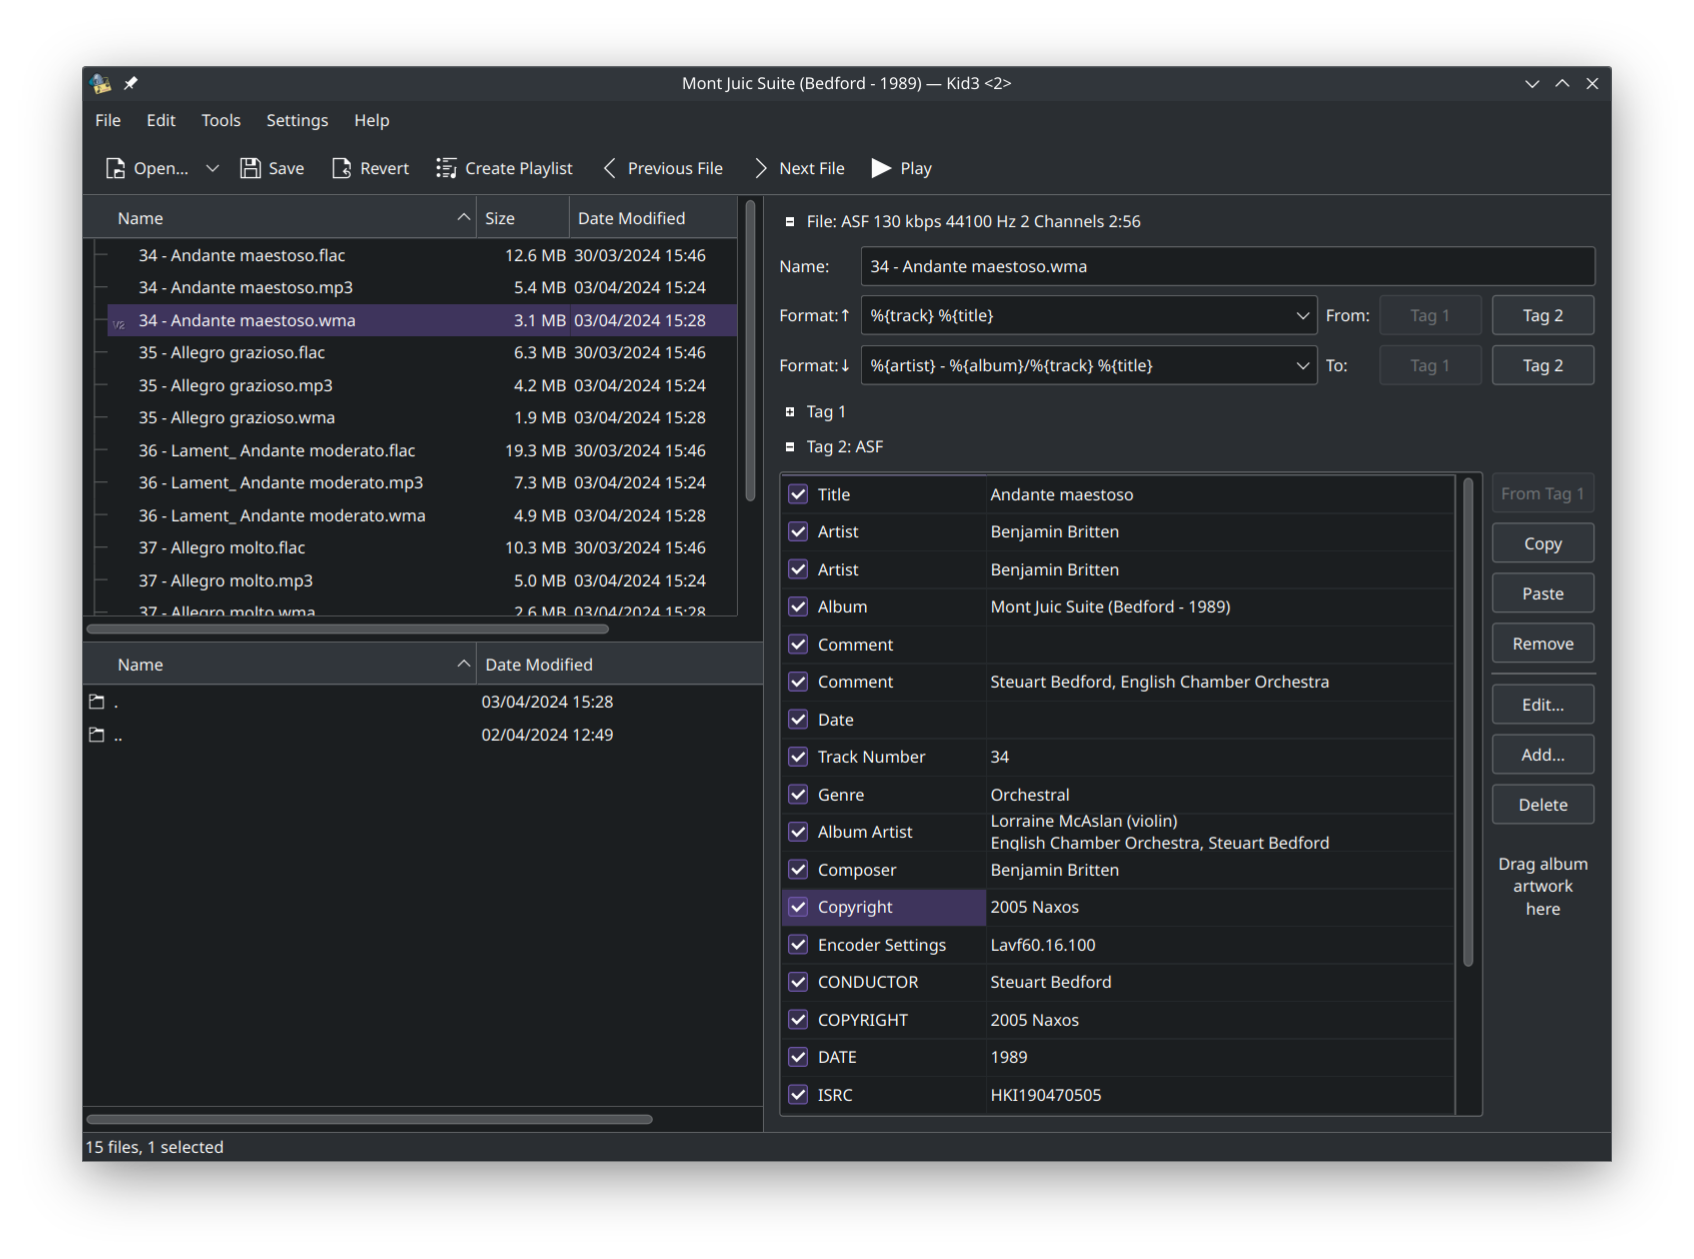 Not only does the WMA not appear to have any album art, but some of the metadata tags have been doubled up, with occasionally different results: look how ARTIST is in there twice, but with the same metadata each time, whereas the COMMENT tag is in there twice, but once it's blank and only the second occurrence has data in it. The short version is that FLAC-to-anything conversions should generally preserve metadata mostly correctly, but you should always check and be prepared to correct. Lossy-to-something-else conversions are likely to be more problematic still, but a lot of the metadata should be preserved nonetheless.
Anyway, regardless of the specifics of tagging in the output files: if you had instead switched on the option to Delete source files configuration option, your file manager would now only show that the output files exist. The source files would have been automatically deleted, without prior warning or seeking confirmation:
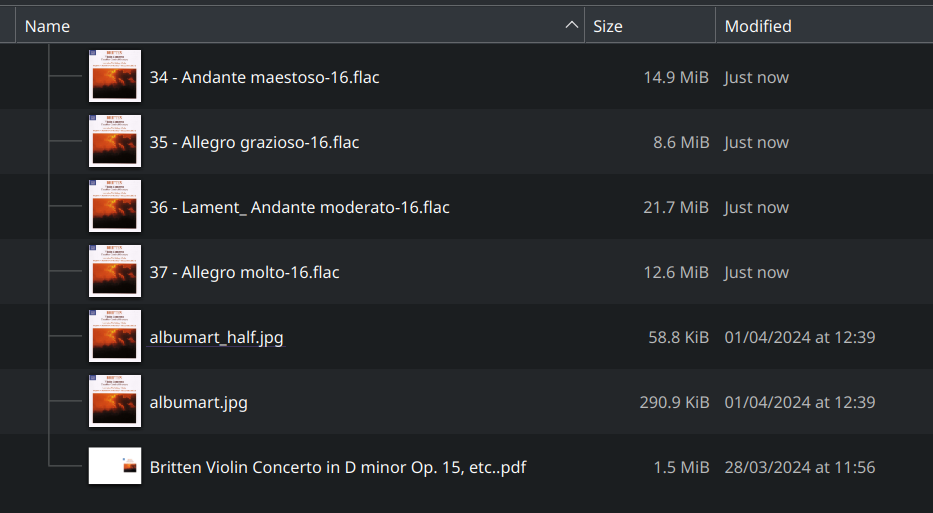
Depending on your choice of output format, however, the surviving file names might look a bit different from the originals. Obviously, if you'd picked MP3, OGG or WMA output formats, the files would now have those extensions attached to the end of their names. More interestingly, however: if you'd picked any of the FLAC output options, the file names (as you see above) would now either have a '16' or a '24' in their file names, indicating whether standard (16-bit) or either of the high resolution (24-bit) FLAC output options were selected. Removing the 'bit-depth indicator' from file names is something you can do, if you want to, by yourself later on. Incidentally, if you were to convert FLAC to HiRes FLAC, you'd obviously end up with original-filename-24.flac. If you were then to perform a second conversion from FLAC to Super Hires FLAC, you might wonder how Semplice would cope, since that would seem to imply creating a new file called original-filename-24.flac, which exactly matches the existing name, and therefore would seem to be impossible. Well, Semplice simply sticks a second bit-depth indicator in the filename, so you'd actually end up with a file called original-filename-24-24.flac, which is a unique name and thus causes no file creation errors. I hasten to add that it makes absolutely no sense to 'up-convert' FLACs in this way! By converting a standard FLAC to a Super Hires one, you add nothing to the audio data in the file: it remains a standard audio signal, just occupying about 8 times as much space as it used to!
Summing up therefore: using a working folder full of audio files, take Audio Processing menu Option 2 and you'll be prompted to select an input and output format. Conversion from the one to the other results in new files being created on disk, but the original files will still be safe in their original format unless you've explicitly configured Semplice to delete them. Lossy codecs have a quality setting that determines the balance between audio fidelity and filesize: the default quality setting is a middling compromise between the two factors, but you can configure a different quality setting if you like. Just be aware that MP3 quality settings work in reverse to those of OGGs or WMAs. If one of the FLAC options is chosen as an output format, the bit-depth of the chosen format will be added to the output files' names. Whilst you can run the audio conversion process multiple times over the same set of files, it is not usually sensible to do so: converting lossy to other lossy formats results in compounded loss of audio fidelity, and converting FLACs to other forms of FLAC adds nothing to the already perfect audio fidelity of the original.
4.0 Installing Sacd
Semplice Version 2 makes an effort to install all its software dependencies automatically, including the sacd program that is needed to convert ISO files ripped from SACDs into WAV files (which Semplice can then convert into other audio formats, of course). Unfortunately, sacd is seldom in the standard software repositories for most Linux distros, so installing it becomes a matter of downloading its source code and then, literally, compiling that into a usable binary executable. That sounds troublesome -and it can certainly be a messy sort of operation if you're not used to it! That's why Semplice tries to automate this compilation process during its own initial installation. You can test whether Semplice's efforts worked by simply opening a command prompt and typing the command: sacd. You should see a response similar to this:
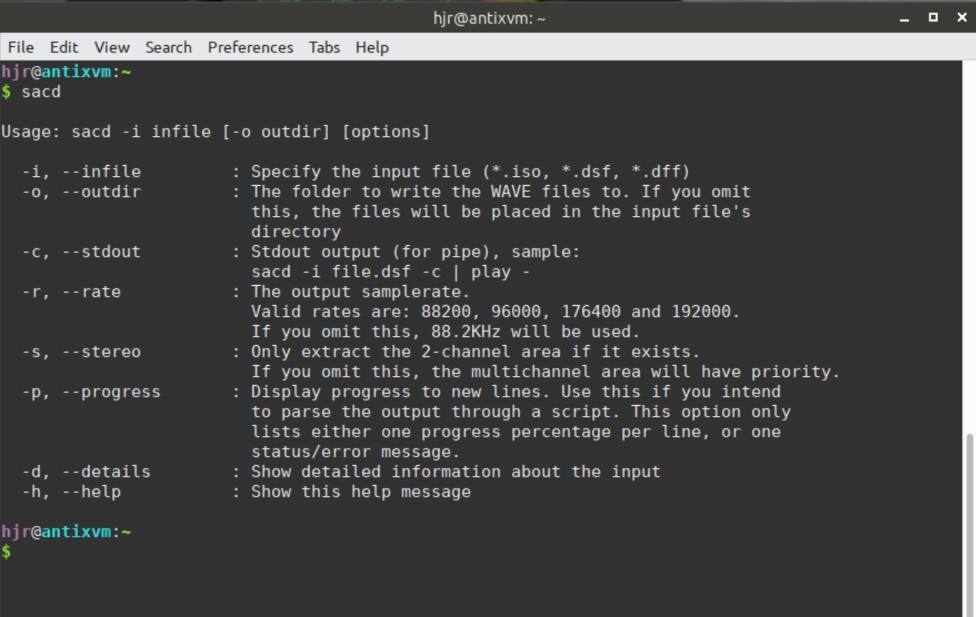
If you see that sort of usage help text, it means sacd is installed correctly and functioning properly: you need read no further in this section, therefore!
Try as it might, however, Semplice cannot guarantee that its sacd installation efforts will succeed. If they don't for one reason or another, you will have seen above (Section 3) that subsequent attempts to use Semplice to convert an ISO ripped from an SACD will fail with a warning message about sacd not being available on your PC. If that happens to you and you want to correct it, these are the steps you'd need to take, with the details varying by distro, as you'd probably expect, as follows:
Arch-based Distros
On Arch, Endeavour, Manjaro, Garuda and similar distros, you can actually install sacd directly from the Arch User Repository (AUR), using a command such as:
yay -S sacd
If you're using pamac or another front-end to the AUR, substitute in an equivalent command as appropriate. In theory, your AUR front-end should ensure all appropriate software dependencies are pulled down for you automatically. The sacd source code will then be compiled into a working binary for you, without any further effort on your part.
Other Distros
Other distros tend not to have sacd in their standard repositories -and if they do, it's not guaranteed to be the one that Semplice has been written to work with. Therefore, you need to take things in two stages. First, add software to your system to allow it to compile new binaries from source code, like so:
- Debian: sudo apt install git cmake binutils pkg-config build-essential python3 python3-dev
- Ubuntu: sudo apt install git cmake binutils pkg-config build-essential python3 python3-dev
- Fedora: sudo apt install git cmake binutils pkg-config gcc kernel-devel python python-devel
- OpenSuse: sudo zypper install -t pattern devel_basis ....followed by.... sudo zypper install cmake python python-devel git
Note that the 'python3-dev' package may have been renamed for your distro: if you get warned that no such package exists, try replacing that name with python3-is-dev.
The second step is accomplished by typing the following sequence of commands into a terminal session:
cd
git clone https://github.com/Sound-Linux-More/sacd.git
cd sacd
make
sudo make install
And that should be that: once sacd has been installed, you can clear up the debris left behind from this entire build process by issuing the commands:
cd
rm -rf sacd
These commands merely remove the source code folders, not the installed, compiled executables. If you type the command sacd at this point, you should see the display of advice on how to run the program properly shown in the first screenshot of this section.
Note that on Ubuntu 22.10, I had to issue one extra command to make the operating system aware of where, precisely, all the shared files that sacd depends on were actually copied to: that distro seems to build things into /usr/lib64 rather than vanilla /usr/lib, and that makes sacd itself think the files it depends on are missing. A simple sudo ldconfig /usr/lib64 issued before you type the 'make' command, will fix that problem, though. Any distro in the Ubuntu family is likely to be affected by the same problem, of course (and fixed by the same fix!)
If this all seems a lot of a palaver to go through for just getting to listen to some classical music, remember: you wanted to swim in the sea of SACD! If you don't do SACD ripping, you don't need to do any of this... and if you do, you only have to do this once!
|[Back to Front Page]|[Tagging Home]|[Audio Processing Home]|[Ripping Standard CDs]|[Ripping SACDs]|[All About SuperFLACs]|