 1.0 Introduction

Semplice Version 2 now includes CD ripping functionality.
Semplice CD rips are basic, in the sense that they are always of the whole disk and no attempt is ever made to do any metadata or album art fetching: for classical music, all Internet-sourced metadata is complete rubbish and you'll end up spending more time correcting it than you would in simply typing it in from scratch in the first place (which Semplice's Tagging menu is there to help you do, of course). Semplice CD rips are, however, always accurate: for starters, the ripper uses the cdparanoia tool to ensure that defective parts of a source CD are read and re-read as many times as needed to arrive at a 'true' output. As an additional factor in achieving an accurate rip, Semplice will examine your optical drive and try to determine a 'read offset' for it: most optical drives read data from block X when they've been instructed to read it from block A. Knowing that difference between requested and actual read locations allows Semplice to adjust the stream of data coming off the CD and thus ensure it's an accurate representation of the data that was originally pressed into the CD. Finally, Semplice will attempt to compare any rips you get it to do with a database of other people ripping the same CD (called the AccurateRip database). If you all end up with the same bits in the same places, you can be very confident that your rip is bit-perfect. This functionality comes from Semplice's interaction with the audiotools package, which is therefore a software prerequisite for Semplice: usually, Semplice will automatically install this package for you as part of its own installation process. If for some reason Semplice fails to install it for you, then CD ripping will still work, but no querying of the AccurateRip database will take place to see if your rip is equivalent to anyone else's. See Section 5 below for instructions on how to manually install the audiotools package should you need to do so (though hopefully, unless you're running a weird distro configured in weird ways, you won't need to do so!)
Semplice CD rips always output FLAC files, ready to be tagged with suitable metadata and otherwise post-processed into catalogue-able state.
Semplice Version 2 now also includes a convenient front-end for ripping SACDs.
SACDs are much more complicated to rip than standard audio CDs: you'll require specialised hardware to read the disk, for one thing. Semplice cannot help you with that side of things! But you then need to interact with your SACD player over a home network -and that's the bit that Semplice now puts a nice front-end on, making things a little easier to configure and execute. Semplice's SACD rips always result in the production of an ISO: a single file containing within itself the entire musical data contained on the source disk. ISOs can be turned into FLACs for more convenient playback using Semplice's audio-converting capabilities (found under the Audio Processing menu).
In the following sections, I'll outline the various configuration parameters which control the standard CD ripping process and how you should set them to suit your own circumstances. I'll then work through an example of how the ripping process works. Finally, I'll point you to a separate article that walks you through the SACD ripping procedure, which is very much sui generis!
2.0 Ripping Configuration Parameters
All Semplice Version 2 configuration parameters are set by using the Miscellaneous menu, Option 1:
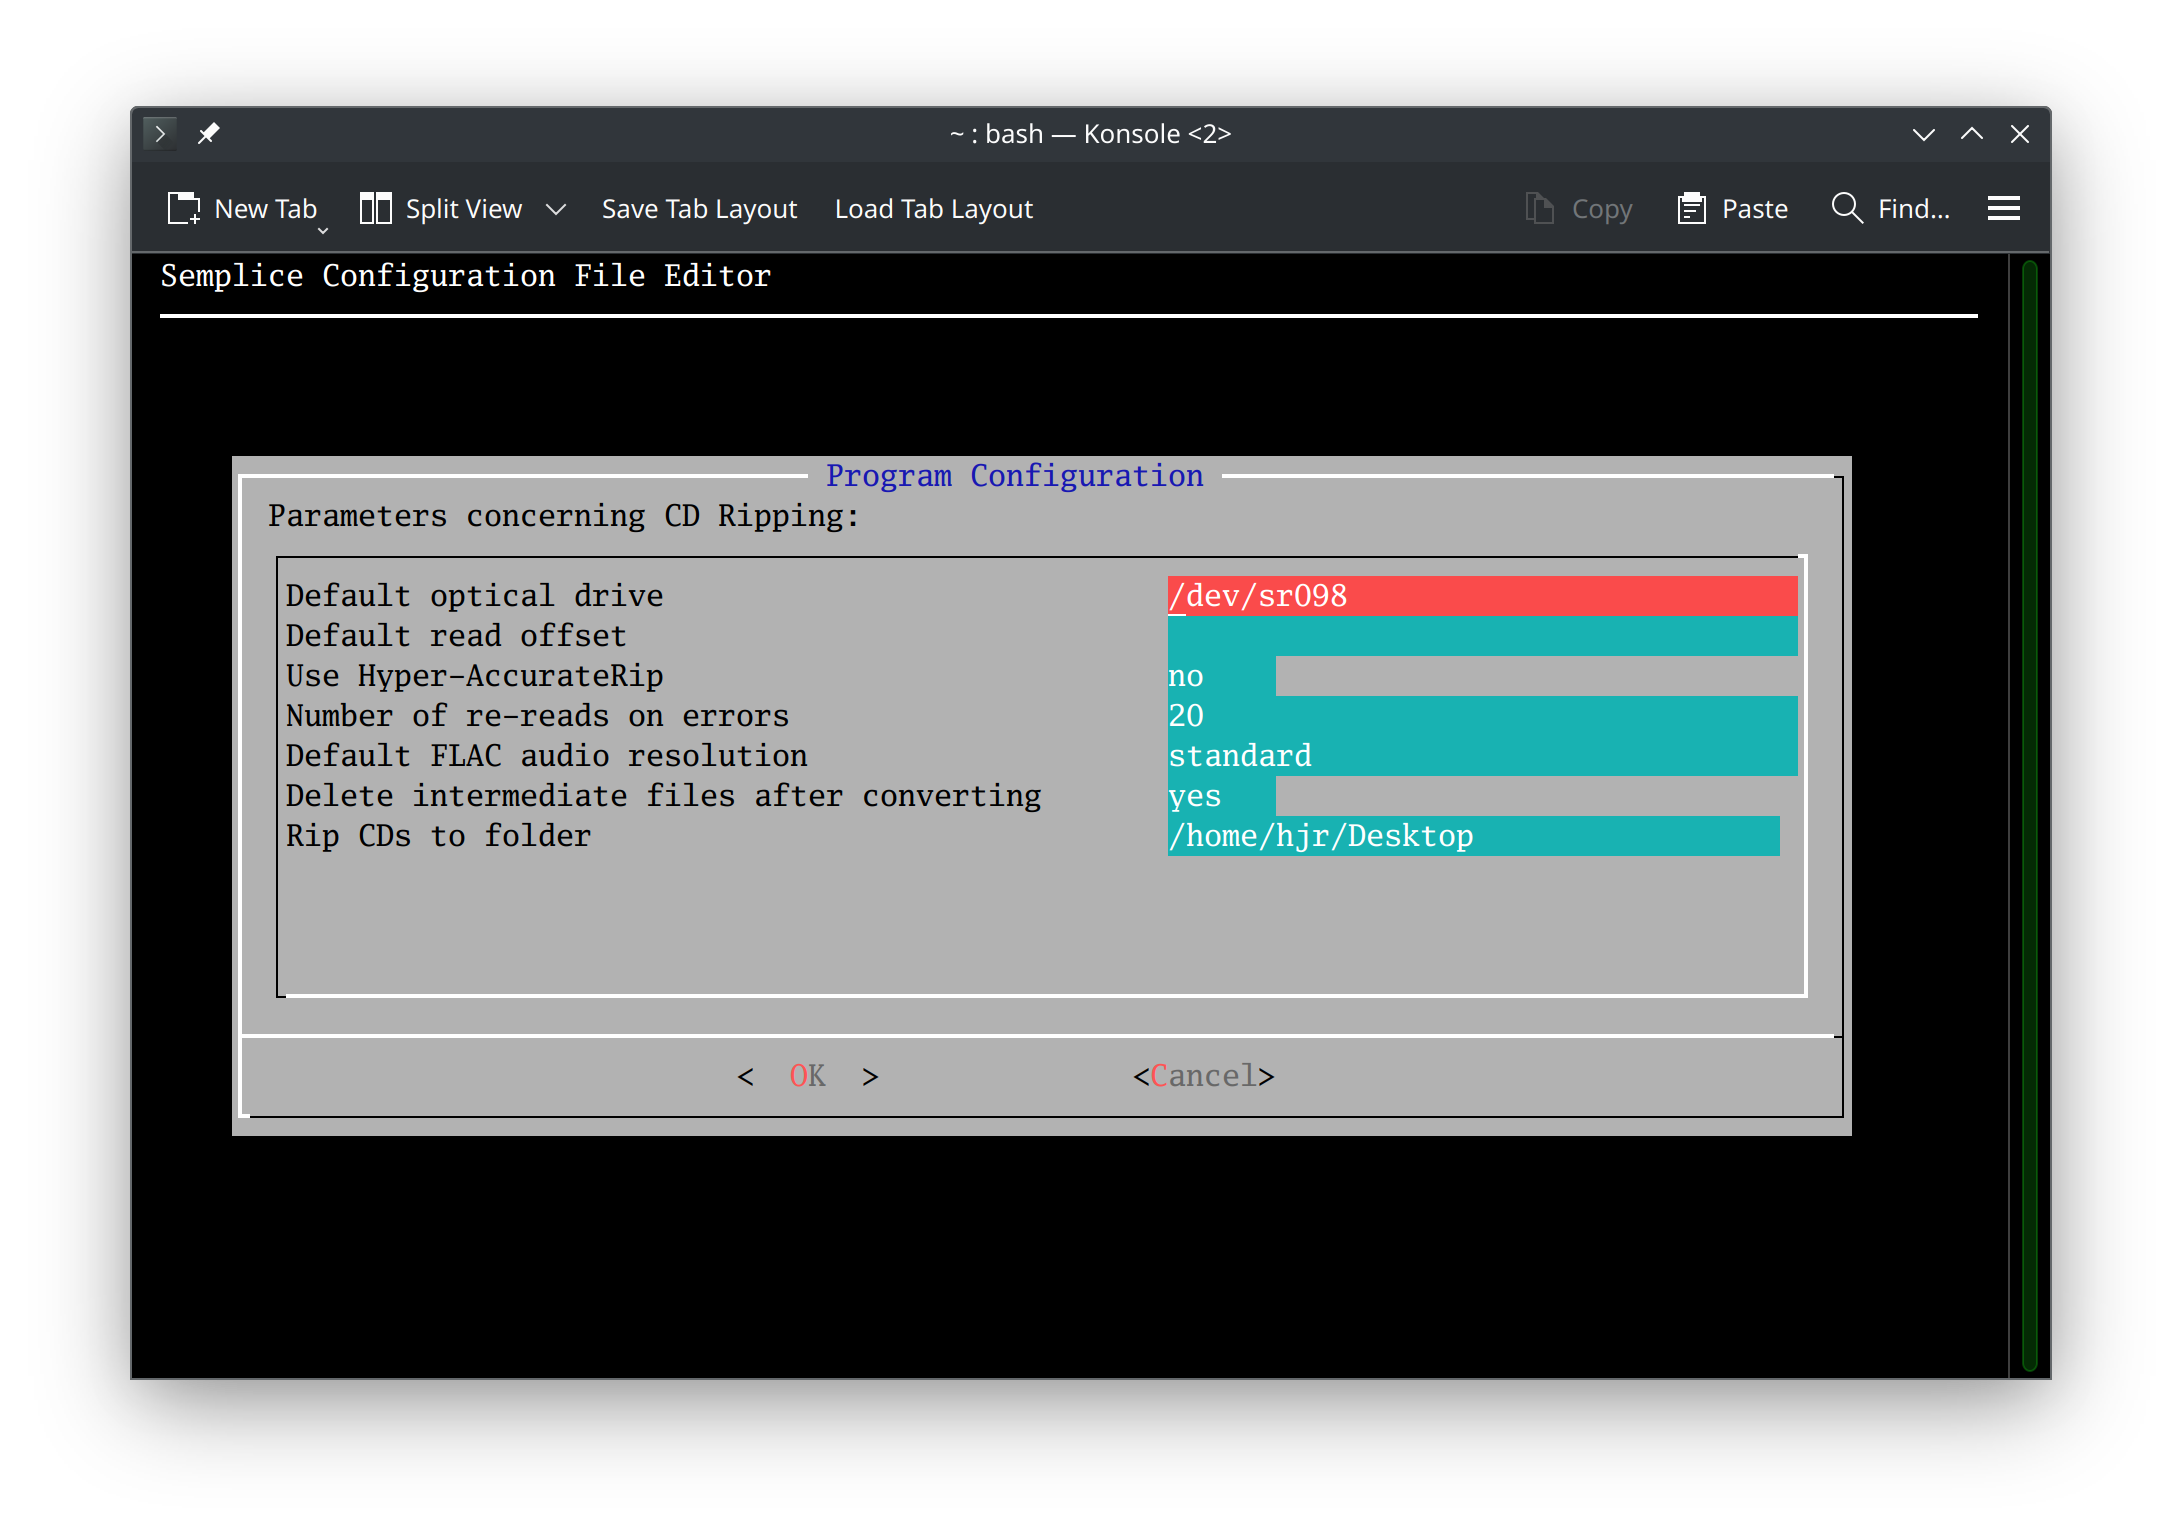 I'll work down the list of parameters in the order they're presented in the above screenshot.
2.1 Default Optical Drive
If your PC only has one optical drive, it's probably called /dev/cdrom or /dev/sr0 and there's no question about it being the 'default' one, as it's the only one! You can therefore leave this parameter blank, since Semplice will default to using the one and only optical drive you have anyway.
However, you may have multiple drives attached to your system and therefore this entry tells Semplice which of the multiple possible drives to use by default. You can always override the default setting at any time by using the Ripping menu Option 2 (Specify Optical Drive).
In the above screenshot, for example, you see I've configured /dev/sr098 to be my default drive; but using Option 2, I see this:
 ...which allows me to pick /dev/sr0 to use instead. Selecting a drive manually with Option 2 doesn't alter what the default device is said to be in the configuration file: it's only valid for the duration of the current Semplice session (or until you re-take Option 2 and change it to be a different drive, for example).
If you have difficulty knowing what device name to set the default optical drive to, you can do a few things that might help:
1. Use Option 2 to list all optical drives on your system: the /dev/sr0 or similar device name will be visible there
2. Open a command prompt and type the command lsblk | grep rom : that will list something like 'sr0' as a device name, so prefix that with '/dev/' and you should be in business:

3. Try using /dev/cdrom: that's the common default name for an optical drive on most Linux systems.
4. Try issuing the command eject -d at a terminal prompt and see what device name it returns:

If you mention a string value for this parameter which doesn't correspond to an actual, physical device accessible by your PC system, you'll see an error when you first try to rip a CD:
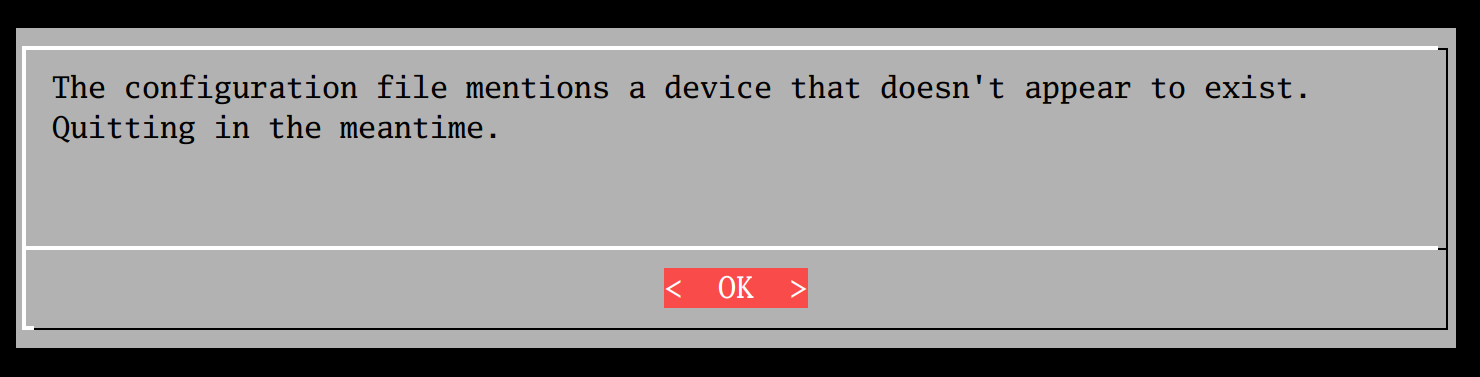
There's nothing you can do at this point (except click OK to return to the menu, of course). You'll need to determine a correct device name and set that in the configuration file before any rips can take place.
2.2 Default Read Offset
Semplice will attempt to identify your chosen optical drive and compare it with a list of known devices stored in the AccurateRip drive database. If it manages to identify your drive, it will be able to look up what 'read offset' to apply to it. When your drive tries to read the first audio sample off a CD, it will 'miss' by a known, regular amount: try to read sample 1, it might read sample 7 or sample 103 instead, for example. To correct for this tendency to read-ahead or -behind of where it's meant to, we apply a read offset (of -6 or -102 in these examples), and this will ensure that the drive actually starts reading where want it to.
Working out what the correct read offset is, however, a lengthy process that Semplice does not attempt to do: it simply identifies the manufacturer's name of your optical drive and looks for that in the database. If it finds a unique match, great. If not, then Semplice will not be able to apply a read offset automatically (i.e., it will actually use a read offset of zero, which almost certainly won't be correct). If Semplice is unable to determine a read offset for you, you can instead set the Default Read Offset to a numeric value of your own devising. Positive numbers just go in as numbers, negative ones with a minus-sign prefix: so you might type in '6' for 'positive 6' or '-6' for 'negative six', for example. If you type in a leading plus-sign, however, Semplice will automatically understand what you meant, so typing "+6" works, too.
Be aware that if you're using an optical drive manufactured by a reputable and reasonably well-known company, there should be no need to set a Default Read Offset. Just leave it blank and Semplice will dynamically work out what offset to apply. If you choose to supply a value for this parameter, that value over-rides anything Semplice might have worked out for itself ...and that usually means your CD rips are going to be inaccurate. Only fill this parameter in, in other words, if you're using an obscure optical drive that the AccurateRip database has never heard of!
As a worked example, here's what Semplice recognises my optical drive to be (using Ripping menu Option 2):

So, although it was a no-brand-name £12 el-cheapo from Amazon, it turns out my drive was manufactured by HP: a reputable enough brand! If we consult the AccurateRip drive database manually, we see this entry:

This tells us that we ought to expect Semplice to use a read offset of plus 6 (and that 140 other people have used the same make of drive in the past!). As I rip a CD with Semplice using this device, the screen shows me:
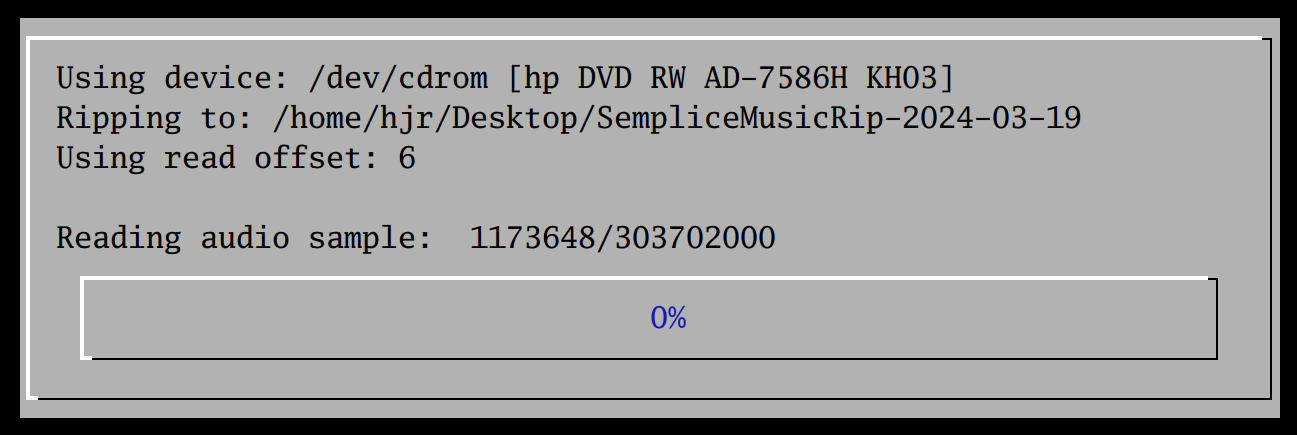
Lo and behold, Semplice has worked it out and arrived at 'Using read offset: 6'. So it got it correct, at least as far as the AccurateRip database is concerned. Now let me override that by setting an explicit offset in the configuration file:
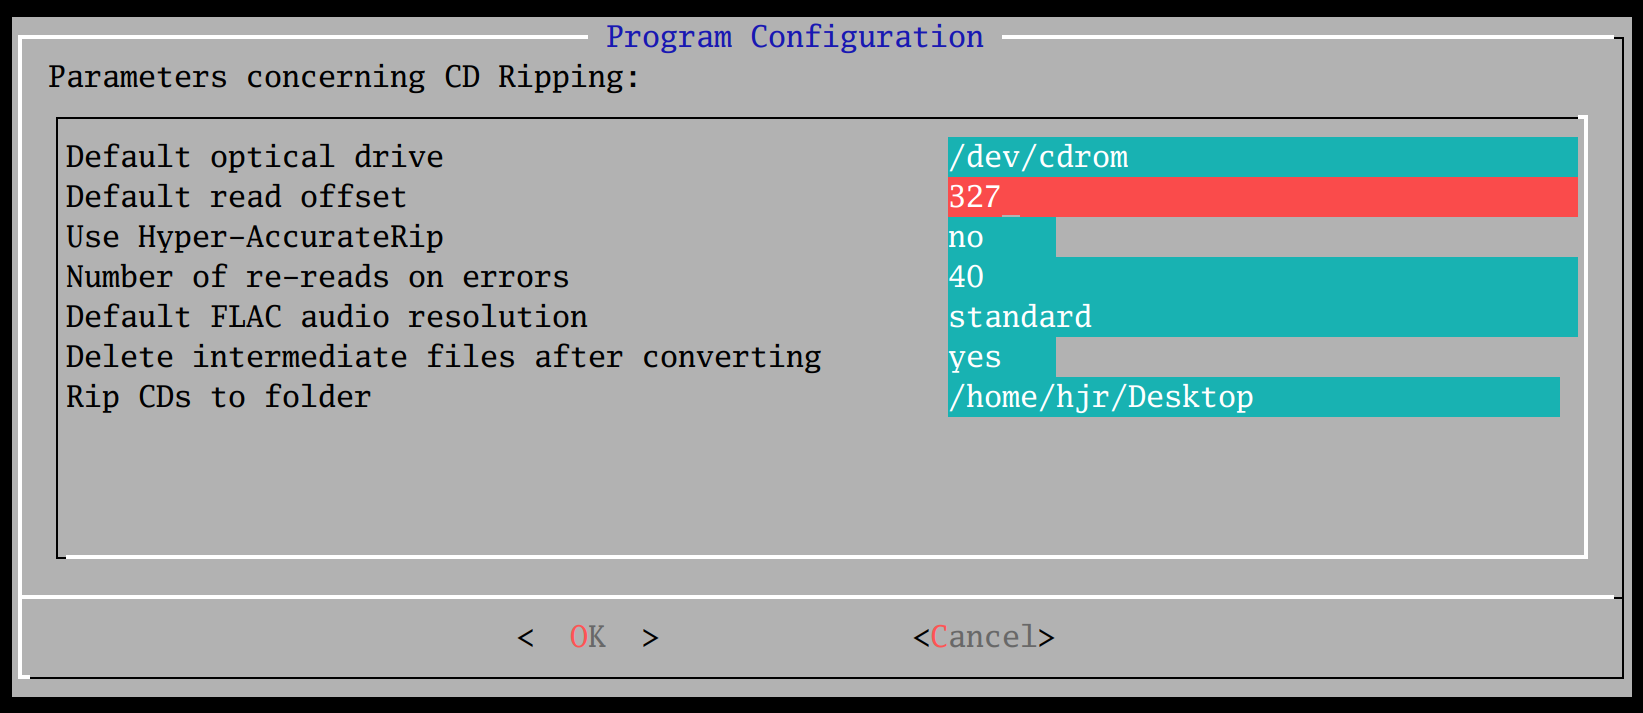
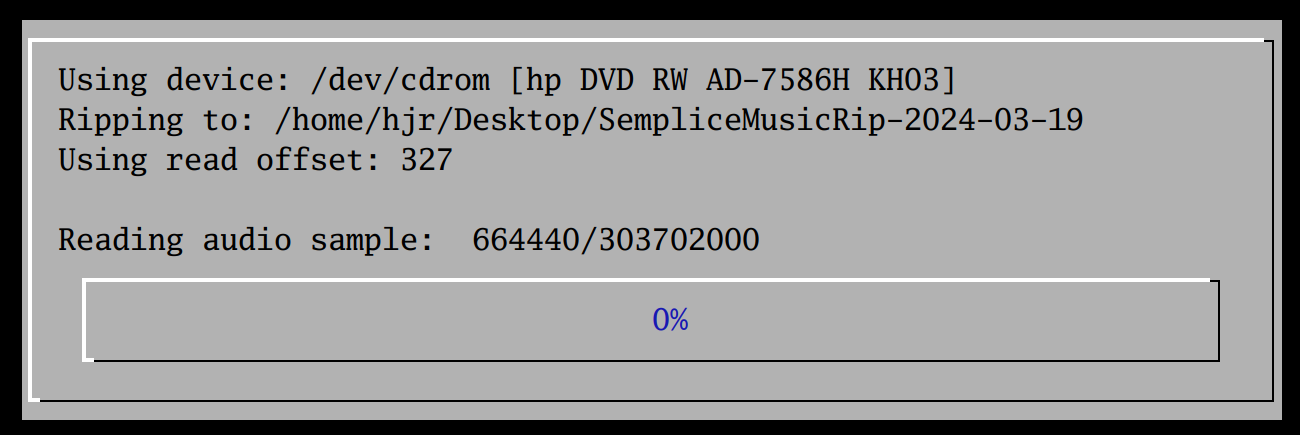
So, here I'm insisting on a read offset of 327 for whatever reason. What happens when I rip my next CD, then? Well, first you are warned that a manual override has been supplied:
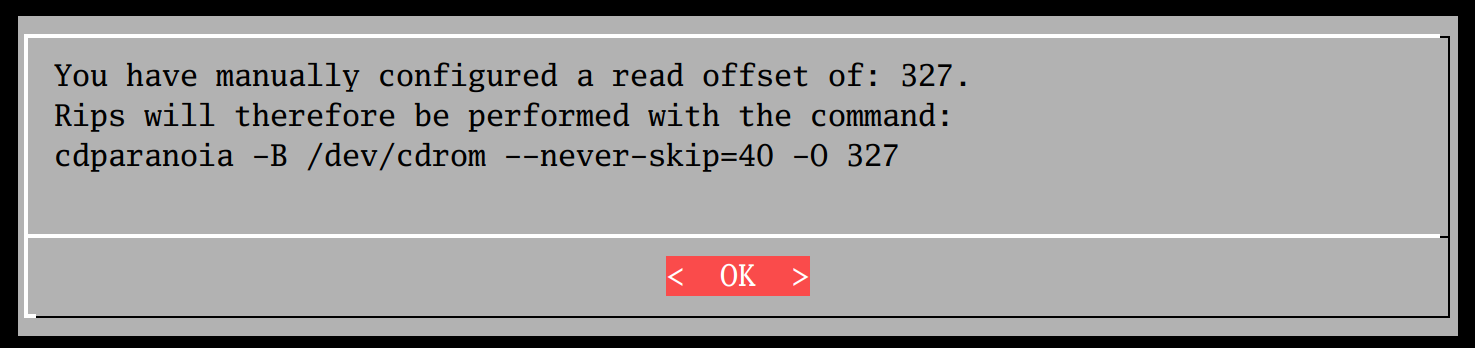
Secondly, as the rip progresses, you'll see your manual setting appear in the appropriate place:
So, the short version is: don't supply a default read offset yourself unless you have to. If Semplice can determine the correct offset for you automatically, let it do so. The parameter is there for those people using weird and wonderful hardware that is rare enough not to have an entry in the AccurateRip database!
2.3 Use Hyper-AccurateRip
Please do not switch this parameter on by setting it to 'yes': leave it set to its default value of no. If you enable the parameter, your rips may well be super accurate (as the parameter name implies) but they will be completely unique and you'll have ripping results which are not matched by anyone else who has ever ripped the same CD in the past. This may make you feel warm and fuzzy and slightly superior, but it essentially renders the entire AccurateRip technology non-functional and is therefore less than ideal. The parameter is there for those who insist on scratching nit-picky data itches, not because it makes any practical sense!
For a fuller description of the reason why someone might, in a fit of madness, want a 'hyper accurate rip' capability, read this blog post of mine. The short version is that when the people devising the AccurateRip system first determined what the 'true' drive offsets for optical drives were, they computed it incorrectly and were out by 30 frames. If AccurateRip says your read offset should be 6, therefore, it should really and truly be -24. This is probably pedantically and technically correct, but it's useless information: misreading 30 frames of CD audio means you're missing 0.6 milliseconds of audio from the start of the CD. It's an error that's really not worth worrying about and is never actually audible. Therefore, hyper-accurate rips are of no practical use at all, but turning them on does mean no confidence about the quality of your rips can ever be determined or reported.
2.4 Number of re-reads on Errors
If your CD is scratched, old, covered in jam or otherwise not in pristine condition, reading it will inevitably encounter errors. Fortunately, most CD read errors can be worked around because of the error-correcting codes embedded within the data stream itself. It just takes multiple attempts to read the data in the tricky spots to get an error-corrected result. Such re-reads are done entirely automatically as the need arises -but if we didn't put a hard limit on them, Semplice might try re-reading the same bit of a damaged CD for ever!
This parameter therefore controls how many times Semplice will re-read bad data sectors until it either gets a good, correct result or gives up. The default number of re-reads is 40. If the error can't be corrected after 40 retries, the rip carries on regardless, with bad data left in the rip (probably audible as a click or pop). The higher the number of re-reads, the slower a CD rip will generally take; a lower number goes faster, but might mean more pops and clicks in the final result. You have to find a re-read level that balances speed and accuracy in a way you're happy with: the default of 40 is meant to provide a 'reasonable' outcome in most circumstances.
2.5 Default FLAC Resolution
FLAC is inherently a lossless audio codec, meaning that though it is a compressed version of an audio signal, every part of that signal can be recovered by decompressing the data. This parameter therefore has nothing to do with the 'quality' of a FLAC produced by Semplice: definitionally, all FLACs are perfect!
Rather, this parameter deals with situations where non-standard CDs are being ripped. A standard audio CD contains data sampled at 44,100 times a second (44.1KHz), with each sample being stored as a 16-bit value. This '16-bit, 44.1KHz' signal is therefore considered Semplice's standard FLAC output. The literal value of 'standard' for this parameter, as shown in the screenshot that started this section, is therefore also the default value for this parameter.
You may, however, occasionally encounter CDs that use a higher sampling rate or bit-depth and wish your FLACs to reflect that, too. For example, I recently ripped a DVD-Audio, which claimed to have been sampled at 88.2KHz using 24-bit values. Dealing with such disks, you may want Semplice's FLAC output to use a higher-than-normal encoding,too. The parameter therefore also takes literal values of high (resulting in 88.2KHz, 24-bit FLACs) or extreme (which results in 192KHz, 24-bit FLACs).
There is no value in ripping a standard audio CD to either of these higher 'resolutions', but the option is there for people who may encounter non-standard CDs or audio DVDs and wish to preserve as much of the music signal as possible.
2.6 Delete Intermediate Files
Semplice has to rip a CD initially to WAV files: large, lossless digital audio files. It then compresses those WAVs into FLACs, which preserve all the audio data in the source WAV, but at about half the original size. That rip-and-convert functionality is entirely automatic. The end result is, of course, two files for every track on the original CD: one WAV, one FLAC. The question then becomes: do you want Semplice to automatically delete the WAVs after the conversion process completes, as they are merely uncompressed equivalents of the FLACs and are thus, strictly speaking, superfluous to requirements? Remember that the original WAVs can always be reconstructed perfectly from the FLAC, by using the audio conversion options found under the Audio Processing menu.
Valid settings for this parameter are either yes or no, with yes being the default.
2.7 Rip CDs to Folder
By default, Semplice will write its WAVs (and thus FLACs) extracted from an audio CD to the $HOME/Music folder of the user doing the rip. You can set this parameter, however, to make Semplice write its output to anywhere else you prefer. If the folder you specify here doesn't exist, it will be created for you the next time you perform a rip, assuming you have the appropriate privileges needed to do so. If the folder cannot be created because of permissions or other system issues, the default of $HOME/Music kicks in as before.
3.0 The Ripping Process
To begin ripping with Semplice, make sure your optical drive is actually connected to your PC (if it's a USB device, for example); that a valid audio CD has been inserted into the drive; and ensure that the drive's tray is closed. If those three conditions are met, simply press R to get to the Ripping menu and then tap 1 to begin the ripping process. Semplice will begin by listing all the tracks on the CD, asking you to place a marker where each new recording on the CD begins. For example, consider this tracklisting from a CD of Christoph von Dohnányi conducting Stravinsky and Bartók:
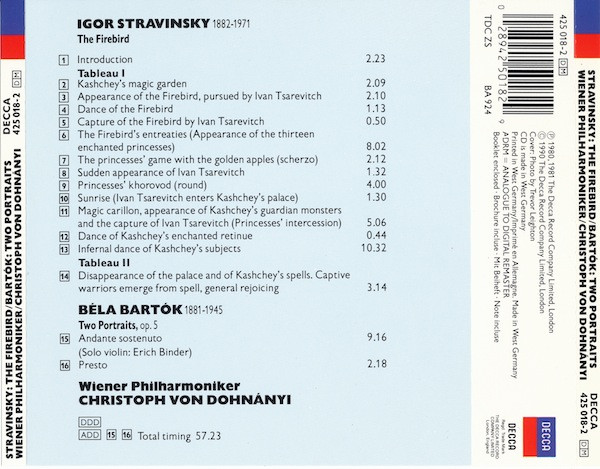
Looking at that set of tracks, I hope it is obvious that tracks 1 to 14 make up one 'recording', and tracks 15 to 16 make up a second, entirely different recording: the fact that they are both supplied on the same CD is irrelevant, as Axiom 8 says! Therefore, when I start the ripping process in Semplice and it presents me with this screen:
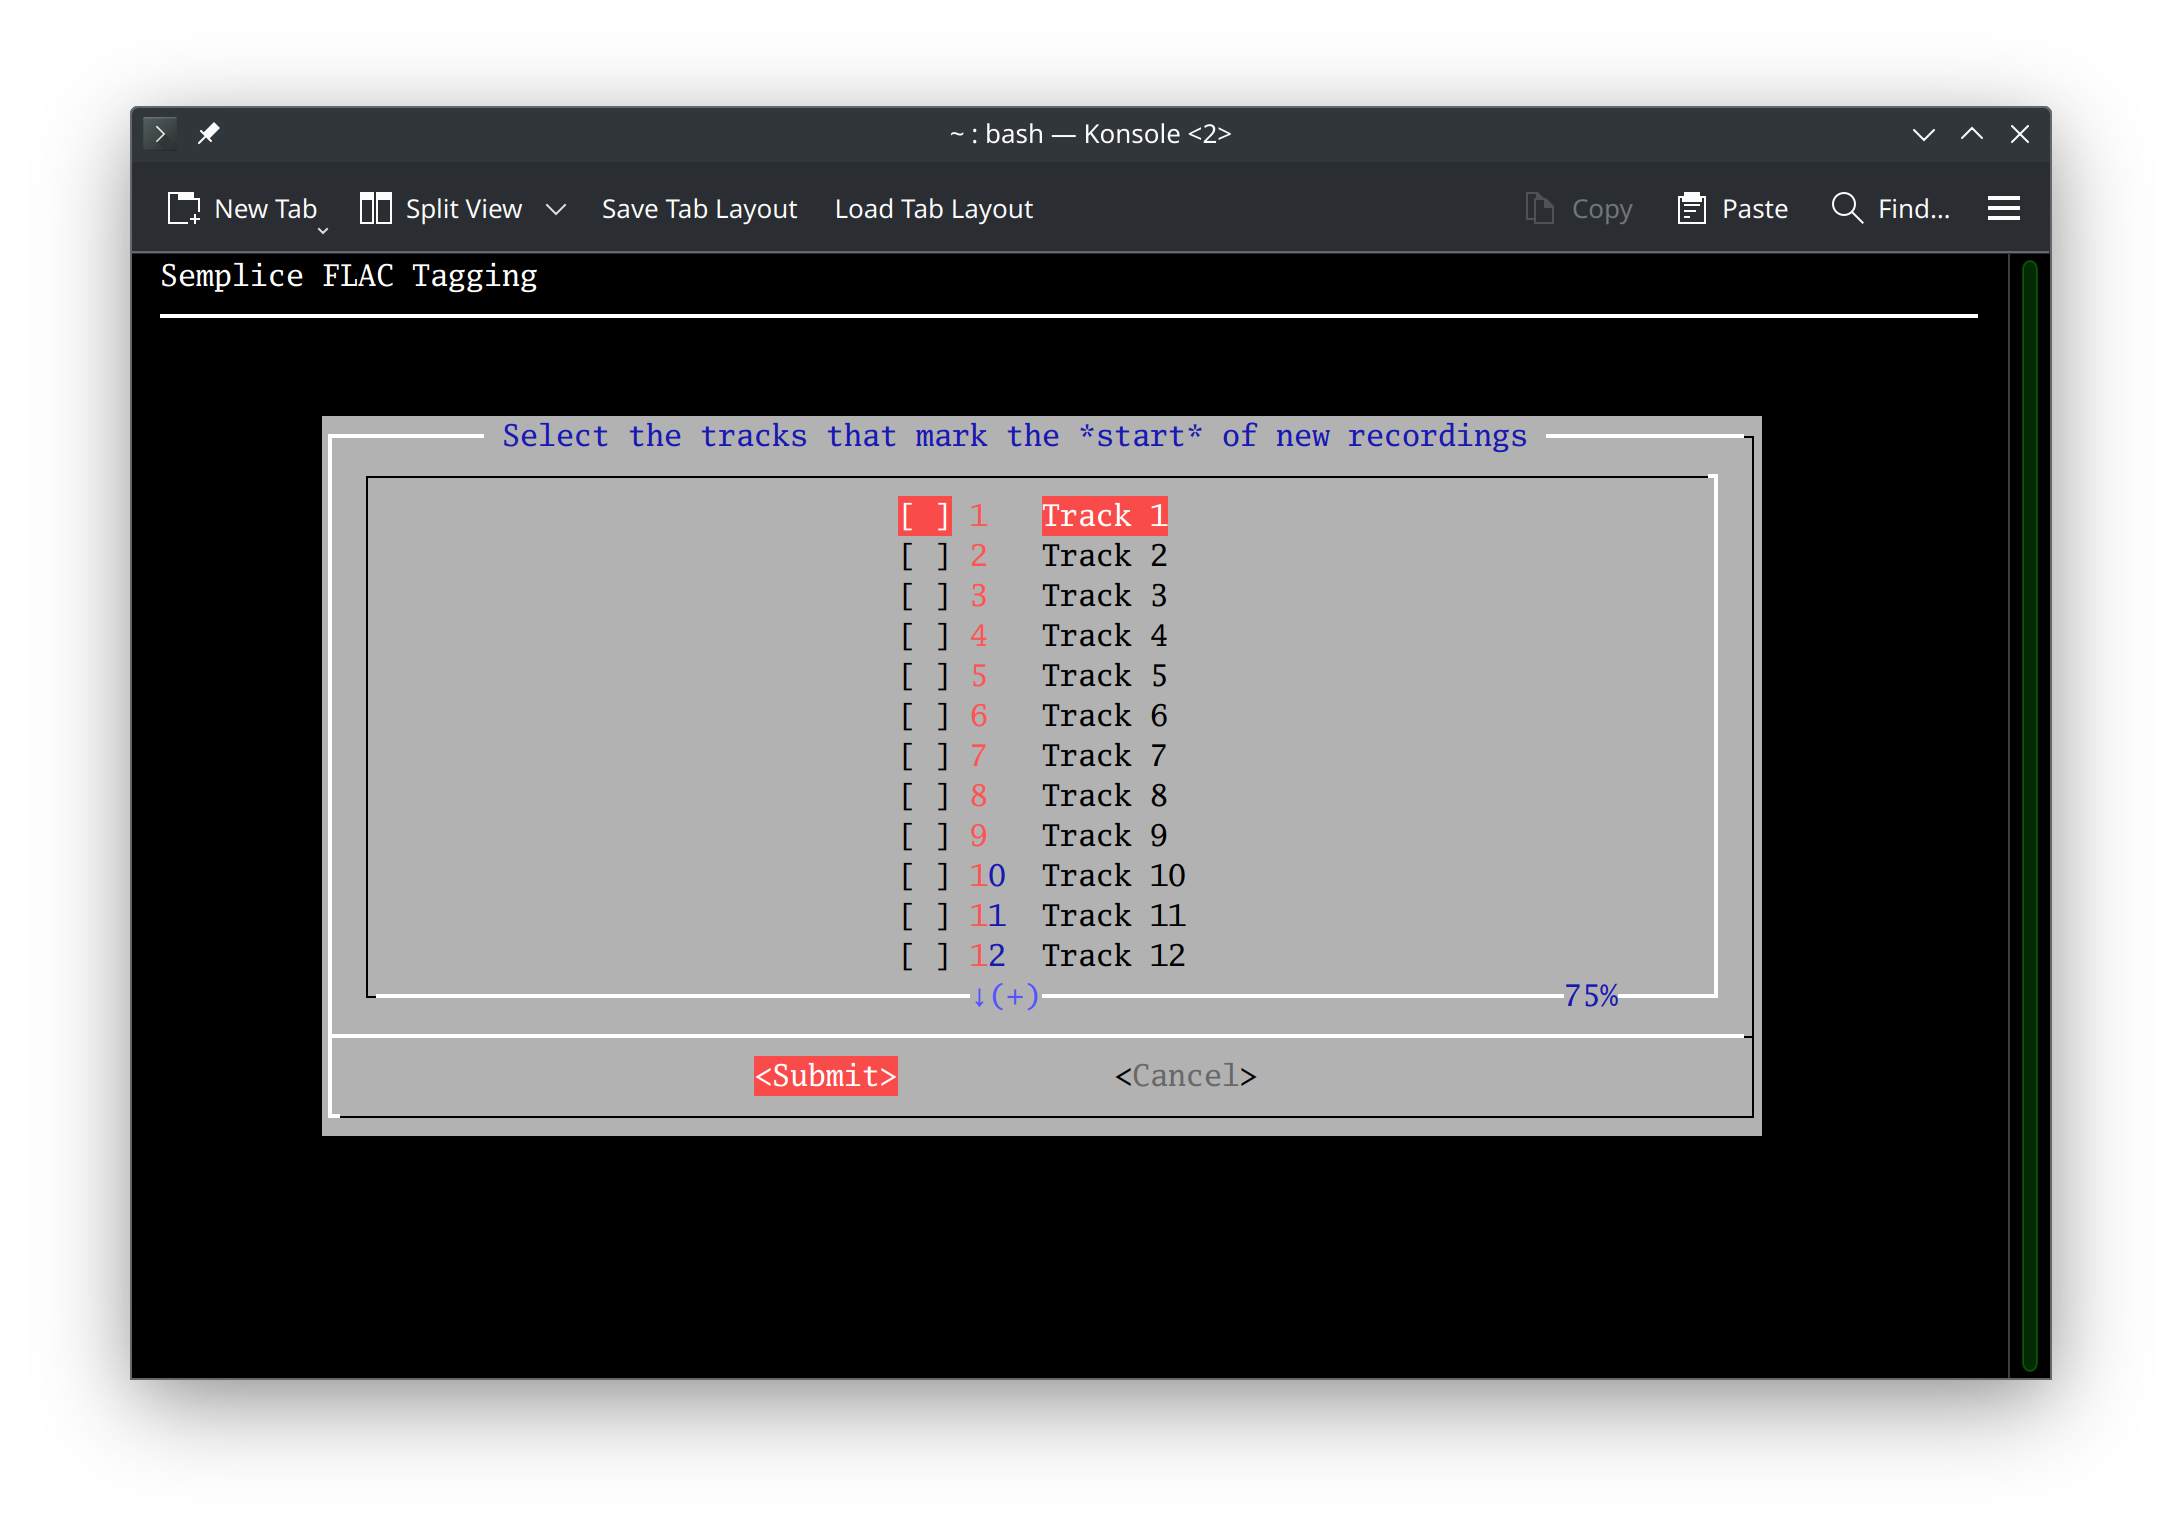 ...my job is to scroll up and down the list of tracks until track number 1 is highlighted and press the Space Bar so that an asterisk appears next to that track inside the square brackets; and to then scroll down until track 15 appears and do the same thing:
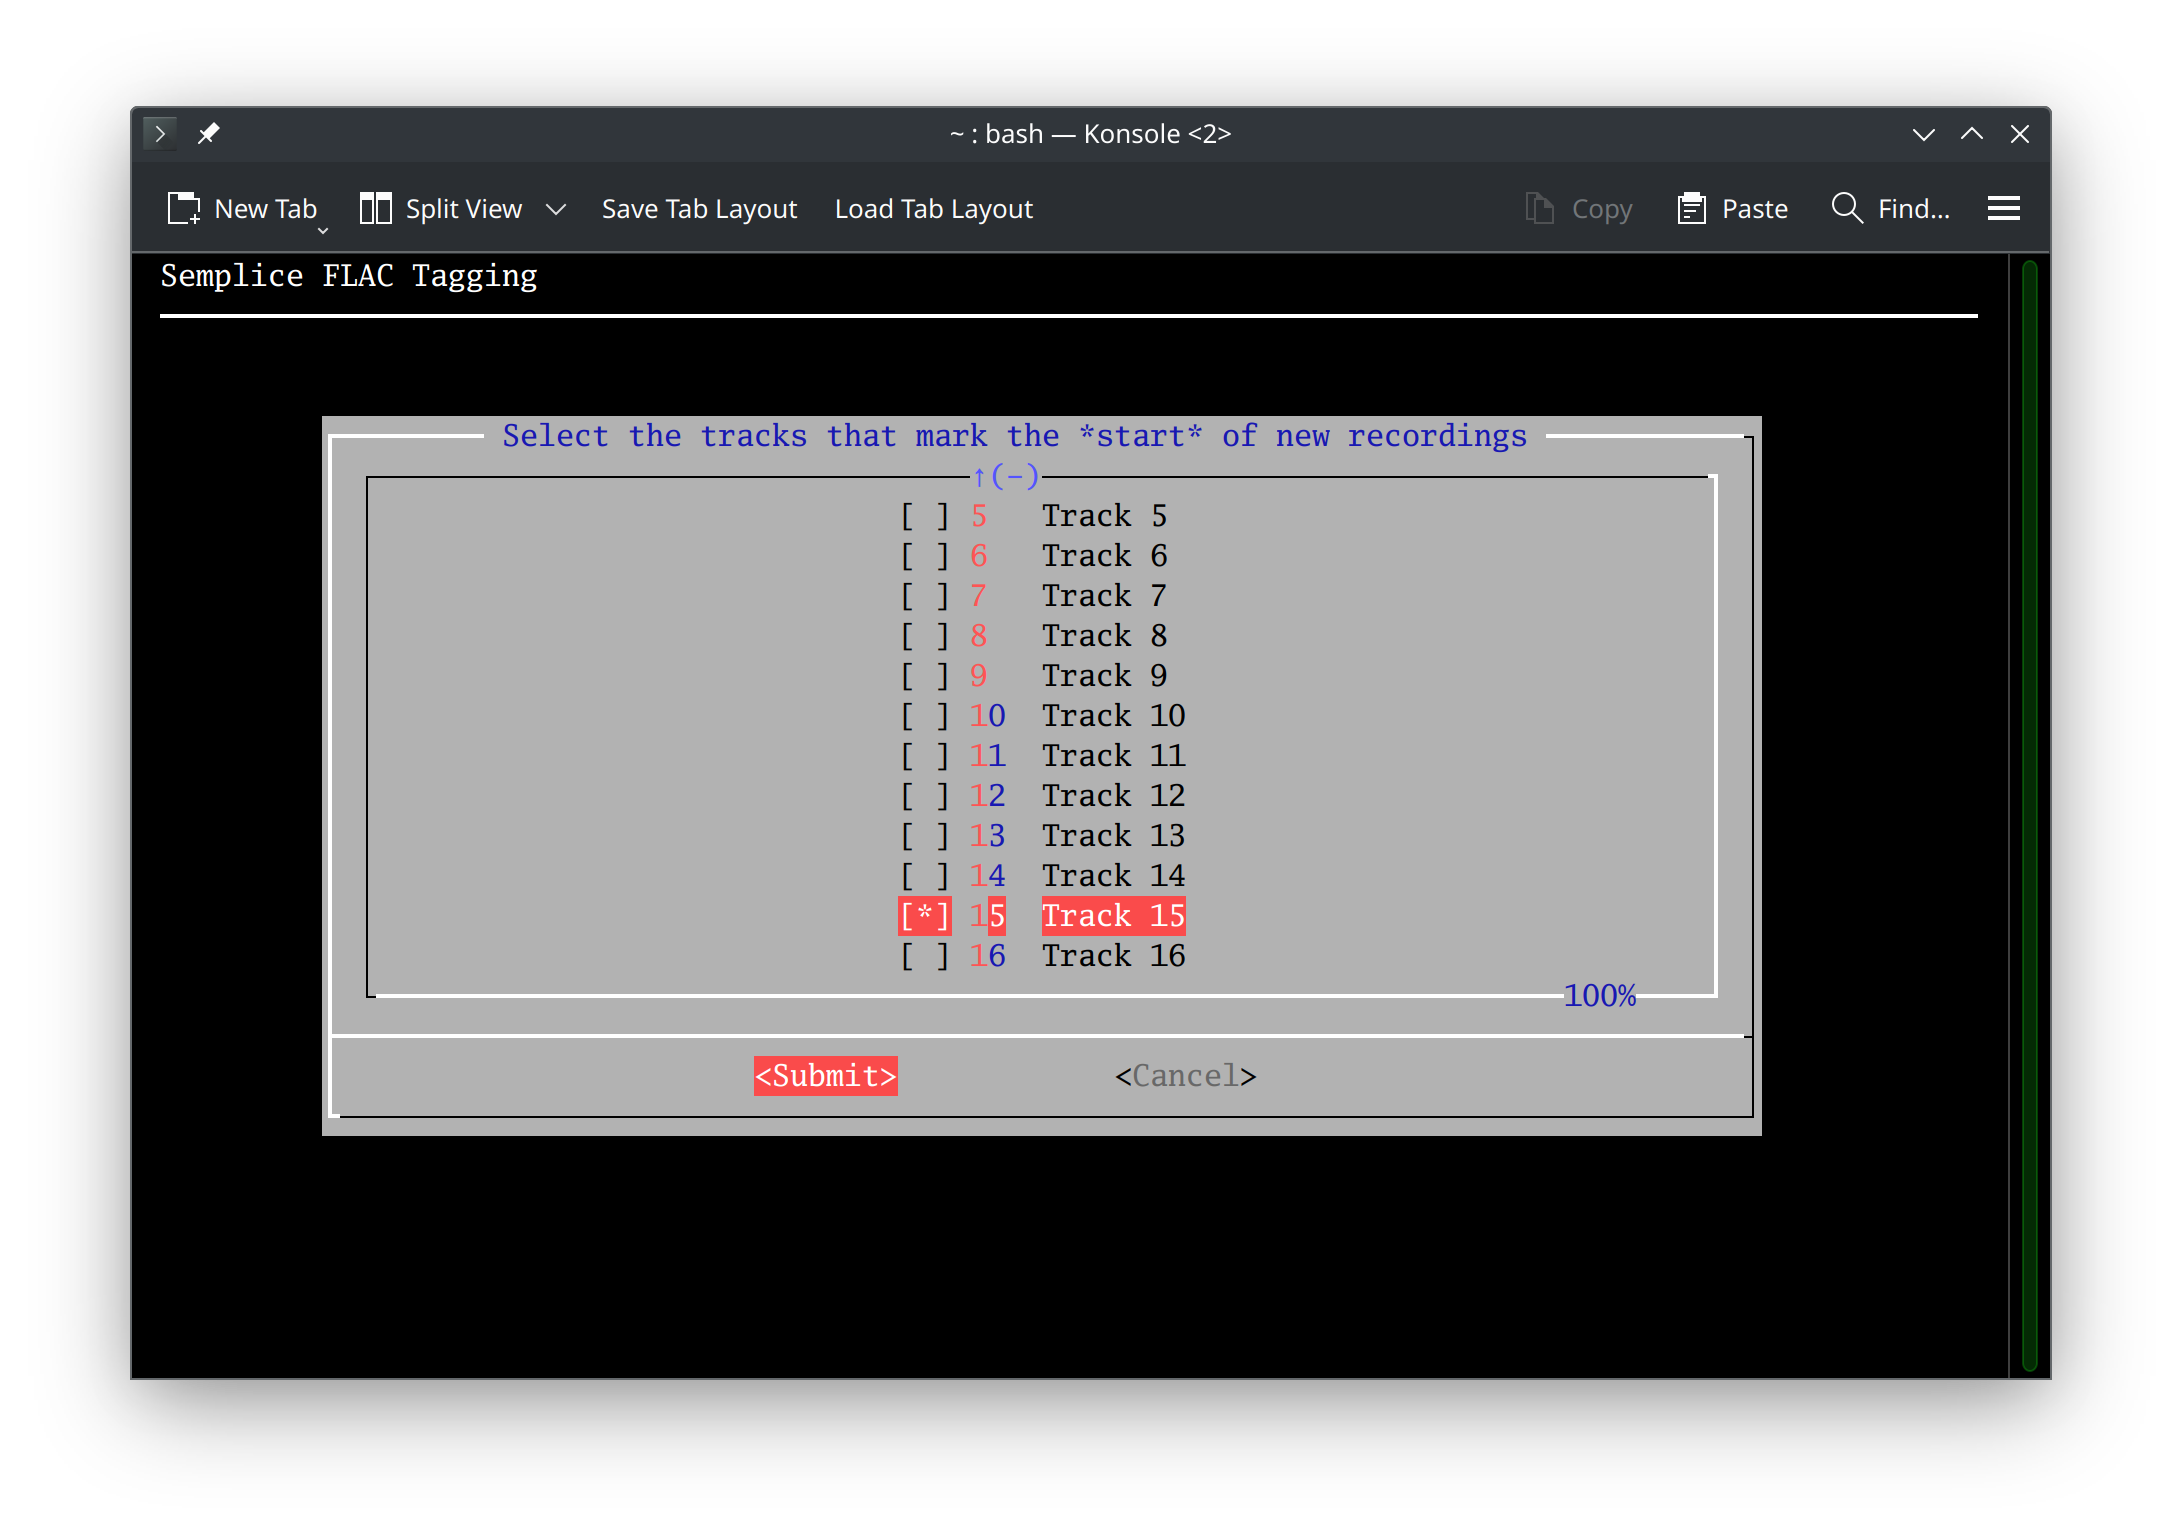 Once Semplice knows the start of each recording, it will split this rip out into separate folders of FLACs as appropriate: in this case, I'm obviously going to end up with two folders, one for the Stravinsky and one for the Bartók work. There is no limit to the number of recordings you can carve out of a CD in this way (subject only to the number of tracks on the CD, of course) -and if the CD is an entire recording, not needing to be split up into separate rips, you can just click the 'Submit' button without having put an asterisk next to any track at all. You could also just put an asterisk next to track 1 and click 'Submit', too: both approaches mean 'this is an entire recording'.
Once you've identified the start of each recording contained on the one CD, highlight the [Submit] button and press [Enter] (you can also click the Submit button with a mouse, if you prefer). The ripping process starts practically immediately:
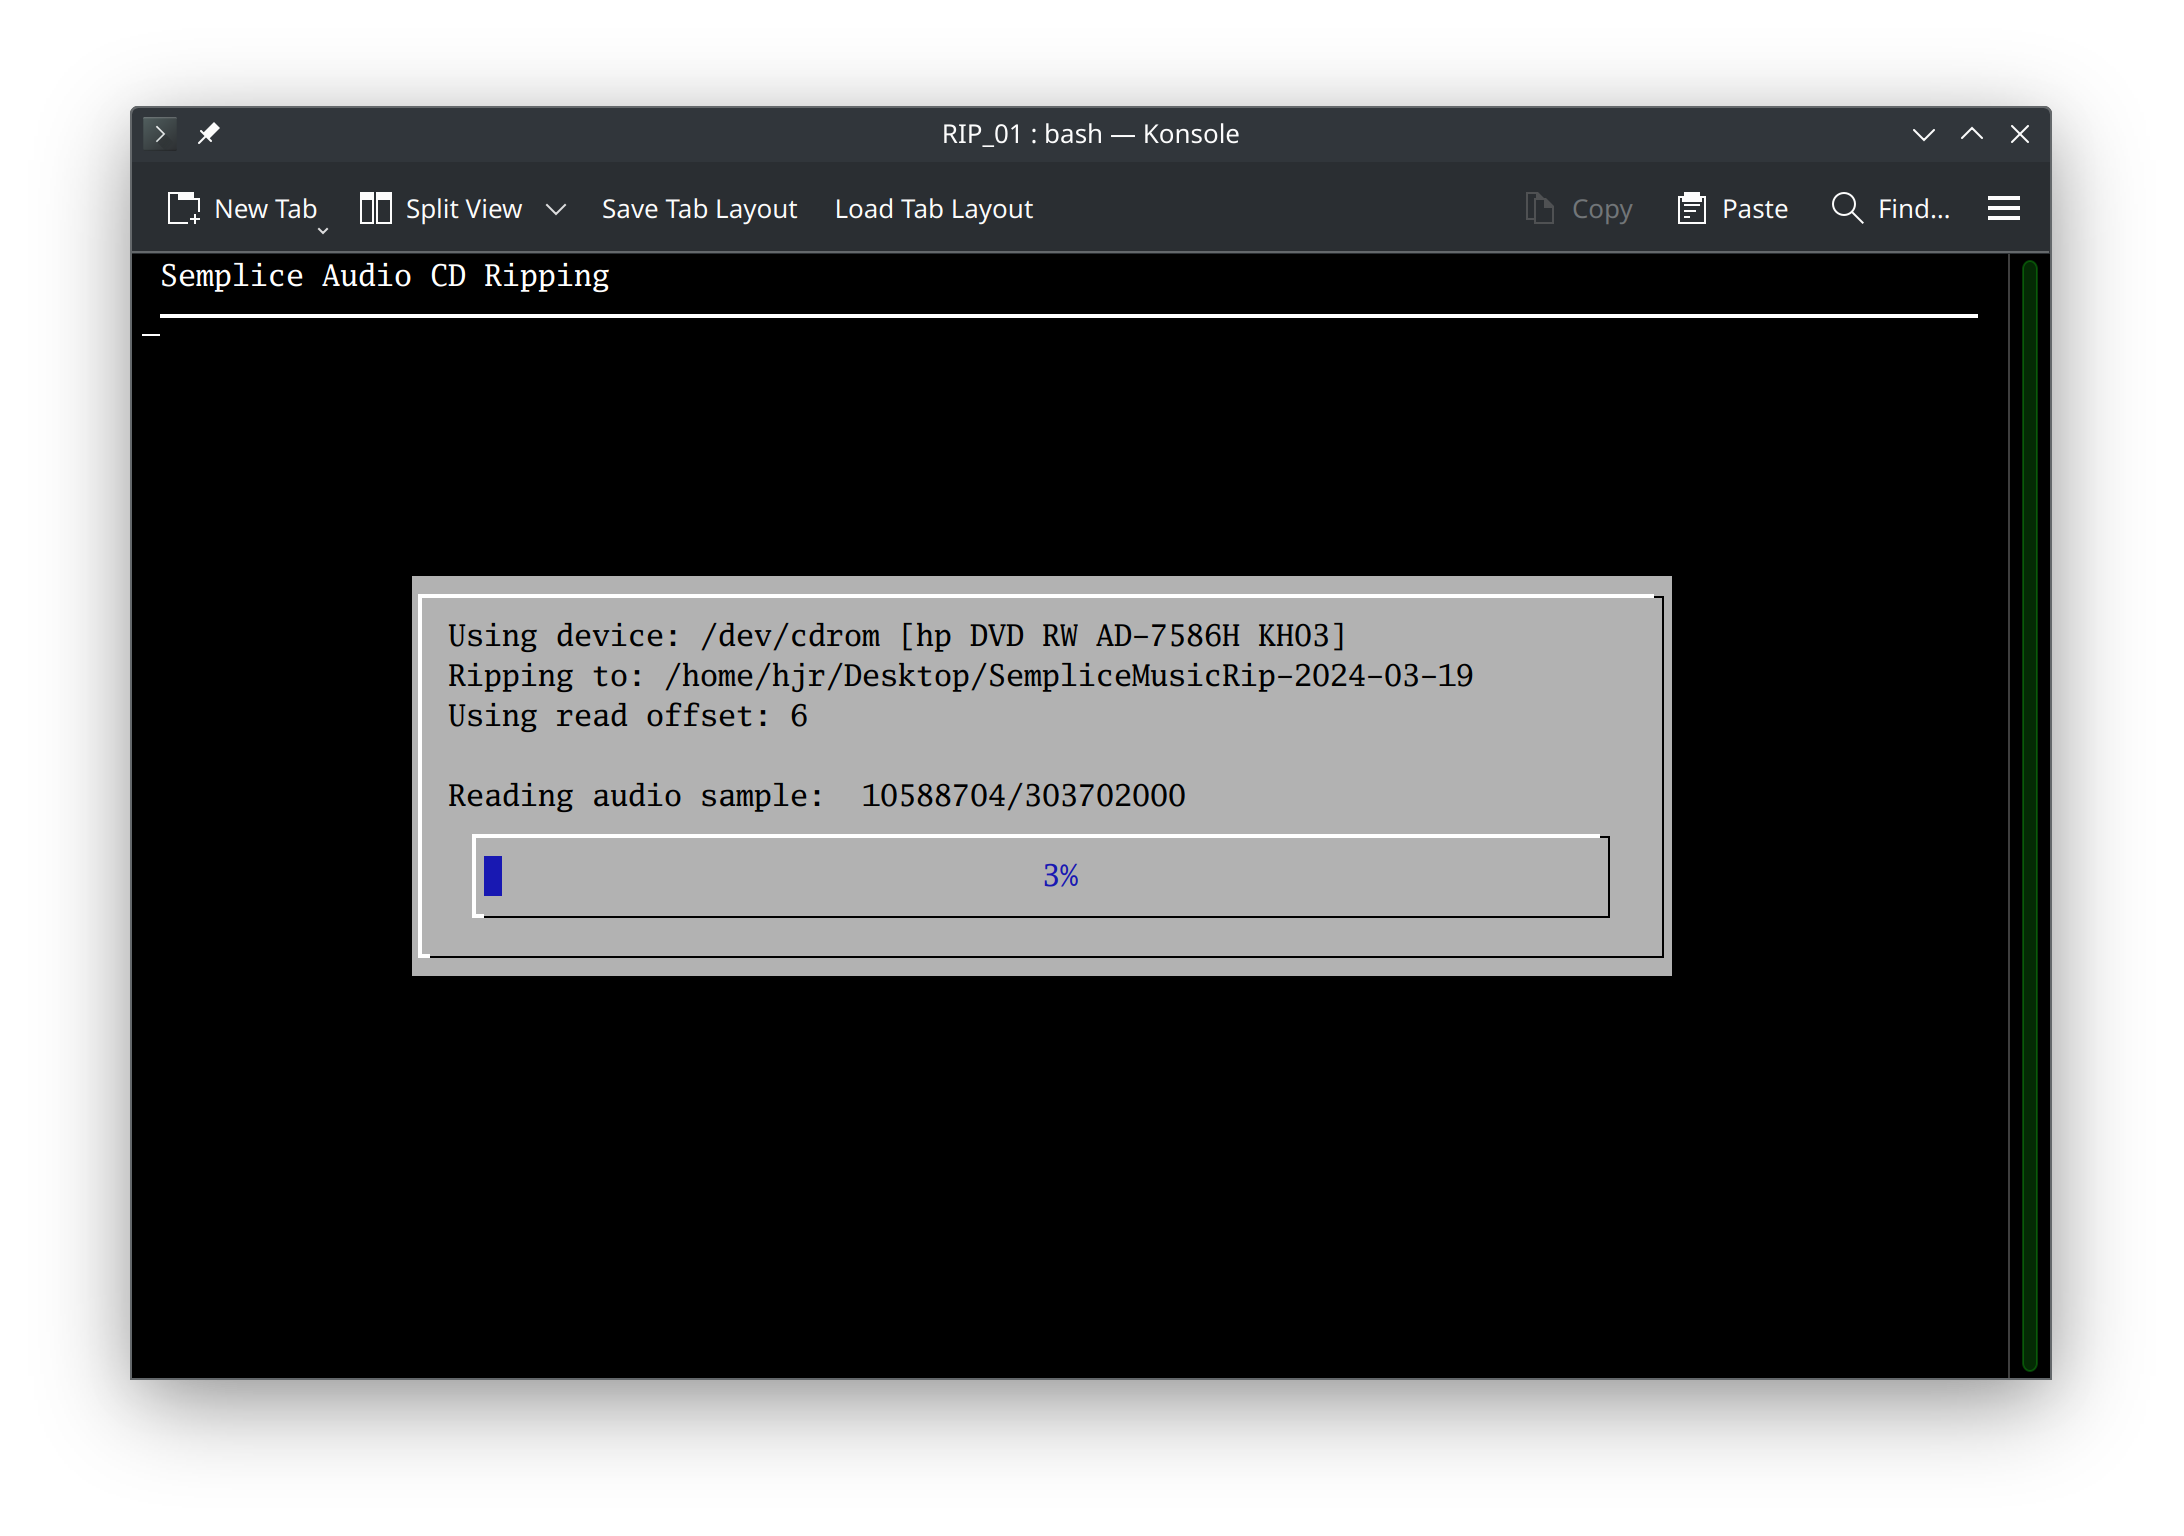 As you can see, Semplice will confirm what optical drive it's using, the folder it's ripping to, and the read offset it's using to ensure an accurate rip. The progress bar then ticks up periodically as new 'frames' of the CD are read in turn. Whilst that's happening, you might want to inspect the folder where Semplice says it's writing the rip. In my configuration file, I've got the 'Rip CDs to Folder' parameter set to /home/hjr/Desktop -but you can see from the above screenshot that Semplice has created a sub-folder on my Desktop, called 'SempliceMusicRip-2024-03-19'. In other words, Semplice will always create a date-based sub-folder within where your parameter file says to write rips. Inside that sub-folder, you'll get additional sub-folders, one per rip:
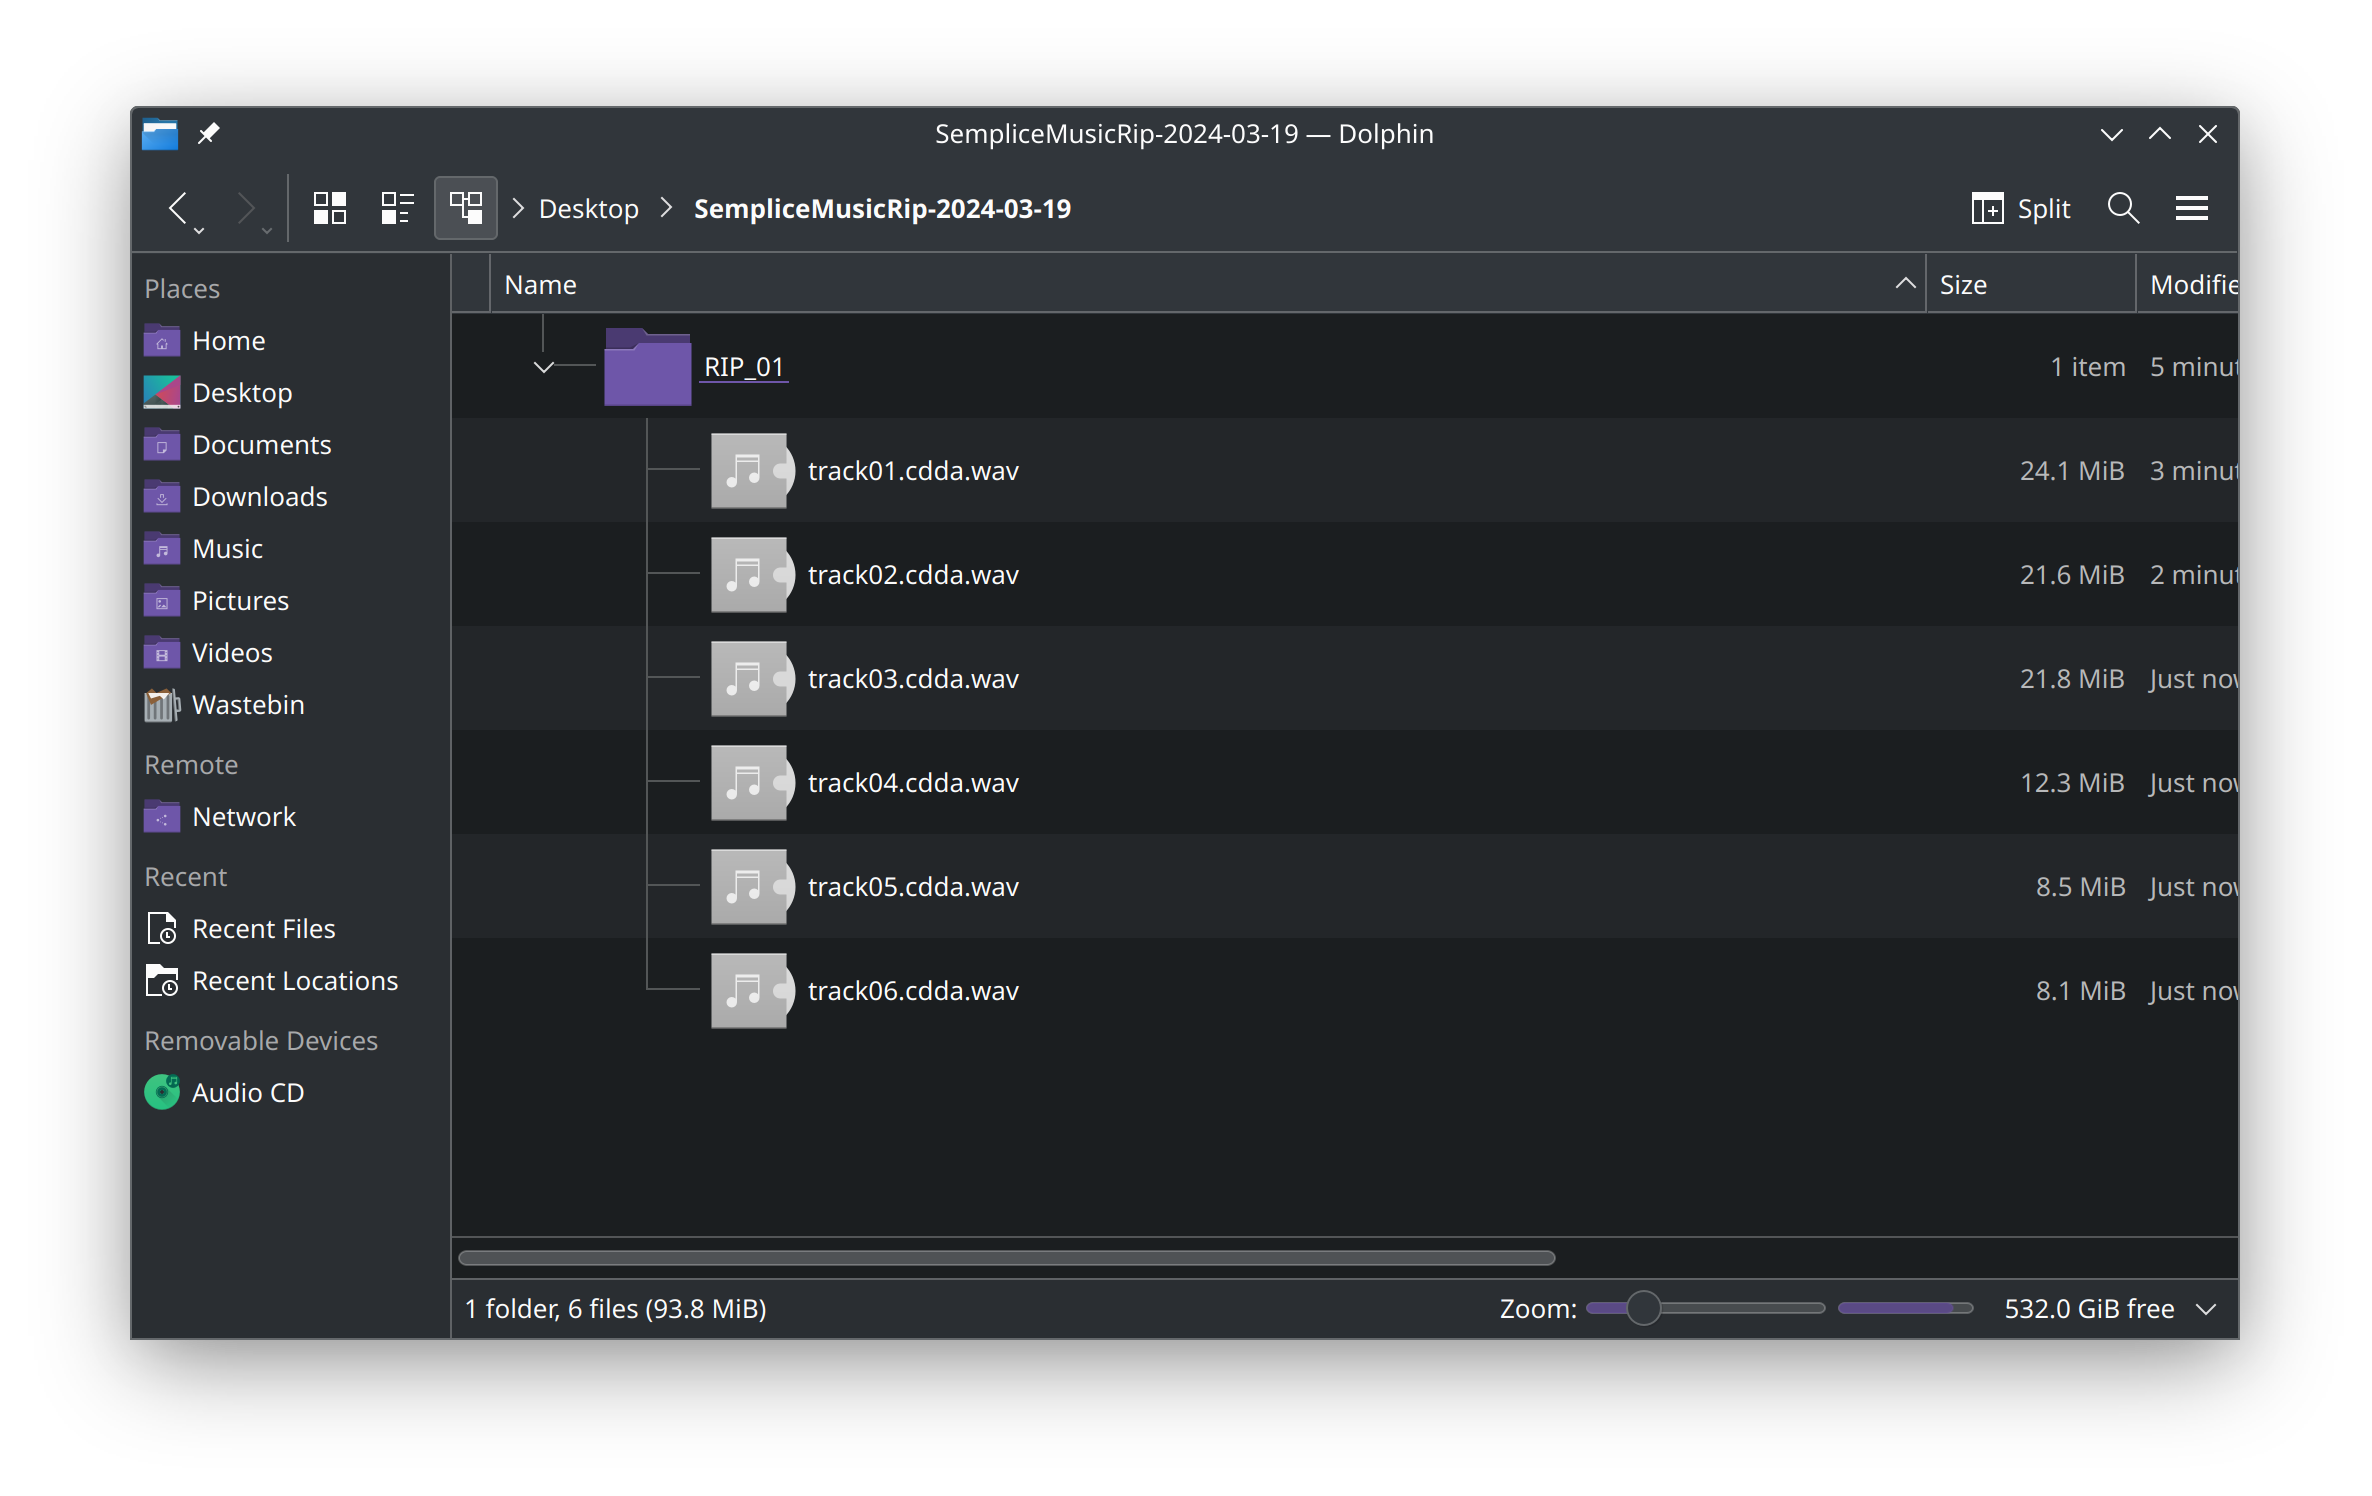 Here, you can see my rip of the Dohnányi CD is in-progress and therefore only the first six tracks have been ripped so far -but they're being written into a 'RIP_01' folder. The Bartók tracks will, when ripped, end up in a 'RIP_02' folder. Semplice will keep creating new 'RIP_xx' sub-folders as needed: you can rip multiple dozens of CDs in one day and end up with a 'RIP_142' folder, for example!
You'll notice from that last screenshot, too, that the rips are coming off the CD as WAV files: uncompressed, lossless audio data. That will get sorted for you soon enough!
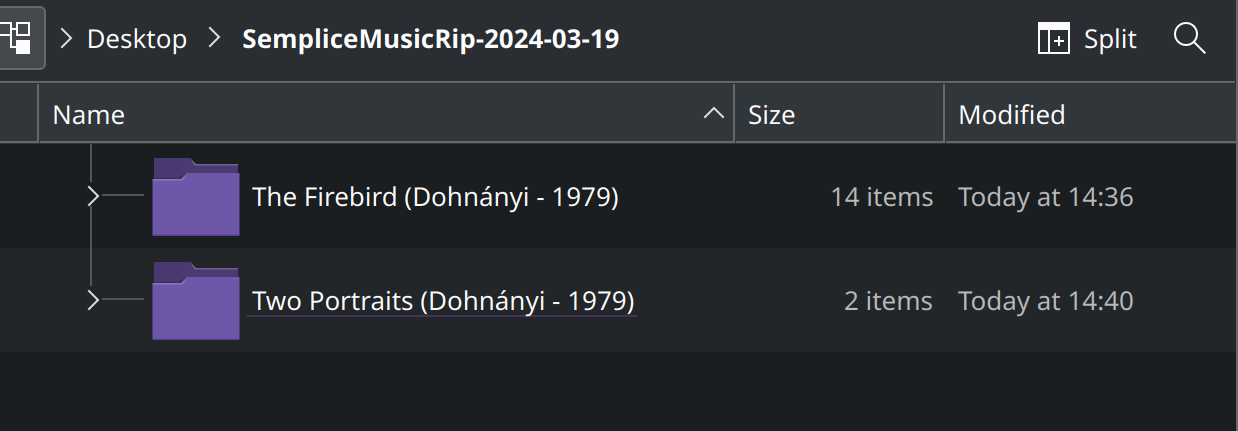
Here's my file manager once more, after everything has been ripped from the one CD: you'll notice the two RIP... folders and the multiple ripped tracks within each:
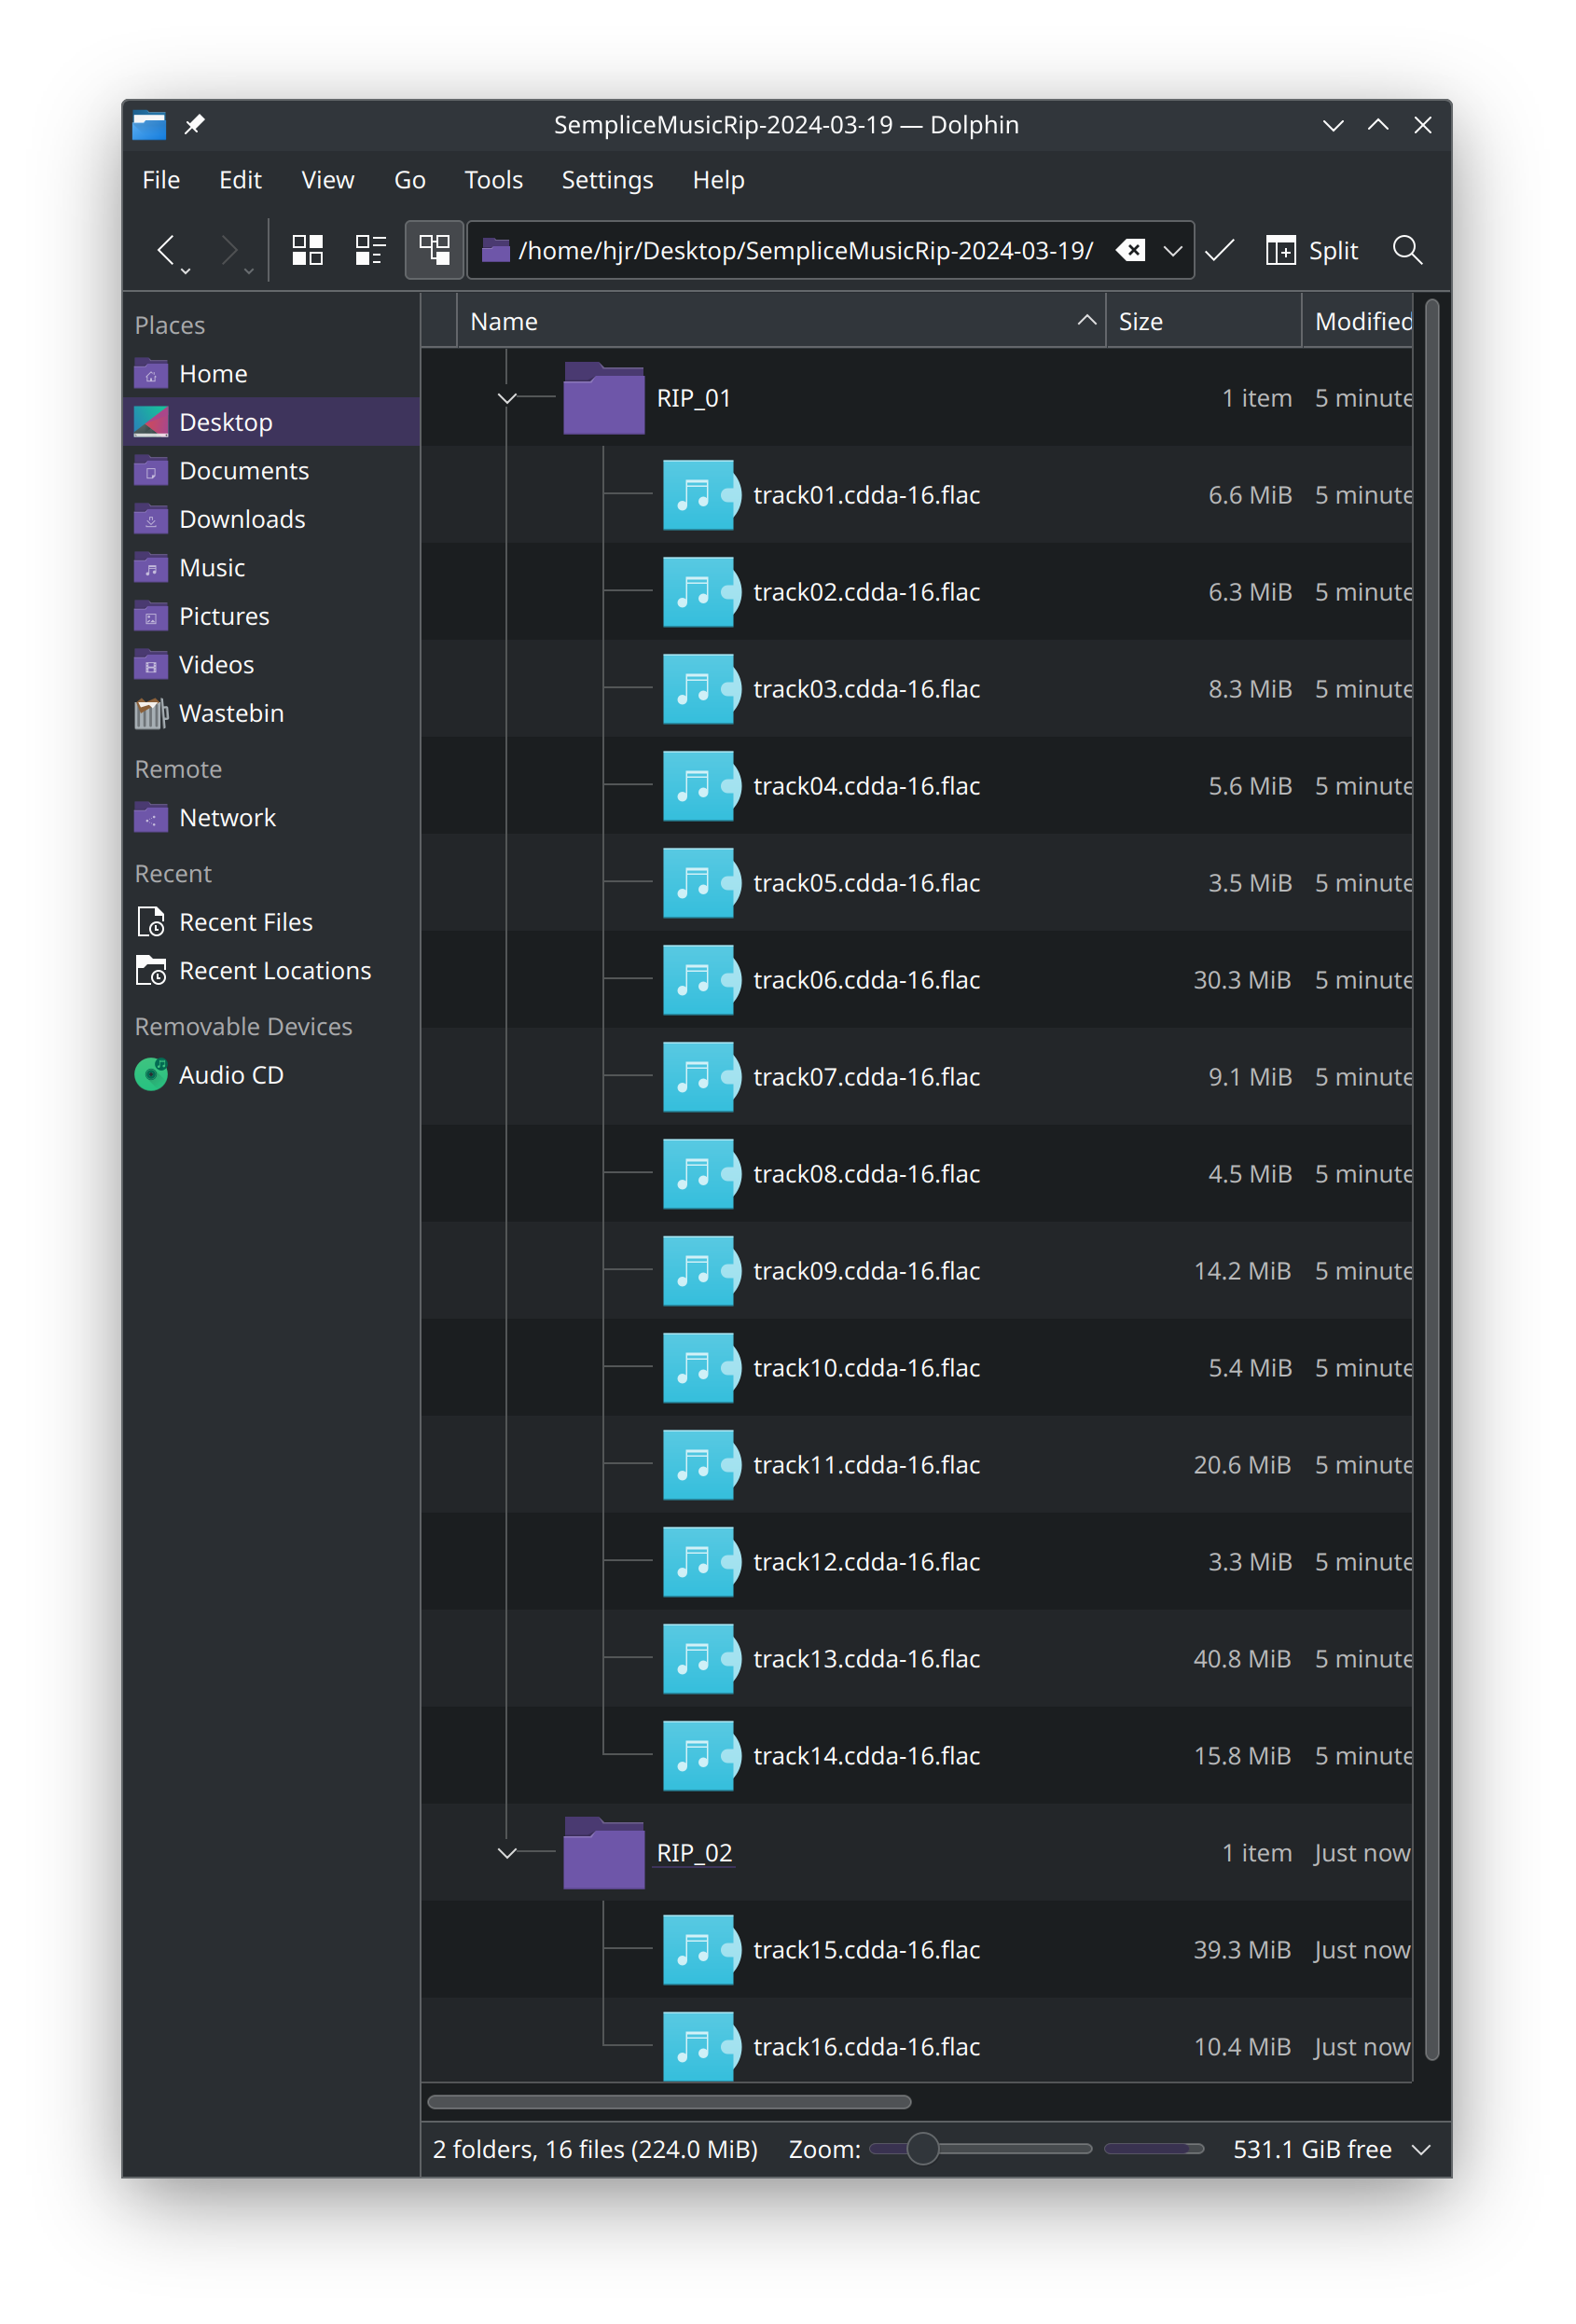 So, I identified two starting tracks when the rip process first began; now I've ended up with two separate RIP... folders and inside each I've got a bunch of FLACs, not WAVs: the conversion from WAV to FLAC is done automatically for you. Back with Semplice, for this rip I now see the following message:
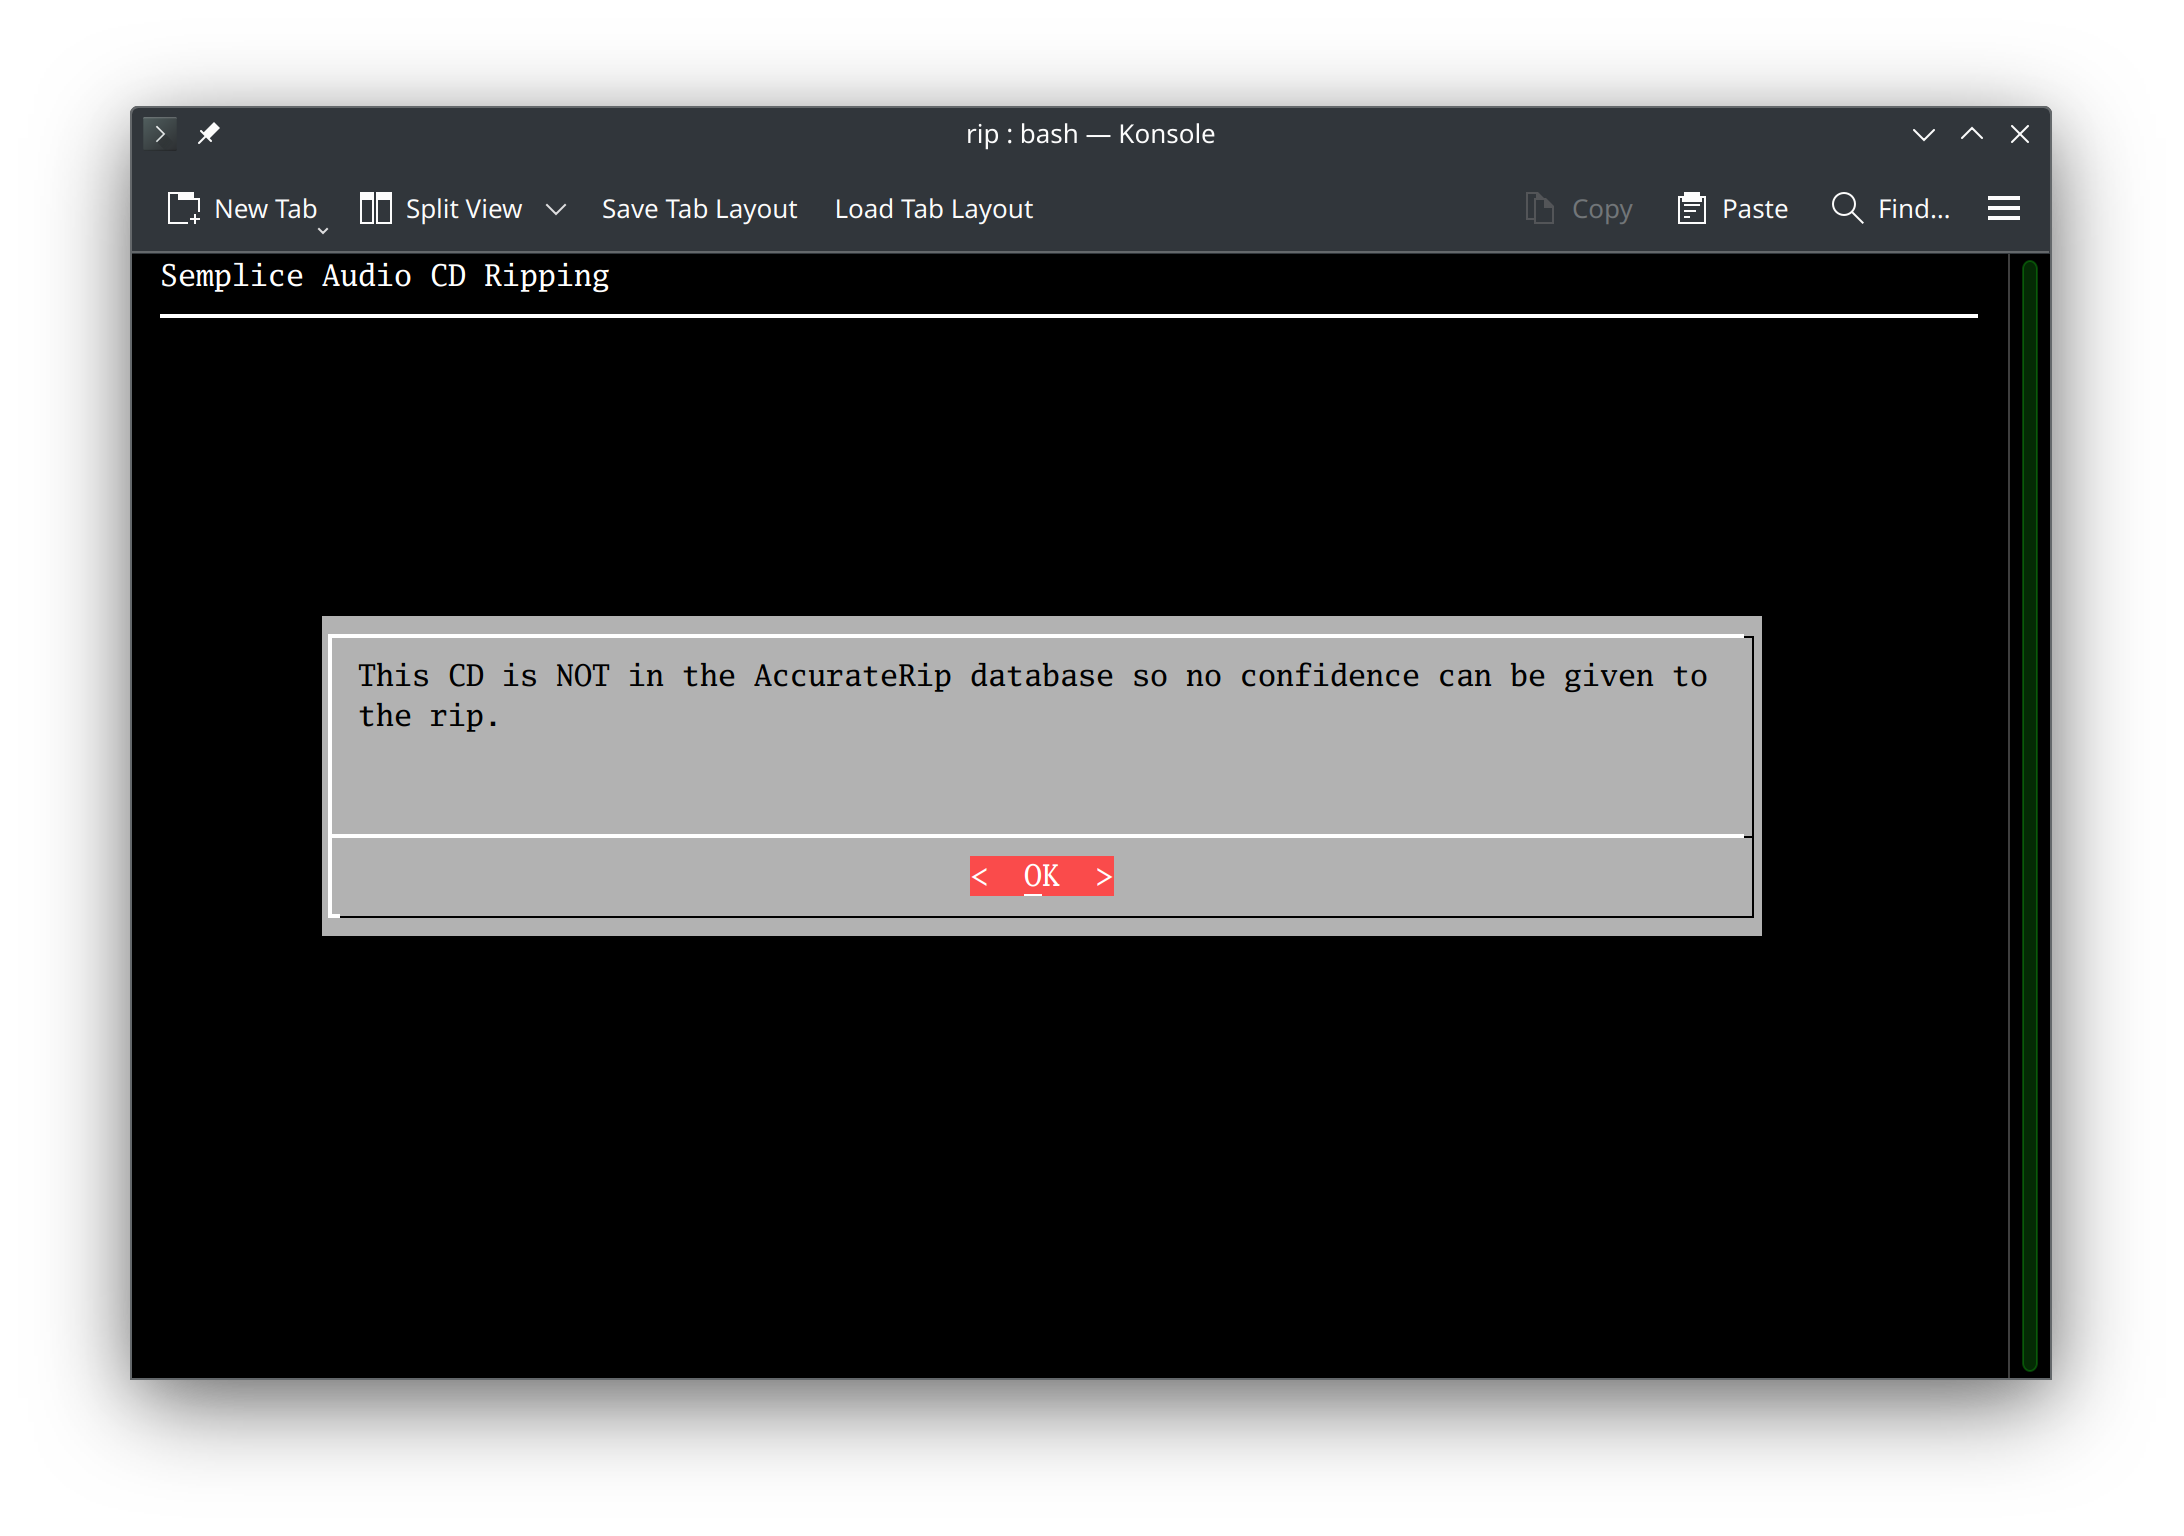 For classical music rips, I'm afraid this will be quite a common occurrence: classical music is not the world's most popular form of music, so the AccurateRip database often doesn't have records of other people ripping the same CDs as I tend to rip! This message is not an indication of anything going wrong with the rip, therefore: just that you are pretty much on your own on the planet having ripped it! Out of interest, you could visit the $HOME/.local/share/semplice2/rip folder at this point and check the contents of the ripaccuracy.txt file contained within:
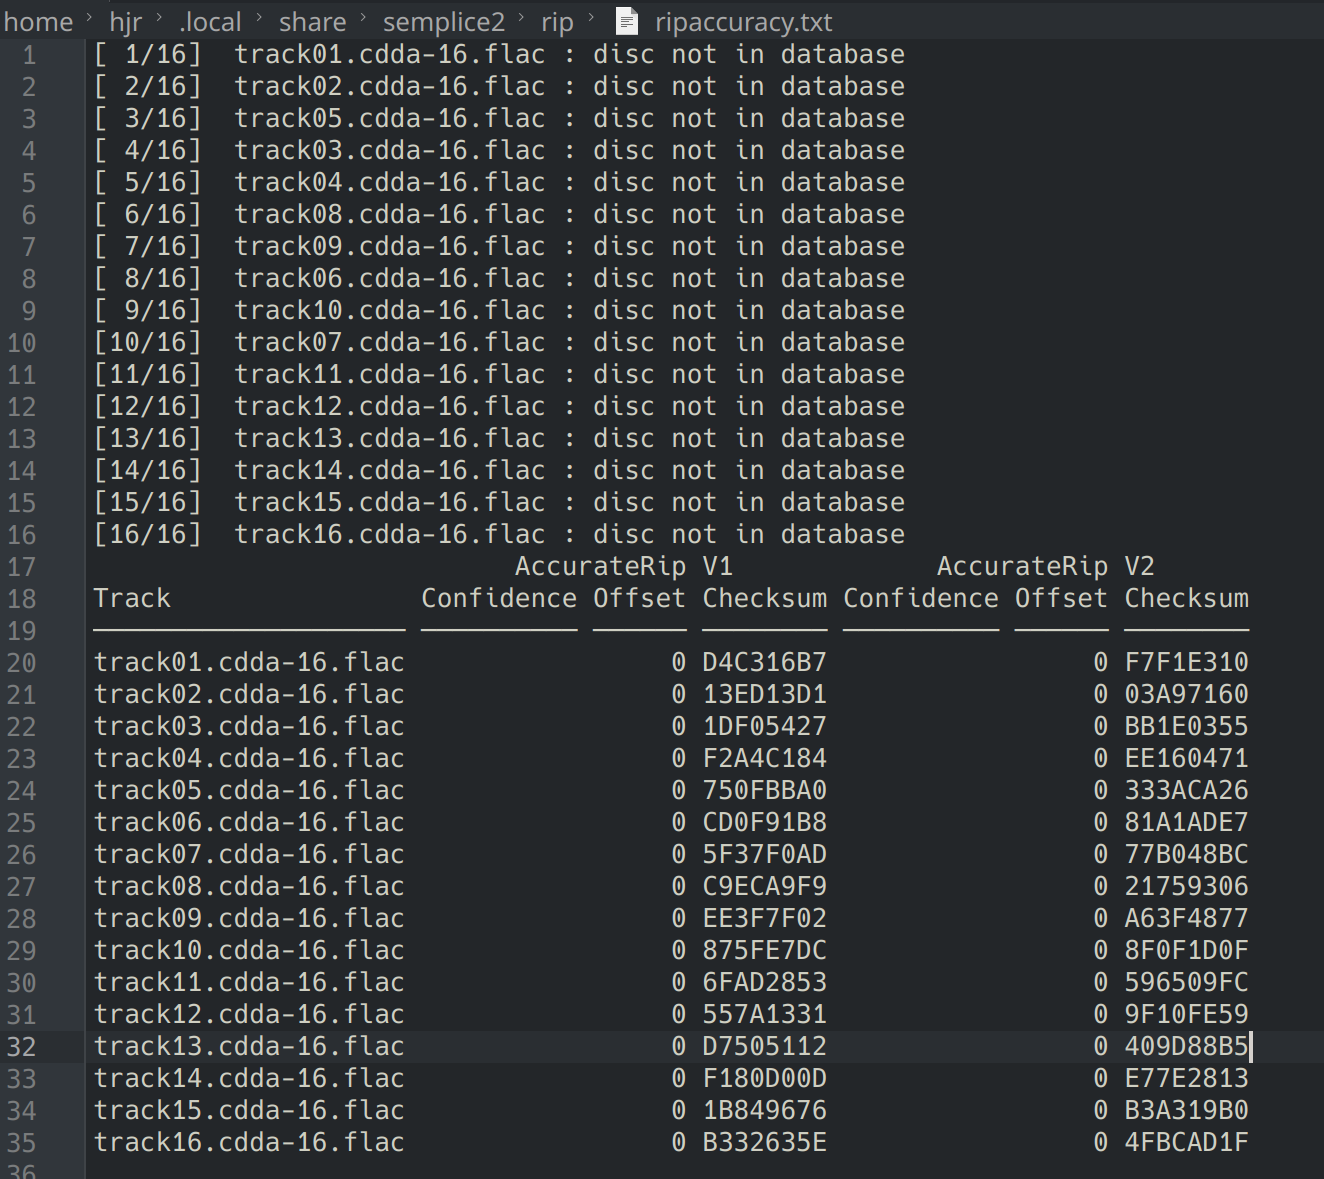
It's mostly gibberish, of course: those 'Checksum' columns are the digital 'fingerprints' of your rip and its those which should match up with the same fingerprints produced by other rippers of this CD. As the 'disc not in database' statements make clear, however: on this occasion, no fingerprint matching can be done. All I can do is therefore click 'OK' on the message box Semplice's displaying and return to the main menu (with the disk being ejected from the optical drive as I do so).
If your CD is one of the more popular ones, such that other people have ripped it in the past and had their digital fingerprints added to the AccurateRip database, you'd have seen this sort of response from Semplice at the end of the rip:
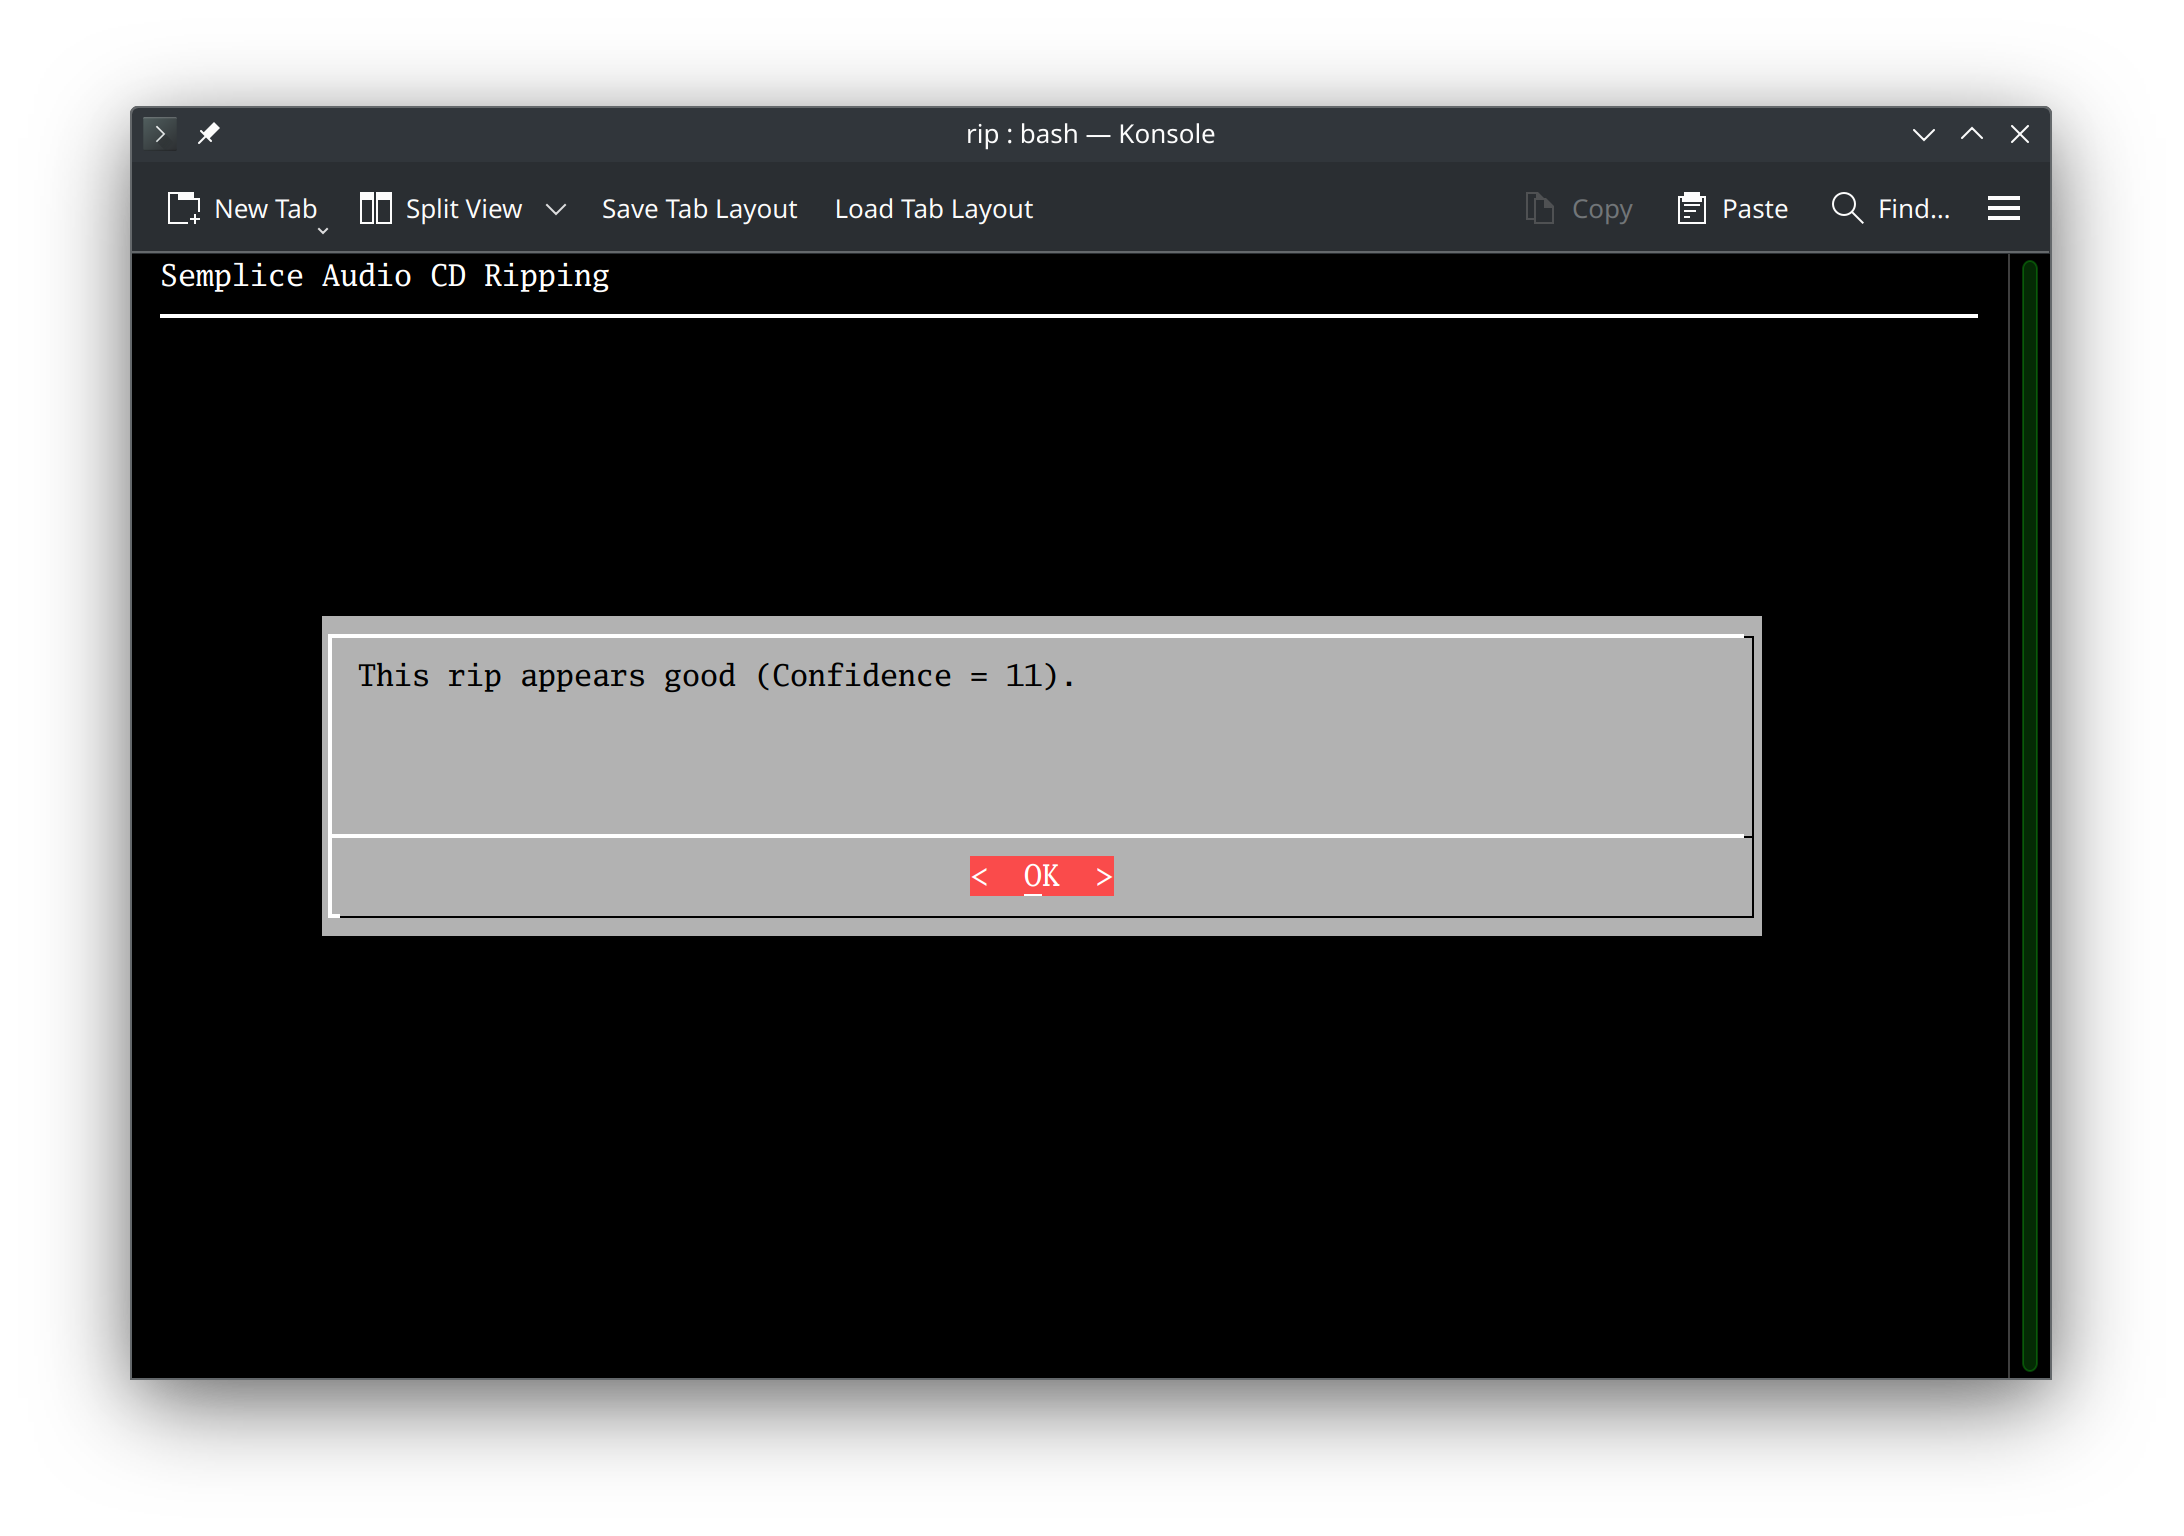 Here, the 'Confidence = xx' message tells you how many other entries in the AccurateRip database match your own digital fingerprints. In my case, 11 other people have ripped this CD with the exact same audio signal output as me... which is intended to give you a feeling of some confidence that your hardware isn't doing uniquely weird things when reading a CD.
Remember that if you have switched on Hyper-Accurate ripping in the parameter file (please don't!), Semplice will not even attempt to do a confidence check for your rip: it will simply remind you that you can read all the gory technical details in the ripaccuracy.txt report, as found in $HOME/.local/share/semplice/rip.
Summing up, therefore:
- Semplice rips accurately, not speedily
- It works out the read offset for your optical drive automatically, but if that fails, you can supply a value of your own
- It rips whole disks
- But it can split out different parts of a CD into separate sub-folders: you just tell it what tracks indicate the start of new recordings on the one CD
- The rip produces WAVs, but these are auto-encoded into FLACs. By default, the intermediate WAVs are deleted when the rip concludes
- An attempt is made to find your CD in the AccurateRip database and, if it can be, a confidence value will be returned. If it can't, it doesn't mean the rip is wrong; it rather means your musical tastes are somewhat specialised!
Importan Note: Point 6 above (i.e., the attempt to find your rip in the AccurateRip database) is only true if the Semplice Version 2 installer was able to install the audiotools package correctly during its own installation. That should be true for all supported distros, but if that audiotools installation process goes wrong for some reason then Semplice will silently not perform an AccurateRip database lookup. Remember that it also won't do a lookup, even if audiotools is installed correctly, if Hyper-Accurate Rips are enabled in the Semplice configuration file.
4.0 Post-Rip Processing
The Semplice CD ripping functionality results in folders called lovely names such as RIP_01 and RIP_02 and so on, along with FLAC tracks with delightful names such as track01.cdda-16.flac and the like! Once the rip has finished, therefore, your work is all before you: the folder names need (according to Axiom 17!) to represent the extended composition name of the recording... and then the job of marking up each of the tracks with appropriate metadata begins. That is a job more fully described in the tagging part of this user manual. For now, I'd content myself with a bit of folder renaming, resulting in this:
With the physical folders correctly named so as to represent each of the 'recordings' I ripped from my CD, I'm off to get tagging!
|[Back to Front Page]|[Ripping SACDs]|[Semplice Tagging Model]|[All About SuperFLACs]|[Volume Boosting]|[Audio Codec Conversions]|