1.0 Introduction
 This is a little bit out-of-scope for a set of documentation articles about how to install and use Giocoso, but I wanted the chance to document what I think is a really cool way to use Giocoso: to have it run on a small PC somewhere inconspicuous (in my case, it's the loft, and it's a Raspberry Pi 4) and send its audio signal across the home network to my desktop PC, which happens to be hooked up to a relatively decent set of audio gear and speakers.
To be fair, it's not really Giocoso that's able to do this (which is why this is a little out of scope!): it's actually the PulseAudio sound system, which has network playback built-in (rather as x11 has the ability to send graphical data across a network). All Giocoso does is to hook in to these PulseAudio features... and exploit them, mercilessly!
Fair warning: this can be tricky to get working and relies on some expertise with networking, Linux sound architecture, Linux configuration files and so on. What I document here works for me and my setup, but it's quite possible that one slight quirk or change of circumstance renders you incapable of achieving the same outcomes. I'm afraid it has to be left as something of an exercise for the reader to see if any of this works for you!
I also haven't tried getting a Raspberry Pi to transmit audio to a macOS PC, so that's definitely off the table for now 🙂
2. Architecture Basics
Let's start off with some terminological exactitude. I have a decent desktop PC which is attached to a hi-fi system and some nice speakers: I want the music I play to come out of those speakers. That makes my desktop PC the sound server. It's going to be running the PulseAudio sound system in a way that allows other devices on the network to transmit to it.
Up in my loft, I have a Raspberry Pi 4 (by the way, it works with a Pi 3, too) which is running Giocoso and wants to send music out across the network to anyone that can receive it. That makes my Raspberry Pi the sound client.
There is configuration required on both ends of this setup (though it's fairly minimal). Both server and client need to be able to talk 'PulseAudio', for starters. Specifically, this means we need to install a program on each side of the architecture called paprefs (i.e., PulseAudio Preferences). That's available in the standard repositories for both my Pi (which runs Manjaro for ARM) and my desktop PC, which runs Manjaro (the x86_64 flavour).
On the both client and server, therefore, issue appropriate commands to install paprefs. For Manjaro, that's just:
sudo pacman -S paprefs
If any additional programs (like the entire PulseAudio system libraries!) need to be installed as well in order to satisfy dependencies, fine: let the package manager do as it feels it needs to.
3. Server Configuration
On the desktop PC, you have to configure PulseAudio to announce itself on the network and to accept connections from elsewhere on the network. That's done by launching the PulseAudio Preferences utility. On Manjaro with KDE, that lurks under the Settings menu:
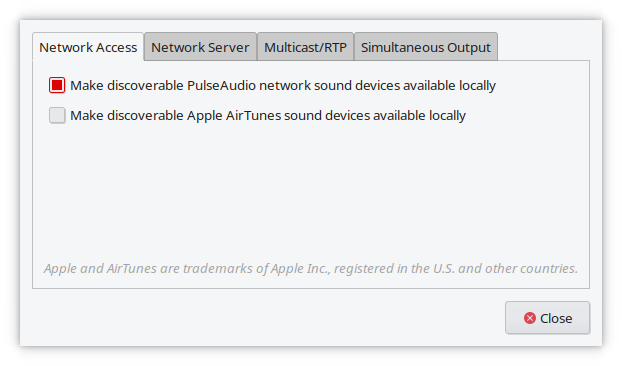
As you can see, the program displays four tabs going along the top of the program. On the first ("Network Access"), switch on the Make discoverable PulseAudio network sound devices available locally checkbox, as you see in the above screenshot. Don't click [Close] just yet, though!
Next, click on the Network Server tab:
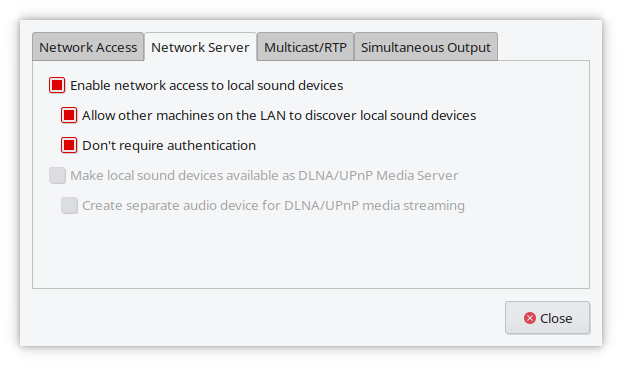
Here, you need to enable the top three checkboxes as you see above: Enable network access to local sound devices; Allow other machines to discover local sound devices; and Don't require authentication. If you care about security on your home network then, obviously, that last option isn't ideal! It is possible to configure things securely, using client/server authentication keys, but that's way outside of scope for this very basic introduction to the topic of networked audio!
Now you can click [Close] and have the new server settings applied.
4.0 Client Configuration
On the Raspberry Pi (the client in this setup), there's no software to install. Instead, you just issue this command in a terminal session: export PULSE_SERVER="tcp:<ip-address-of-desktop-pc>" and then launch Giocoso with the --forcepulse runtime parameter. Audio should immediately be piped to your desktop PC (though you may need to fiddle the Pi's own audio settings so that sound is sent to the right local device: in my case, I originally had audio directed to the headphone port on the Pi, rather than the HDMI 'audio sink'. Once I'd made the HDMI interface the default and disabled the headphone output, everything worked fine).
If you prefer not to have to keep typing the 'export PULSE_SERVER...' command every time you want to do network music play, you can set that parameter in your $HOME/.bashrc environment-setting file. Just tack the same command to the end of that file, save it, and then issue the command:
source .bashrc
...to have the new setting picked up by the existing terminal session (or you can just close the existing terminal and open a new one; or you could reboot, if you're feeling so inclined).
Naturally, this way of doing networked play is restrictive: only one remote IP address can be exported at a time, after all. If you wanted to broadcast your audio to the cinema room, the bedroom, the kitchen and so on, each with their own small PC waiting to receive an audio signal... well, this setup only permits one of them at a time to be the audio recipient. Which is not to say 'broadcasting' to multiple locations simultaneously on the home network isn't impossible: PulseAudio can certainly do that. It's just that it's so far out-of-scope for Giocoso documentation that I really am not going to venture into those waters here!