 1.0 Introduction
Super Audio CD (SACD) was introduced in 1999 (i.e., about 20 years after the original, 'ordinary', CD). It was intended to be the 'next generation' audio format, given its higher fidelity and longer playing times than standard CDs. Unfortunately, those changes from the original CD standard meant that disks using the new format were completely incompatible with 'normal' CD players, which meant that to experience the joys of SACD required the purchase of new (and expensive!) hi-fi kit.
Recognising the marketing disaster that would mean, most record companies produced 'hybrid SACDs': the one physical disk would contain two separate layers, one of which would literally be the same data as you'd previously have stored on a standard audio CD; whilst the second layer would contain the all-new, all-singing, all-dancing high resolution SACD audio data. That would mean a hybrid disk could be played in a standard CD player -but only its standard CD audio layer would be read when doing so. If you wanted access to the hi-res SACD data layer, you still needed to spring for the new, expensive dedicated SACD players ...and that's where the costs would start heading skyward! Accordingly, SACD never really took off before it got side-swiped entirely by the download and streaming revolution that basically killed off all physical audio and video formats. New releases of SACDs essentially ended in about 2009, so it was a fairly short-lived audio standard.
However, the classical music industry seems lately to have taken a bit of shine to SACD once more, with quite a few new releases coming out in hybrid SACD/CD format -and, quite often, it's the SACD layer that embodies the results of extensive remastering, whilst the standard CD layer merely contains the same audio that was found on the original CD release. As a result, modern classical music SACDs often sound much better than their accompanying CD layers... if only you could listen to their SACD data! To be clear, however, it is the mastering of the SACD layer that improves the listening experience. Vanishingly few people can hear any difference for the same mastering regardless of whether it's coming from the SACD data layer or the standard CD audio one. Claims to the contrary can be made in writing to the 'I have a £10,000 pair of speaker cables you can buy if you are mad enough' department!
Nevertheless, grabbing that re-mastered SACD data is a desirable thing all on its own -and thus there is a considerable desire in classical music circles to be able to rip their SACD's SACD audio data, in preference to ripping just their standard CD layer. Unfortunately, ripping an SACD is not much easier than playing them ever was: it requires special hardware and software, for starters. Rather more seriously, however, in my view, is the fact that all the descriptions I've ever seen on how to rip SACDs around the Internet consist of half-explained procedures spread out over hundreds of pages of forum posts. See, for example, this forum thread which started off promisingly enough as a simplification of other threads that had got too complex and jumbled... but as it now itself consists of 237 (and counting!) 'pages' of information, questions, possible answers and much else (at least as of the time of writing) it has become, frankly, utterly bewildering to try and sort out into a coherent set of easy-to-follow steps!
Having banged my head against that particular brick wall for long enough, I thought I'd better document how I go about ripping my SACDs. To be clear, the steps I outline below are performed, in part, on a Linux desktop PC (Endeavour OS) and were documented as working in October 2024 (though this article first appeared in April 2021: edits concern, mostly, how to convert the output of an SACD rip to usable FLAC format using my Semplice program).
2.0 The Hardware
2.1 The Blu-ray Player
The fundamental problem of ripping or listening to SACDs is the same in either case: you need specialised 'SACD-aware' hardware to understand the physical format and layout of the disks themselves. Back in 1999, those specialised players were forbiddingly expensive. Today, however, we call them 'Blu-ray players' (since Blu-ray was a Sony invention, and SACD was a Sony/Philips joint invention, it should come as no surprise that most Blu-ray players can read and play SACDs)... and, happily, the fact that streaming services have basically killed off all physical audio and video media means that you can pick up second-hand SACD players for just a few tens of pounds or dollars without much difficulty.
Here, for example, is the one I purchased in 2020 from Ebay:
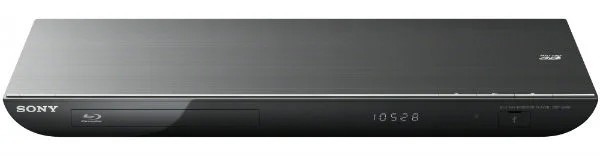 It's a Sony BDP-S490 Blu-ray player, first reviewed in What Hi-Fi way back in November 2012 -so mine was nearly 9 years old at the time of purchase, but even today, four years further on, it functions perfectly and only cost me £60. Prices in 2024 seem, if anything, a little cheaper, at just the £45ish mark.
So, if you want to rip SACDs, buy yourself a cheap Blu-ray player... but be warned that it can't be just any old player: only certain models do what we need them to do (which is to basically act as a file server on a home network, allowing ripping software running on your desktop PC to grab data from off the SACD spinning away inside the Blu-ray player). The list of Blu-ray player models that can do this is quite short (and largely consists of Sony players):
Sony
- Using the x86 extraction software: BDP-S390, BDP-S490, BDP-S590, BDV-E190, BDP-S4100, BDP-S5100
- Using an ARMv7 extraction software: BDP-S6200, BDP-S7200, BDP-S790, BDP-A6000, BDV-NF720, BDP-S6500, UHP-H1
Pioneer
- Using the x86 extraction software: BDP-80FD, BDP-160, BDP-170
- Using the ARMv7 extraction software: MCS-FS232
Oppo
- Using the x86 extraction software: BDP-103 and 103D, BDP-105 and 105D
Cambridge
- Using the x86 extraction software: Azur 752BD, CXU
Arcam
- FMJ UDP411, FMJ CDS27
Primare
- Using the x86 extraction software: BD32 MkII
Electrocompaniet
- Using the x86 extraction software: EMP3
Denon
- Using the ARMv7 extraction software: DBT-3313UD and 3313UDCI
Yamaha
- Using the x86 extraction software: BD-S677
Marantz
- Using the ARMv7 extraction software: UD7007
You'll notice that Sony and Pioneer are, by far, the suppliers of the largest number of compatible players. You'll also find that the Sony S390, 490 and 590 players are probably the most abundant and cheaply-bought at second hand models. I have not used any other models than my Sony S490, so I list the other models here because I'm told that they work, but I have no proof that they do, nor any experience of them doing so. (But please see this set of instructions supplied by a kind reader for how to do things on a Sony S390).
You'll also spot from that list that a lot of the players use Intel processor technology, and some (usually the more modern ones) use ARM processors. That makes no difference to the user wanting to play a Blu-ray movie, of course... but it makes a difference later on when it comes to downloading the right software needed to turn your Blu-ray player into a file server.
2.2 The USB Drive
The second hardware component you'll need to acquire is an easy one: a USB-2 thumb drive that has a capacity of at least 2GB (but it can be more if you have a bigger one handy). I stress USB 2.0, not USB 3.0: most of the older Blu-ray players I just listed come with USB sockets that were built way before USB 3.0 was a thing! So, it's best to keep things entirely compatible and old-fashioned.
Here's the one I use:
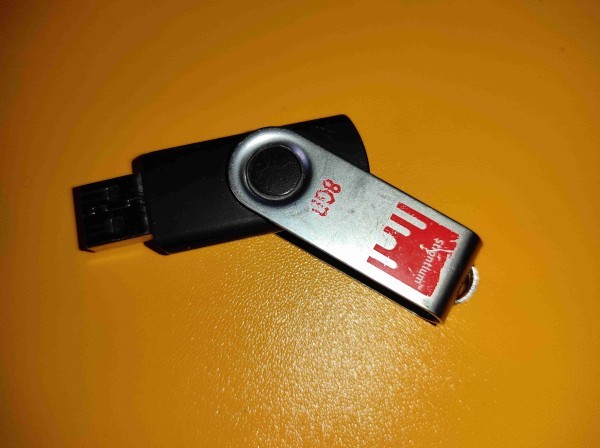
As you can see, it's nothing special. Just a very old, worn, knocked about and, frankly, rather knackered 8GB USB 2.0 thumb drive. I've also used a 4GB equally knackered equivalent, so the drive does not need to be very big at all, nor very fast or expensive!
You need to format the thumb drive to be using the FAT32 file system (most thumb drives seem to come supplied that way already, but if you're like me and have used multiple file systems over the years on the same USB drives, you might need to break out the KDE Partition Manager or Gparted to 'make it so'). From mentioning a possible need to partition, I hope it's also clear that you should have nothing stored on the USB drive at this point, and anything that is there should be deleted or removed by the new format operation. You want to start with a blank slate!
If you want to put a brand new partition table onto the USB stick to make sure you're starting from the cleanest of clean slates, make sure it's an MS-DOS type, not a GPT one.
2.3 The Home Network
As I've already mentioned in passing, this ripping process will work because your Blu-ray player will turn itself into a sort-of file server, offering its disk caddy and its contents to software running somewhere else on the network to access. For that to happen, your PC needs to be able to communicate with the Blu-ray player over a network of some kind.
The Blu-ray players I'm familiar with have built-in wireless networking and cabled networking (my S490 ships with a standard RJ45 Ethernet port, for example). I would recommend you use the wired networking if at all possible: there's a lot of data on an SACD disk which has to be transported from the player to your PC, so unless your wifi network is fast and completely reliable, wired is just a lot quicker and less hassle to get working.
I rather need to assume you are familiar with the basics of setting up a home network, anyway, because the topic of networking can be a complex and awkward one and is really outside the scope of this article. The simple version is, however, that your PC needs to be able to 'talk' to the Blu-Ray Player over your network -and for that to happen, the two machines need to be assigned compatible IP addresses. You also need to know how your PC resolves web addresses (handled by something called a DNS server) and how it knows how to reach the Internet (handled by something called a Router or a Default Gateway).
The first order of business is, therefore, working out these three pieces of information for the PC or laptop you're already successfully using if you're reading this! In Linux, you will need top open a new terminal and type the command ip addr to find these details:
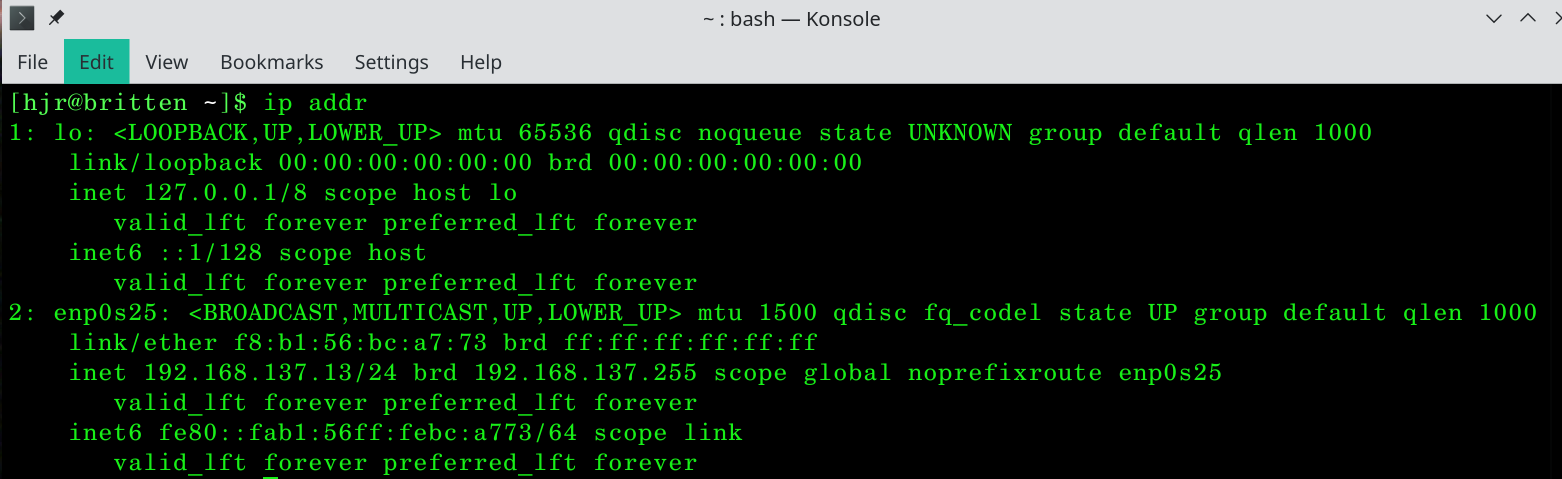
This requires some careful reading! First of all, ignore anything that mentions 'loopback': it's a weird system internal thing that is of no practical use for our current purposes. So that chunk of data that starts in the above screenshot with '1: lo <LOOPBACK...' can be ignored in its entirety. That immediately means we jump down to the line which starts '2. enp0s25...'. In this case, 'enp0s25' is the delightful name my operating system has assigned my PC's real network card. Other distros might assign different names like 'en0'. Wireless devices will have different styles of name again. The key thing here is that the paragraph of text following this device name tells you the first of the three bits of information we need: in my case, where it says 'inet 192.168...', that's my PC's IP address. So, my PC is identified on the network by the numbers 192.168.137.13.
Additionally, we can tell what netmask I'm using: you'll note that the IP address is actually given as 192.168.137.13/24. That "/24" bit of the address is, indeed, the netmask: it tells the computer what parts of the IP address are usable to uniquely identify computing devices on my network and what parts identify the network in general. Let's back up a bit!
As you can see, an IP address consists of 4 dot-separated numbers (such as 192.168.137.13). Each number in that four-part address is from 0 to 255, so 256 unique values in all -and 256 happens to be a number that can be represented in binary mathematics by 8 digital bits. So a full 4-part IP address is 8bits.8bits.8bits.8bits or 32 bits long in total. The "/24" displayed by the "ip addr" command is really just saying that 24 of those 32 bits are used as the 'domain prefix' part of the address; only the remaining 8 bits (which means up to 256 unique values) are used to describe specific PCs or other computing devices, such as printers or mobile phones, working within that domain.
Now, we can display this exact same information ("24 bits are generic, 8 bits are unique") in a slightly different way, too: 255.255.255.0. This looks like an IP address with big numbers in it, but it's actually a 'mask' which blocks or reveals bits of a matching IP address: when the mask says 255, it means 'the complete 8 bits behind this part of the mask are blocked'. When the mask says '0', it means 'all 8 bits behind this part of the mask are usable'. In other words, we pair up the IP address and netmask like so:
192.168.137.13
255.255.255.0
...and this tells us that the first three parts of my IP address (the 192.168.137 parts) define my domain (because they are all blocked by the mask), and the last part are addresses that are specific to different devices on my network (because the 0 in the mask lets those last 256 values be visible and usable).
Think of it like a street address: 156 Acacia Avenue. Which part of that is the 'general' address where lots of people live, and which is the specific bit of the address that identifies your house exactly? In this case "192.168.137" identifies my network generically. It means all computing devices I want talking to each other have to use that exact same general address component. But the "13" bit identifies my PC uniquely within that general 'street address'. That means my Blu-Ray player will need an address of 192.168.137.something, but the 'something' must not be '13': that's like having squatters trying to move into your house while you're still trying to live there! Pick another 'house number', therefore: it doesn't matter specific which one you pick (and remember, there are around 256 to choose from), but nothing else must be using the one you decide to pick.
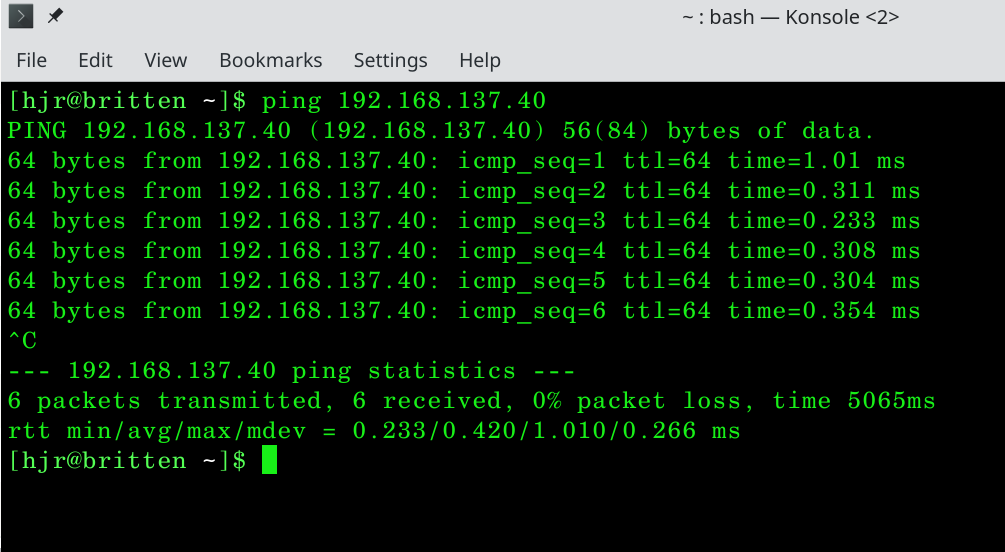
How do you know if an address you want to pick is already in use? You can try to talk to it with the ping command. If it talks back to you, the address is in use; if it says it can't be reached or just refuses to respond, it usually means the address is free to be assigned to some new device (like a Blu-Ray player!). For example:
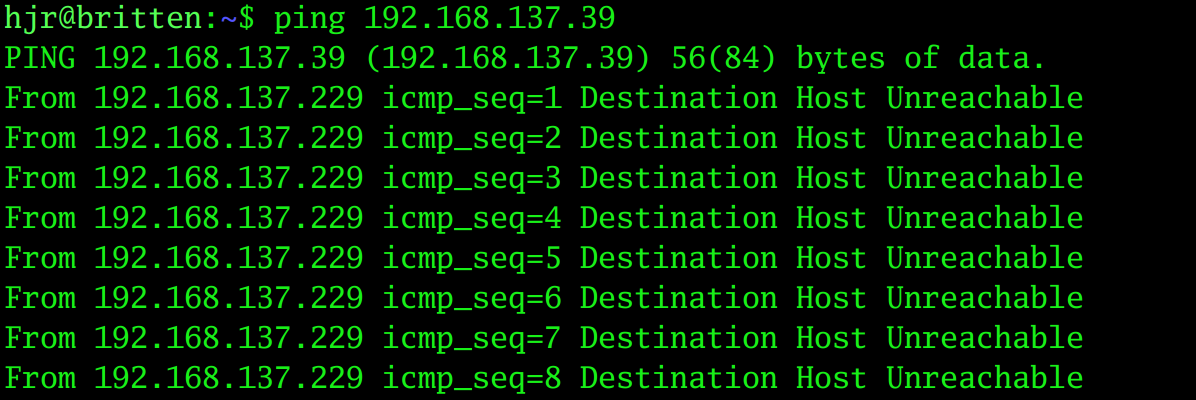
This tells me that trying to talk to 192.168.137.39 is a waste of time -and therefore strongly implies that address '39' is available for use by some new device I add to the network.
On the other hand:
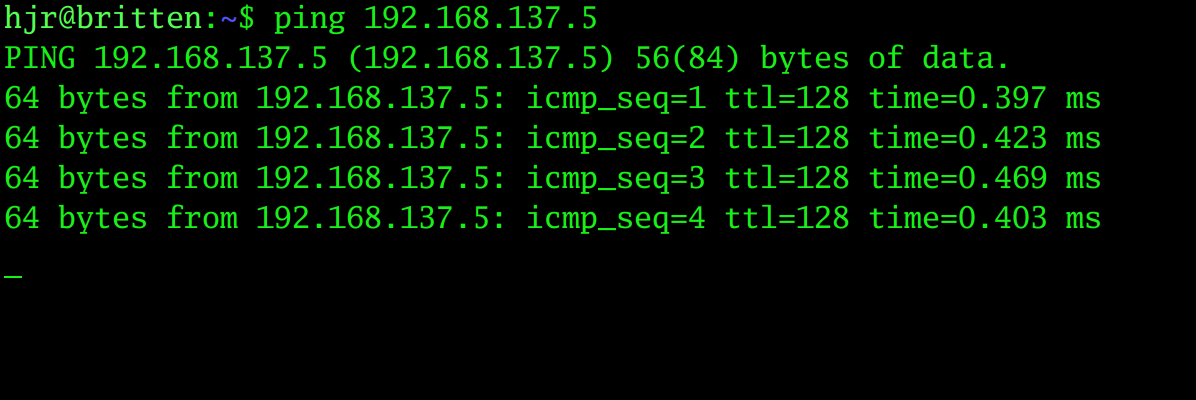
...this tells me that 192.168.137.5 would be a bad choice of address to assign to a new device, because it's clearly already assigned to something: the fact that messages are bouncing back from that address in less than ½ millisecond is clear proof that the '5' address is already in use and able to respond to pings.
For the other two bits of networking information, some additional commands are needed: cat /etc/resolv.conf will tell you how your PC resolves 'wordy addresses' into 'number IP addresses': how 'www.google.com' is turned into the address 142.250.200.4, for example:

In this case, the command reveals that my DNS Server (the thing doing the word-to-number translation) is running on an internal server. I can tell it's internal, because it's using another 192.168.137.something address, like my PC. You may more probably see your network uses someone else's DNS Server to do this job, though: it's common for people to use 8.8.8.8 as a DNS Server (that's the free one provided by Google) or 1.1.1.1 (the free one provided by Cloudflare). You may also see a much more elaborate IP address that isn't an internal one: that will most likely be the DNS server provided by your Internet Service Provider. Whatever it is, make a note of it!
Finally, we need to know how your PC connects to the Internet: the IP address of the box which receives requests for data from within your house and directs, or routes, those requests outside, to the wider Internet. This is your home network's default gateway, the IP address of your router and it's discoverable by typing the command ip route | grep default like so:

In my case, as you see here, my router's internal IP address is 192.168.137.100.
Technically speaking, you only need the IP address range and netmask to get a PC talking to a Blu-ray player: the DNS and Gateway settings are only needed if the Blu-ray player needs to get to the wider Internet. Generally, that's not really needed for SACD ripping -but it's a good idea to make sure your Blu-ray player is using the latest firmware update and Internet access would be required for that, so it's a good thing to know.
So, without this being a proper networking text book, I hope from the above you know how to find your IP address and its netmask; the address of your DNS server; and the address of your Default Gateway. Hopefully, too, you understood the bit about netmasks and how they mean that only part of an IP address identifies devices specifically and the rest identifies 'the street' generally: and armed with that knowledge, you'll have been able to pick an address which your Blu-Ray player can use when it needs to -and how you know that address hasn't already been assigned to some other device on your network, because you know how to ping it and not get a reply!
Make a note of all these details, therefore, because you'll need them when configuring your Blu-Ray device shortly!
3.0 The Software
There are two bits of software that you need to obtain. One runs on your desktop and does the 'fetching' of music data of the Blu-ray player's SACD; the second runs from the USB stick I mentioned earlier, whilst plugged into the Blu-ray player's USB port, turning the Blu-ray player into a data server of sorts.
3.1 AutoScript
I'll start with the software that runs on the Blu-ray player (from the USB drive), which is called AutoScript. It can be downloaded from this Dropbox, but in case that link ever dies in the future, and if you prefer not to trust to anonymous Dropbox folders discovered on the 'net, I've prepared a single ZIP-file copy which can be downloaded from this very website.
Note that my download is only of the 'Intel Processor' x86 variety. If your Blu-ray play requires the use of the ARMv7 version of the software, you'll have to download that from somewhere other than this site. The specific software to download depends on your precise model. The Sony BDP-S6200, for example, uses a different version of AutoScript from the BDP-S6500. So choose and download carefully!
You need to create a folder called AutoScript (note the capital letters A and S in that lot) on the USB drive itself and then put the three downloaded files (or the three files extracted from the ZIP file I've linked to) inside that folder.
This is therefore OK:
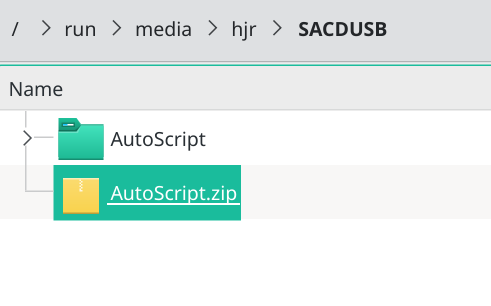 That's the root of the mounted USB drive, onto which I've copied the AutoScript.zip, and then I've right-clicked the zip file and asked for it to be 'extracted here'... and an AutoScript folder has been created for me automatically. Within that folder are the three downloadable files:
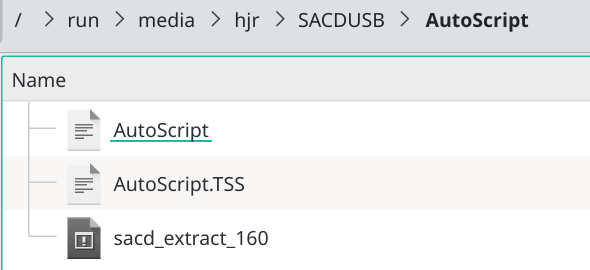
Note that I've now changed to be inside the AutoScript folder, and the three files are present and correct.
I stress this because placing the files correctly on the USB stick sounds so trivially easy to do -yet, from the support forums I've seen, it trips everyone up! They put the three files into the root of the USB stick, for example. Or they somehow manage to create an AutoScript/AutoScript folder/sub-folder pair and put the three files into the sub-folder, which means they are now one folder level too deep. Or they manually create a folder called 'autoscript' (with no capital letters) and that won't work either!
To summarise this part of the process then, and for the avoidance of doubt: you want a folder called /AutoScript to be at the root of your USB drive, and within that, the three files you see listed in the last screenshot above. There should be nothing else stored on the USB drive. Once you've got the USB stick correct, you can safely eject it from your desktop: that half of the job is now complete.
3.2 Sacd_extract
The software we run on the desktop to extract the SACD music over the network is called sacd_extract. Unfortunately, there are about a bazillion versions of the software knocking about the place -including versions which won't work! Some of these non-working versions are in various Linux distro's standard repositories, too, so installing the wrong version is very easy to do!
To make life as easy as possible, therefore, I've prepared copies of the software which I know to work, which can all be downloaded from this website with a simple click of the appropriate link:
On Windows, note the program is called "sacd_extract.exe", so you need to add that ".exe" to the end of all the commands that involve running sacd_extract. You also run the program on Windows just by typing the name "sacd_extract.exe", without prefixing it with a 'dot-slash' as you do on more Unix-like systems like Linux and MacOS. So, for example, throughout this article you'll see me say 'type the command ./sacd_extract....' and on Windows you'd simply type 'sacd_extract.exe' not './sacd_extract.exe'. Other than that, however, the program runs as identically on that platform as it does on Linux.
I should finally mention that I have no idea whether sacd_extract runs on newer M1, M2, M3 or M4 Macs: I only have ancient Intel CPU Macs to hand, so I know the software works as advertised on those (feel free to buy me a new, Apple Silicon-based iMac if you want me to test these things out!). As it is, I simply don't have any newer Macs to test on, unfortunately: so by all means give it a try, but I can't vouch for what might happen there. If it's possible to run virtual machines on an Apple Silicon Mac, then maybe try building one and installing a vanilla Linux distro inside it and use the Linux version of the sacd_extract software from there... but again, you're very much on your own, I'm sorry to say.
Once you have downloaded the appropriate software, on Linux and MacOS you'll need to make the program executable. On Linux, you'd do that by opening a terminal session, changing directory to wherever you've saved the download and typing:
chmod +x sacd_extract
You can then check that the program runs by typing the command:
./sacd_extract
...which should prompt this sort of output:
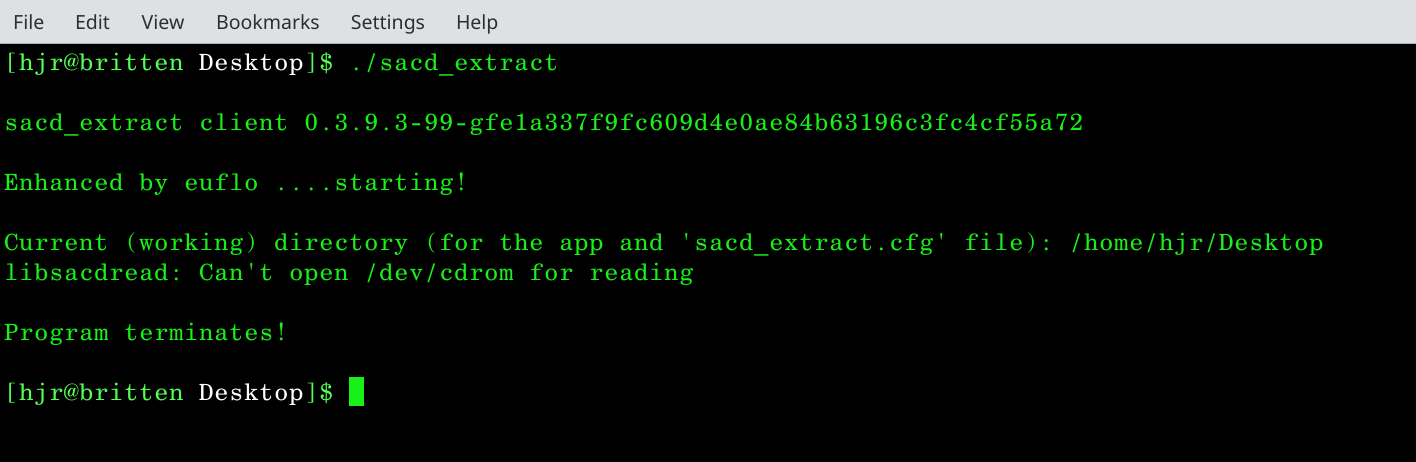
Don't worry about that message about 'can't open /dev/cdrom': it's just a standard error at this stage of proceedings and won't be an issue once we get things properly prepared. Also don't get concerned that I'm running my copy of the software from the Desktop folder rather than the Downloads one: it doesn't matter much where you run the program from, provided you are consistent about it.
PLEASE NOTE: As at July 2025, this test-run of sacd_extract seems, on some Linux distros, to display the error message: "error while loading shared libraries: libxml2.so.2: cannot open shared object file: No such file or directory". If this happens to you, you'll need to use your distro's package manager to install the missing shared library. Known fixes are listed below:
On Arch-based distros, issue the command: sudo pacman -S libxml2-legacy
On Debian-based distros: No fix needed as yet
On Ubuntu-based distros: No fix needed as yet
On Fedora-based distros: No fix needed as yet
On Suse-based distros: No fix needed as yet
With both the Autoscript and sacd_extract pieces of software obtained and prepared, we're almost ready to start ripping something!
4.0 Preparing the Blu-ray Player
Before we get into SACD ripping, though, there are a few things we need to do to the Blu-ray player itself, so that it is contactable over the network and won't do silly things like putting itself into hibernation when we're in mid-rip!
Obviously, the specific options you take and what they look like may well be different for you, if you're using a Pioneer player, compared to me and my Sony S490. So, take what follows as general advice, rather than specific guidance on where you'll find the relevant options in your player's setup menus. A user-submitted set of instructions using the Sony S390 provides a useful guide and point of comparison as to how things can change between versions of apparently similar hardware: many thanks to reader Scott for being prepared to document and contribute.
I also offer my apologies in advance for the generally poor quality of the screenshots that are about to come, and the fact that I can be seen lurking in nearly all of them! I have not yet mastered the art of photographing TV screens with reflections in abundance!
Anyway...
4.1 Network Configuration
You first want to make sure your Blu-ray player is connected to your home network correctly and that it can reach the Internet if it has to. For this to work, you'll need to assign your Blu-ray player a workable IP address and corresponding netmask; the address of a DNS Server it can use to turn 'word addresses' into 'number addresses'; and the address of the Default Gateway that will let it talk to the wider Internet. All the stuff we discussed back in Section 2.3, basically!
First, find your player's Settings menu, and within that, the Network Settings option:

Next, select the option that lets you configure your home networking details. In Sony's case, that seems to be called 'Internet Settings', though it's really less to do with the Internet we know and love, but rather 'networking' in a general sense:

You probably then get a chance to configure a wired or wireless network:
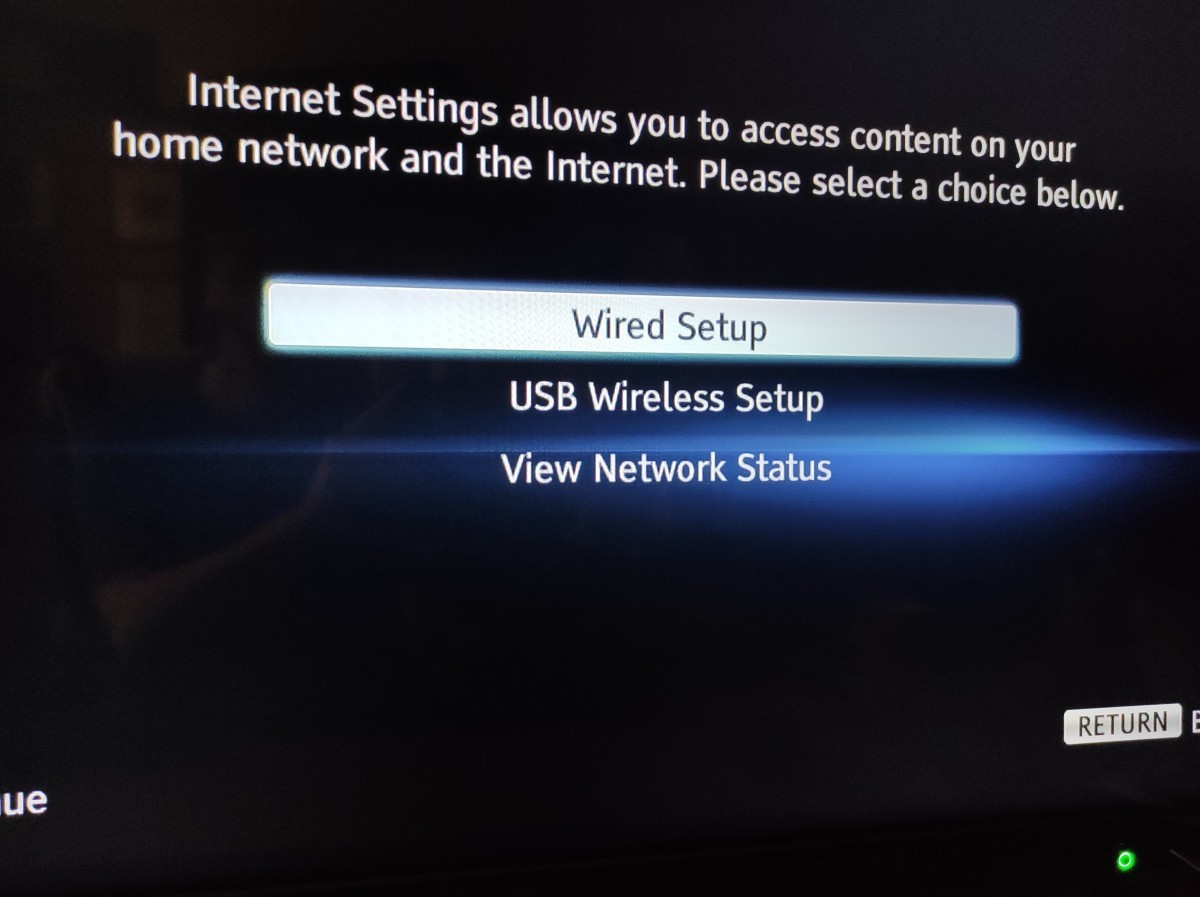
As I mentioned above in Section 2.3, even if a wireless networking capability is available, I'd strongly recommend using a wired network connection, assuming you have ethernet cables and switch or router ports available! Thus, I'm taking the 'wired' option you see here.
Often, as in this case, the player manufacturer will guide you to setting things up in an automated fashion:
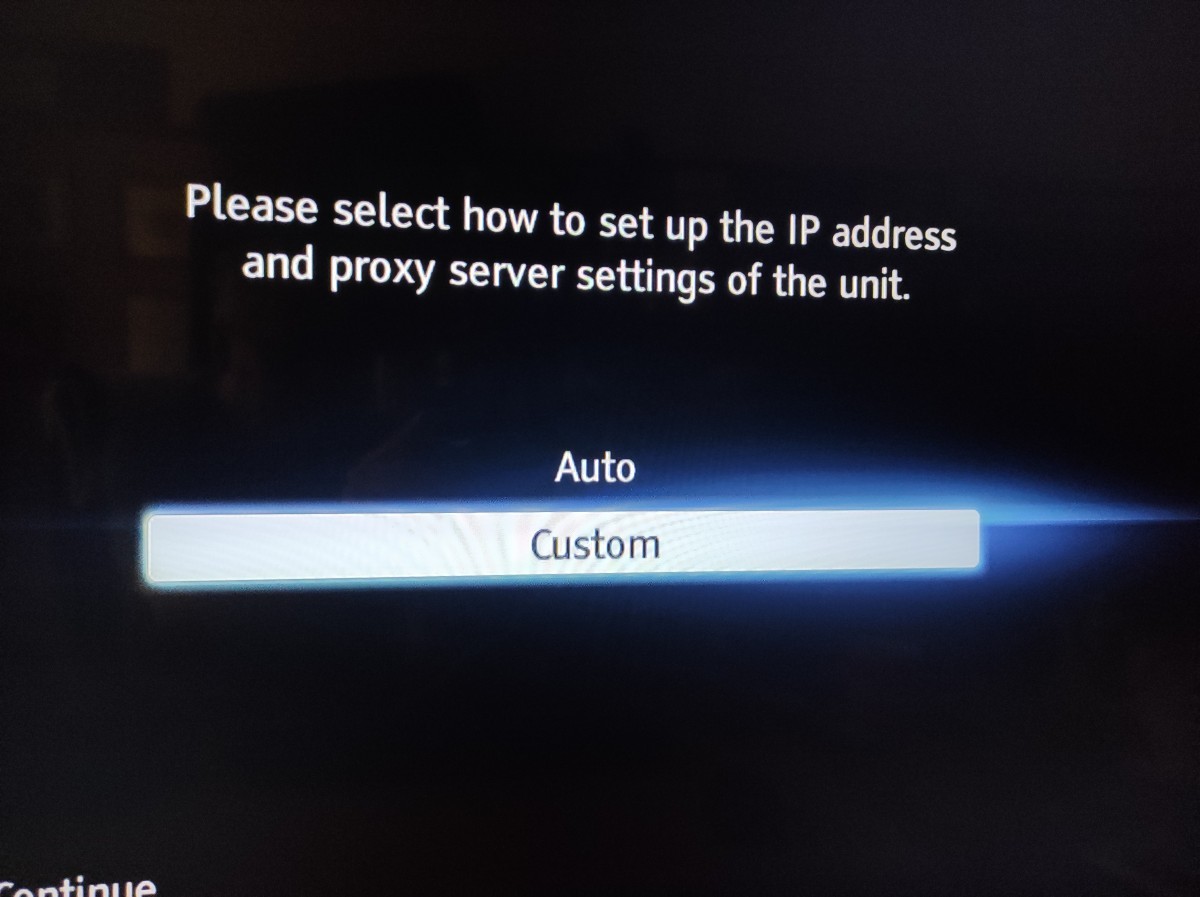
The 'Auto' option here, if taken, would basically mean your player became a DHCP client and would seek to configure IP, DNS and Gateway addresses as a DHCP server tells it to. Most ISPs supply routers that offer this DHCP server capability, so chances are good that 'Auto' will work. But I prefer to setup my servers with fixed IP addresses assigned by me... and that means having to take the 'Custom' option.
Not one to take 'No Auto' for an answer, however, Sony basically repeats the question:
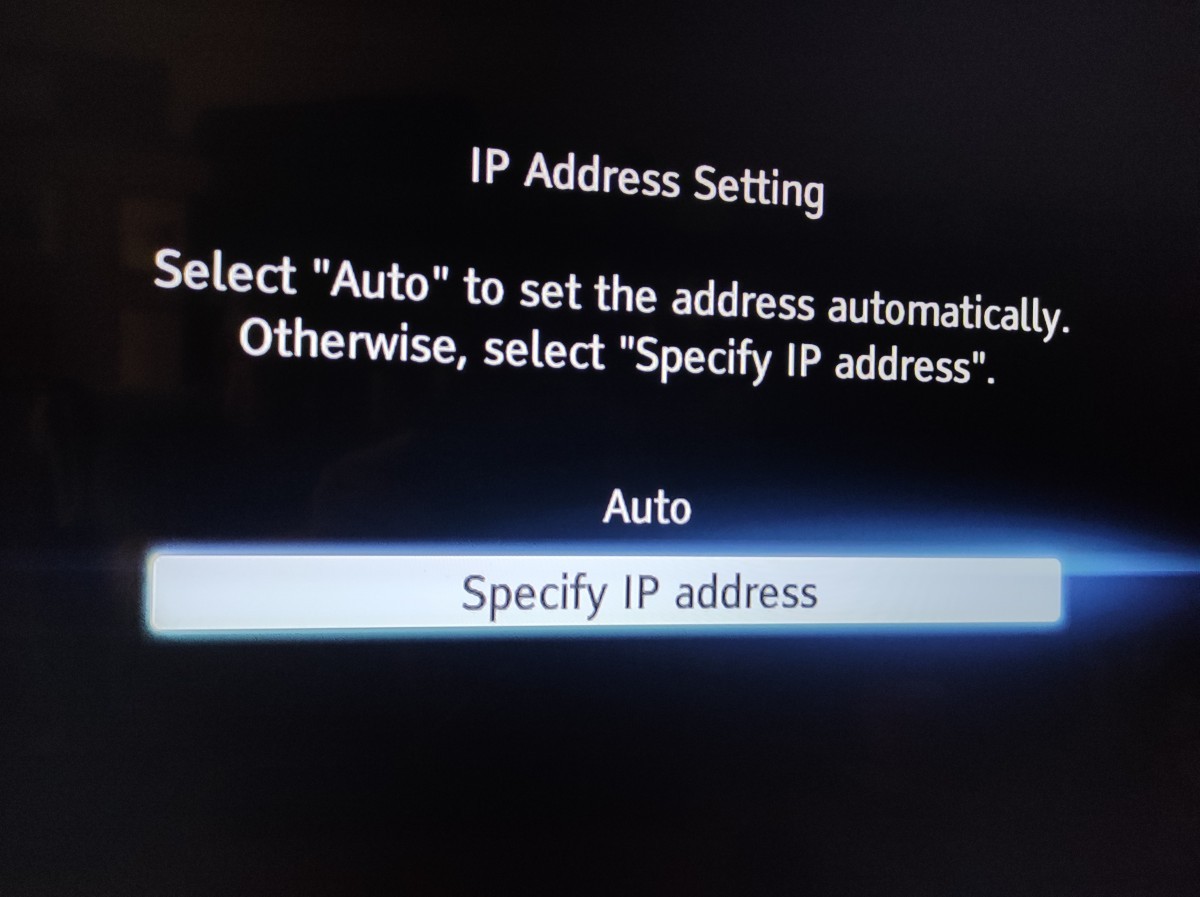
Again, I don't want things auto-configured, so I've gone for the 'Specify an IP address' option. The next screen is where the configuration actually happens:
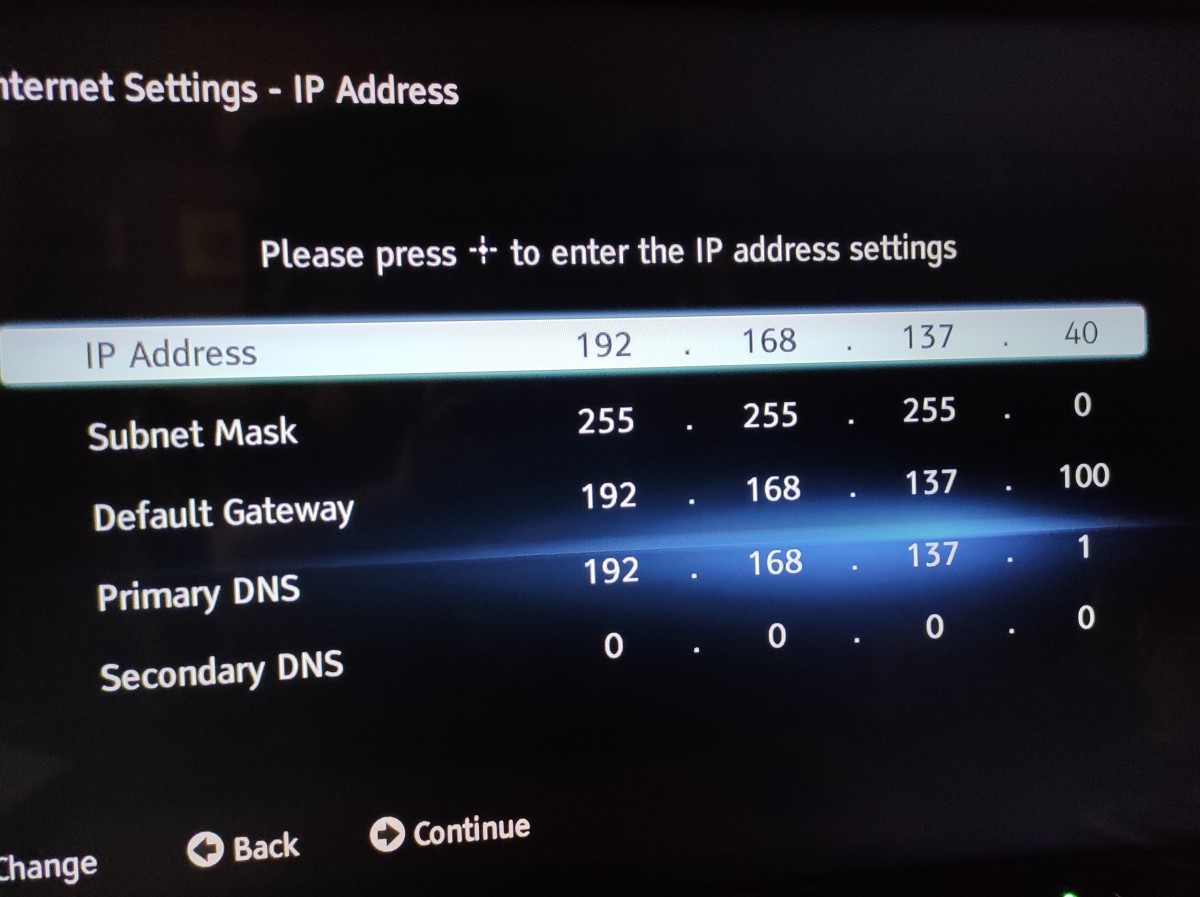
As I mentioned back in Section 2.3, these numbers apply to me and my home network: yours are likely to be substantially different. You can see from my choice of IP Address and Subnet Mask that my generic domain address is '192.168.137': that's the bit which both my PC and the Blu-ray Player have to share. You can also see that I've assigned unique address '40' to be the player's specific device addres: this is the bit of the whole IP address which no other device on my network is allowed to be using at the same time as the player is switched on.
You'll notice I don't have a secondary DNS: that's the only optional entry here, really. Everything else is necessary if the Blu-ray player is to talk to the rest of my home network and talk to the wider Internet.
Next, you are asked if you use a Proxy Server:

Proxy servers are really an old-school thing now (except in corporate environments, where controlling what bits of the Internet are accessed by employees is important), so I doubt you have one at home: by all means specify it if you do though. Me... I'm taking the 'No' option!
That's pretty much all you need to do. Usually, the player will now take the networking information you've provided and use it to try to make contact with the wider Internet:
If you got all your network information entered correctly, you'll soon see this sort of thing:

...and that tells you that everything has been tested and passed. You're now in Blu-ray business!
4.2 Perform a Full Firmware Update
Now that we have established Internet connectivity, it is possible to upgrade the BluRay player's firmware. I certainly have not had any issues with doing this -and doing it means you know you're starting from a state where annoying firmware bugs and security holes have (hopefully!) been patched. However, as a couple of correspondents have recently reminded me, some hardware vendors have been known to disable key bits of functionality in their firmware updates and it's therefore plausible that by upgrading your firmware, you'll actually be locking yourself out of being able to rip an SACD at all! The example that springs to mind is Sony's PS3, which was prevented from having a Linux distro installed on it by the release of new firmware in 2010, though it had been possible before then.
For the record, the firmware version I'm using with my Sony player is: M12.R.0510. Correspondents have told me that an earlier firmware version doesn't work as per my instructions, so clearly the process is firmware-version dependent.
As I say, I had no issues once I'd updated my BluRay player's firmware -but a degree of caution is advised. If the rest of these instructions fail, it's possible a firmware upgrade might help. If they work without doing an upgrade, then fine: maybe skip the firmware update altogether: your choice!
In my case, I need to visit my Setup menu option once more and this time take the 'Network Update' option:
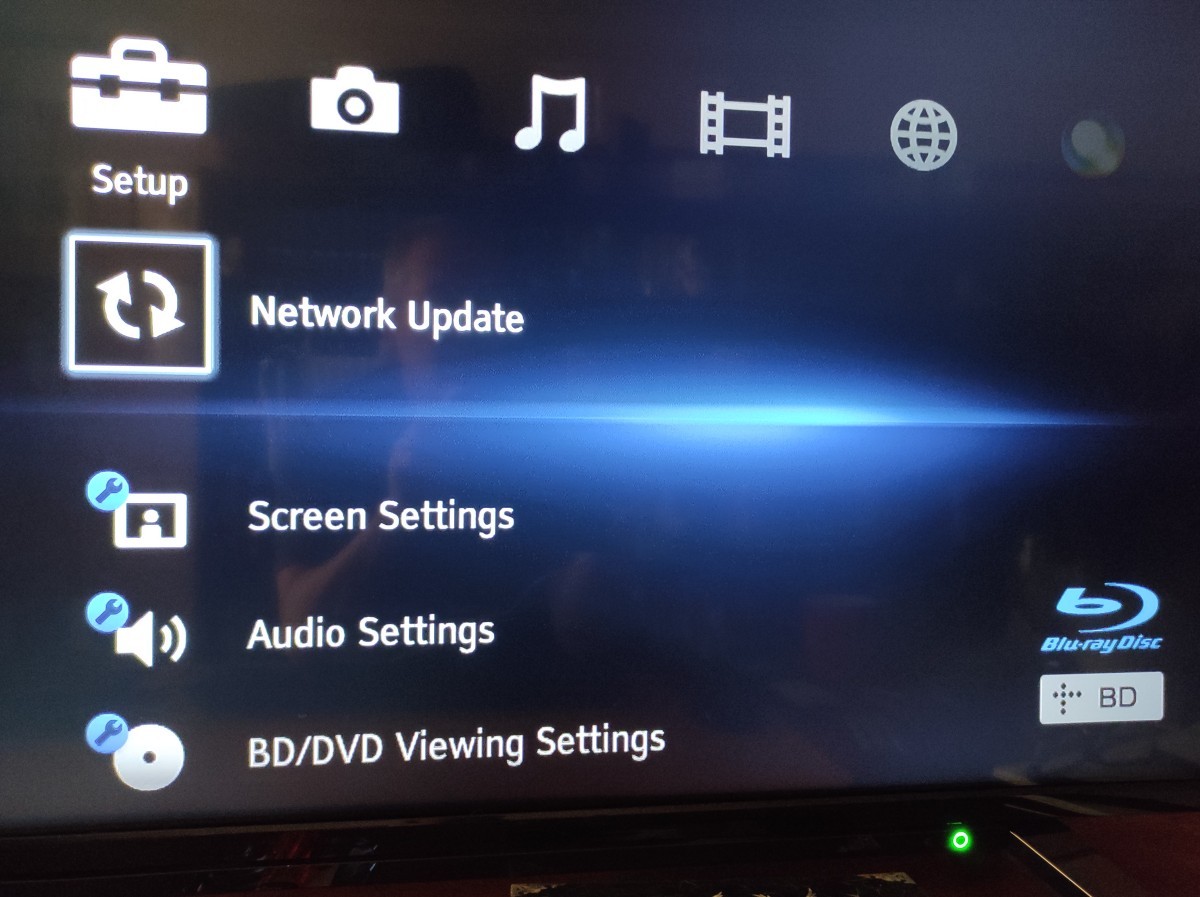
Of course, it may not be called precisely that on non-Sony models, but hunt around and see if you can find an equivalent. Shortly after I take that option, I see this response:

...which is Sony's way of telling me that my firmware is already as up-to-date as it could be. If a firmware update is available, however, the player should auto-detect it and offer to download and install it: follow whatever prompts are offered at this point in order to make that happen. You'll usually be warned to make sure that once the firmware update starts, you don't turn the machine off (otherwise you'll probably turn the player into a useless brick of plastic and metal that doesn't work at all!) So, give yourself plenty of time to let the update happen without you getting impatient about it. Now is probably a good time to get a cup of tea!
4.3 Other Configuration Settings
Finally, there are a handful of settings for a Blu-ray player that probably ought to be set, though it might not be fatal if they aren't. Again, the precise location of these options and what they're called will depend on the model of player you're using, but these screenshots come from my S490, so see if you can find something on your player that sounds approximately equivalent!
In the Audio Settings:
...make sure that DSD Output Mode is set to be OFF:

In the BD/DVD Viewing Settings option:
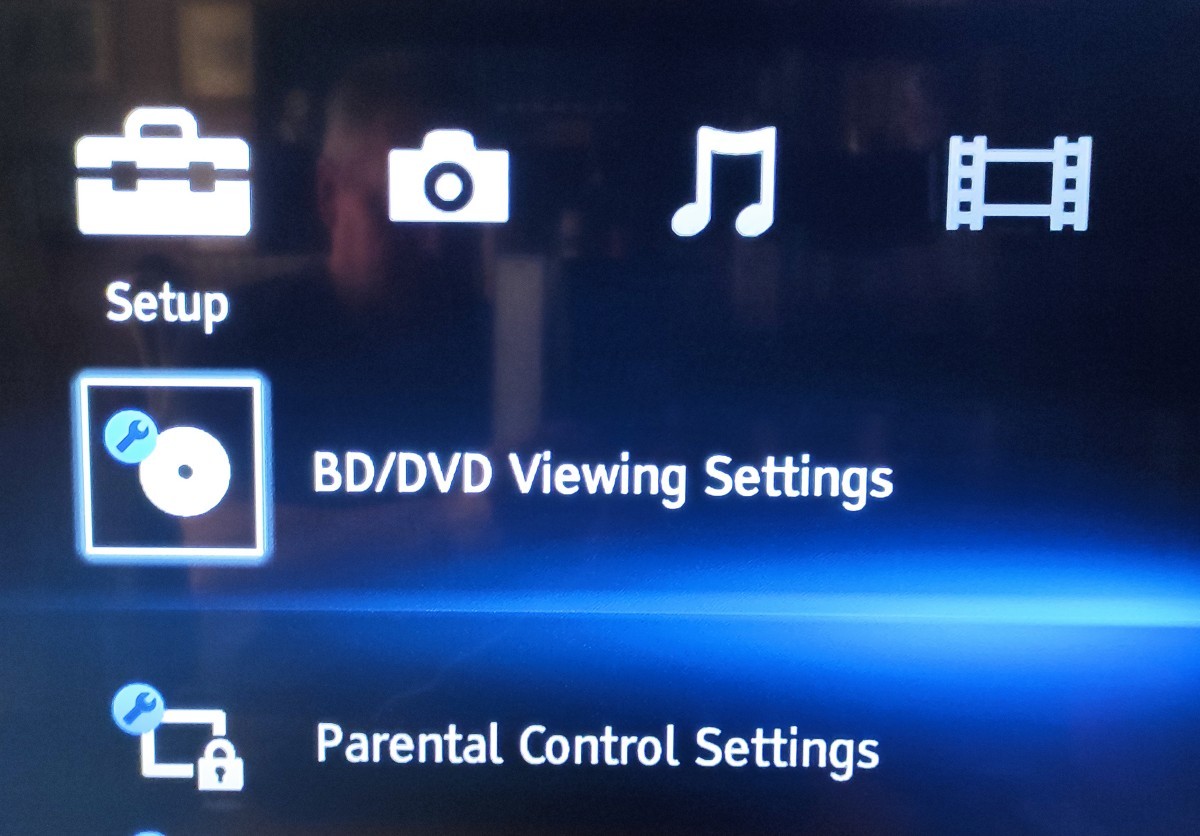
Make sure that BD Internet Connection is set to Do not allow:

I assume this is to try to stop any SACDs which might have Internet-checking copy protection from being allowed to connect to the Internet, but I can't be certain. It seems to be a generally-recommended thing for successful SACD ripping, anyway.
Next: in the Music Settings menu:

...Make sure that the option to play back the Super Audio CD playback layer is set to Super Audio CD:

Finally: in the System Settings menu:
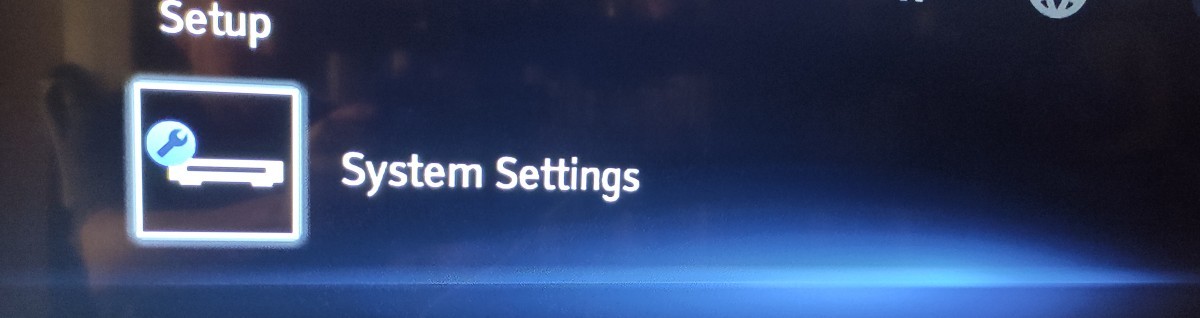
...make sure that Quick Start Mode is set to be On:

Fiddly though some of these options are to find and set, it is happily a mostly set-and-thereafter-forget affair, so you only have to experience the pain once!
5.0 Converting the Blu-ray Player into a File Server
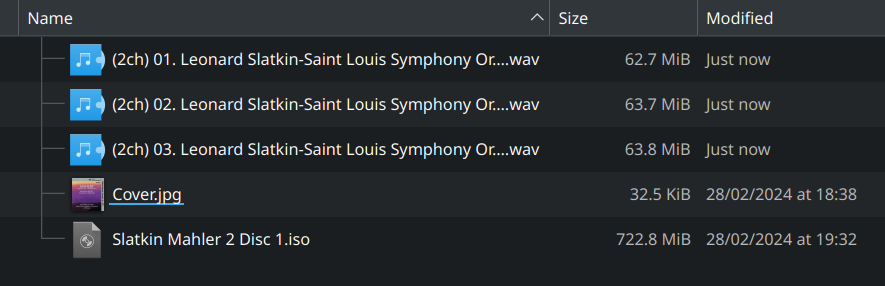
With all that updating and configuration sorted out, we're ready to try actually performing an SACD rip. I'm assuming you actually own a proper SACD, of course! For my recent 60th birthday, I decided to splash out and treat myself to this:
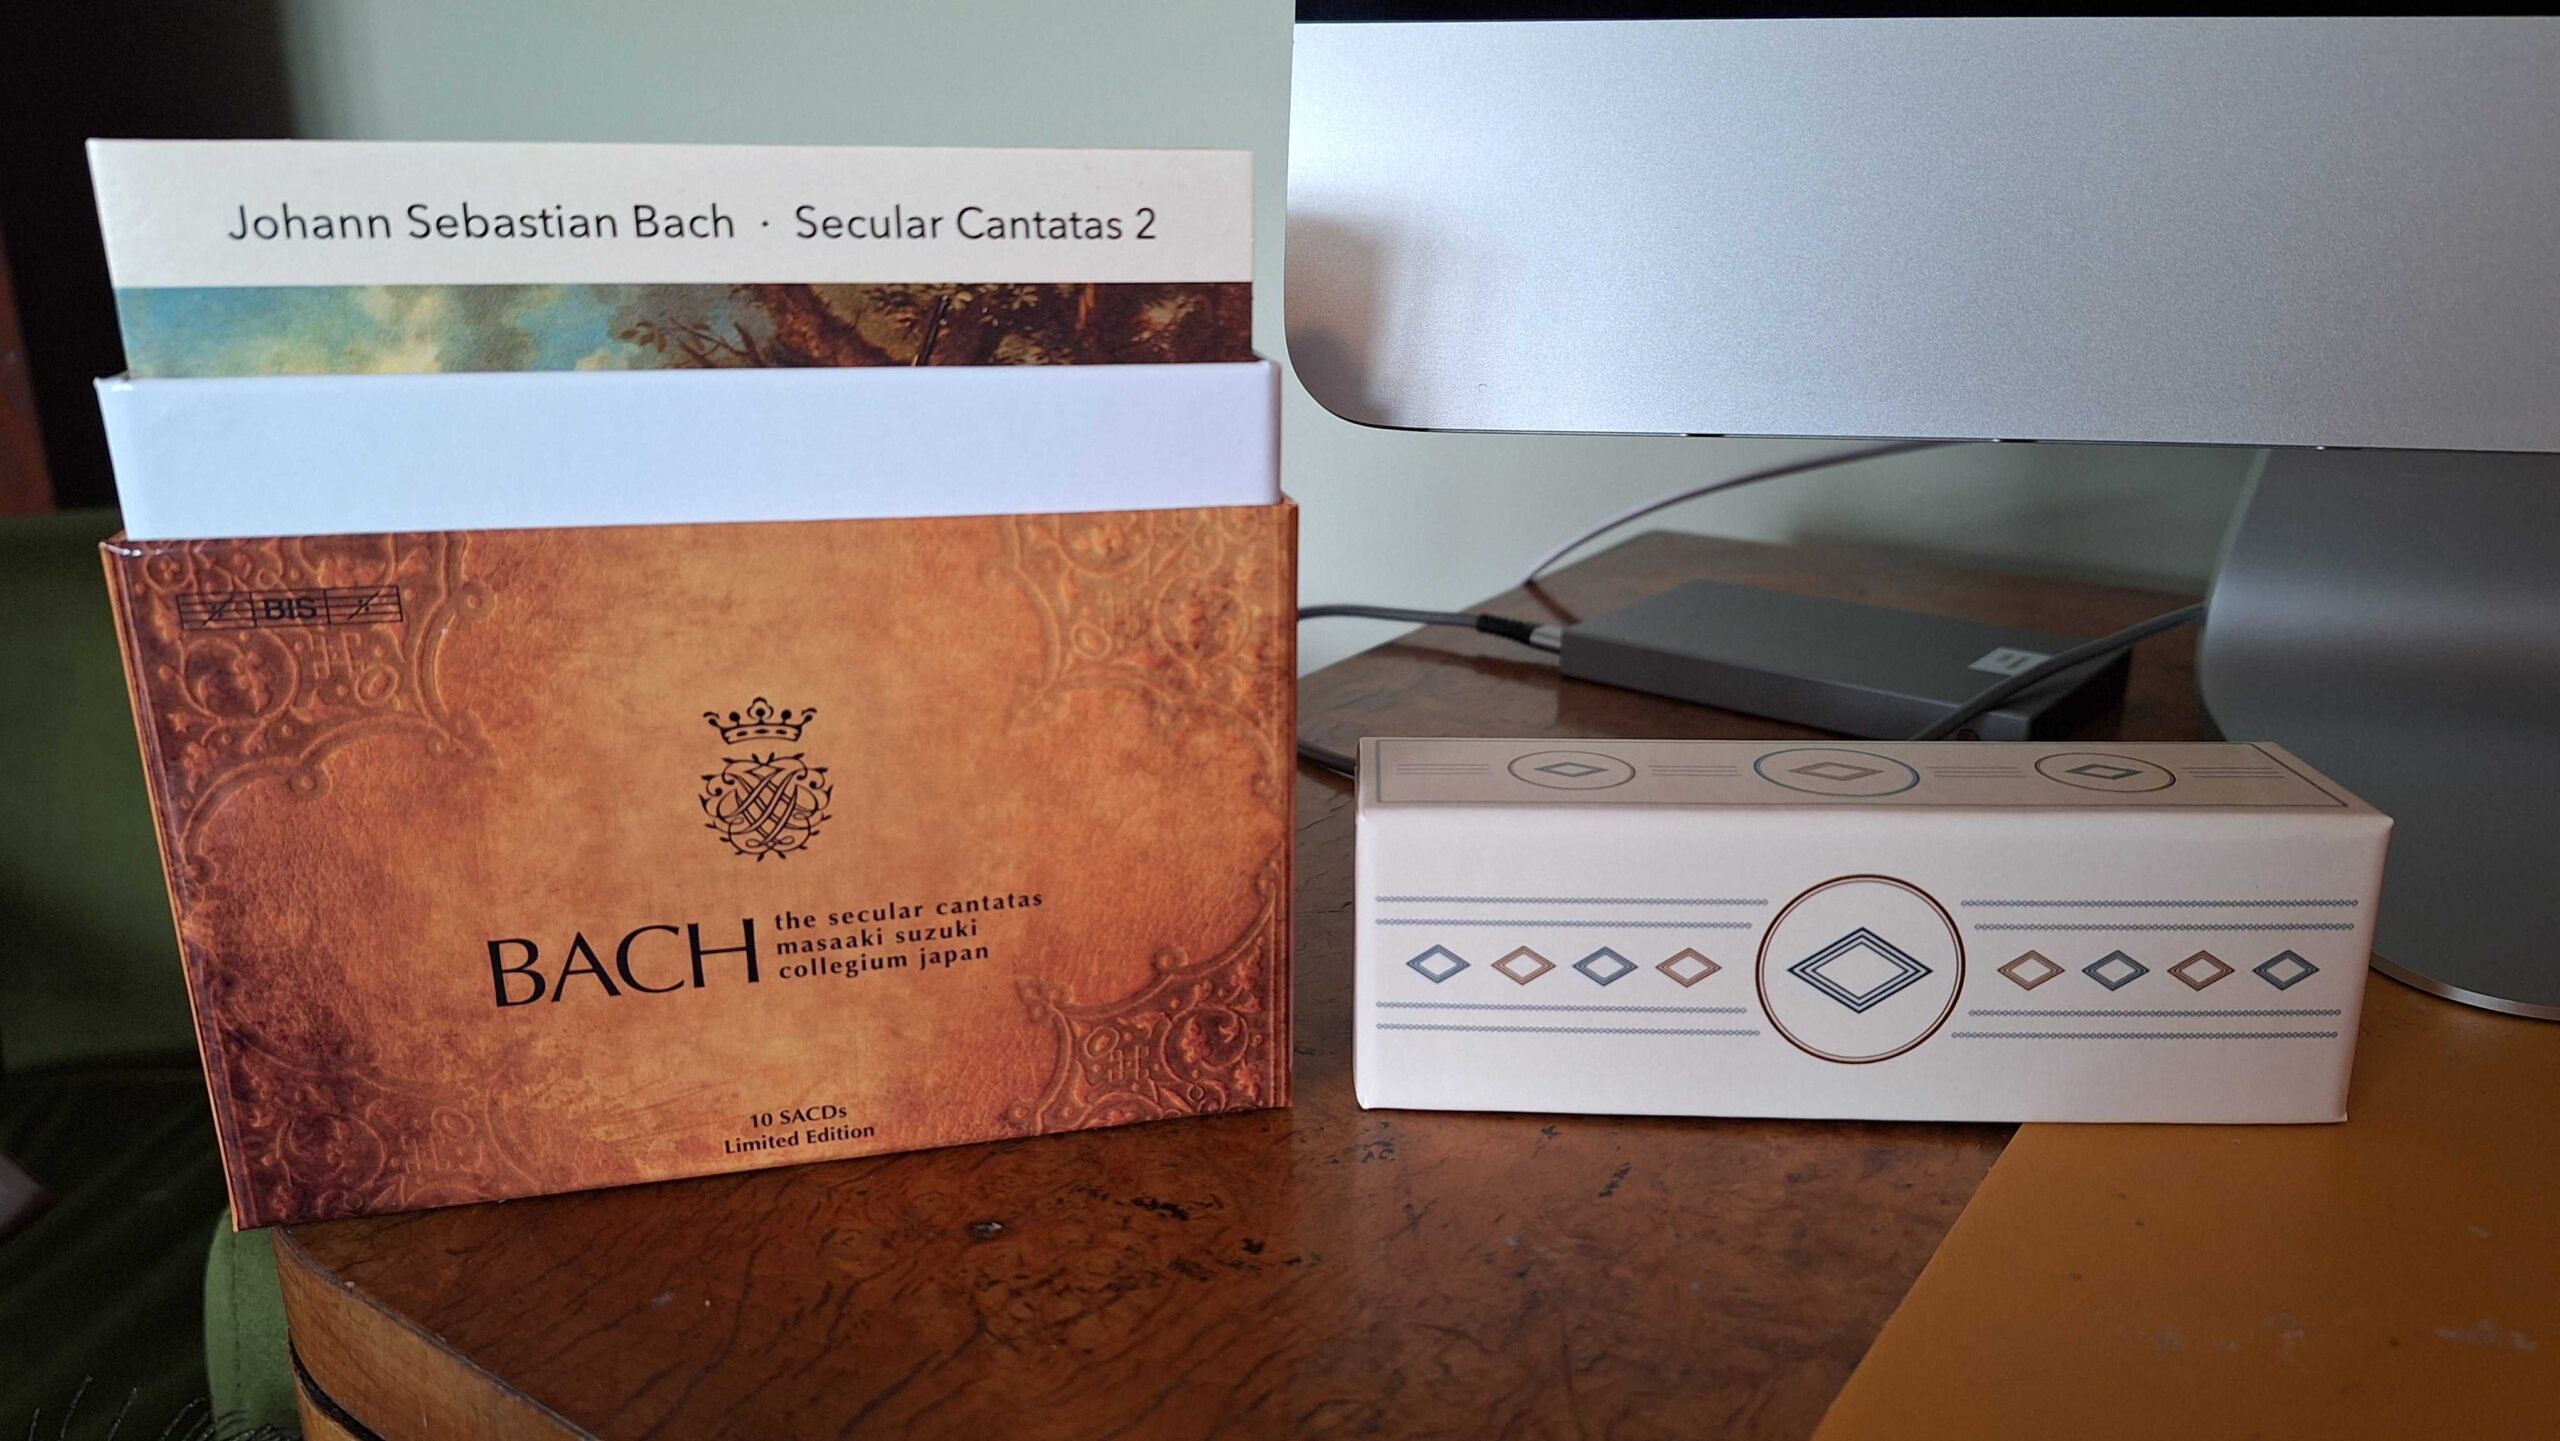
It's a boxed set of all Bach's secular cantatas, performed by Masaaki Suzuki, containing 10 SACDs in all. The SACD logo you see at the start of this article is present on the base of the box, along with a note that these are 'SACD Hybrid' disks, meaning that if I wanted to, I could just rip the standard CD layer of audio that they contain in addition to the special SACD layer.
I will also say at this point that these next steps can be really quite tricky to get right -and there are a lot of false or misleading instructions about them available elsewhere on the Internet. It's also true that different players behave differently, so not all instructions apply. For example, it's commonly said that you should 'insert the USB drive into the Blu-ray player and this will trigger the disk tray to open'. Well, not on my BDP-S490, it doesn't!
So: I shall document what works on my S490 first, because I know what works on it and in what order things have to be done. On other models, you may get different or unexpected results and you may need to play around a little until things work correctly.
5.1 The Steps for the Blu-ray Player
-
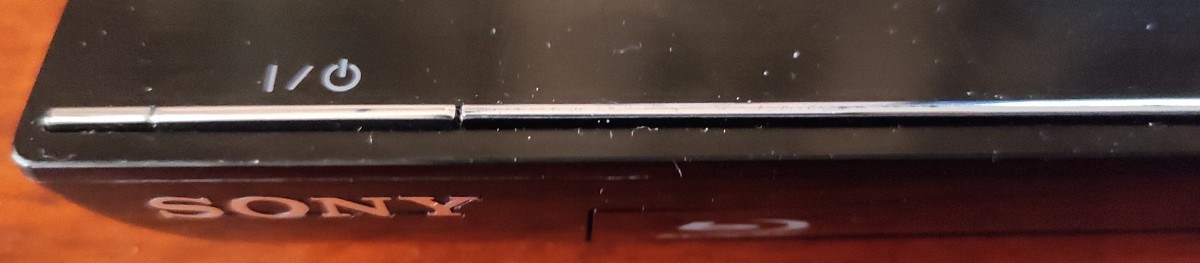
- Power on your Blu-ray Player, normally, by pressing the on/off button on the face or top of the unit. Mine, for example, is over on the left-hand side, above the Sony logo:

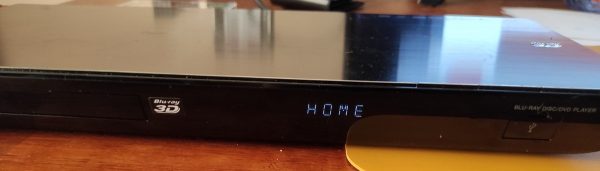
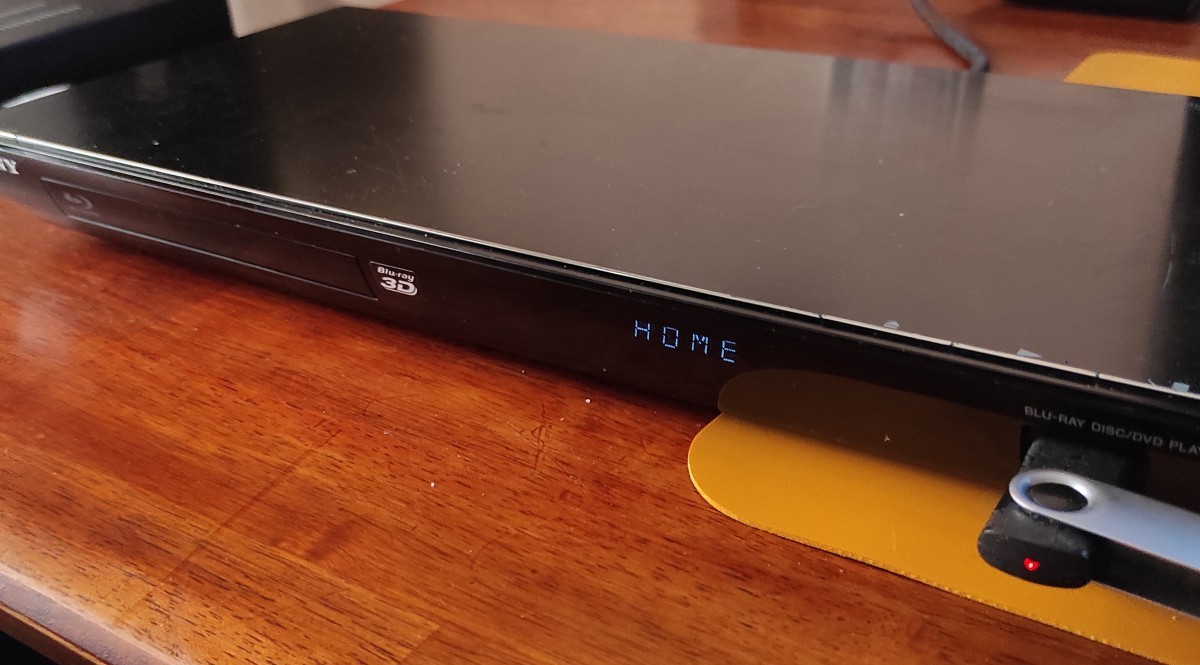
- The player's front display should probably start off by displaying the word 'Empty' (indicating that no SACD is present) and will end up displaying 'Home', to indicate it's waiting for instructions:
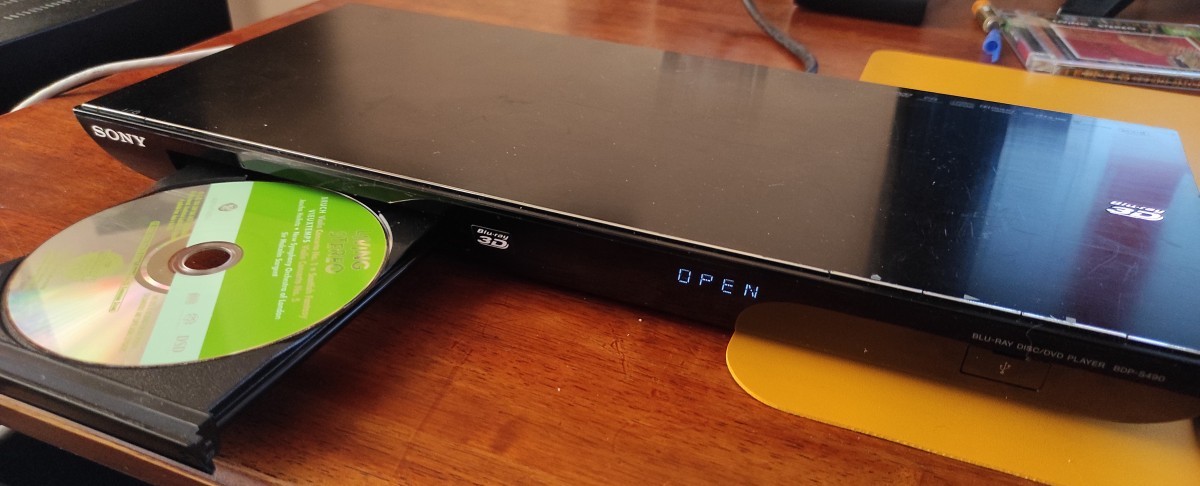
Open the disk tray and place your SACD in it. Do not close the tray. Just leave the disk 'hanging' in the open:
- Now insert the USB stick you prepared earlier (the one with the AutoScript folder and its three files contained within):

As you can see in that screenshot, the red 'reading' light on my USB stick is now illuminated -and the disk tray has closed itself. That's what you want to see happen. Incidentally, there is some debate on various Internet forums whether you can use the front USB port, the one on the back of the player, or either at will. In my experience with the S490, either works just as well, but the front port is more convenient to access, so that's the only reason I use it in preference to the one on the back. After a while, that 'Home' messsage you see will/should change to indicate the total play time of the SACD that has now been inserted into the player: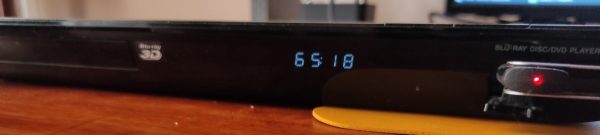
- When you reach this state of affairs, where the SACD's total duration is displayed, briefly press the Off button and wait for the player to turn itself off. This might seem odd: presumably the player has to be 'on' to serve music to others? Well, yes: but in this case, though the machine will appear to be off, it's actually in 'sleep mode'... and for Sony players, we need the player to be in sleep mode if it is to work properly. Other manufacturer's players don't need to be in sleep mode for a rip to work, so you don't turn off Oppo or Pioneer players, for example... but I have no actual experience of those players, so I'm only reporting what others have claimed. All I can say is: for Sony players, once the SACD duration/play time is displayed, you must touch the off switch to put the player into sleep mode.
- Power on your Blu-ray Player, normally, by pressing the on/off button on the face or top of the unit. Mine, for example, is over on the left-hand side, above the Sony logo:


By way of a quick summary of these steps, then:
- start with the player plugged in, with power on, but with the device switched off
- switch on
- eject tray
- place SACD on tray, but don't close it
- insert USB
- wait for tray to close and total play time to display
- press the off switch to put the player into a sleep mode
Note that once in this 'server mode' state, the player will stay that way until the power cable is physically unplugged. So, once you've ripped one SACD, you simply press the player's eject button, place the next one on the disk tray, close the tray, wait for the new total play time to appear and then touch the power-off button to put the player back into 'sleep mode' once more. Just a note too: I found swapping SACDs a bit of a pain: pressing eject would open the tray and let me remove the existing SACD, but the tray would auto-close quite quickly, long before I could load the next SACD into the tray. So, I had to eject -> remove existing SACD -> let tray self-close -> eject again -> load new SACD -> press close to manually close the tray -> wait for total play time to display -> press the off button briefly ...and I had to do that each and every time I wanted to rip the next SACD in the set.
I've seen reports that, after several SACD rips, the Blu-ray player suffers an out-of-memory condition and sort-of crashes itself. I haven't met that condition as yet -but if you do, simply unplug, wait for 15 seconds, put the plug back in the socket, and start again from step 1 above.
So now the Blu-ray side of things is done: the device is sleeping, but ready to serve music data over the network. Some people advise removing the USB stick at this point (as it's not technically needed). I have often not bothered doing this and still found that the first SACD rip works just fine, nevertheless. I have, however, found that second and subsequent rips can prove problematic if the USB is left inserted -so, I too would recommend removing the USB stick once the first SACD has been inserted into the tray and is ready to server across the network. I guess the real point is that you never want the player to boot up with the USB stick plugged in. So, by removing it now, you make sure that this can't accidentally happen. Incidentally, even if it does boot up with the USB stick in, nothing bad happens: it just won't be able to rip an SACD disk again until you power it off (actually, you really need to unplug the player from the wall socket for at least 15 seconds) and reboot it without the USB stick being present)
5.2 The Steps on the Desktop PC
So now we switch away from the Blu-ray player (which you leave in its off-but-sleeping mode previously described), and back to our desktop PC. First, we want to make sure we can connect to the player in the first place:
At a new terminal session, a simple 'ping' command directed to the known IP address of the Blu-ray player indicates that it's connected just fine to the home network, and we can talk to it. You'll need to substitute in the IP address you actually assigned to the Blu-ray play, back at section 4.1 above, of course: the .40 address you see here just happens to be what I assigned my player!
Finally, you downloaded the sacd_extract utility back at Section 3.2 and stored it somewhere on your PC (probably the Downloads folder, but I'm using the Desktop, for no particular reason). In the terminal you just opened, cd to that folder, and type a variant of this command:
./sacd_extract -i 192.168.137.40:2002 -s -z -2 -o /home/hjr/Desktop/rips
That invokes sacd_extract with various options, as follows:
- It says to connect to the device at IP address 192.168.137.40, on port 2002 (so that's how sacd_extract knows to talk to my Blu-ray player)
- The -s switch says to extract the music to DSF files rather than to an ISO (I'll explain about this more later on)
- The -z switch is a technical instruction to not 'zero pad' the music that's about to be extracted
- The -2 switch says to extract the stereo signal from the disk (rather than the multi-channel 5.1 surround sound signal it might contain)
- And finally, the -o switch says where to write the extracted music files: in this case, I'm saying to dump it on my Desktop.
If the player itself is properly primed to act as an SACD server, you'll see this sort of thing happen in response to that command:
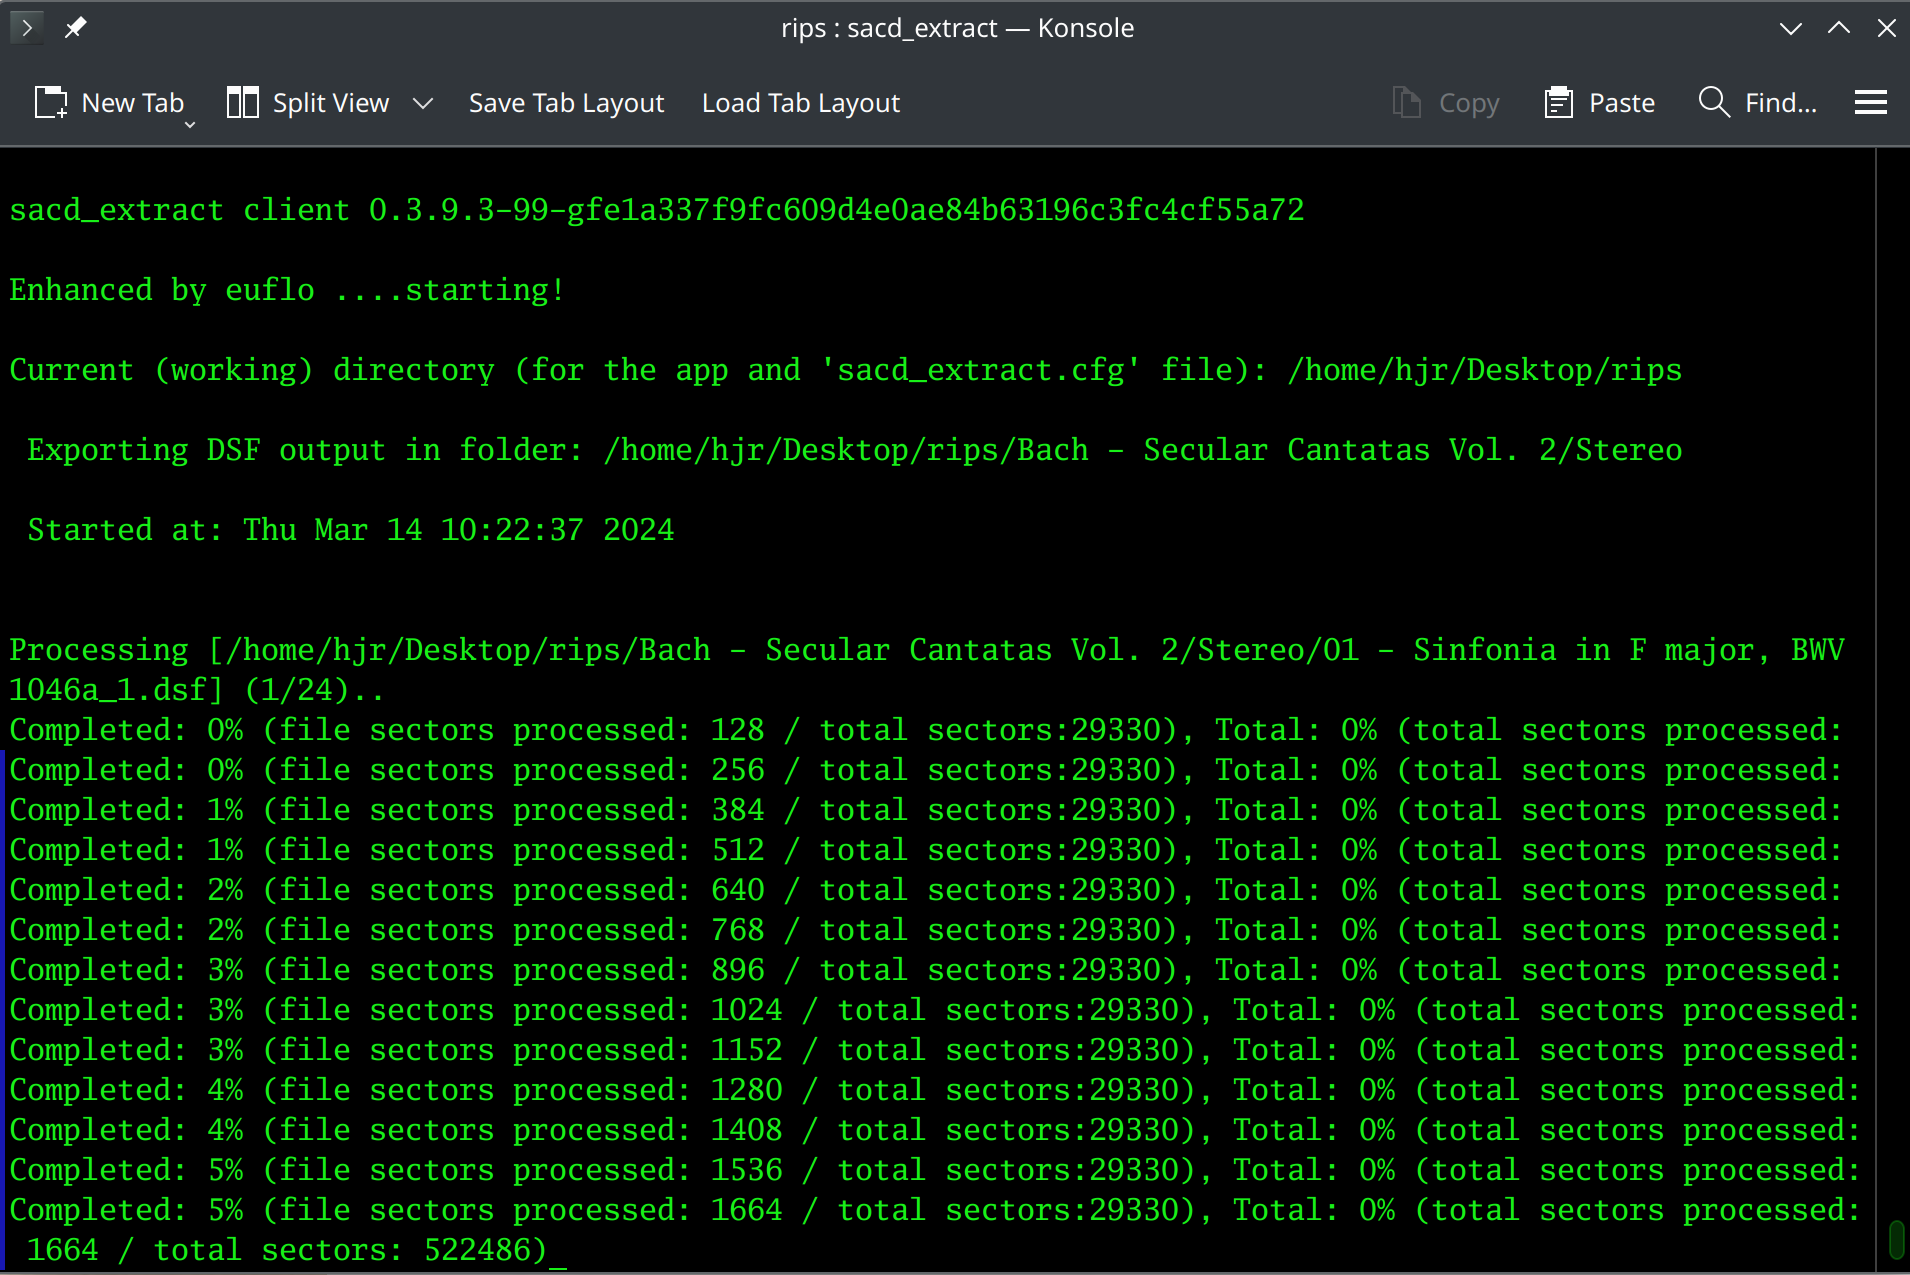
There may be a pause between you issuing the command and anything actually appearing to happen! In my case, for example, the 'Enhanced by euflo ....starting!' message would appear practically instantaneously and then the terminal would just sit there doing nothing, which was a bit nerve-wracking! Fortunately, my old SACD player makes quite a racket when it's spinning a disk at speed, so I could hear that sending the command over the network had triggered the SACD player to do something. A little patience was then rewarded with the complete, steaming pile of gibberish you see displayed here ...meaning that, at last, data was flowing between the player and my PC.
In the middle of that screenshot, you'll notice that the wall of text mentions 'Bach - Secular Cantatas Vol. 2': the SACD player has read metadata to determine that this is some Bach, in other words. That's interesting, because no ordinary audio CDs contain that sort of metadata, but all SACDs do. The data in those tags is universally rubbish, though, so you'll still need to supply your own after the rip completes! As an example of what we're dealing with on this metadata front, here's a directory listing once I'd ripped the ten disks of the set:
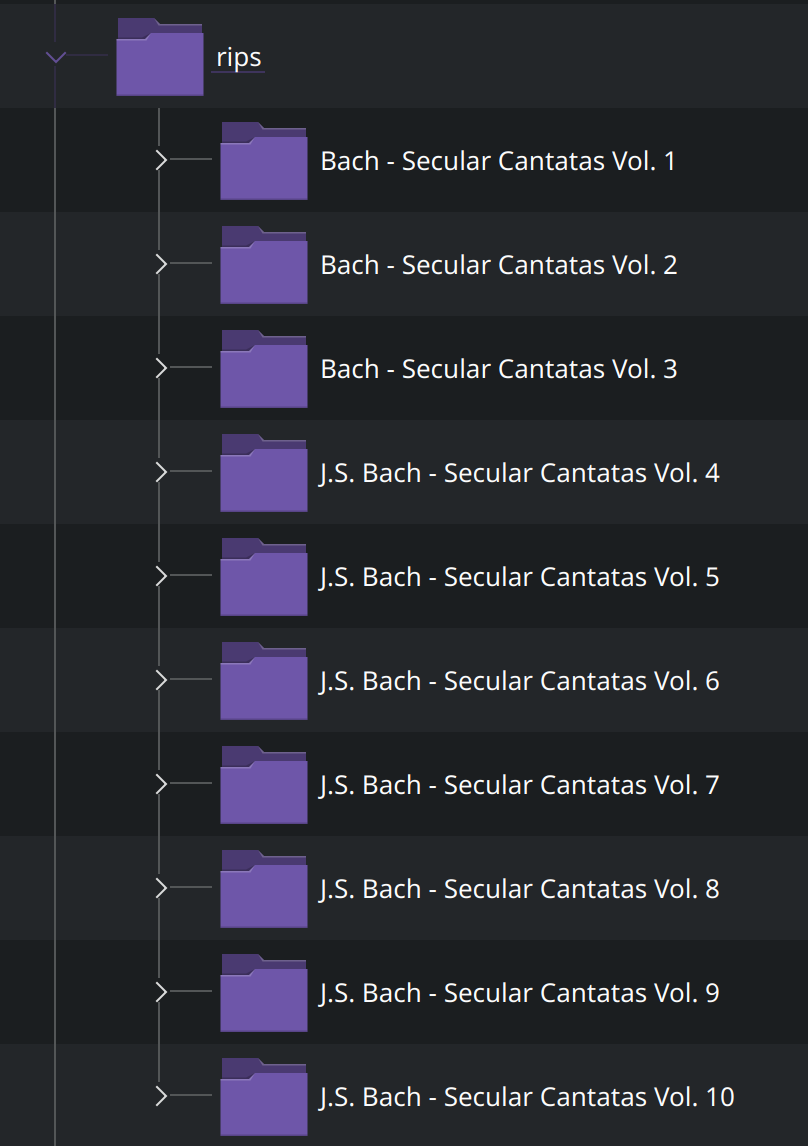
You'll spot that whoever tagged this particular metadata into the SACD set decided after disk 3 that mentioning mere 'Bach' was insufficient: hence, disks 4 onwards are said to be by 'J.S. Bach'. This sort of data inconsistency drives me up the wall and is the principal reason why I say that all music industry-derived metadata is completely worthless, without exception!
Anyway: the point is that you can at least tell what is being ripped and that the right disk was put into the correct player, so there's that!
For the rest of the display: well, it's just a lot of technical hocus-pocus, showing what sectors of the disk have been ripped. The percentage on the very right of each line is the percentage of the entire disk ripped so far; that nearer the left of each line is the percentage of the particular track that's being ripped.
As these numbers scroll off the screen, you'll notice a new folder has been created (within wherever your -o switch said to put the ripped music). In my case, as you saw above, each new disk produced a new 'Secular Cantatas Vol. x' sub-folder, and within each of those sub-folders, as the rip progressed, things would appear, like so:
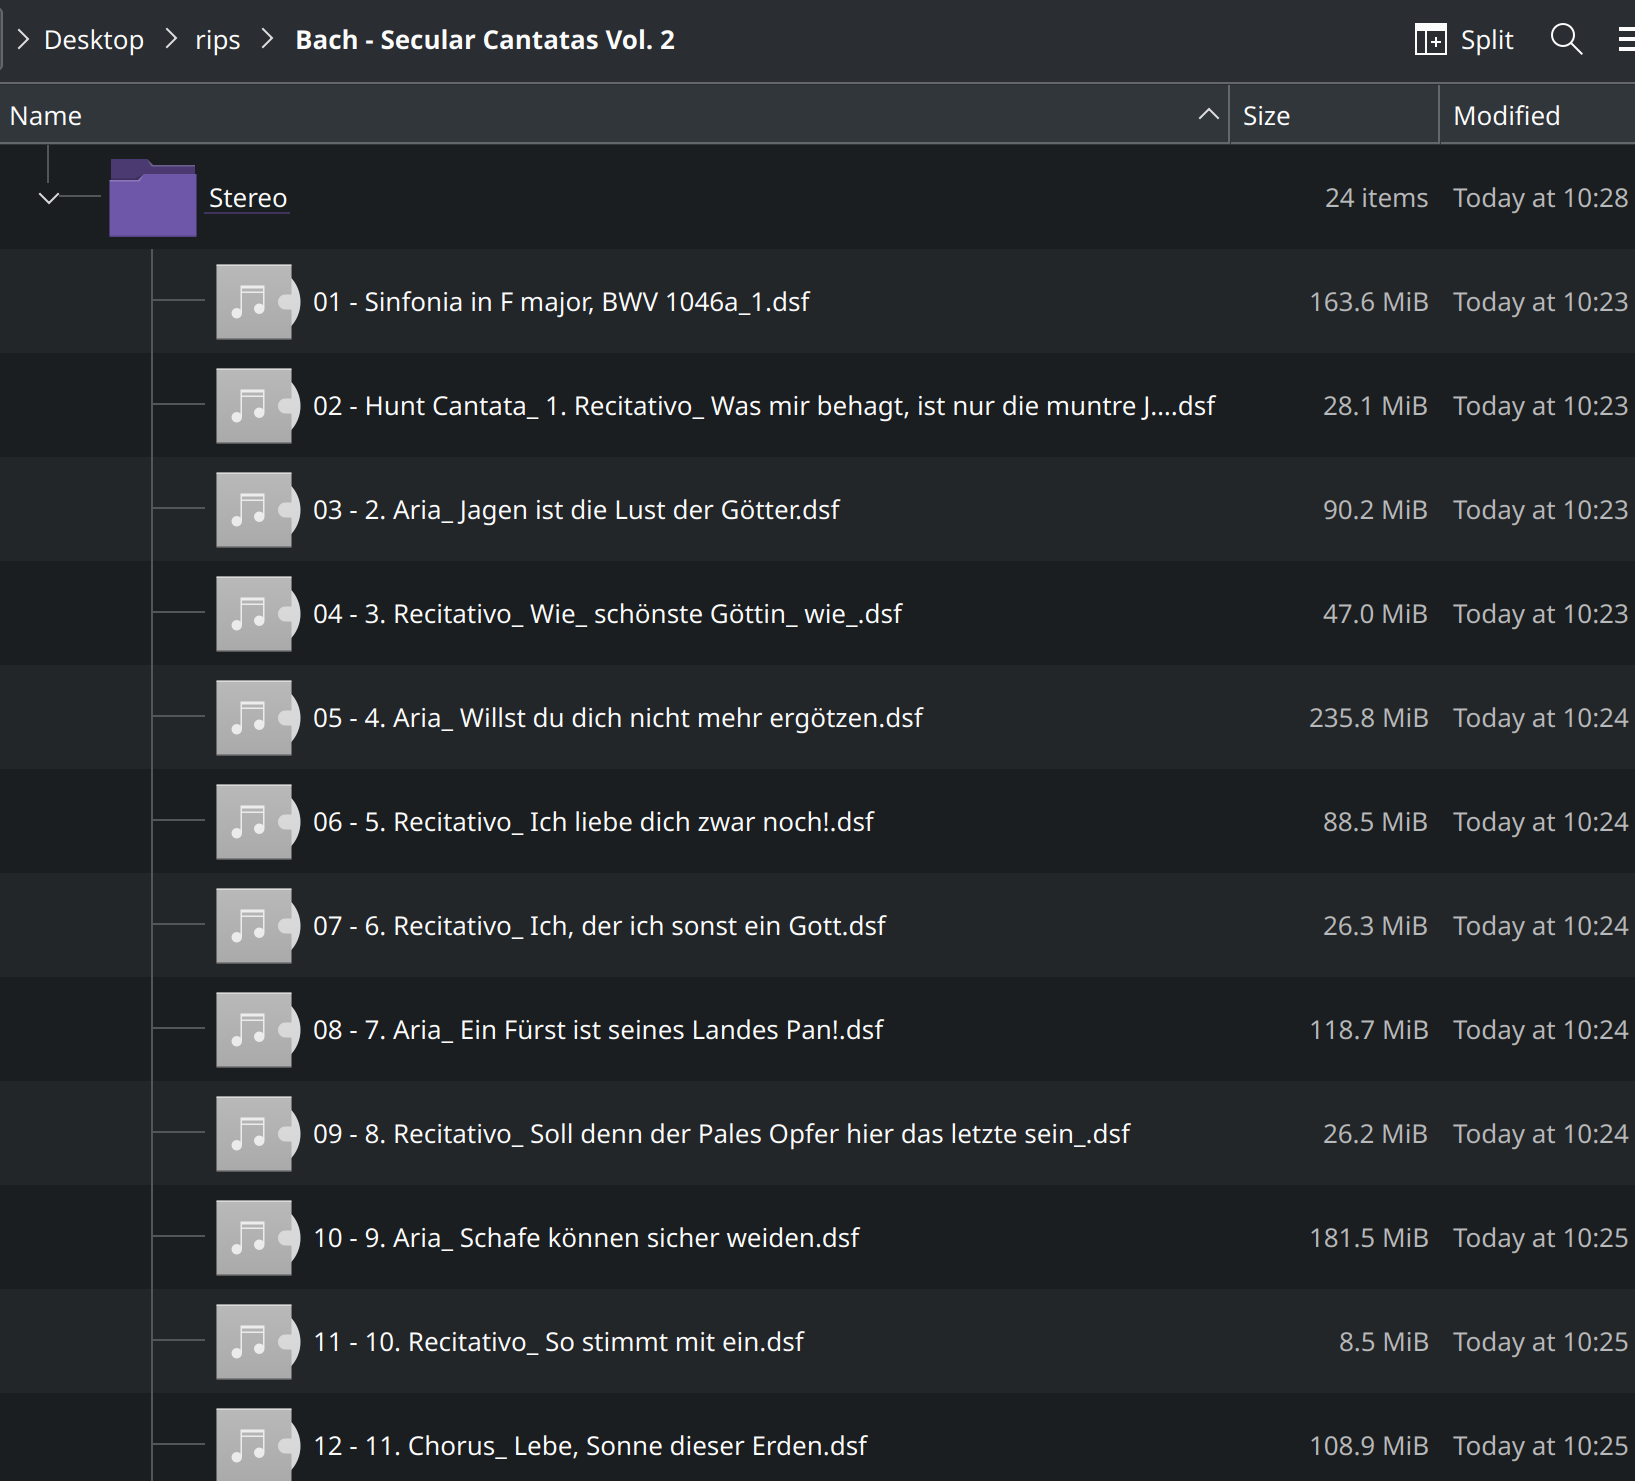
That is, a 'Stereo' sub-folder was created, and then within that, a pile of individual 'DSF' files appear, each usually rather large (in the hundreds of megabytes, though obviously it depends on the track length as to the exact scale of the data involved).
DSF files are 'Direct Stream Digital Files': they're the raw audio data, stored in a format that's native to SACD and which very few media players can readily play. I'm producing DSFs because I used the '-s' switch in my earlier ripping command, you may remember.
I could, instead, have used this variant of the command:
./sacd_extract -i 192.168.137.40:2002 -I -z -2 -o /home/hjr/Desktop/ISO\ Rips
This time, there's a -I switch instead of the -s. That triggers the creation of a single ISO file, so that the rip looks like this:
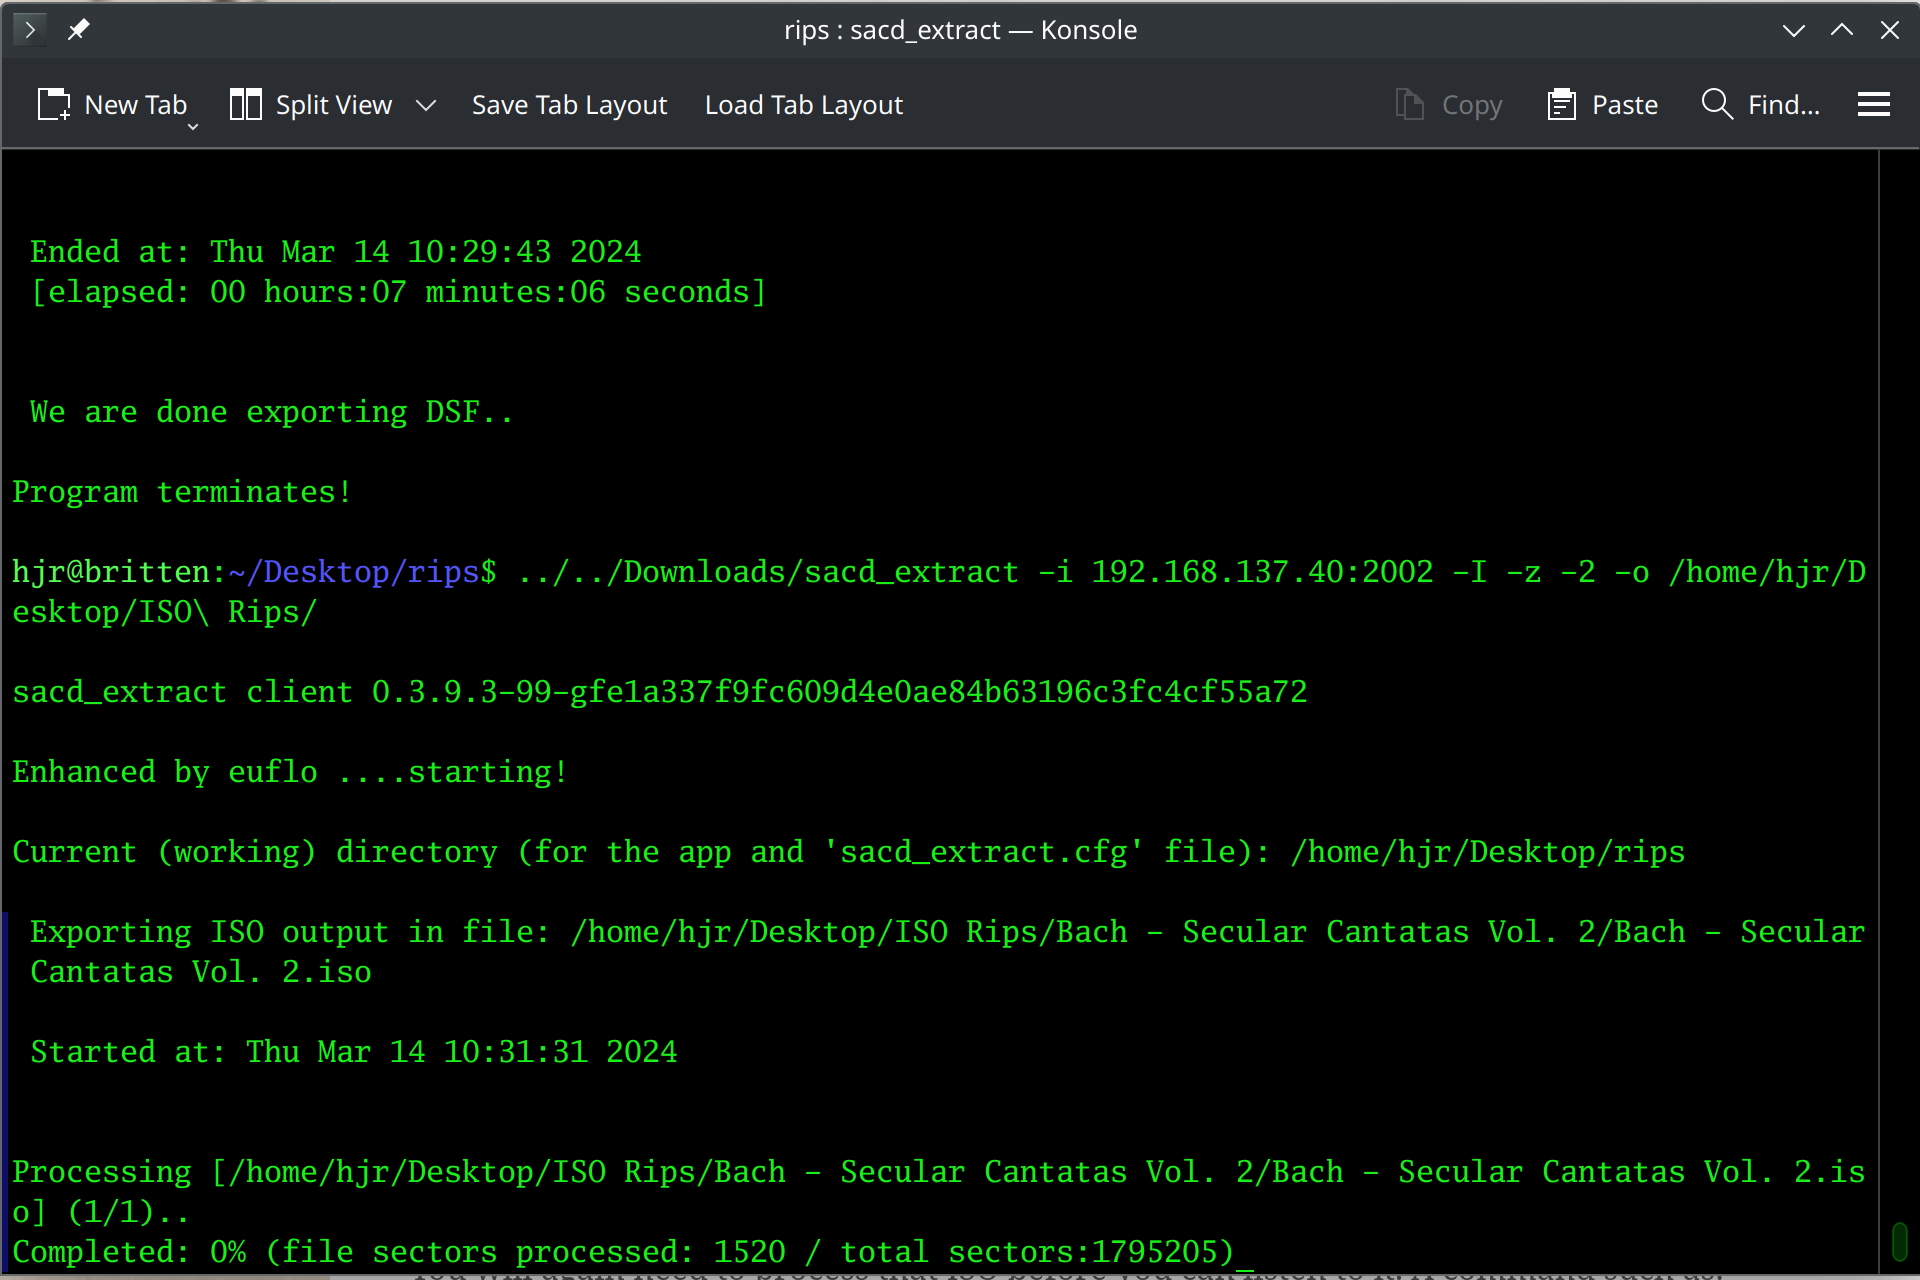
You might notice that instead of bazillions of lines of 'file sectors processed...' lines scrolling up the terminal, this version of the command outputs a single line that shows the same count of sectors processed as with the DSF example, but a single percent complete indicator and no scrolling. It's thus a bit 'cleaner' to output to ISO than DSFs. The resulting rip is a lot simpler, too:
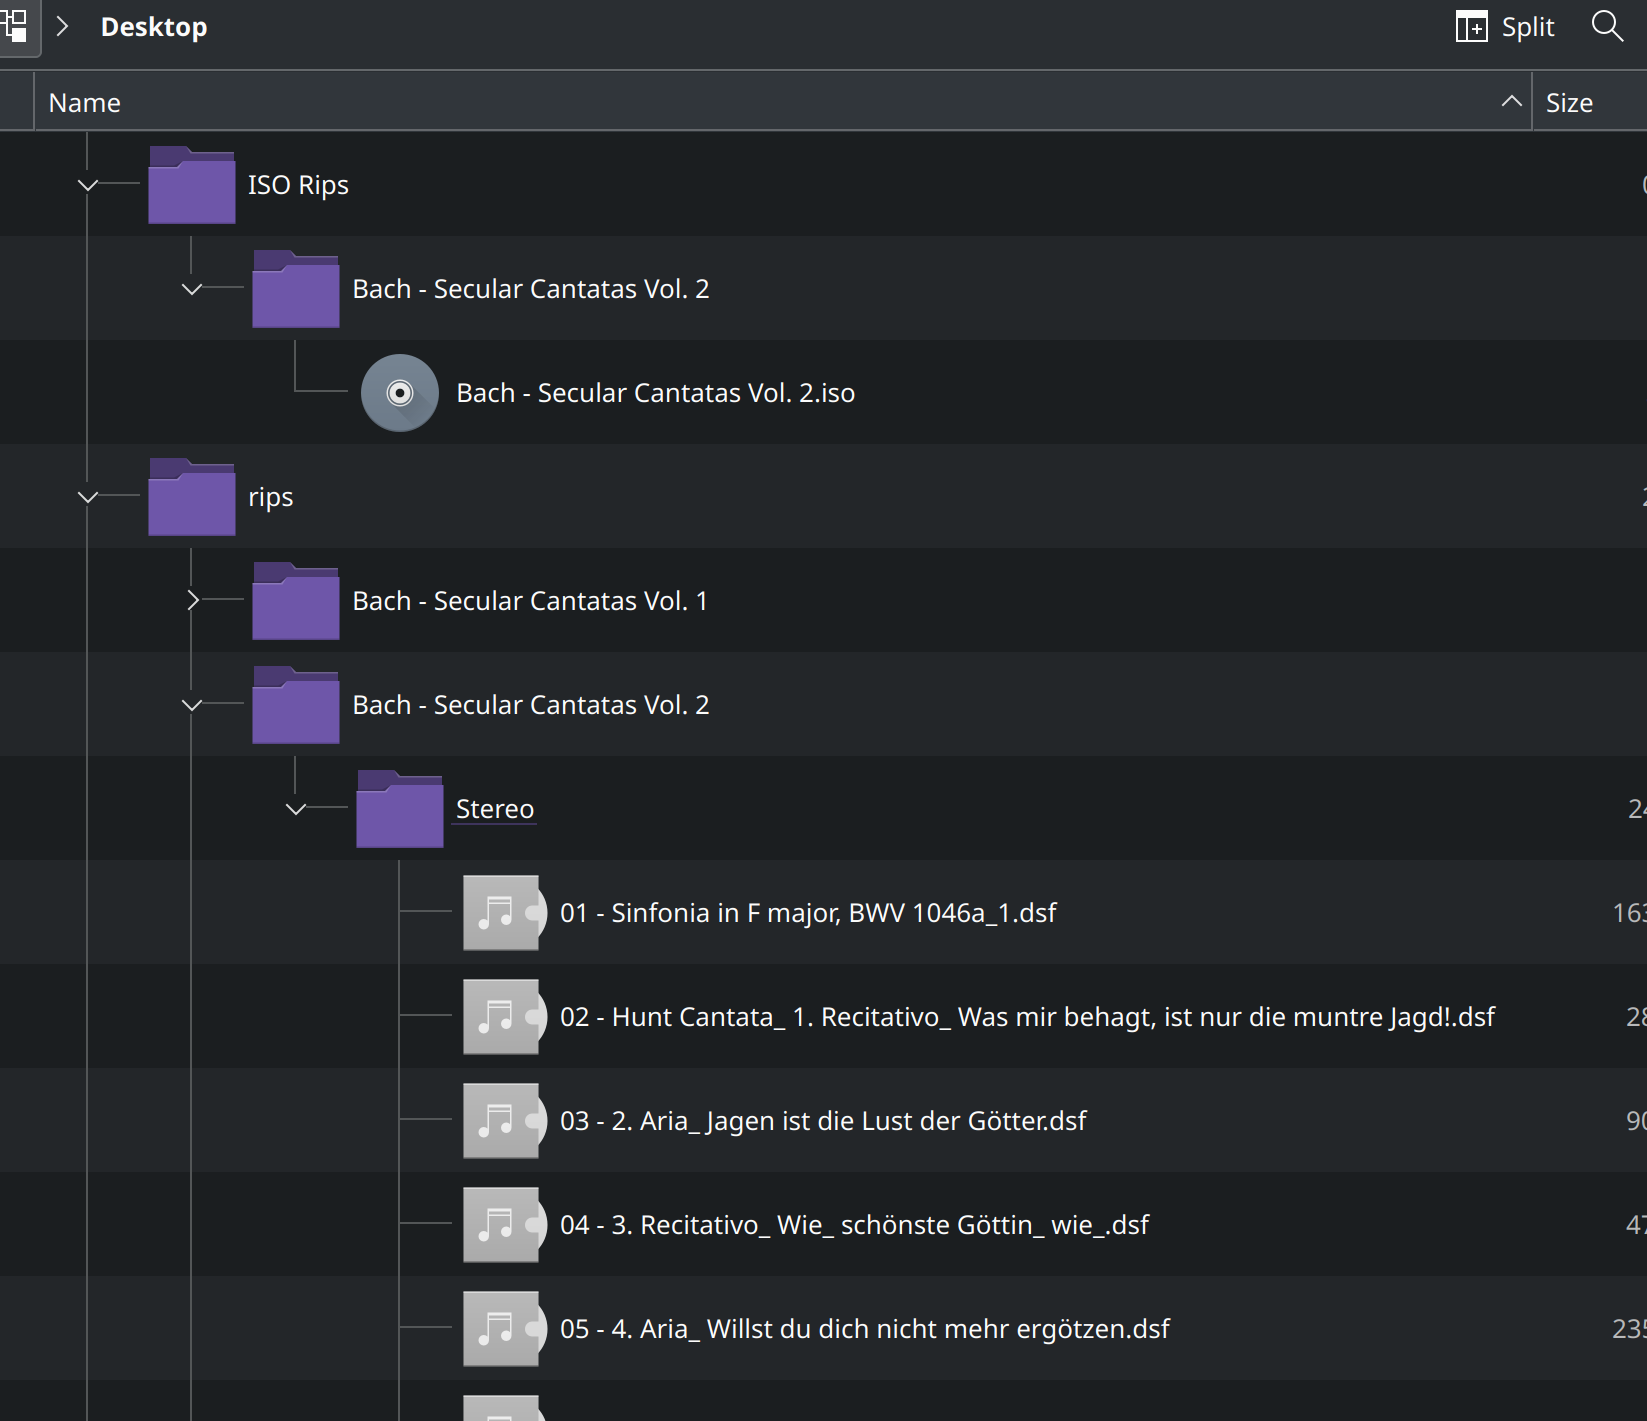
Towards the bottom of this screenshot of my file manager, you see the DSF output of the second volume of Bach's cantatas as before: a folder called 'Stereo', and within that, a bunch of individual DSF files. Above this, however, I've also ripped the second volume to an ISO: and you'll note that you get a single sub-folder containing the recording name and then, within that, a single file using an ISO extension.
An ISO file is simply a sort of 'container file', within which all the audio data that is contained in those separate DSF files is stored as one complete whole. The audio data is identical in either case, however. There is no data difference between 20 DSFs and a single ISO that 'contains' within itself the same 20 DSFs' audio data.
Why does the sacd-extract utility then let you choose either output option? What's the point of outputting to ISO, if DSFs are audio-data identical? Or vice versa, come to that?
It comes down to the old problem of gapless playback. When you have separate tracks of audio, a lot of music players in the early days of digital audio used to struggle transitioning from playing one file and starting playing from the next: there would be audible pauses as the transition took place, or (worse) glitches and clicks of one sort or another. That was true of even music ripped from ordinary audio CDs: imagine how such players coped when the data volumes were the tens of times greater that they are when dealing with an SACD! Well, the old-time fix for players that couldn't do gapless playback was to present the music in the form of a single file that, by definition, required no file-to-file play transitions and thus had no gaps: and that's the reason the ISO file format exists. It represents a single file, containing within itself all the data from all the constituent 'tracks' making up the original SACD -but, as a single file, it can be played back without gaps, even by players that can't do proper gapless playback.
Fast forward about 25 years and computers have so much more computing power than we could dream of, back in 2000, along with solid state storage with read speeds orders of magnitude faster than the spinning hard disks of yore: the problem of gapless playback isn't really a problem any longer!
I'll go further: most music playing software cannot natively play either format, though an increasing number of high-end music hardware can. Even software players (like Foobar2000) can play one or other format by means of deploying a plug-in. But I don't use such hardware players and I don't use those sorts of software players either: my music player of choice is Giocoso, and it can only play FLACs. So, one way or another, I'm going to have to convert my SACD rips to FLAC format ...and therefore, again, there's no reason to prefer ISOs to DSFs or vice versa. Both are only ever 'intermediate' formats for me, so it really doesn't matter which I rip to.
And finally, I'll mention something I've been doing for many years now: when I rip a 10-track CD to 10 separate FLACs, I'll combine them back into a SuperFLAC when I'm done, meaning that I only ever play 'single file FLACs', no matter how many 'tracks' they may have been made up of on the original CD. I do this for a couple of reasons: file systems generally perform better when storing a few large files, rather than lots of small ones; and I don't approve of the concept of 'tracks' in classical music anyway. So, for a combination of practical and philosophical reasons, all my per-file FLACs get combined into a single per-recording FLAC in the end ...so, once again, I don't particular care whether I rip an SACD to a single ISO or a dozen DSFs: whatever the nature of the source, I'm going to end up with a single FLAC, one way or another!
So, in short: whether you prefer to rip to ISO or to separate DSFs is entirely a matter of purely personal preference. There is simply no technical reason to prefer one output format to another.
6.0 Converting SACD Ripped DSFs to FLAC
So, let's assume for now you've ripped your SACD to separate DSFs. You now want to convert them to a format that practically all music players can handle without drama: FLAC. I have a piece of software to do that, called Semplice, freely available from this very website. Install it with the commands:
cd
wget doco.absolutelybaching.com/seminst
bash seminst
Follow the prompts and supply the sudo password when prompted. Launch the program by typing semplice in a terminal session: you may get prompted to install some software prerequisites before Semplice can run effectively. Install anything requested, then retry running Semplice itself once more. If all the software prerequisites have been installed correctly, you'll see this:
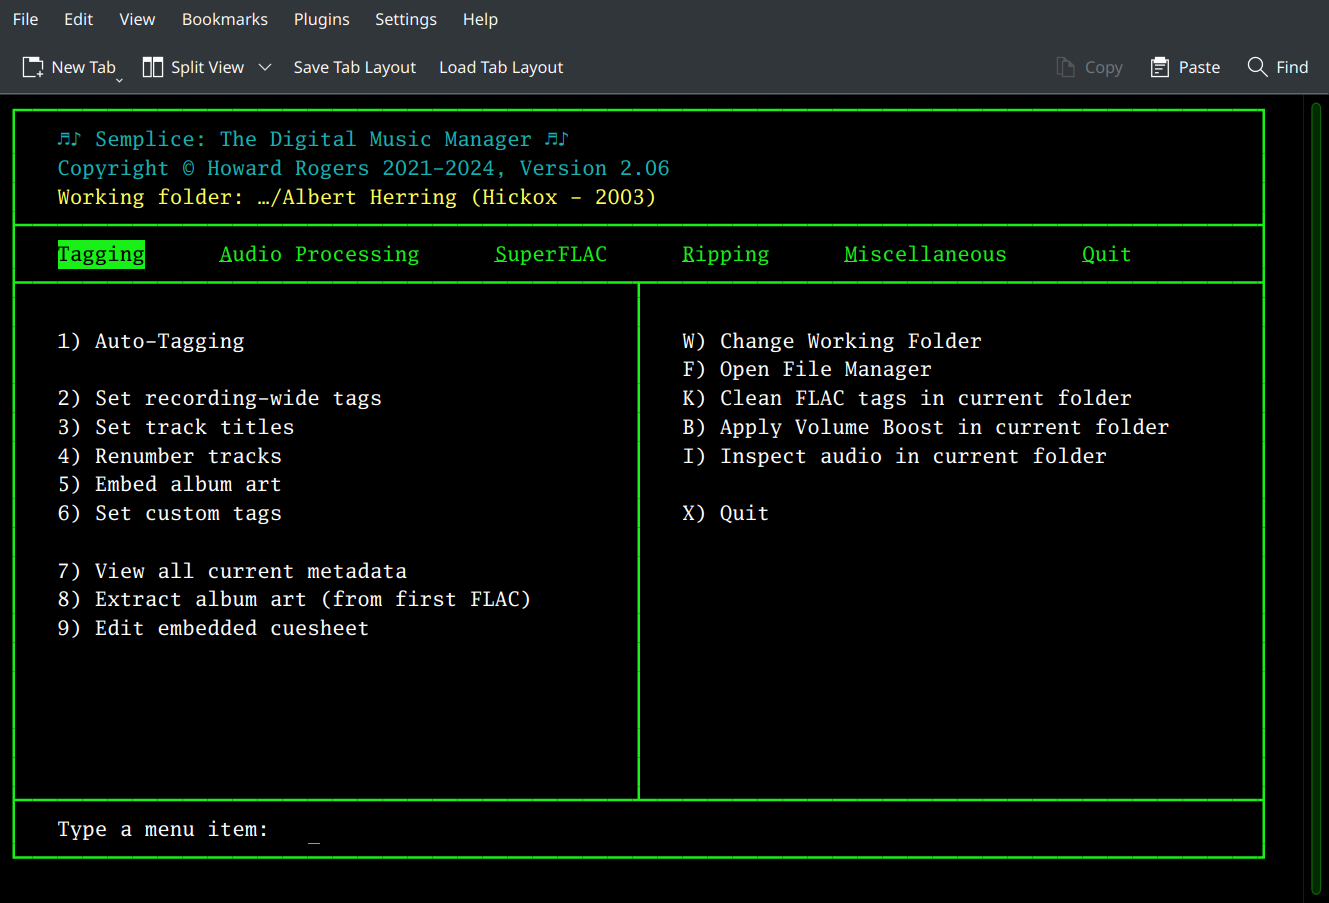
Semplice lets you do lots of different things with your digital music files (such as tagging them and giving them a volume boost), but the main thing to worry about now is to go to the Audio Processing menu (tap the letter 'A' or use the right- and left-arrow keys to get there):
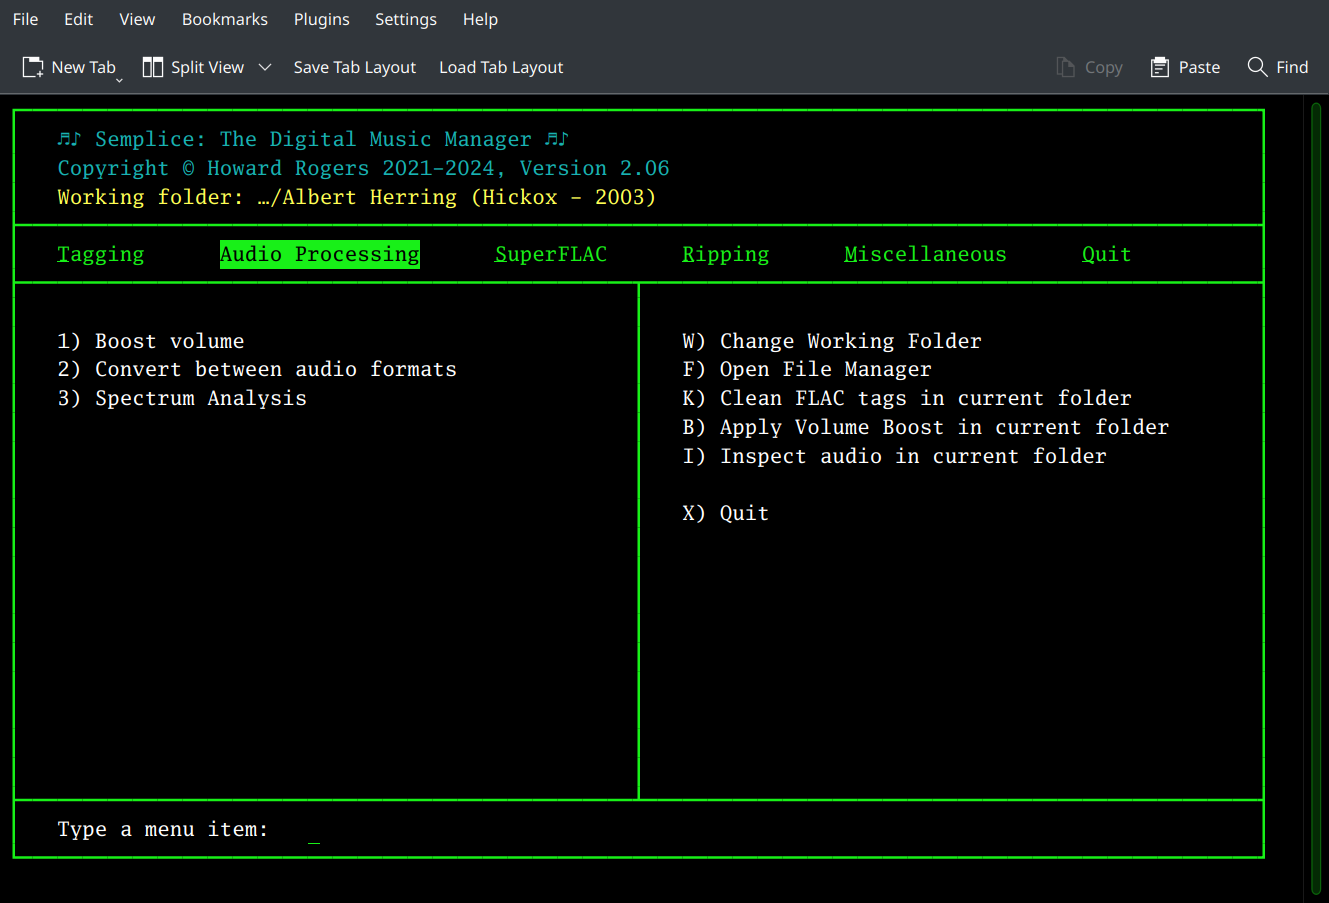
Option 2: Convert between audio formats is then the menu option you're after, so tap the '2' key to select it:
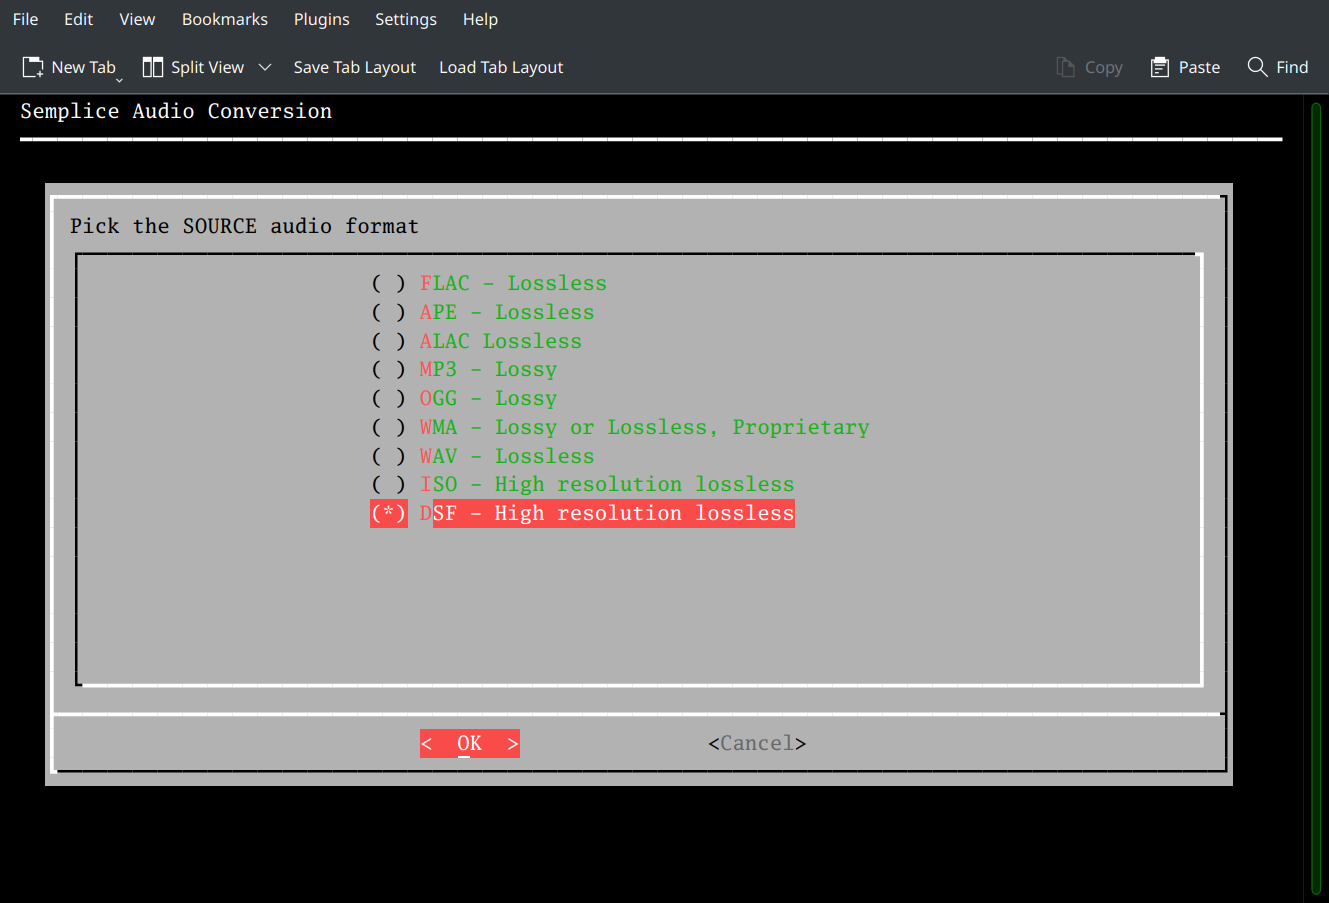
Arrow-down to select the appropriate source audio format and press the Space Bar to select the appropriate one: an asterisk will appear next to the selected item. In this screenshot, you can see I've selected the DSF format item. Note that I could equally well have selected the ISO option, if I'd ripped to that format, too.
Press [Enter] to submit your selection. The screen changes to display all the possible output audio formats:
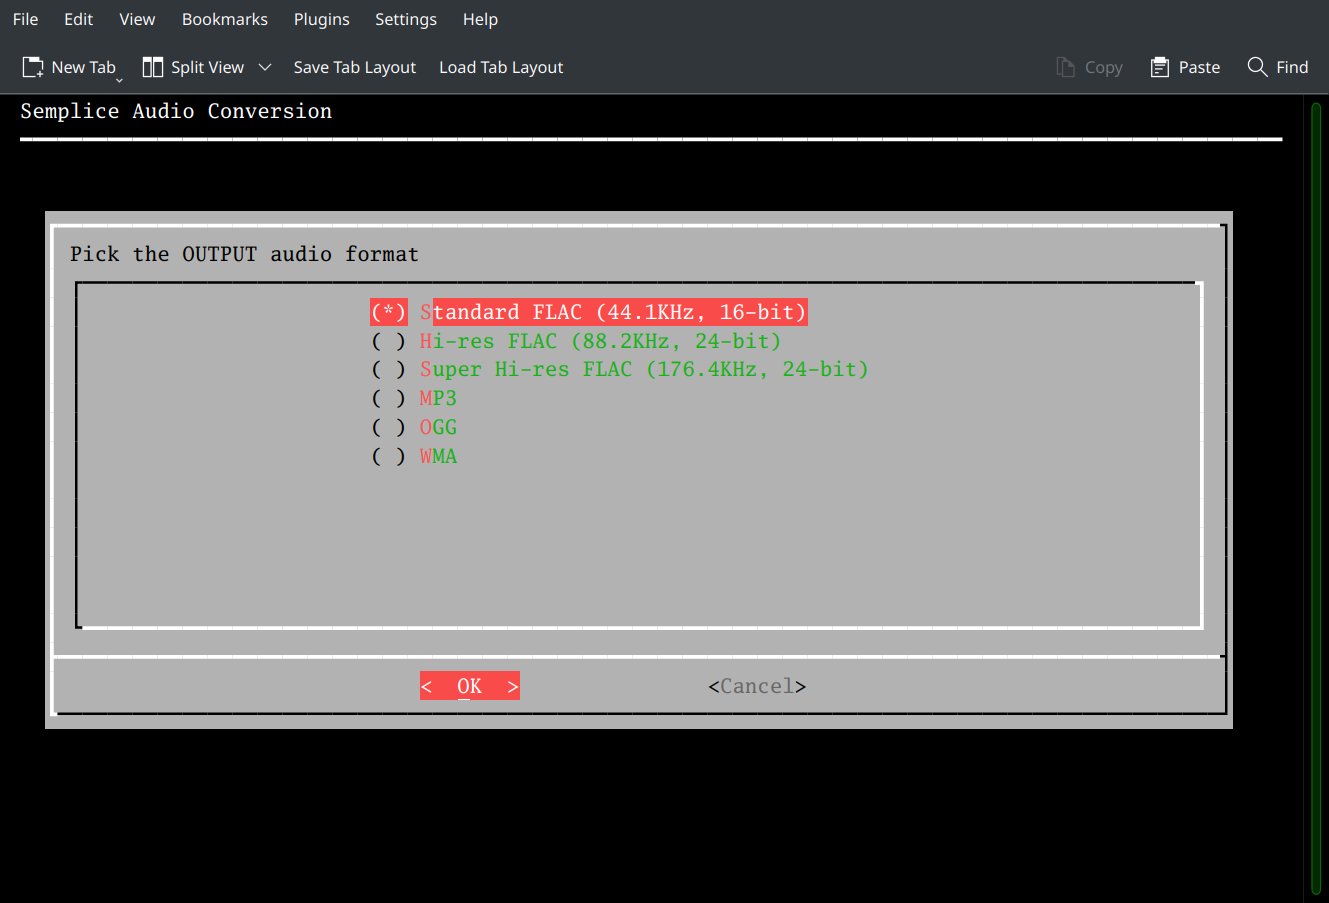
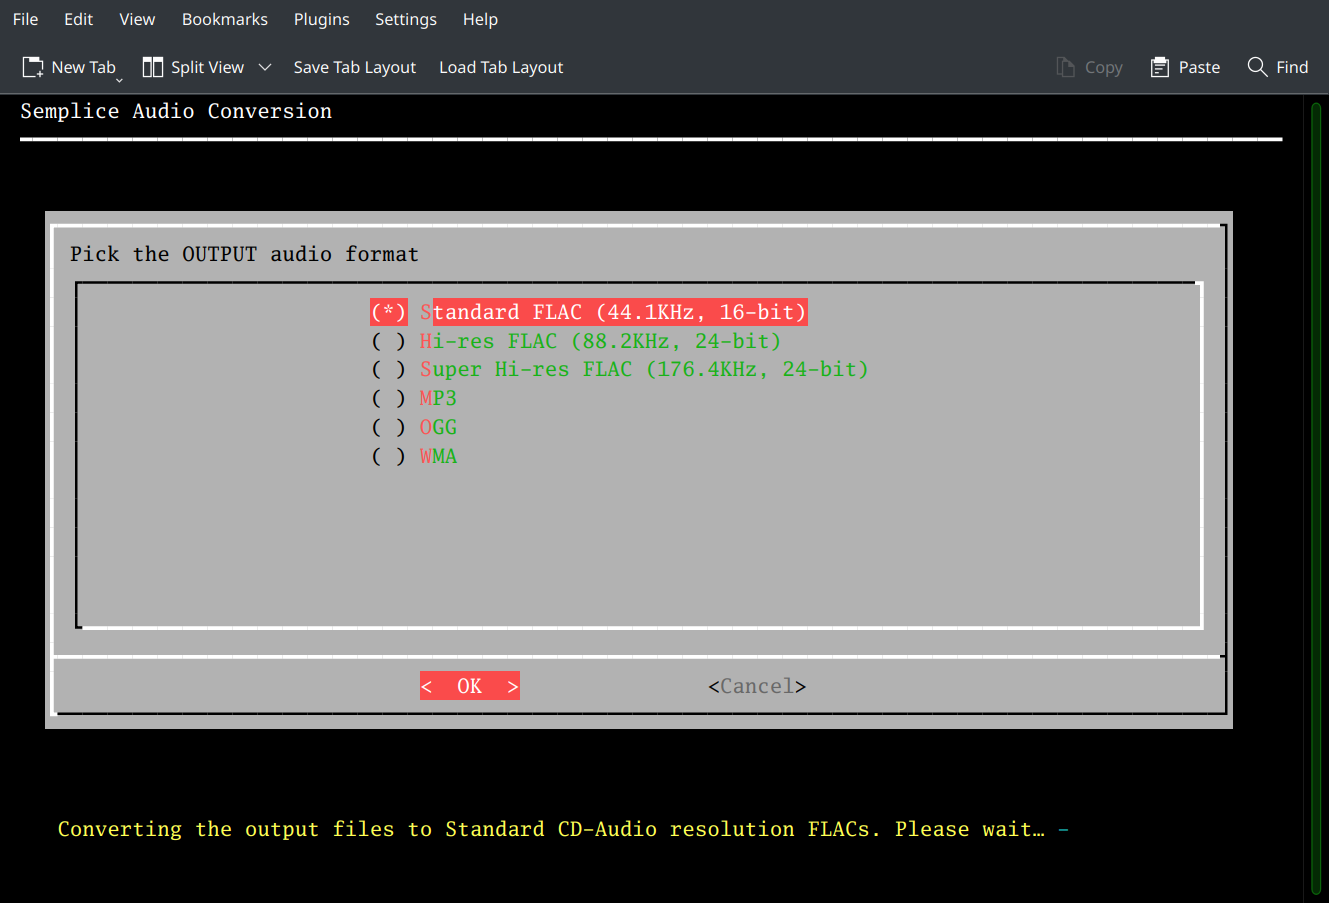
Again, you simply arrow up and down until the right item is highlighted and then hit the Space Bar to select it. You'll probably want to output to a FLAC format -but you'll notice that three different ones are available. Do you go for 'Standard', 'Hi-res' or 'Super Hi-res'? The difference is that 'standard' produces 16-bit audio files sampled at 44,100 times a second -precisely what standard CD audio is created as; Hires produces 24-bit audio files sampled at 88,200 times a second (there's an error in the text shown on the menu in that screenshot! It should show 88,200 not 82,000); and the Super Hires option produces 24-bit files sampled 176,400 times a second. Note that 88.2 and 176.4 are both whole multiples of standard CD's 44.1 sampling rate: the intent is not to cause dithering errors by converting to sample rates that are not divisors of each other.
Almost no human ears can actually hear anything better than standard CD audio (there's a reason Philips and Sony sound engineers invented CD audio the way they did!). Older human ears will definitely not hear anything better than standard CD audio. Audiophiles with more money and sense, but also younger listeners, and maybe the occasional human with so-called 'golden ears' might get benefit from a hi-res FLAC, sampled at 88.2KHz: the extra bits and higher sampling rate allow such files to have a greater dynamic range than standard CD audio files, but most mere mortals wouldn't be able to tell the difference. The Super Hi-res option is only there for people who like to have bragging rights. Such high sampling rates produce audible results that are physically incapable of being discerned from an 88.2KHz audio signal, though they consume four times the data.
I do have older ears and therefore I always down-convert my SACD rips to standard CD audio sampling rates: I buy my SACDs for their re-masterings, not for their extra bits and Hertz! However, if you want a higher "quality" audio format, the general feel in the music industry seems to be that DSF64 (which is what most SACDs are authored at) approximately equates to an 88.2KHz sampling rate. If your SACD contains DSF128, DSF256 or even DSF512m then you'll probably want to go for the super hi-res 176,400Hz format.
Anyway: pick one and press [Enter] to go ahead with the conversion. As soon as you do, the screen will change to something like this:
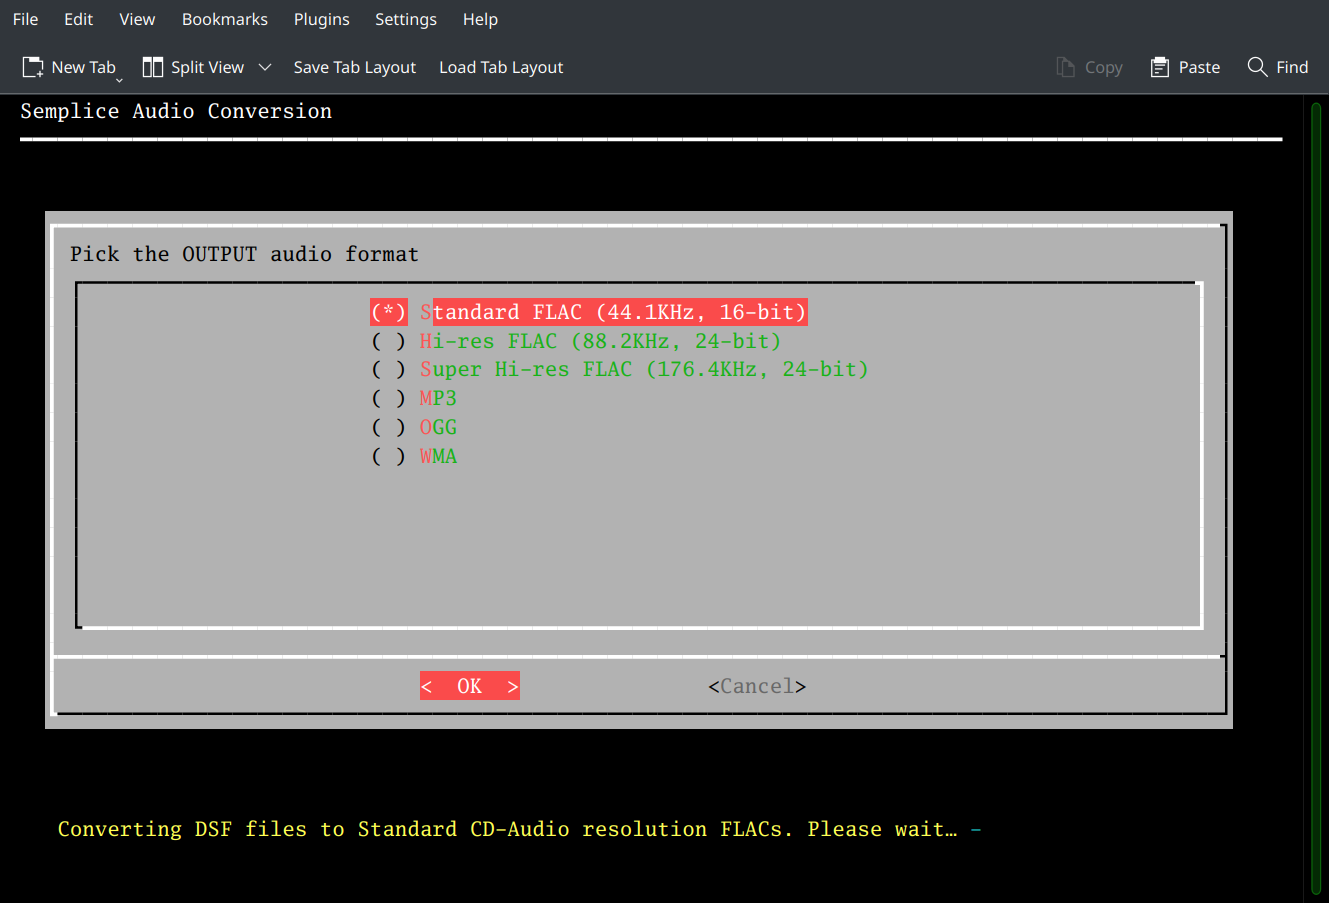
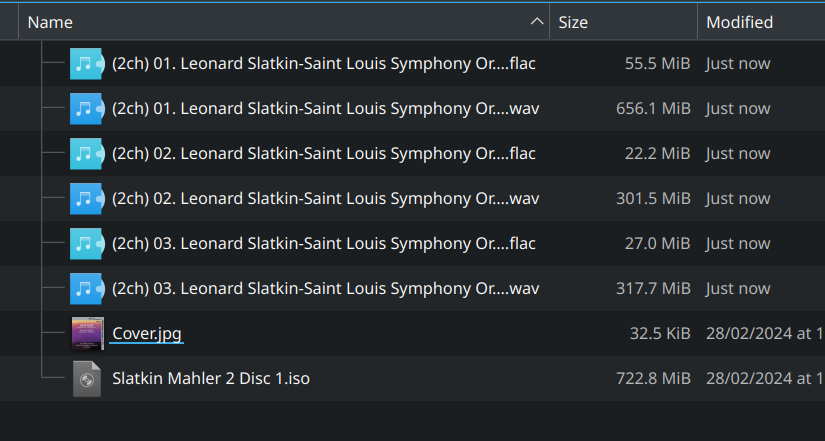
The message in yellow at the bottom of the screen confirms that the conversion is taking place (and reminds you what sort of output format you selected, too). You can see the work in progress in your file manager:
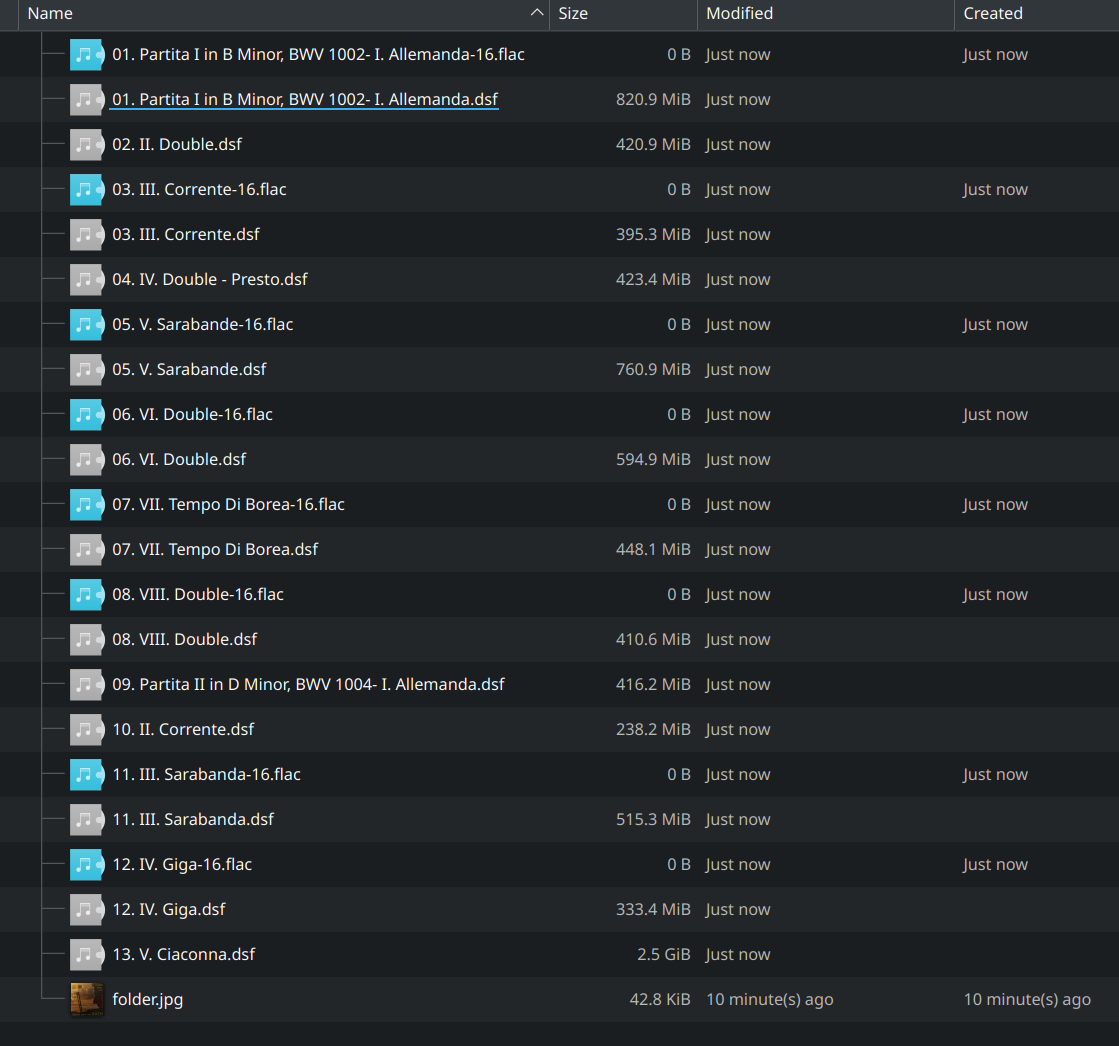
For every DSF, you'll see an equivalent FLAC equivalent, its size increasing over time as the conversions proceeds.
When the conversion is complete, Semplice will return to its main menu. The file system will end up looking like this:
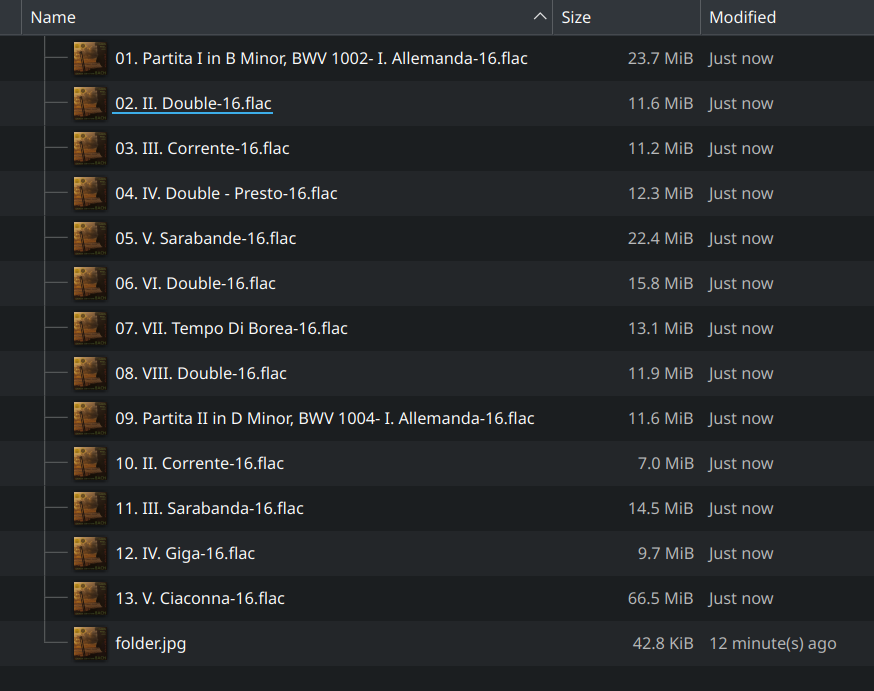
You'll immediately notice (and perhaps panic!) that the folder now only contains FLACs: where have the original DSFs gone?! Well, mine have irretrievably been deleted ...but that's because I've configured Semplice to work that way! If you navigate to the Miscellaneous menu and take Option 1 - Edit Configuration File, you'll see various configuration parameters that affect the way Semplice works. There are four 'pages' of these parameters. Press [Enter] to move from one to the next. On the fourth page, you'll see this:
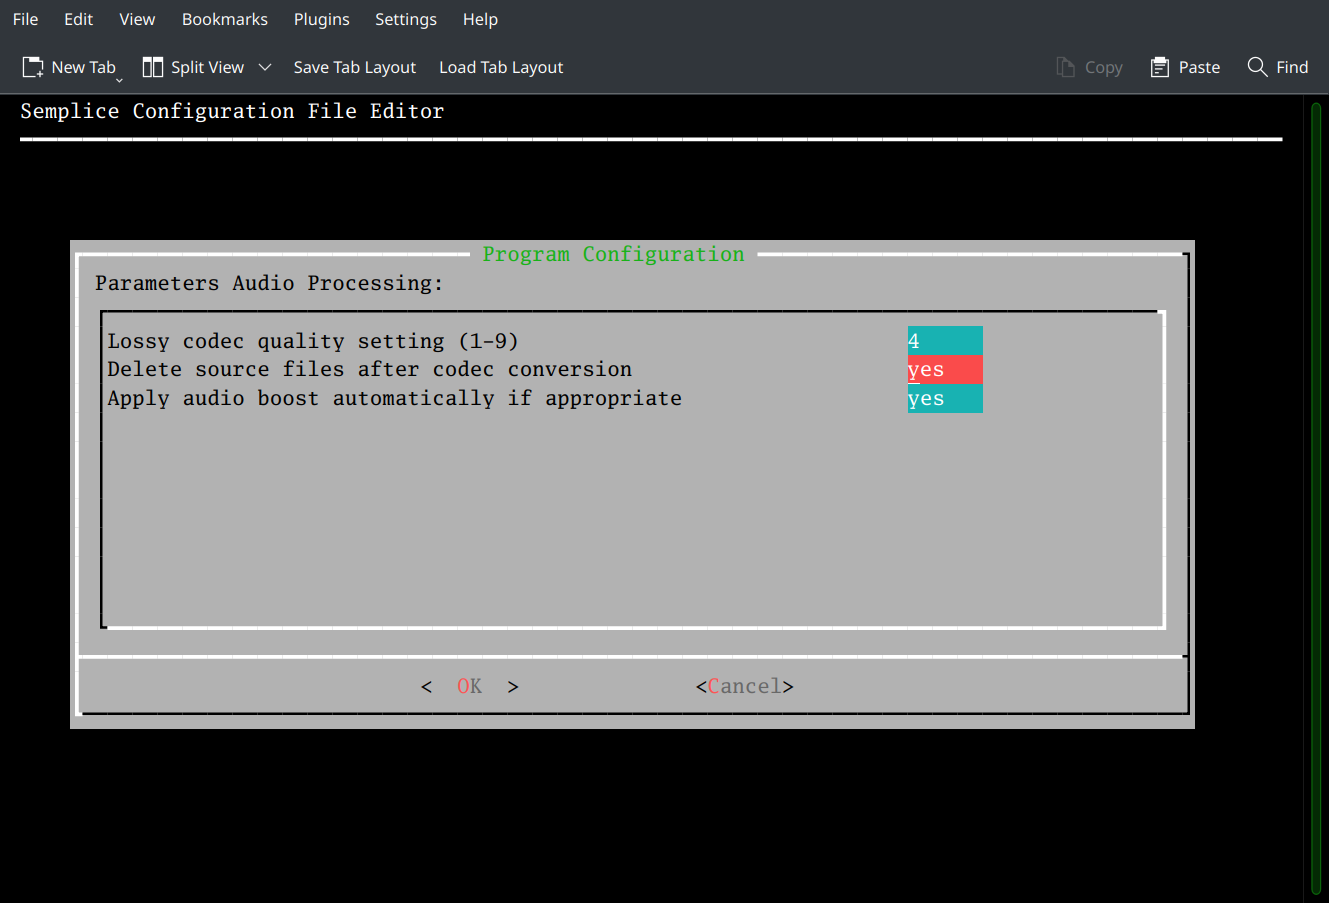
The second, highlighted parameter there has been set (by me) to 'Yes, please delete source files after codec conversion'. If you want your DSFs (or ISOs) not to be auto-deleted, make sure that parameter is set to 'no' (which it is by default, anyway).
Anyway: one way or another, you now have a set of per-track FLACs that you can play on all players and with most music-playing software without drama.
7.0 Converting SACD Ripped ISOs to FLAC
What if you'd ripped your SACD to a single ISO, though? Can Semplice help there?
Certainly! Again, cd to the folder containing the ISO before launching Semplice. Use the Audio Processing menu, Option 2 once more. Select ISO as your input format and whatever you fancy as the output format. This time, as soon as you press [Enter] with a selected output format, you'd see this:

To begin with, Semplice splits the ISO into its constituent tracks: it does so by outputting uncompressed and lossless (and thus large) WAV files, which in your file manager would look like this:
Here, you see the source ISO and the separate WAV files being extracted from it.
When all the tracks have been extracted from the ISO, Semplice's display changes to display the following message:
The separate WAVs now get converted into lossless, compressed FLACs (of whatever bitdepth and sample rate you chose). In your file manager, things would now be looking like this:
Here the WAV files and their equivalent FLACs exist side-by-side. This does, of course, mean that at least temporarily, your hard disk needs enough space to store yet another version of your SACD (around half again of the space occupied by the original rip).
When this process completes, Semplice will return to its main menu and your file manager will end up looking like this:
You'll immediately notice that whilst I now have a nice set of FLACs, the WAVs have entirely disappeared! However, the original ISO is still there on disk -and this is why it's quite safe for the WAVs to be automatically deleted: they are only an intermediate file between the ISO and the end-result FLAC and could always be re-created by asking for a fresh conversion from the source ISO which, you'll note, has not been auto-deleted.
This automatic deletion of the intermediate WAVs always happens, regardless of what you've configured the 'Delete source file after codec conversion' parameter to be in the Semplice configuration file. It's also true that ISOs are never deleted after conversion, regardless of what that parameter is set to. When converting from ISOs, therefore, remember to clear up the source ISOs yourself: otherwise, you'll be taking up multiple gigabytes of disk storage unnecessarily! Other than that, though, you'll notice you again end up with a series of per-track FLACs.
Incidentally: the reason why ISO conversions break the 'auto-delete' rules in this way is that ISOs are the only input format that cannot generally be played directly by most of the media players I'm familiar with; even DSFs can be played with appropriate plugins installed for most of the more common players. Accordingly, there's no easy way to compare the output of an ISO conversion with its source. Semplice therefore was written always to keep the ISO source around for safety's sake.
High-resolution FLACs will always look identical to 'ordinary' FLACs ripped from standard CDs (though you might notice they're all a bit 'fat' as far as file sizes go!), but if you play them via a Digital-to-Audio Converter (DAC) that exposes details about the music it's being fed, you'll see something this:

That indicates the DAC recognises that a 24-bit, 88.2KHz audio signal is being received: these are therefore hi-res FLACs, not your bog-standard CD Audio ones!
8.0 Volume Boosting
For various technical reasons, SACDs are often mastered at a much lower volume level than ordinary CDs would be (the short version is that the much higher sampling frequencies can introduce harmonic 'noise' into the audio signal; keeping the volume low allows these noise injections to be filtered out appropriately). It's not always the case, but usually you'd expect an SACD to be about 5 or 6 decibels quieter than a standard CD equivalent. You can live with this by the simple expedient of continually turning the volume knob on your hi-fi system's amplifier up or down, depending on whether you're playing files extracted from an SACD or a standard CD.
If you are vaguely sane, however, you may want to properly fix this problem!
From its Audio Processing menu, take Option 1 - Boost volume. This triggers a scan of every FLAC found in a folder. The program analyses the peak volume reached in each track. If at the end of analysing everything Semplice determines that the loudest track could be volume-boosted by an amount that takes it to a maximum non-distorting volume, it will propose to apply that same volume boost to every FLAC in the folder. In this way, all FLACs get louder by the same amount -thus, the relative loudness between them doesn't change, but the absolute volume level of all of them increases.
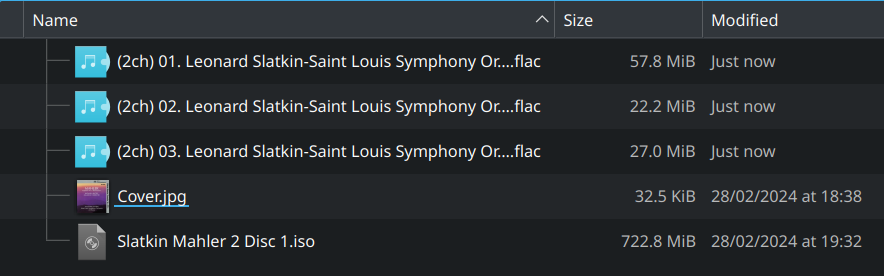
Here's what happens when I take that option from within the folder containing the FLACs produced from my rip-to-ISO SACD extraction done earlier, for example:

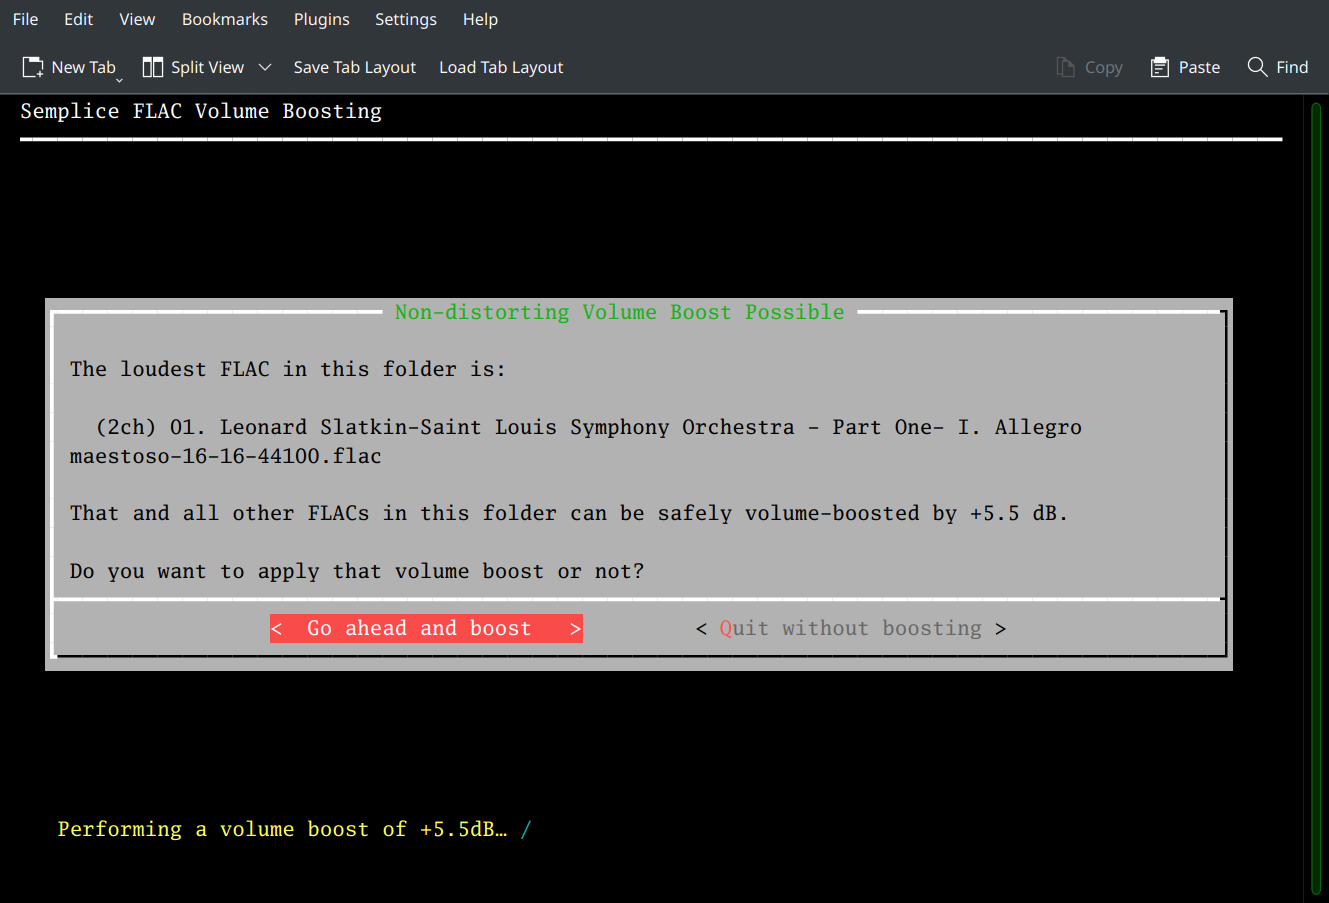
Each file is scanned, one at a time, and its peak volume is detected. Once all files have been scanned, Semplice works out what the maximum safe volume boost could be applied to all the files in that folder. Here, it has determined that File 1 (out of 3) is the loudest FLAC and, despite being the loudest, it can nevertheless safely be boosted by 5.5dB. That same boost will be applied to the quieter files, too, if you click the 'Go ahead and boost' button.
Semplice will never propose a volume boost that would introduce distortion to an audio signal. It always errs on the side of caution too: no matter how quiet the loudest file might be, it will never propose a boost larger than +7.5dB, since a boost greater than that implies that the original audio has been mastered particularly quietly -and probably for a good reason! Recording engineers generally know what they're doing when things are mastered that quietly (famously, for examples, some recordings made in the Kingsway Hall in London are often mastered more quietly than you might expect because otherwise you can hear the rumble of tube trains in the background!)
If you say 'go ahead and boost' when prompted, this happens:
The program immediately starts to apply the volume boost. Note that Semplice does not modify the original FLAC: if you were to look in your file manager at this point, you'll see this sort of thing:
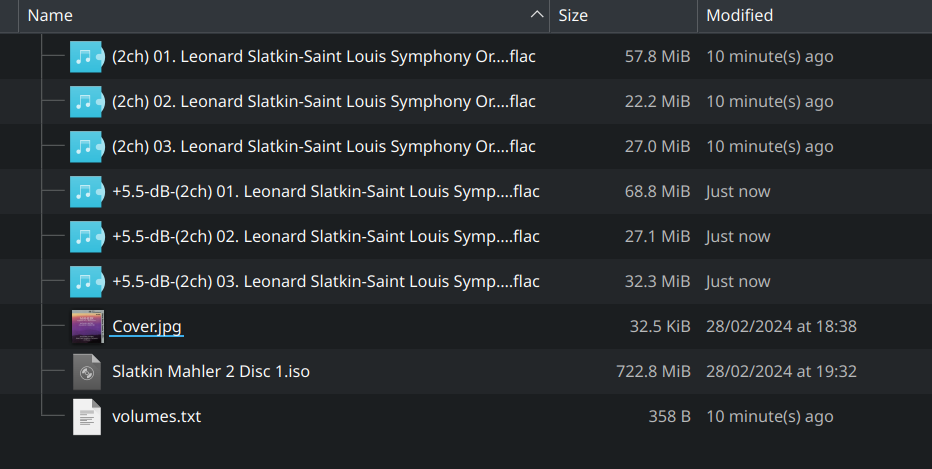
You'll notice that the original FLACs are all listed in the folder as before, but they've now been joined by equivalent FLACs with a prefix that represents the volume boost amount: in this case, three FLACs now exist with a "+5.5-dB" prefix. The originals are therefore quite safe at this point: Semplice is creating new files that are volume-boosted, not altering the originals.
At the end of the volume boosting phase, Semplice displays this message:
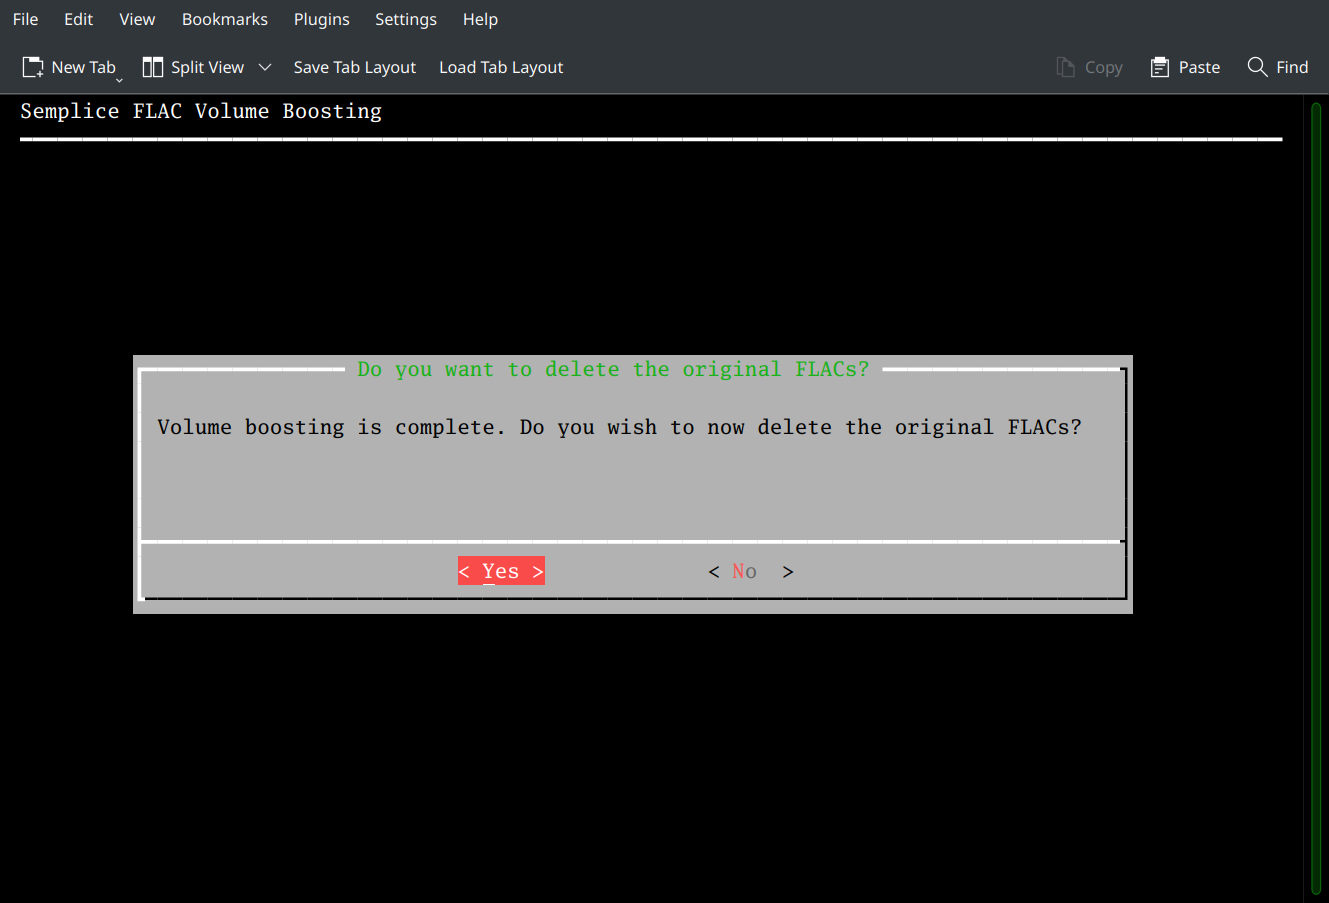
It offers to delete the original FLACs, if you select the 'Yes' option by pressing [Enter]. The idea here is that you might want to listen to an original FLAC and its volume boosted equivalent to check that the volume boost hasn't done anything nasty to the audio signal. Once you're satisfied that the volume-boosted files are fine, you probably won't want to keep the originals. Take the 'y' option to delete the files, therefore.
Before I go ahead and do that, here's the state of play on my PC, once more:
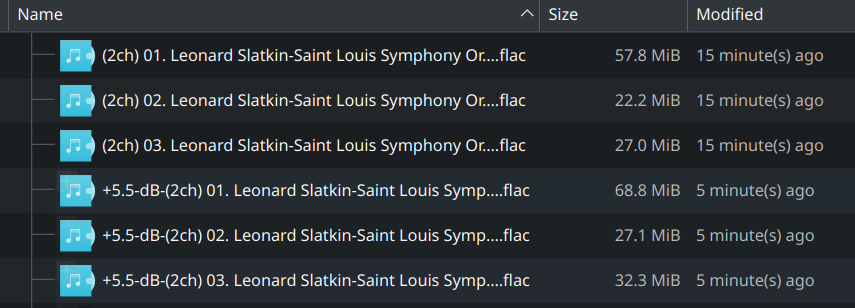
Make a note of the file sizes here. The original File 1 is 57.8MB big; its volume-boosted equivalent is 68.8MB. Similarly, file 2 is 22.2MB in the original and 27.1MB in the volume-boosted state, and so on.
Now let me select the 'Yes' option back in Semplice to trigger the deletes of the original files:
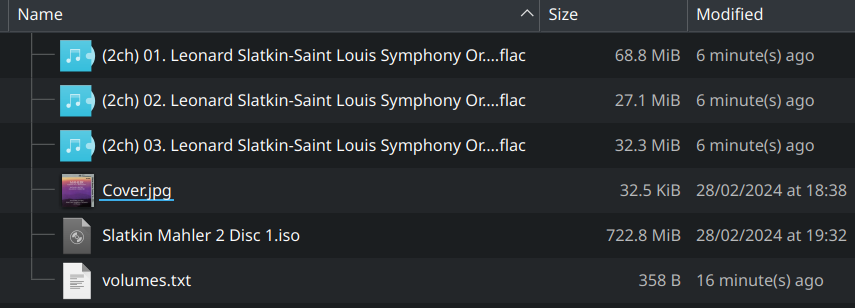
The effect is immediate: there are now only three FLACs listed in the file manager and none of them now have the "+5.5-dB" prefix in their file names, so they look like the original FLACs, in terms of their names. But look at the file sizes again... even though the files lack a volume-boosted prefix, the sizes tell you that these are the volume-boosted versions of the FLACs. Semplice has, in other words, deleted the original FLACs and renamed the volume-boosted replacements so that the file names no longer contain the decibel differentiator.
The net result is that you now possess a complete set of per-track FLACs, sourced from an SACD, and adjusted to be as loud as they can possibly be, without distorting and without changing the relative volume difference between tracks.
Incidentally, if you take the Miscellaneous menu, Option 1 - Edit Configuration File once more, on the fourth page of configuration options you'll see this:
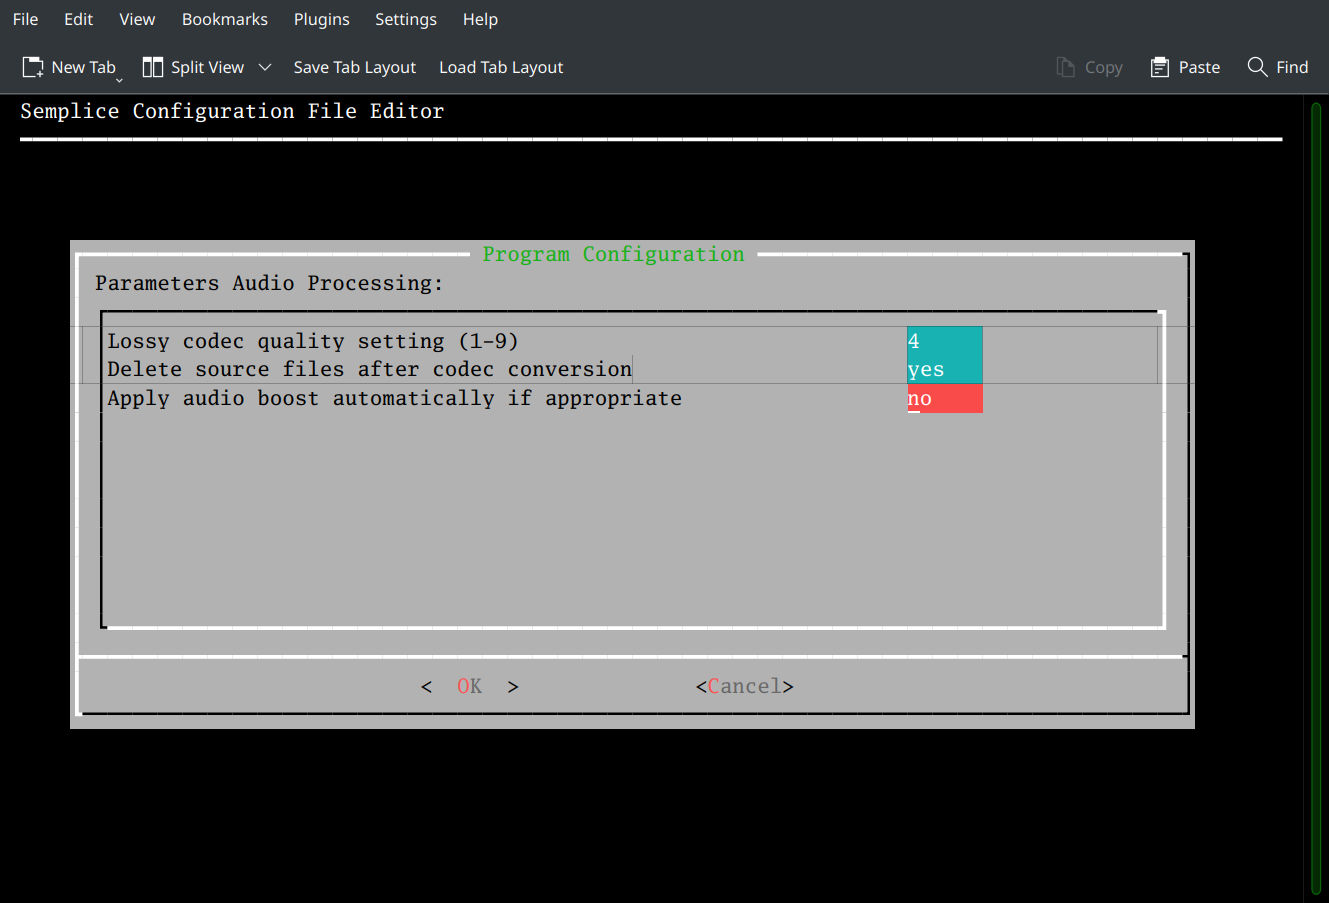
That last option, 'Apply audio boost automatically if appropriate' is, by default, set to 'no', which is why when I took the option to volume boost, Semplice analysed and then asked me if I wanted to apply the boost. If I were to set this configuration parameter to 'yes', then when I take the option to volume boost, Semplice will analyse the files exactly as before and, if it determines that a volume boost can be applied, it will apply it without asking you whether you want it to go ahead. It still won't delete the original files without asking, however. It's just a little bit more convenient to create the db-prefixed files automatically without extra prompting, but you're definitely still in control over whether the originals or the volume-boosted files are the ones you want to live with.
9.0 FLAC Merging
Finally, I'll remind you that I mentioned above that I have a philosophical and practical objection to storing lots of 'tracks' to represent a single piece of classical music. Once I get my 'track FLACs' volume-boosted, therefore, I like to join them back together to create a single 'SuperFLAC': a solitary, huge FLAC that contains within itself all the musical data that was originally stored in the multiple-track version of the original rip.
Semplice does this job for you, too: just take the SuperFLAC menu, Option 1 - Merge tracks into SuperFLAC:
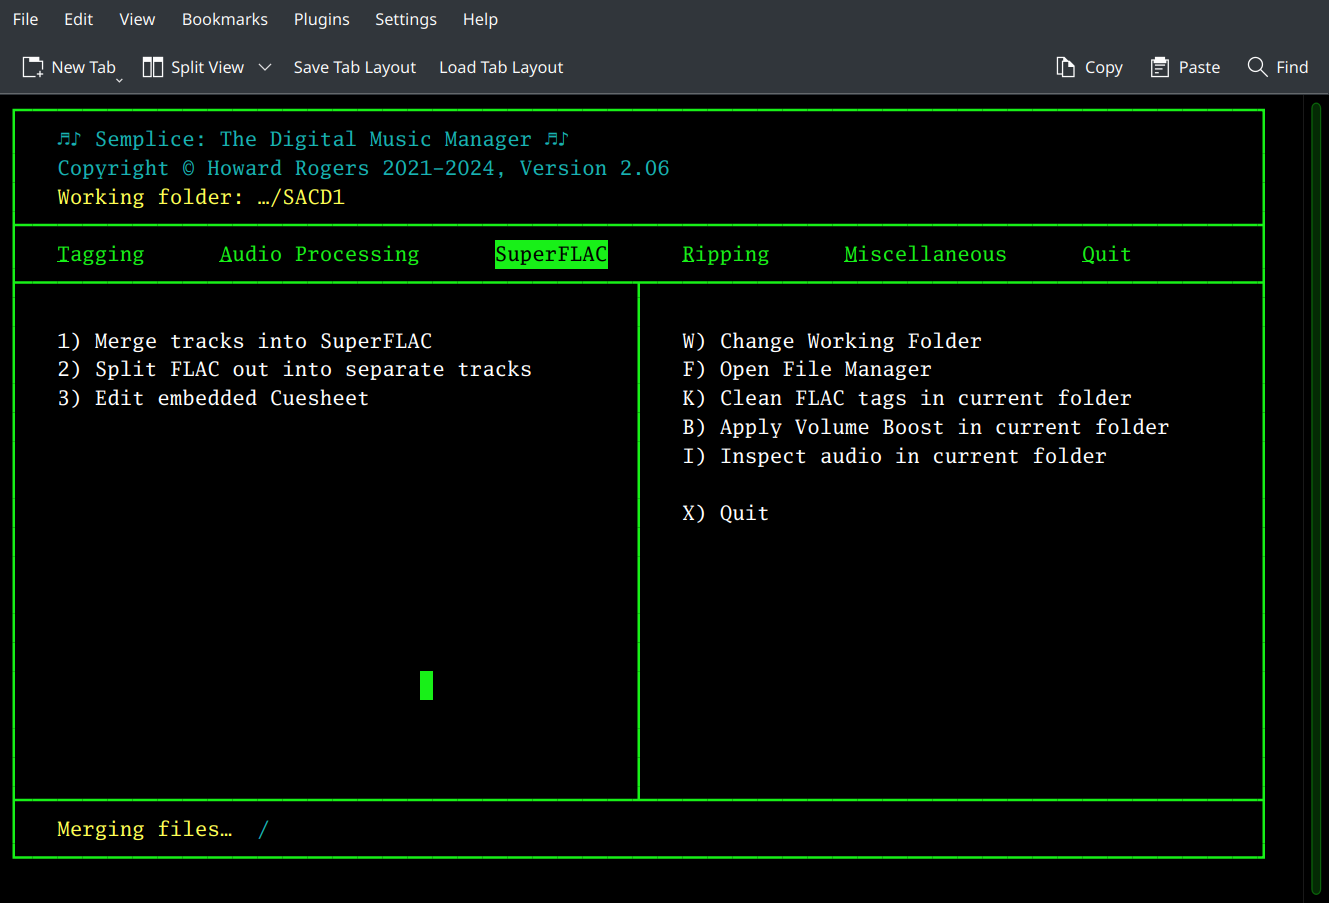
To start with, Semplice checks all the metadata tags the individual FLACs have been marked up with (if any). Once the metadata checks have been done, Semplice immediately starts to merge the FLACs into a single file and displays the fact that it has begun the merging process in the program's status bar, towards the bottom of the screen.
This process can take a long time. You can monitor progress in your file manager:
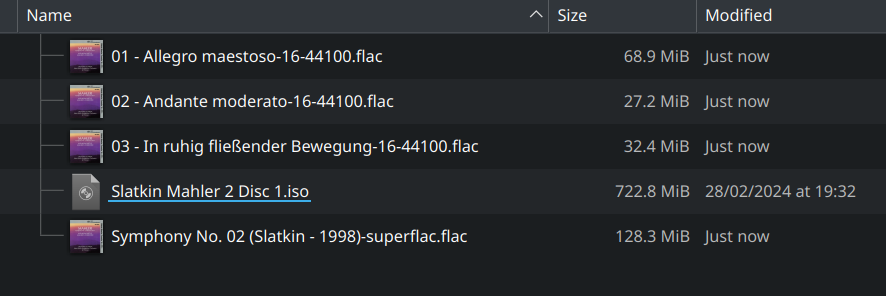
You'll see the three source FLACs (plus the ISO they came from), sitting alongside the new 128.3MB FLAC, whose name is the same as the ALBUM tag assigned to the first FLAC in the folder. A bit of mathematics tells you that 68.9+27.2+32.4 = 128.5MB, so you can see that, give or take a bit of rounding by the file manager, the symphony-named SuperFLAC really does contain all the data stored in the 3 separate per-track FLACs.
When the merging process completes, Semplice lists all the per-track FLACs that are now really surplus to requirements:
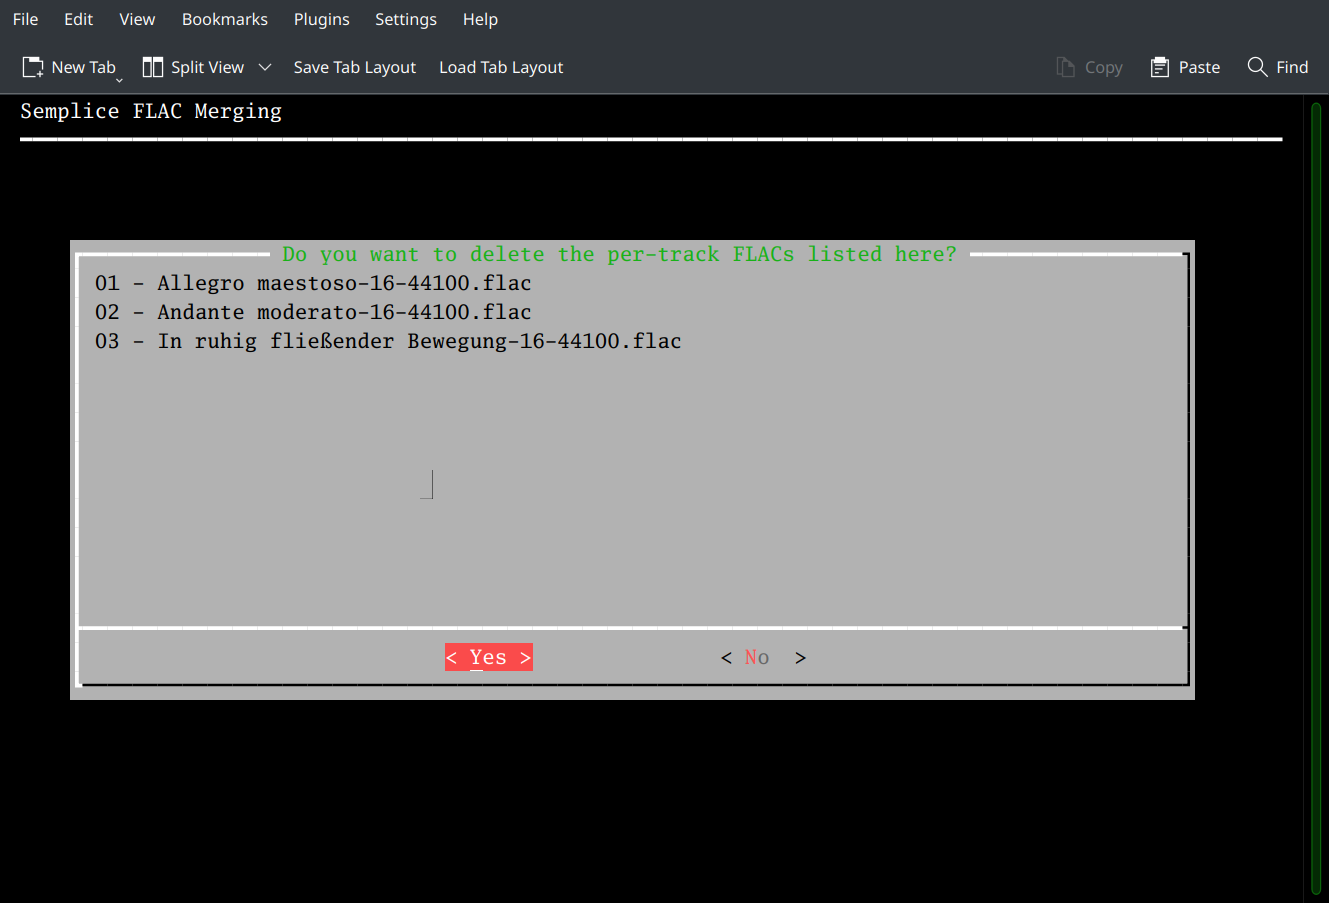
The list might be long, if there were lots of per-track FLACs: just scroll up and down through it if necessary. When you're ready, select the 'Yes' option here and then press [Enter] to submit it: only at this point will Semplice delete the source, per-track FLACs:

On this occasion, the original ISO is left behind on disk, too, from before... but all the per-track FLACs have indeed been deleted. So you now have a FLAC equivalent of the ISO originally ripped from the SACD, but (as you can see) it's much smaller in comparison, which your hard disk will thank you for!
10.0 Conclusion
Ripping SACDs isn't terribly hard -but finding a coherent explanation of how to do it can be! The main secrets to success are, firstly, to own one of the suitable Blu-ray players; secondly, connect it to your home network correctly; third to prepare the USB stick properly; and fourthly, to get the sequence of what you do to the Blu-ray player to get it into sleep-and-serve mode correct. That last one is where it can get frustrating, because if you power-on with the USB stick already in-place, it won't work. If you close the tray door yourself, after placing the SACD on it, it probably won't work, unless it's the second or subsequent rip in a series of rips. If you forget to tap the power-off button after the tray closes, it won't work. Only when you get the power-on -> open tray -> place SACD on tray, but leave it open -> insert USB stick -> wait for disk duration to display -> power-off routine down pat does this stuff become (mostly!) effortlessly successful.
And once you've ripped your SACD, you'll need to post-process the ripped file to turn them into playable, but hi-res, FLACs... but Semplice has you covered in that department, whether you decide to rip to ISO or DSF originally.
Remember, too, that though SACDs automatically supply plenty of metadata tags for your newly-ripped music files, most of it is complete garbage and will need to be corrected by manually tagging the files after the rip is complete: Semplice has you covered there, too (just use menu options 1 to 9 to tag your FLACs with more suitable metadata).
Semplice also helps you apply an appropriate volume boost to your ripped SACDs, and additionally to combine per-track FLACs into a single SuperFLAC, capable of true gapless playback and much more convenient to store on disk than dozens of per-track FLACs you might be more used to.
In any event, I hope this article has clarified what's involved in getting access to your SACD data! Ripping can be a little tricky, but post-processing the rip with Semplice can be relatively straightforward. Happy SACD ripping, therefore!