1.0 Introduction
This is the second in my series showing how I would suggest you go about the business of ripping and tagging different CDs of varying configurations on a Linux platform using my own Classical CD Ripper (CCDR) and Classical CD Tagger (CCDT) tools (which are free to download and use and whose basic operation has already been described in the first article of the series).
In that first article, we saw how to rip and tag a CD containing just one work by one composer. In this article, however, I'll be explaining how I'd go about ripping this CD:
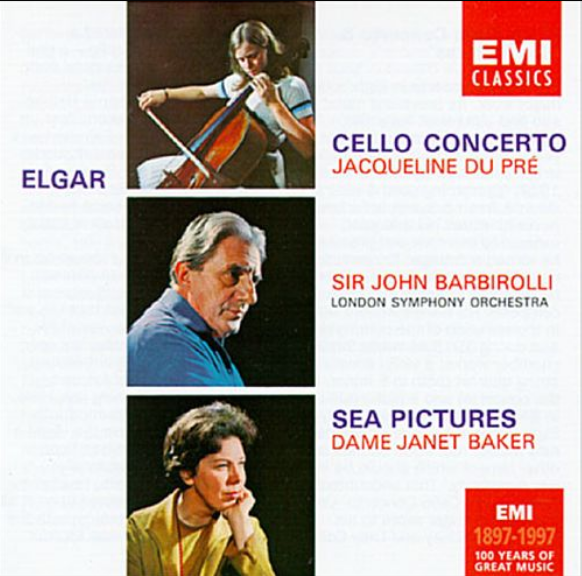
The contents of this CD, as listed at Discogs, is as follows:
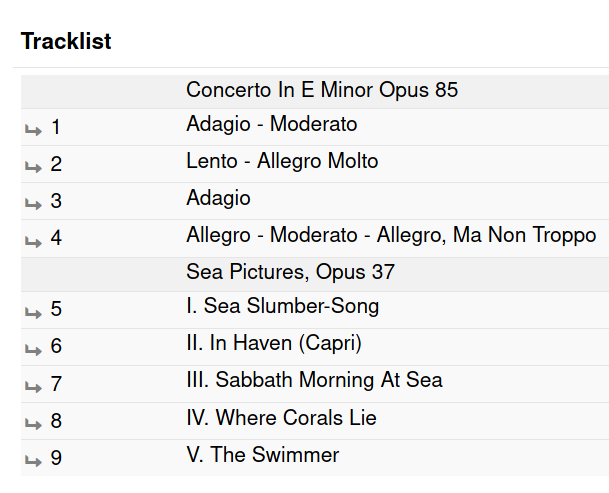
Try to ignore Discogs' invariable propensity to stick capital letters where they don't belong! The main point to get from that listing is that there are 9 'tracks' belonging to two different 'works' on this CD: 4 belong to the cello concerto and 5 the orchestral song cycle 'Sea Pictures', both written by Edward Elgar.
Other, more recent, pressings of this CD include the Cockaigne Overture as track 1 -which tells you that (a) I was cheated when I bought this version! and (b) that there's nothing special or time-honoured or deserving of special respect or esteem in this particular packaging of the two works. On another day, EMI decided to release exactly the same recordings in a different configuration, so one configuration is as 'special' as any other (i.e., not special at all).
Accordingly, we do not need to treat this CD as a holy relic and keep these two works attached to each other. Look at their opus numbers for a start: they tell you that the two works were published years apart from each other. Elgar wrote the Sea Pictures in 1894. He wrote the cello concerto in 1919, when he was an old man and his music was fast falling out of fashion. Almost 25 years (and 49 published works) separate the two pieces. They no more intrinsically belong together than do chalk and cheese. On the other hand, it is true that they do share the same conductor and orchestra and both were recorded, as far as I can tell, on the same day in 1965. So yes, there is a bond between them! Nevertheless, two completely different works by a composer in his relative youth and his dotage, in two completely different genres (concerto and song cycle) and with two different principle artists (Jacqueline du Pré and Janet Baker) mean that, all things considered, I shall be ripping this single CD as though it were two entirely separate works (and thus as two 'albums').
The general point I'm making here is that 'what makes an album' is a question with no definitive answer: but just because a record company stuck two things on the same bit of plastic doesn't make them 'an album' in my mind!
2.0 Performing the Rip(s)
Ripping this CD on Linux with CCDR is a little more complex than the equivalent operation on Windows. On Windows, we rip everything into one giant pile of files in one hit, then use the tagging software to split the two component works apart from each other. But CCDR works in ways that means this approach is not so appropriate this time round: instead, we perform two rips which CCDR will keep separate from each other from the start.
So, we start by inserting the audio CD into your computer's optical drive and launching the CCDR program (by typing the command ccdr in a terminal session):

As you will see, since this isn't the first time CCDR has been run, it remembers the settings you set when it was last run. In particular, it's remembered which optical drive to use (in my case, because my desktop PC has two to choose from, it's my DVD-ROM. If you wanted to choose a different drive you should press Ctrl+C to quit the program abnormally, then re-run it with a -d= or --device= run-time switch. For me to use my DVD re-writer, for example, I'd re-launch the program with the command ccdr -d=/dev/sr1. You will usually find your optical devices are known to your Linux operating system as /dev/sr0, /dev/sr1 and so on.
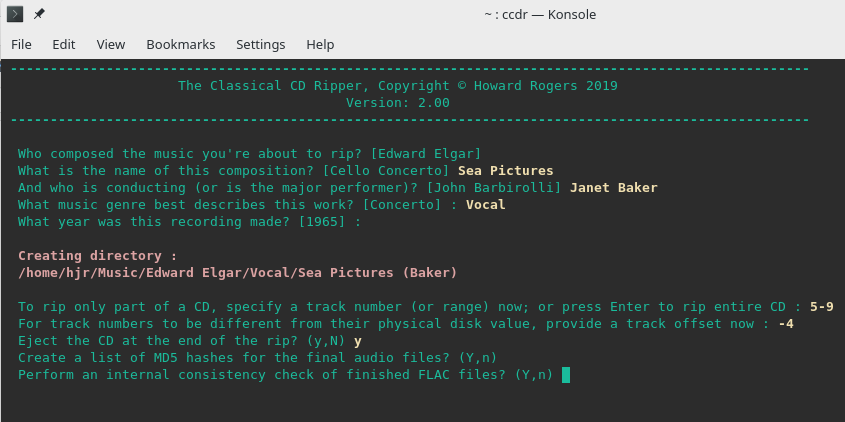
Once you agree to proceed, the program will check that there is an audio CD present in the selected drive. If it finds one, it then starts prompting you for bits of information to describe it:
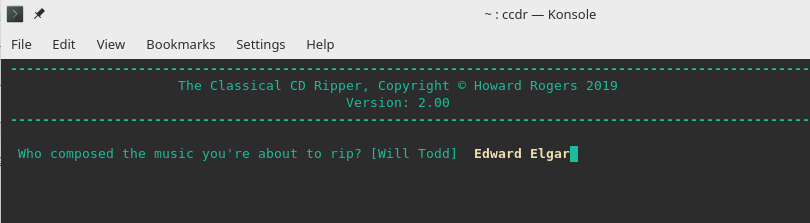
It begins by asking you who is the composer of the music you're about to rip. That's an easy one in this scenario: both pieces on the CD were written by the same composer and I've therefore supplied Edward Elgar's full, ordinary name (without titles and post-nominals!), as listed in my suggested list of 'correct' composer names. Notice that within the square brackets after the composer's name question is some text: that's the name of the last composer whose work was ripped using this tool. If that name had been correct for this current rip, I could just have pressed [Enter] to accept it. I'm only typing something else in because this new composer is not the same as the last one I used. We'll see this 'remembering' feature comes in handy shortly!
Once the correct composer's name has been typed in correctly, just press [Enter]:
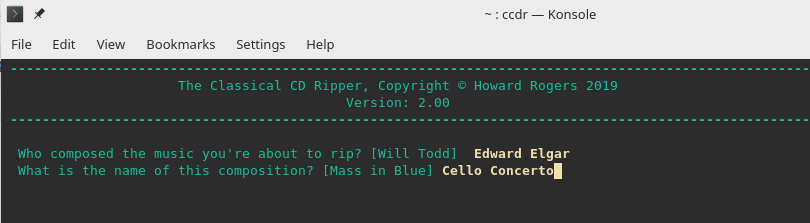
Now, because we've got two separate works on this CD and you are being asked the name for a single composition, you type in the name of one of the works on the CD. Which one you mention first doesn't really matter, as you'll find out shortly. But keeping things simple, since the track list says tracks 1 to 4 are the cello concerto and tracks 5 onwards are the Sea Pictures, let's take them in that order. You type a composition name in a meaningful manner, without lots of unnecessary technical detail, and using a word order that avoids redundancies and makes the important things come first in the word order. In this case, I've gone for 'Cello Concerto' because Elgar only wrote one of them, so we don't need 'No. 1' (as there was no 'No. 2'). We can leave off the opus number, too, because it's not significant (though if you're really keen on seeing it, feel free to include it). We also don't need to say 'Concerto for Cello and Orchestra', because all concertos include an orchestra and we want the principle instrument name up-front (see Axioms 8 and 9).
Note again that the last time I ran CCDR, I used it to rip a piece of music called 'Mass in Blue': whatever CCDR did last time becomes a default offering in square brackets the next time you run it. If that default offering applies, you can just press [Enter] without doing any fresh typing. But in this case, I have to type. When I've done so, I can then press [Enter] to proceed:
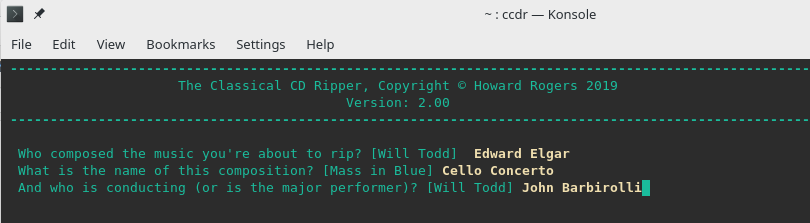
Now I need to supply a 'distinguishing artist' -usually a conductor's name, or that of the principle artist. In this case, I've chosen to go with 'John Barbiriolli' (without mention of his knighthood). You might prefer to mention Jacqueline Du Pré -but you would bump into a limitation of CCDR if you did, because it always takes the last word typed in for its purposes, as you'll soon see. So, artists with multi-part surnames will always confuse it, and you'll end up talking about "Pré's cello concerto". We can sort this out during the tagging, but for now I'd suggest typing in conventional two-word names, so 'John Barbirolli' it is. As ever, if the previous run of CCDR used a name that you could re-use, just press [Enter] to accept it this time round -but in my case, I need to type a fresh name before pressing [Enter].
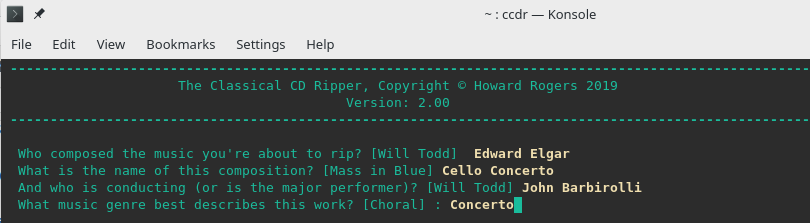
Next, you are asked to specify a genre for the work that's about to be ripped. Select an appropriate one from my list of 'approved' genres if you can: it makes for a nicely-standardised way of working. In this case, the work is obviously a 'concerto', so that's what I type in: as ever, the last time I ripped something, its genre is displayed as a default suggestion, which pressing [Enter] without typing anything would accept and apply to the new rip. However, my last rip was of a choral work, so I'm required to type the word "Concerto" in from scratch before pressing [Enter].
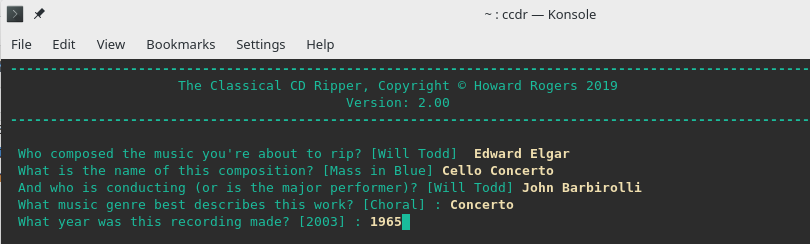
Finally, you're asked to specify the year in which the recording was made that you're about to rip. From the CD booklet (or maybe from an online source, such as Discogs) you can probably determine this with some accuracy -but if not, feel free to make one up that seems plausible. The recording date isn't terribly useful for most classical music listening purposes, so there's no need to get very precise or to get hung up about getting it spot-on accurate. A year is all that's required -and I happen to know this one dates to 1965. Once again, your last rip's recording year is shown in brackets and had it been applicable this time round, I could just have pressed [Enter] to re-use it. But for now, I type the new year first and only then press [Enter] to proceed.
That is in fact the last 'album-wide' piece of data you're prompted for. As you press [Enter] on the recording year submission, this happens:
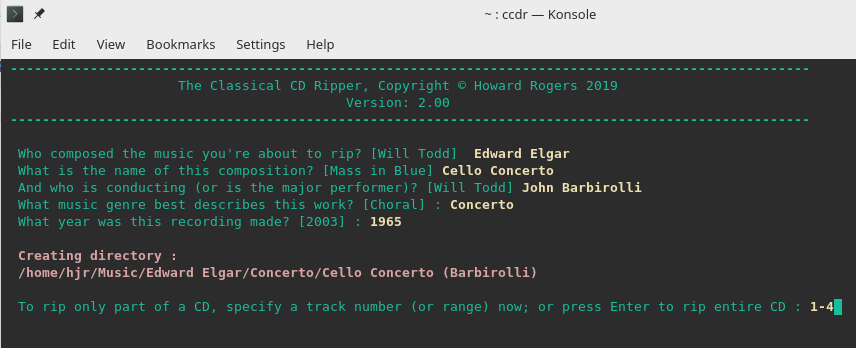
Notice that the program has created a set of nested subdirectories within your defined ripped music 'home' folder (which, by default, is $HOME/Music, but can be changed at run-time by specifying the -h= or --home= switch). To name them, it's taken the answers to the questions already asked. The 'who composed this' answer has become the primary sub-folder; the 'what genre is this' answer has become the secondary sub-folder; and the answers to the 'what's the name of this composition' and 'who's the conductor' questions have been combined to provide the tertiary sub-folder name.
At this point, therefore, CCDR has got all the album-level information correct -except, of course, that not all of our CD counts as 'this album'. In the present case, only the first four tracks are actually the Cello Concerto; the other 5 belong to a different composition altogether, so the answers provided up to this point cannot -and must not- apply to them. That's why CCDR now asks you whether you want to rip the whole CD or just a part of it. In our case, we only want to rip the part of the physical CD which actually represents the Cello Concerto work we've described to CCDR. So instead of just pressing [Enter] at the 'to rip only a part of a CD' prompt that is now displayed, it's important to specify the track or tracks which actually represent the 'work' you've described thus far.
In my case, the Cello Concerto makes up tracks 1 to 4 of the entire CD, so my answer is 1-4. That's a number 1, the hyphen (or minus sign) and then the number 4, all typed without any spaces between them. That detail is important to get right!
You cannot type "1,2,3,4" or "1 to 4" or any other variant you care to invent. If you did type '1,2,3,4' then only track 1 would end up being ripped. Obviously, if the cello concerto only consisted of (say) track 6, you'd be fine just typing the number '6': CCDR is quite happy to rip one track in isolation from all the rest. It is also quite happy to rip the entire CD in one go (just press [Enter] at the prompt for that). But for any multi-track rip that is not-full-CD, a contiguous range of track numbers needs to be submitted in this number-hyphen-number, no spaces format.
When you've got your track range entered correctly, press [Enter]:

We'll meet this next question again shortly, but for now, note that I'm not entering anything here. I'm going to rip tracks 1, 2, 3 and 4 and I want them to end up numbered 1, 2, 3 and 4 ...so I want no track number adjustments to be made at this point. Therefore, I supply no track offset and merely press [Enter];

Like most CD rippers, CCDR now offers to eject the CD from the optical drive at the end of the rip. The default is not to do so, however (because 'N' is shown as upper-case inside the brackets), so I could just have pressed [Enter] to accept that once more. However, I've just typed 'n' to make my choice obvious at this point. Why don't I want the CD ejected? Because I'm only ripping a part of the CD at this point (specifically, tracks 1 to 4). I will want to keep the CD in the drive when I'm done so I can then rip the other tracks on the CD as a second 'work'.
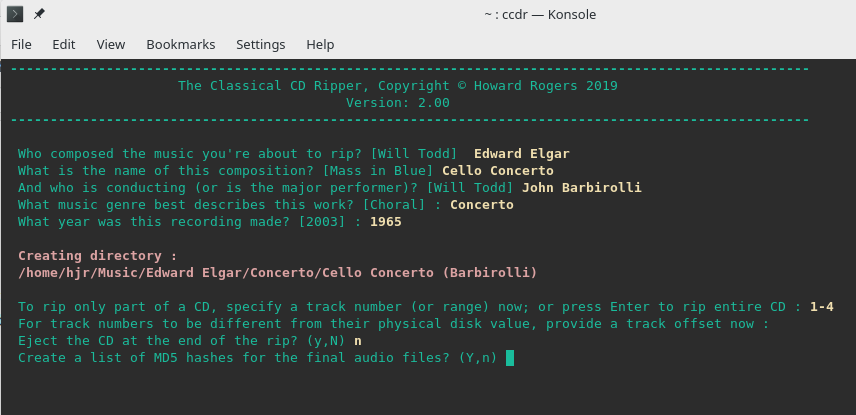
A couple of final questions of a more technical nature are now thrown your way. First, do you want to create a list of MD5 hashes. The default is to do so. It makes no real difference to the rip process itself whether you do or don't. An MD5 hash is a numerical summary of the audio signal obtained during the rip for each track, however; so with it in hand, you could rip the same track(s) on a completely different drive. If the drive's working accurately, the audio signal obtained (and thus its new MD5 hash) should be identical to the first. An MD5 hash is therefore a way of letting you quickly assess the accuracy of a rip, if you are of a mind to do so.
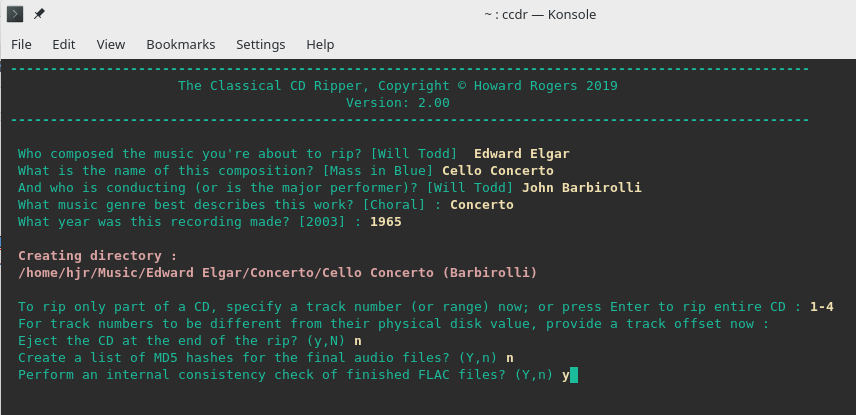
Whether you produce the MD5 hashes or not (and I've now chosen not to bother doing so in this screenshot), I would recommend you allow the final FLAC file outputs from the rip to be internally tested for consistency. It doesn't add much time to the rip to perform this check, but if it passes, you can be sure that the resulting FLAC files are 'good' or 'true' copies of the original audio on the physical CD. The default is to perform this check, but I've again spelled it out explicitly, to make it clear what I'm doing.
So at this point, you've had to do quite a bit of typing: a composer, a composition name, a conductor, a genre, a recording date and a track range. You've also potentially had to type in a 'track offset' (though I've not needed to do so on this specific occasion), and answer three 'housekeeping' questions to finish things off. It can seem like quite a drag before you finally get to rip anything! But if you press [Enter] after that last 'internal consistency check' question, this will happen:
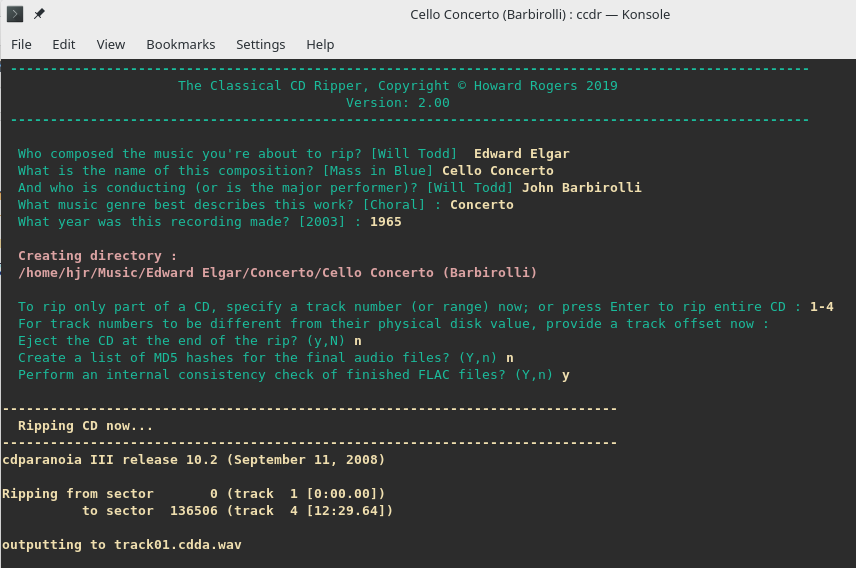
CCDR hands over to the CDparanoia program to perform the actual rip, and it is then responsible for displaying the progress of the rip, track by track. As more tracks are ripped, the text in the terminal session will scroll upwards, so you may be unable to see the whole thing in one session. As I mentioned in the first article of this series, there is a comprehensive guide to the various icons and symbols you might see during the ripping process is available at the official cdparanoia website.
In my case, my rip of the Cello Concerto went like this:
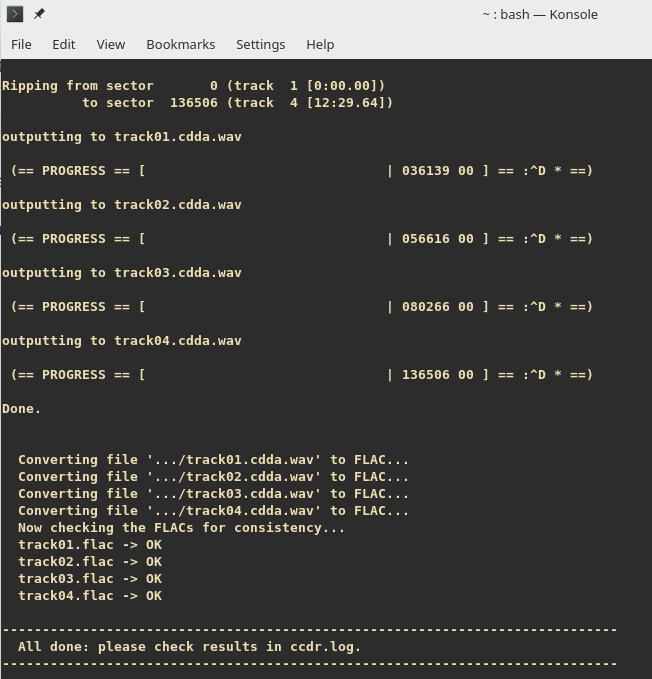
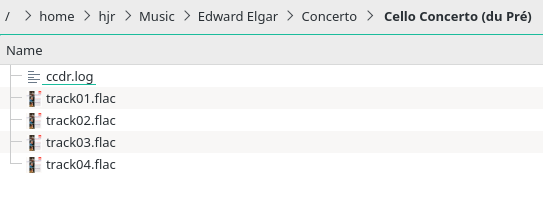
You'll notice to start with that only tracks 1, 2, 3 and 4 were ripped -as I told CCDR to do. All four have been ripped with complete success (as the :^D icon at the right of each track's ripping output indicates). They've been converted to FLAC format successfully -and the internal consistency check of those conversions have all passed successfully. So this is a good rip, and if I look on my hard disk using my system's standard file manager, I can see the physical consequences of it:
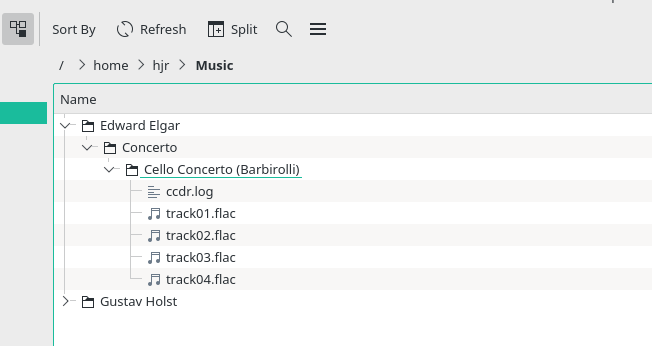
The Gustav Holst directory is there as a consequence of the rips I did in the first article of this series. The new arrival is the Cello Concerto one for Edward Elgar, in a Concerto sub-folder. You will note the four tracks don't have meaningful names as yet, but we'll sort that out later.
So that's the first work from this CD ripped successfully. Now what about the second one? Well, my physical CD is already in my optical disk drive, because I asked CCDR not to eject it, so I am already positioned to immediately start the second rip: just type ccdr again to begin that second part of the job.
As ever, you'll be asked to approve the use of the same optical drive you used previously. That's just an [Enter] to say 'yes'. You then get prompted for album and track information, just as before:
The important point to get from that screenshot is, second time around, a lot of the 'previous rip' answers in square brackets are now applicable to the new rip. The composer of Sea Pictures is, for example, the same as the composer for the Cello Concerto -so this time round, I don't have to type his name. It's there already, within square brackets, and I can just press [Enter] to accept it. The recording year this time is also the same as last, so again, I can just accept that when it's suggested to me. I did have to type the work name, 'Sea Pictures', because that's obviously going to be unique for each work you rip. I also chose to type in a new 'major performer' this time: the fact that it's Janet Baker singing is more important for me to know about than the fact that John Barbirolli is conducting, on this occasion at least. The genre also happens to be different (though on a CD of, say, two Shostakovich piano concertos, even the previous entry of 'Concerto' would have applied to the second rip and could therefore have been accepted with a mere press of the Enter key!)
So, the second work extracted from a CD is a bit quicker to process than the first, where a lot of the first work's answers can apply well to the second.
The track-specific stuff is where it gets a bit more interesting, though, I think. Obviously, this time round, I want to rip tracks 5 to 9, as they are the Sea Pictures tracks. So, 5-9 gets typed in when prompted, instead of the earlier 1-4. Note that you can't just guess the last track number. If, for example, you'd typed 5-999 to mean 'track 5 and keep going until you can't go any futher', then the rip would fail with Cdparanoia complaining that it can't find track 999 on the CD. So, with the correct 'last' track number known, you can type in an accurate track number range -remembering, as ever, to specify it without any spaces between the components.
At this point, the track offset starts being very useful. We're going to rip the physical CD's track 5 to hard disk -but it's the first track of the Sea Pictures and therefore needs to be hard disk track 1, as Axiom 9 states. Therefore, we need to subtract 4 from the CD track number to arrive at the correct hard disk track number: I therefore enter -4 as my track offset. This same offset will be applied to all the other tracks involved in the rip: so CD track 6 will become hard disk track (6-4)=2 and CD track 7 will become (7-4)=3 and so on.
The answers to the remaining housekeeping questions are then answered pretty much as before -except that I have chosen, this time, to eject the CD on conclusion of the rip. There are no more works to rip after this one, after all, so why bother keeping the CD in the drive?!
As before, CCDR then hands off to CDParanoia to perform the physical rip from CD to hard drive:
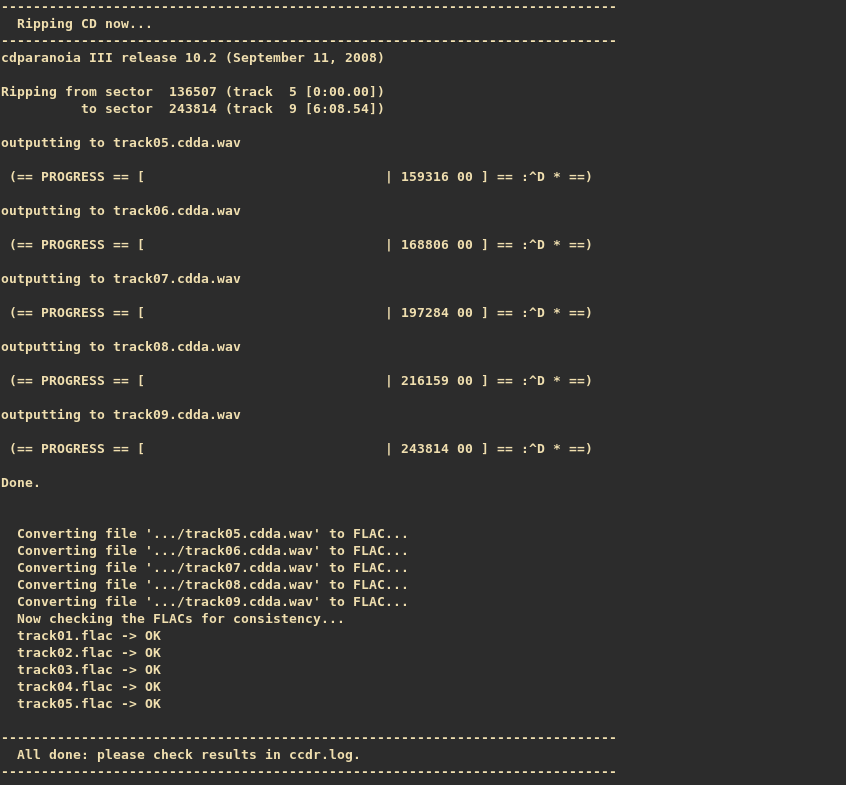
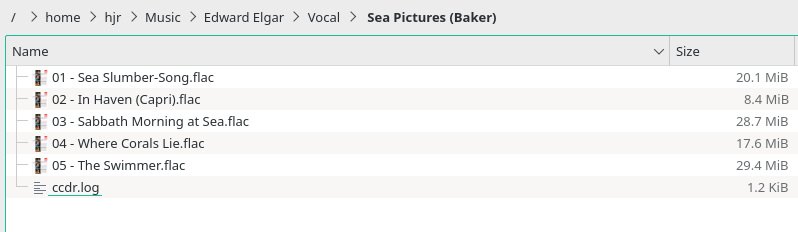
The progress report again indicates complete success ...but you might also note that whereas the tracks ripped are numbers 5, 6, 7, 8 and 9 at the top of that report, by the time you get down to the final FLAC consistency check, they have become track numbers 1, 2, 3, 4 and 5: that is the effect of the '-4' track offset being applied. As before, you can see what has happened, physically, on your hard disk by checking things out in your file manager:

So now there is a second sub-directory, under the 'Edward Elgar' one, for 'Vocal' works, and within that can be found the five tracks of the Sea Pictures. Their names are meaningless at this point, true enough -but that's what the tagging process will sort out for us, soon enough.
The main thing to get from this, I think, is that ripping different parts of a single CD is quite easy to do.You just rip one part of the CD first, specifying its track range and a track number offset if needed; then you rip the second part, specifying a new track range and track number offset as appropriate. It's quite likely that the first rip will involve quite a bit of typing; but the second one will involve considerably less, because the composer, year of recording and principle artist may well be the same for them both (though they weren't in this specific example). When the second rip can re-use answers previously supplied for the first, simple presses of the [Enter] key will re-submit the same data for the new rip without you really having to type anything!
Meanwhile, because each part of the CD will become separate 'works', or 'virtual albums', supplying different composition names for each rip will ensure that the different parts of the CD end up stored in physically separate locations on hard disk. So whereas on Windows, we relied on MP3Tag in the tagging phase of things to physically move different parts of a CD to different physical locations, CCDR has already done that for us during the ripping phase of procedings.
But we still need to worry about tagging things -because those track names won't do at all! So let's move on to doing that next.
3.0 Performing the Tagging
Our tagging program, the Classical CD Tagger or CCDT, can only process FLAC files it finds within a specific directory. Since CCDR has ripped our disk into two separate disk locations, it follows that we now have to complete things by running CCDT twice, within those separate locations.
Before we begin, though, recall the minor problem with the Cello Concerto: we had to supply a 'distinguishing artist' for it, and couldn't say it was 'Jaccqueline du Pré', because a multi-part surname such as 'du Pré' would have confused it. Accordingly, I had to use 'John Barbirolli' to get the rip underway with something vaguely meaningful. But I still want Jacqueline to be my 'distinguishing artist' for that work, since she means a lot more to me than John Barbirolli does (at least in this context!).
So, we come to an important principle of using CCDT well: make sure your physical disk structures are correct before starting. What I mean in this case is that the name of the 'Album' in my directory tree should be made right in my file manager, before I try doing anything with CCDT. So, for me and my KDE-on-Manjaro setup, therefore, I need to launch the Dolphin file manager, navigate to the Cello Concerto directory and choose to rename the folder:

I can then change the '(Barbirolli)' part of that folder name to my preferred '(du Pré)' and end up with things physically looking like this:
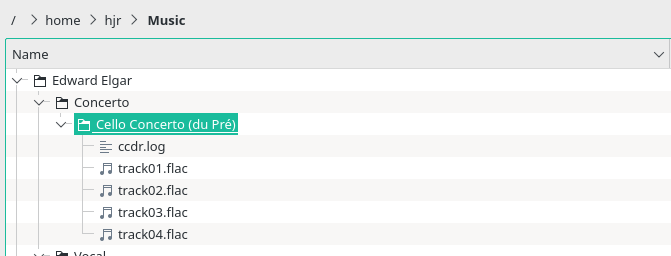
Changing the name of the folder housing the music tracks doesn't, obviously, affect any of the metadata stored within those FLAC tracks themselves. But it means things look correct, physically, before we launch CCDT.
So with that tiny bit of physical disk housekeeping out of the way, it's time to open a new terminal session, navigate to that Cello Concerto directory, and launch CCDT by typing the command ccdt:
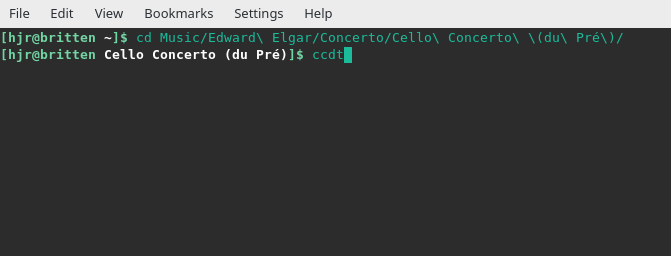
Remember that your folder names will contain spaces (because we're human, not computers!) and that on Linux, these spaces need to be 'escaped' by preceding them with a back-slash character. So you type 'Edward Elgar' as 'Edward\ Elgar', with a back-slash before the space separating the names. If it makes it easier, remember you can use Bash's tab completion feature: type E<tab> and it will complete 'Edward\ Elgar' for you, including an automatically-created back-slash in the right place.
Once the program launches in the correct folder, it will display its main menu of options:
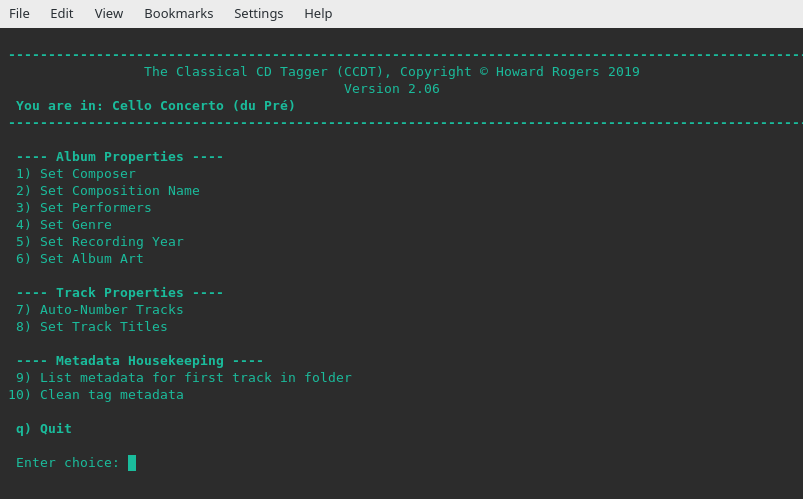
As discussed in the first article in this series, it is not strictly necessary to take all these options in turn, since CCDR will have filled in details of things like the composer, composition and genre tags for you already. So, in theory, you could just take options 3, 6 and 8 at a minimum, so that appropriate performer details, album art and track names are provided. However, for my Cello Concerto, I will also need to take option 2, since my composition name is currently set at 'Cello Concerto (Barbirolli)' and I want it to read what the physical folder name shows (and which CCDT shows you in the top left-part of the screen: Cello Concerto (du Pré).
3.1 Album Name
So, taking option 2 from the main menu and pressing [Enter] first:
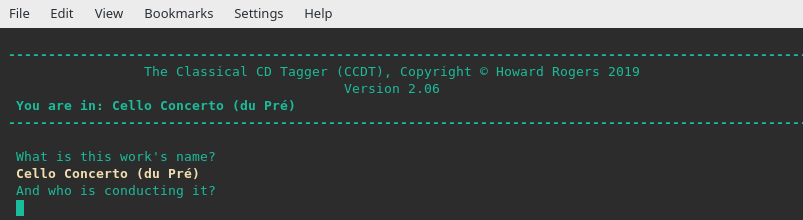
It's a little hard to get what I've done here from a static screenshot, I'm afraid! When prompted for the 'work's name', I actually pressed the key combination: Ctrl+Shift+Insert. That pastes in the current physical directory name into whatever prompt is being offered. So that yellow text which reads 'Cello Concerto (du Pré)' was not typed by me. I simply pasted in the current working directory into that part of the screen with the Ctrl+Shift+Ins key combo. If that didn't work, I could also have used the mouse to select those words from the 'You are in:...' display towards the top of the screen, right-clicked, select copy from the context menu, then right-clicked and select paste from the context menu. Whichever way you do it, your physical folder name becomes the work's title, in accordance with Axiom 17.
This ability to Ctrl+Shift+Ins, combined with the principle of getting your physical folder names right before you launch CCDT, means that it's trivially easy to tag things up with long, complex 'album names'. You get the album name right once, when naming your folders; with one three-fingered key press, you type in all that correctly without further effort and apply it to as many tracks as are in that folder in one hit.
Note that the prompt for 'work name' goes on to ask you 'who is conducting it'. If your work name already includes a distinguishing artist (as mine does), there's no need to answer that second question, so you can just leave it blank (as I'm doing) and press [Enter].
3.2 Performers
Typing 3 [Enter], we get to the prompt that will allow us to tag up the performers taking part in this 'virtual album'. For the Cello Concerto, the performers are -in the usual hierarchical order we use for these occasions- John Barbirolli, London Symphony Orchestra and Jacqueline du Pré (cello). The conductor loses his knighthood (so it's not Sir John Barbirolli); the orchestra loses any possible definite article (so it's not The London Symphony Orchestra); and Jacqueline du Pré gets her name spelled correctly with an e-acute at the end of it, plus an indication that she's the cellist not the tea lady.
We accordingly enter the details like so:

The reason for omitting titles and definite articles is simply concision and neatness. If you allow 'Sir' now, are you not then committed to also typing in 'The Honourable Professor Sir...' when that happens to be the case? Yuk. Also, no matter that I have great respect for all that Sir John accomplished in his life, he is long since dead and won't know nor care what I call him in my music catalogue.
3.3 Album Art
Typing 6 [Enter] from the main menu lets you tag up your tracks with appropriate album art:
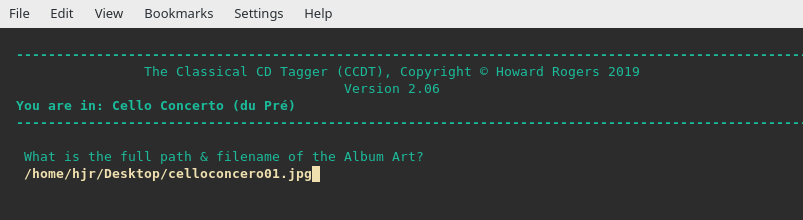
Now, although we're dealing with graphics and JPGs and so on, CCDT is resolutely a text-based program. So there's no graphical way to select the album art: you just, instead, type in a full path to the relevant graphics file on your PC or laptop's hard disk which you want applied to the tracks. The path and filename supplied must be correct, otherwise you'll get this sort of response:

Here, I've accidentally missed off the final 't' of the word 'concerto' in the file name. Result: an error message and, once you press 'any key to continue' a return to the main menu. If that happens, just type 6 [Enter] again to have another go, until you get path and file name correct.
Although I said a 'full path' was required, you can specify it using relative paths if it's more convenient to do so:
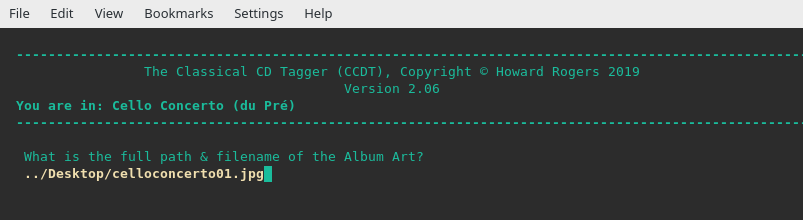
The '..' there means 'go up one directory', so if my graphics file was in the Desktop folder and the Desktop folder was one level above the one I had stored the music files in, that would be entirely acceptable.
Note that environment variables are not acceptable -so something like '$HOME/Desktop/planets01.jpg' would not work. Additionally, tab completion is not functional when specifying the path: you have to type it out exactly and fully, not partially with completion of it by pressing TAB.
Once you get the full path correct and press [Enter], you'll see each track in turn being listed as the album art is physically written to the file involved. That can take a little time if there are lots of tracks and your album art is large. Once the art is written to every track, however, you'll be returned to the main menu.
3.4 Track Names
By typing 8 [Enter], you finally get to enter track-specific names for each of the ripped audio files in turn. Your answers will become the TITLE tags of the tracks in question -and also the physical file names of the tracks. So, currently, my ripped files look like this:
You can see from that screenshot, I think, that album art has been applied to each track (the icon used for each file is a tiny representation of the CD cover art that appeared at the top of this article). You can also see that the tracks have had track numbers applied to them. So now I press 8 [Enter] to begin applying the track titles:
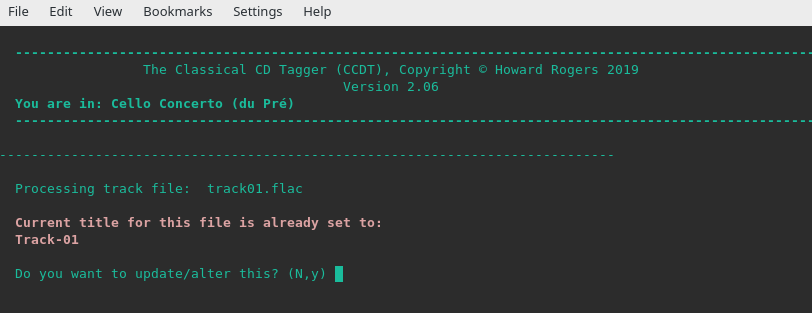
CCDR has already added track title tags (albeit meaningless ones) to each of the files it ripped, so CCDT warns you that an existing tag value is present and shows it to you. If you want to change it to something more meaningful, type 'y'. Any other response will leave the existing TITLE tag unaffected:

Here, I've typed 'y' and that brings up the prompt to supply a new track title -and I type in whatever the CD booklet tells me should be the proper name for this track. If it was a symphony, I might be supplying titles like Allegro molto; if it was an opera, the titles might be things like Act 1: Overture or O solo mio ...whatever makes this track unique and distinct from any other that makes up the work in question. In all cases, we use proper musical grammar (so it's not Allegro Molto Ma Non Troppo, whatever Discogs may say, but Allegro molto, ma non troppo, and so on), so that we comply with the provisions of Axiom 13!
Updated to add (16th April, 2020) : Please note that CCDT has just been updated so that if it detects track titles in files which it knows to have been ripped by CCDR, it now will now not ask you if you want to edit or alter them, but will act as if the track title is blank. It will thus just ask you to supply a new track title and will auto-overwrite the generic title supplied by CCDR with whatever you supply. Given that CCDR's track titles are always 'generic' and meaningless, it seemed awkward to have to type 'y' every time you simply wanted to type a proper track title. The screenshots above show the old behaviour of requiring a 'y' response to the 'do you want to update/alter' question.
You continue to go through the same challenge-response type of process, supplying 'good' track names for each track in turn, until you've titled the last track of the 'album', at which point you will be returned to the main menu automatically. It isn't entirely obvious what any of this track naming has achieved -but if you visit your file manager and take a trip to the folder containing these music files, all will become clear:
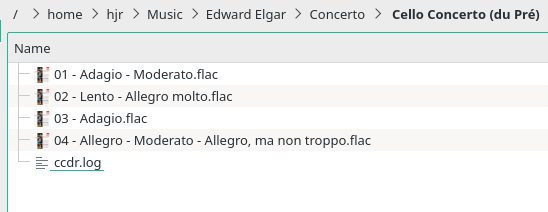
Compare that with the equivalent screenshot taken earlier. It is obvious that my answers to the track name questions has caused the physical files to be renamed accordingly.
3.5 Finishing Up the Concerto
Remember that to conclude a CCDT session, you need to exit from it cleanly. That means taking the 'q' option from the main menu: this will trigger a final 'metadata cleaning' process that will ensure all the right track data is written cleanly and in the correct order to each FLAC track:
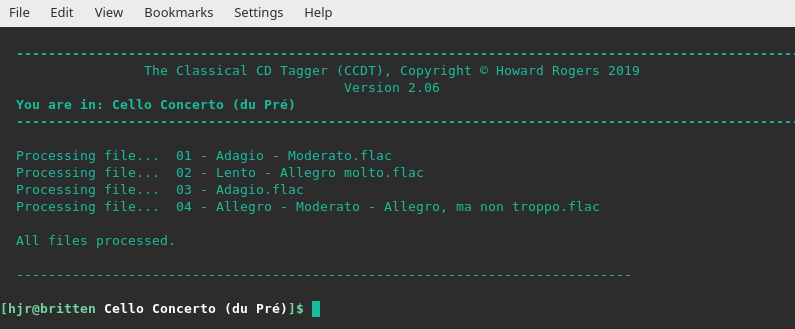
In that screenshot, you can see each file being 'processed' in turn, followed by a final 'All files processed' message being displayed (which indicates no internal errors or inconsistencies were detected during the final clean). You then end up dumped out at the same folder you started the whole tagging process in. That's the first 'virtual album' tagged up, therefore; it's now on to to do the second.
3.6 Tagging Up the Sea Pictures
There's not really a lot new to describe at this point. In the same terminal session you just finished with CCDT, you now change to the second work's folder and re-launch CCDT from scratch:
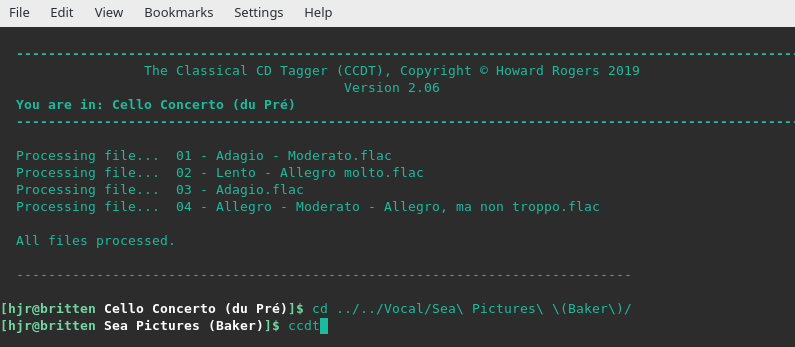
Notice how you can get cunning (and save typing!) by using relative paths. I know I'm starting from Edward Elgar/Concerto/Cello Concerto, and I want to end up in Edward Elgar/Vocal/Sea Pictures... so, if I go up two directories I end up in the Edward Elgar folder, from there I can descend to the Vocal and then to the Sea Pictures folders in turn. You could, of course, just use absolute paths throughout if using relative paths is a bit tricky!
Either way, I've ended up in the Sea Pictures folder and can launch CCDT there. This time, I have no need to change the work's name, because the 'Sea Pictures (Baker)' name is already correct, so I only need to configure Performers, Album Art and Track Names (which means taking options 3, 6 and 8 in turn).
3.7 Save time where possible...
When I take option 3 this time round (to supply details of the performers involved in the Sea Pictures recording), the screen could well look a little peculiar:
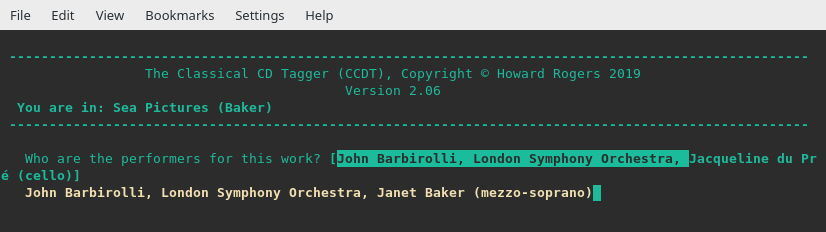
You will note that there's a line of text after the 'who are the performers' question, shown within square brackets. The line of text is long enough that it has wrapped around onto a second line, which is slightly ugly and can make it tricky to read. The text displayed there, though, should be familiar: it's the last set of performers I supplied when previously tagging up the Cello Concerto -note how even Jacqueline du Pré is mentioned again. If all those performers had been involved with the Sea Pictures, I could just press [Enter] at this point to have the entire previous answer to this question applied to the new set of tracks. Unfortunately, however, Jacqueline doesn't have a part in the Sea Pictures -though the same conductor and orchestra were playing for both works. What you see me doing in that screenshot, therefore, is highlighting the first two parts of the previous answer with a click-and-drag of my mouse. A right-click->copy, followed by a right-click->paste then allows me quickly to reproduce the conductor and orchestra components of my new reply to this question, without me having to type anything. I've then simply added "Janet Baker (mezzo-soprano)" to the end of the text I'd copied.
I therefore end up with a complete set of performers for the new work, but only had to type in one of them from scratch. The general principle to observe here, therefore, is that where your previous answers apply in full, press [Enter] to re-use them in their entirety. But where you can use parts of your previous answers, use standard mouse, menu, copy and paste techniques to copy and reuse as much from previous answers as possible. You save a lot of time that way.
When it comes to applying album art to this second 'virtual album', for example:

...the entire previous answer is still correct, so I can just press [Enter] at this point and not type a thing -yet still have the correct album art applied to the new tracks.
Obviously, the track names are very unlikely ever to be re-usable between 'works' or 'albums' so for those, CCDT does not remember previous answers: you're on your own at that point and really do have to type them in yourself, remembering to be grammatically correct and meaningful (so, no pressure!).
I won't bore you with screenshots of me tagging up the Sea Pictures tracks, but I will show you that though we started with this:
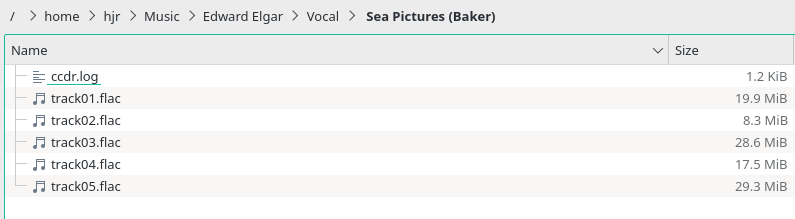
...I end up with this:
Once again, you can see that the icon preceding each file name has changed from a generic 'music' one to a tiny representation of the album art that starts this article. So we can tell album art's been applied. The track titles have also been applied to cause the files to be physically re-named to match.
4.0 Wrapping Up
Once your music is tagged and appropriately stored on the hard disk of whatever laptop or PC you're ripping your CDs to, you can obviously just copy the relevant folders across to your actual, permanent music catalogue (remember: we never rip into the permanent music store directly, because that might mean our ripper or tagger over-writes files we care about). Once there, you can fire up your music player/manager software and see how things look:
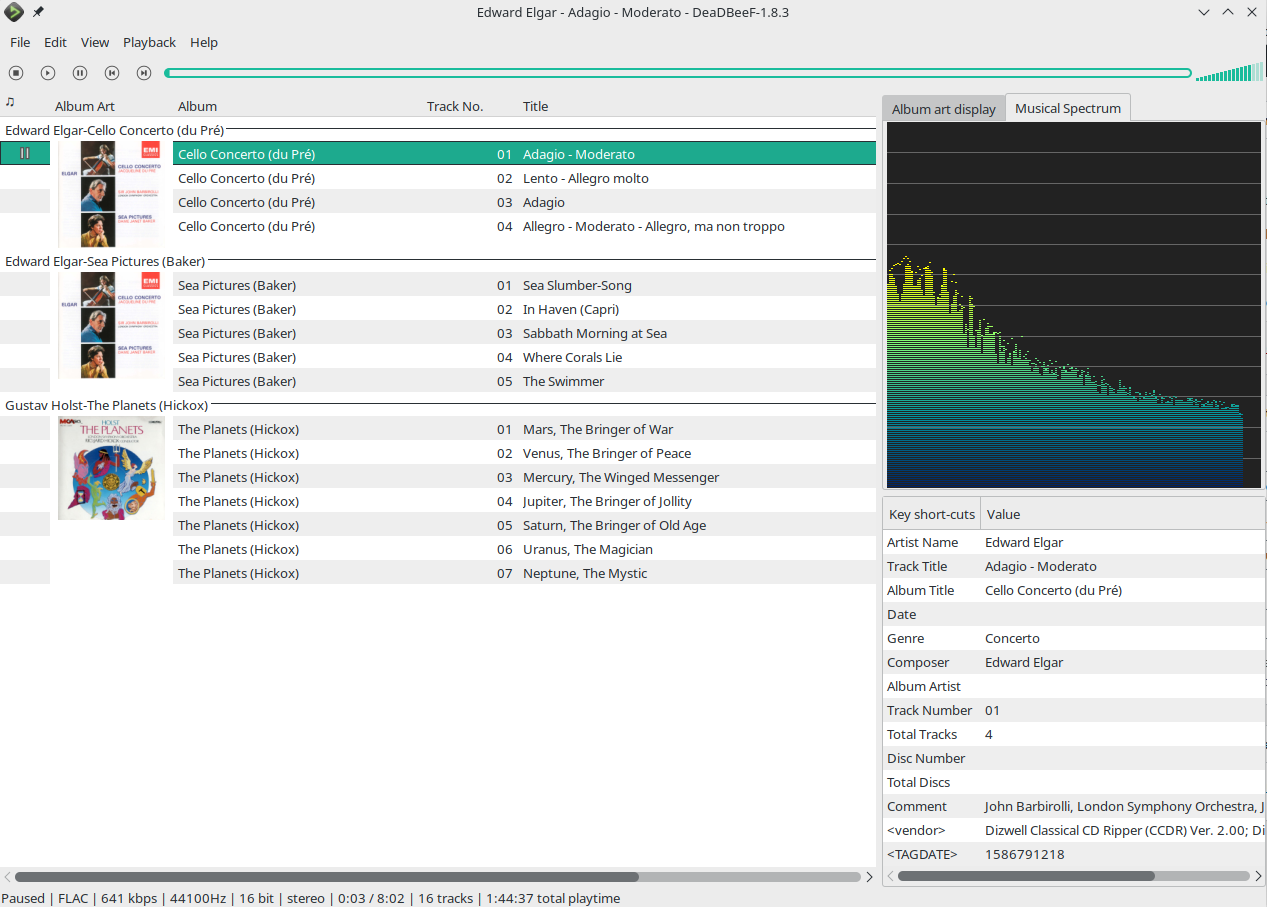
Here, DeadBeef is making light work of the arrival of two new works by Edward Elgar (to accompany the rip of Holst's Planets in the earlier article of this series). The two works by Elgar are nicely distinct -though, because they share the same album art, I can tell that they were once part of the same recording release by EMI. The tag details panel over on the bottom-left of the screen display also nicely shows me details about conductor and orchestra that the main display cannot accommodate.
5.0 Conclusion
Once again, by way of summary of the whole ripping and tagging process, I hope you can see that you continue to use CCDR and CCDT in a sequential fashion, just as we did when ripping a whole CD as a single work in the previous article of this series. The only real difference is that to carve two 'virtual albums' out of one physical CD, you need to run both programs twice.
CCDR is run with track ranges, to specify which part of the CD is being ripped on each occasion. The use of track offsets allows the second rip to nevertheless produce tracks whose numbers start at '1'.
CCDT is also run twice, to fill in things which CCDR doesn't concern itself with, such as performers for each 'virtual album', album art and individual track titles.
This specific example was interesting to follow, too, I think, because it shows a failing in CCDR (the inability to cope with 'distinguishing artist' names that come in more than 2 parts) and the way you fix that up post-rip: by simply re-naming the physical directory correctly, using the file manager of your choice; and then by using option 2 and a Ctrl+Shift_Ins shortcut trick in CCDT to apply that new physical folder name as the new 'album name' to the files contained within it.
Hopefully, you will agree with me that breaking one CD into two component works isn't too difficult at all: two rips with CCDR, two tag operations with CCDT. What could be simpler, in fact?!
Back to the Master Index of the Guides to Ripping and Tagging