1.0 Introduction
Running Giocoso on Windows is not exactly difficult, but it's not trivially to document either! The basic premise is that Giocoso is a Bash script and so Windows needs to be able to run Bash scripts for it to work on that platform. There are various ways that can be arranged, but in these days of Windows 10 and 11, the simplest is probably to install and run the Windows Subsystem for Linux, Version 2 -or 'WSL2' for short.
WSL2 is a fairly transparent way to run a real Linux distro 'within' Windows -and, in its most recent incarnations, it's fairly easy to get Linux programs that output audio and graphics to 'pipe them' onto the Windows desktop and audio hardware. All that needs to be present on Windows for that to happen is an X server and a Pulseaudio Server.
So, in this article, I'm going to show you how to do three distinct things: 1) install WSL2; 2) install an X Server on Windows; and 3) install a Pulseaudio Server on Windows. Once those three things are done -and properly configured!- then Giocoso will run as a first-class Windows program, albeit within the context of a Linux virtual environment. Be aware that things work very differently in Windows 11, where separate X and Pulseaudio servers are not required. There is accordingly a separate article for doing things on Windows 11.
Note that if you are the kind of person that just wants the commands and instructions, without all the explanations and pretty pictures, a very short and concise 'Giocoso on Windows Distilled' article can be read instead of this one 🙂
2.0 Preliminaries
Before we start, let me say I'm running my Windows 10 on 2012-era laptops -so nothing very fancy or particularly over-specced. I'd say 8GB RAM was a practical minimum for what follows, but I'm running in one case on an i5 1.6GHz mobile processor, so CPU grunt is not especially necessary:
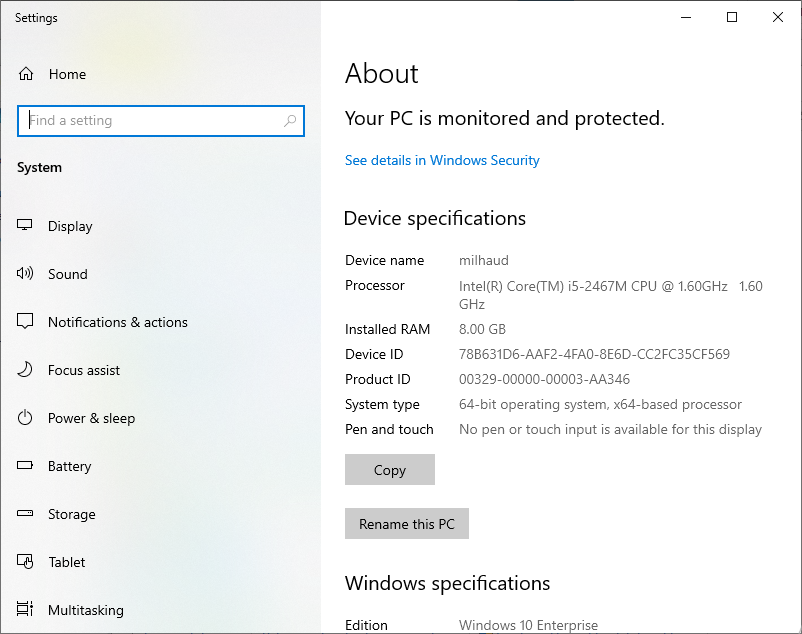
That said, be sure you are running the very latest versions of Windows 10 (or even Windows 11). In earlier versions of Windows 10, Microsoft emulated a Linux environment with 'WSL Version 1', and that won't do what we need it to do. In later versions, WSL Version 2 came out, but even then, the Linux environments couldn't talk to things like sound cards and graphics cards. But the most recent Windows 10 releases have included the ability fo Linux programs to directly address video and audio hardware ordinarily managed by Windows. It's this latest version of WSL2 that we need.
Practically, that means you want to upgrade your Windows 10 PC to be running at least 21H2... but preferably 22H1. Also note that WSL2 installs on any edition of Windows 10: Home, Pro, Enterprise... if it's Windows 10 of any sort, it should work fine.
Be aware that WSL2 is essentially a Hyper-V virtual machine running Linux in a cleverly Windows-integrated manner -but it's still Hyper-V under the hood. This specifically means that your PC needs to have either Intel's VT-x or AMD's AMD-V hardware acceleration features enabled: doing that will require you getting into your PC's BIOS (or UEFI equivalent) and finding the relevant option and enabling it. Since practically every BIOS is unique, I can't tell you how to do that on your specific PC, only that you must do it!
Also be aware that if you're running WSL2 and thus Hyper-V, you can expect other virtualisation platforms (such as VirtualBox or VMware) to behave 'problematically' after installing WSL2. If they work at all, they'll only do so in slow-as-treacle software virtualisation mode. If you are heavily in to VirtualBox (for work, say), I'd suggest that this WSL2 path might not be appropriate for you, basically: though you could install full-bore Hyper-V and hypervise solely using that technology in the future.
As a general point, I've fully updated my various Windows systems, as of May 2022. Subsequent software updates might break things, I suppose; and if you aren't at least that up-to-date, I can't guarantee that what I describe below will work correctly. But it's working for me satisfactorily, as of that date, at least.
3.0 Installing WSL2
The first thing we need to do, therefore, is to install the Windows Subsystem for Linux version 2 onto a fully patched Windows 10 machine. Happily, that's a lot easier to do these days than it used to be!
You'll need a command prompt running with administrator's privileges. So, click [Start], type the letters command until the option to run 'Command Prompt' becomes visible, then right-click it and select the 'Run as administrator' option:
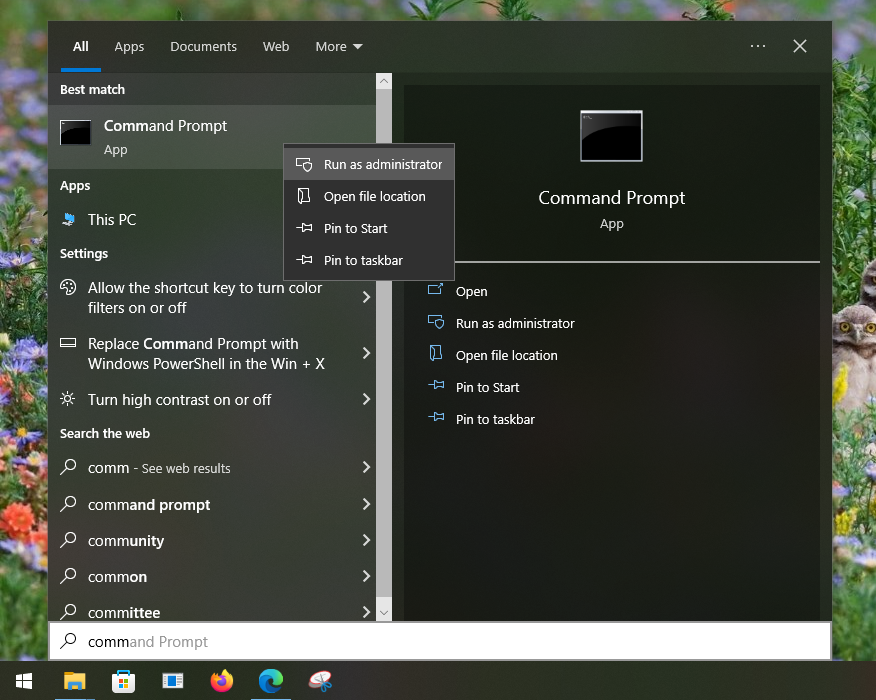
Since you are asking to run this program with elevated privileges, a pop-up will appear asking you to confirm that you are happy to let 'this app make changes to your device'. Click 'Yes' to that question, and you'll finally have access to a command prompt with administrative rights.
Once you do, type this command:
wsl --install
That command will trigger quite a lot of activity, including some substantial downloads of software from the Internet (so make sure you have a functioning Internet connection before you start!):
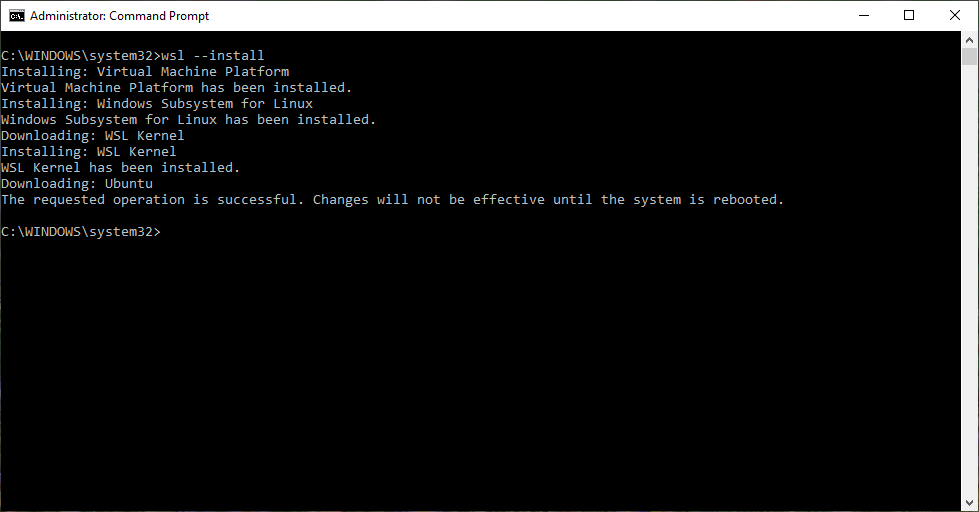
You'll note that the Ubuntu distro gets downloaded, too: that's the default distro that WSL2 works with, but you can install lots of others (such as Debian, OpenSuse and Manjaro). However, installing those other distros is outside the scope of this article and I'll be running with Ubuntu-in-WSL2 for the rest of what follows.
You will also see from that last screenshot that once the WSL2 installation finishes, you need to reboot your PC to really finish things off. Do that now, and when you log on once more, a WSL2 window will automatically open in order to complete the installation process:
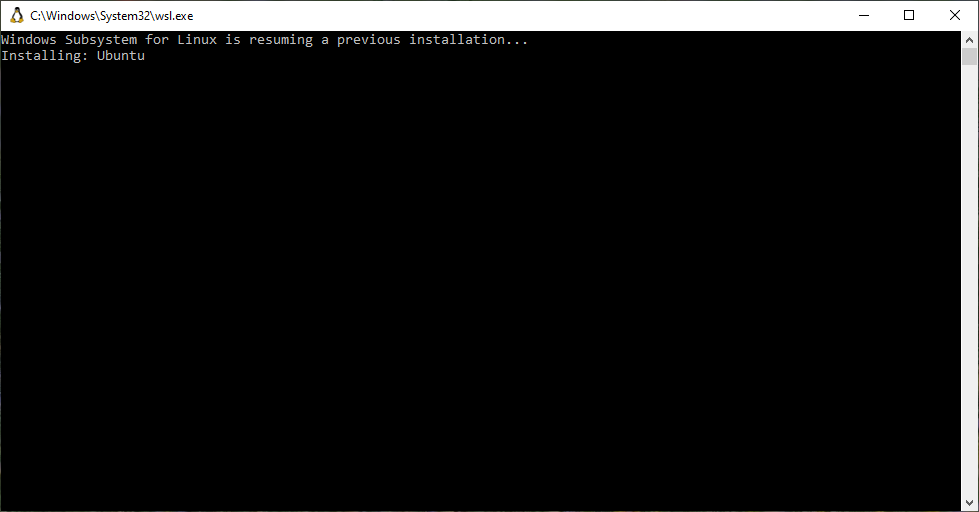
You'll see that the Linux penguin initially appears in the window's title bar; that will eventually change to the Ubuntu roundel logo. This is no longer installing WSL2, in other words, but is actually setting up a full-blown Ubuntu system within your Windows PC. It can accordingly take quite a while for everything to be downloaded, copied to the right place and configured appropriately. Be patient!
Eventually, you should get to this point:
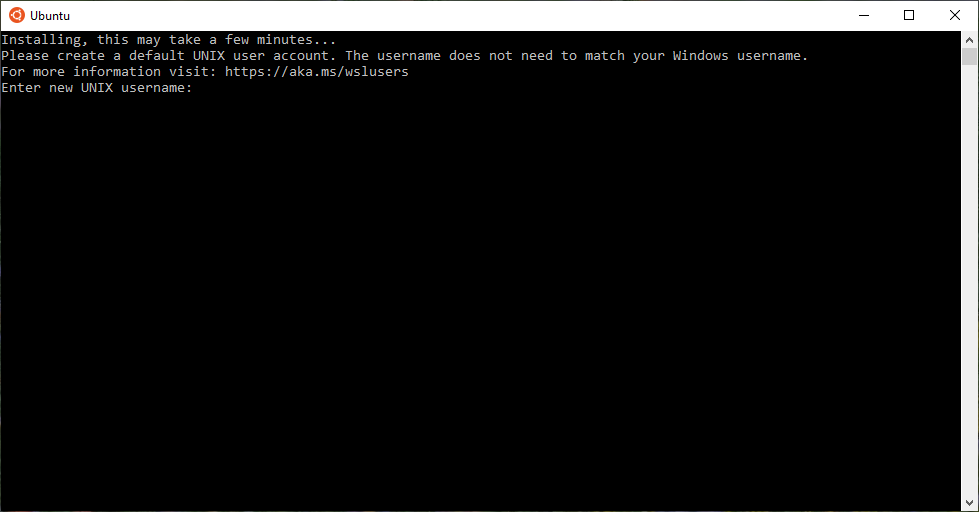
Here, you're being asked to create a new Linux user account (and password). Note that this account doesn't have to be the same one as you use to log onto Windows itself: the two 'realms' of Windows and Linux are completely independent of each other, so you can log on to Windows as 'Fred' and Linux as 'Wilma' if you so wish. For convenience, on the other hand, I tend to re-use my Windows username and password for the Linux account, but you certainly don't have to.
So, simply type in a 'UNIX username' (I love that Microsoft can't really decide if Linux is Unix or not: they call it WSL and then prompt for a Unix username!) and then provide a password for that account (twice, for confirmation). As soon as the password is typed in the second time, this happens:

...and you'll note you're dropped into a Linux command prompt, complete with username "@" hostname prompt -to remind you who and where you are!
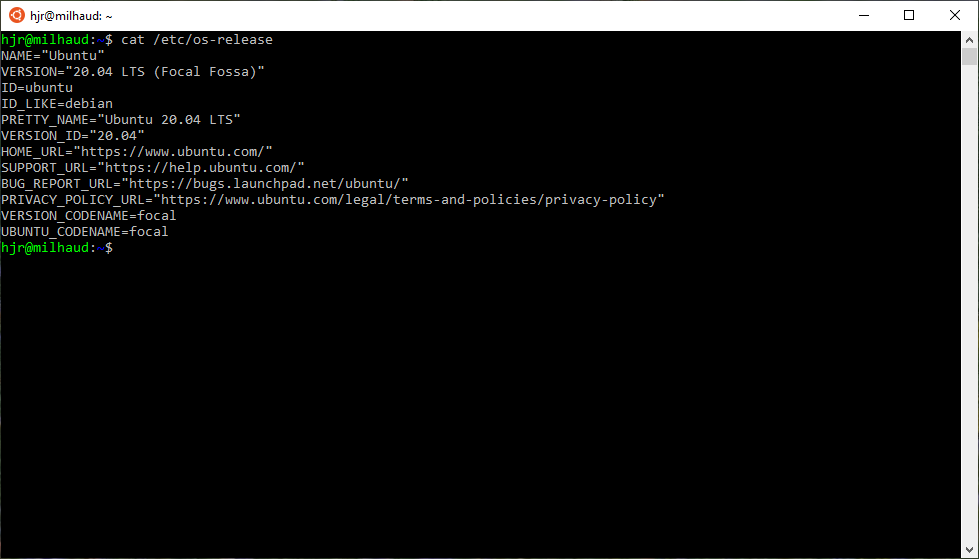
And that's it, really: WSL2 is now installed, along with a fully-functioning version of Ubuntu. In my case, I got Ubuntu 20.04, but by the time you read this, it's possible that you might end up with the newer long-term release, 22.04:
Note that you can close this window at any time, either by clicking the 'X' button in the top right-hand corner, or by typing the command 'exit'. You can then re-launch into your Ubuntu system at any time by clicking Start -> Ubuntu.
4.0 Update Ubuntu
Once you have a working Ubuntu system in Windows, you should update it as it's likely to have used relatively out-of-date sources to build itself. The commands to do that are:
sudo apt update && sudo apt upgrade
The output is likely to look a bit intimidating:

...but that wall of text simply means that there's 177MB of software packages that need upgrading. Answer 'y' to initiate the download and installation of all of them.
Depending on the speed of your Internet connection, the update might take a while... so be patient!
At the end of a complete upgrade of a 'real' Ubuntu system, the expectation would be that you would reboot the PC involved. But this is WSL2's virtual environment and if you try issuing the command to reboot, you'll simply be told:

...and that's clearly a bit bonkers. If the 'host is down', how is it able to send you an error message?!
The point is that Ubuntu is confused at this point: it cannot respond to a reboot command as a 'normal' Ubuntu PC would.
To reboot a WSL2 distro, therefore, you actually have to open a Windows command prompt (with or without administrator rights: it works either way) and type the command:
wsl.exe --shutdown
When you then relaunch the Ubuntu item from the Windows Start menu, the WSL2 distro will be rebooted, with all updates taking proper effect.
5.0 Install an X Server
So now we have an up-to-date command-line Linux environment co-existing with the graphical Windows desktop we know and (cough!) love. Can we get the two to interact? That is, can I launch a graphical program in the Linux environment and have it displayed in the Windows desktop one?
Well, let's test with a simple program to start with: xeyes. We first need to install that in the Ubuntu environment with the command:
sudo apt install x11-apps
You'll be prompted to supply your password; the system will check what needs to be installed to satisfy that program's dependencies; and you'll be asked to confirm you want to proceed:

Type a 'y' answer to that question and a bunch of packages will be downloaded and installed for you. Now you can type the command:
xeyes
...and this will happen:
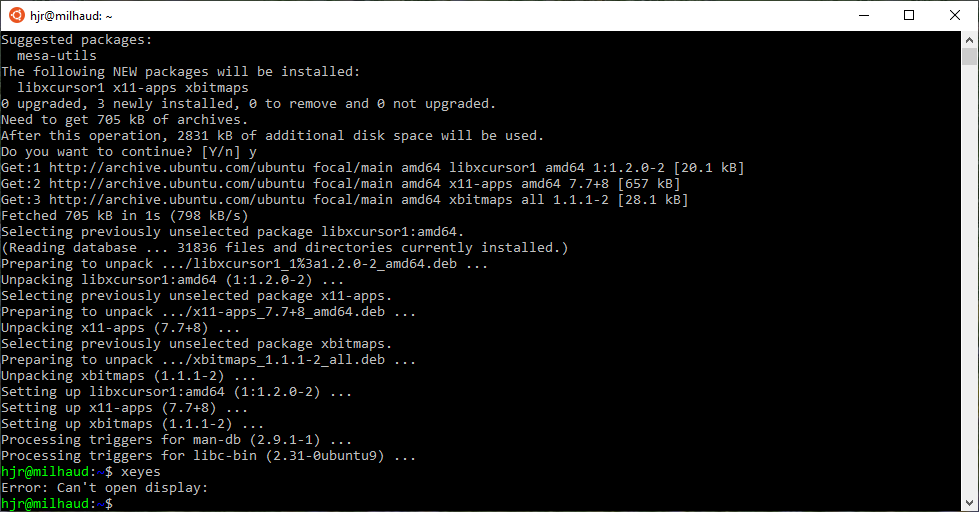
You see the problem: "Can't open display" is Linux's way of saying that it has no way of drawing graphical programs on the Windows desktop. Sure, the program is there wanting to draw things on a screen somewhere, but it has no means of doing it itself, and there's nothing it can talk to that knows how to do it, either.
The crucial bit of the puzzle that's missing is an 'X Server'. That's a piece of software which runs on Windows, and listens out to draw commands from programs running in Linux; when it hears from a Linux program, it's the X Server that knows how to display things on the Windows desktop. So, we need to install an X server before we do anything else.
The easiest way to do that is to install a program called Vcxsrv, which is freely available to download and use as much as you want. Visit that link in your Windows browser and download the program to somewhere on your Windows PC's hard disk (the Downloads folder is usually used for this!) Click the big, green 'Download' button and a ~40MB file will be fetched for you. Locate the downloaded file on your hard disk and double-click it to launch the standard Windows installer.
You'll first see a pop-up asking if you 'want to allow this app from an unknown publisher to make changes to your device'. Click 'Yes' to that and you'll then see this:
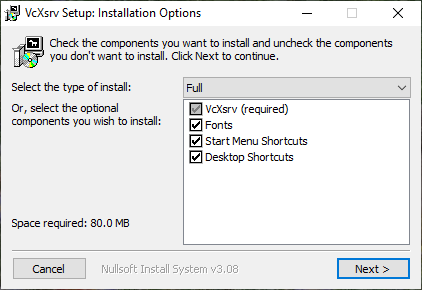
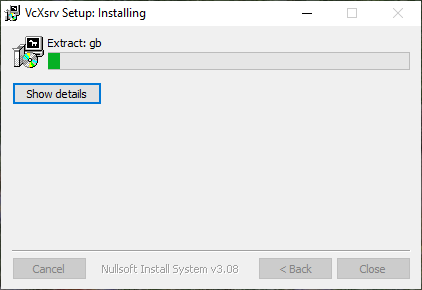
Just accept the selections made by default (which is all the possible items!) and click [Next]. The installer will suggest to house the program files in the C:\Program Files\VcXsrv folder: you may as well accept that, as one folder name is as good as any other in this context! Click [Install] when you're ready and the software copying fun will begin:
When the process is complete, you'll be able to click a [Close] button -and you'll see a big 'X' icon on your desktop, labelled 'XLaunch': double-clicking that is how you'll be able to manually launch the X Server in future. Launch the program now by doing that and you'll see this dialog:
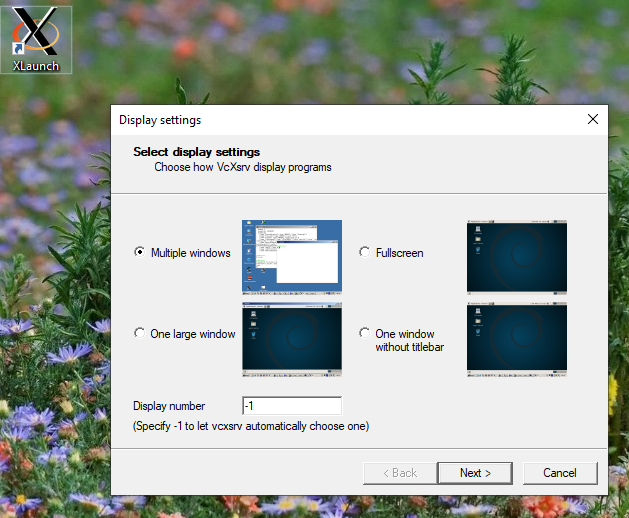
The X Server can display Linux programs in various ways and you get to choose which of those ways should be used here. The default is 'Multiple windows' and that's the option you should generally take: so, with that item selected, click [Next].
Now you are asked what the X Server should do once it launches:
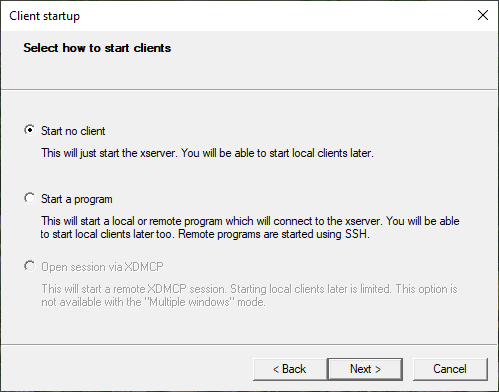
Once again, the default option ("Start no client") is the correct one to select, so just click [Next] once more. That will take you to a final page of configuration settings:
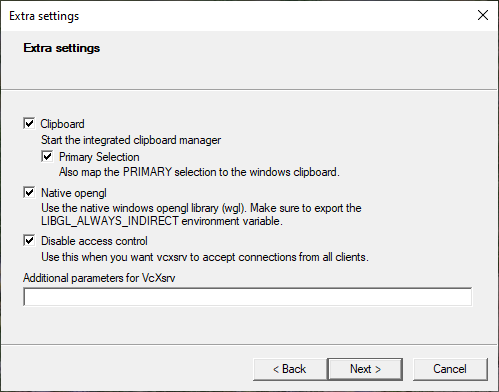
The first two selected items here are both 'on' by default, but the 'Disable access control' one is not, and you need to select it manually. The bad news is this means that your new X Server will now accept connections from any client on your network -so your kids could run a Linux program on their laptop and direct its output to your main desktop, for example! It's not the most secure way of doing things, basically... but it's the simplest.
You might also pause to read the note attached to the second option, though: 'make sure to export the LIBGL_ALWAYS_INDIRECT environment variable'. This is something we'll definitely have to do later on, and I'll show you how and what to do when the time comes.
For now, click [Next] once more. This takes you to the last page of the setup wizard:

You should click the [Save configuration] button at this point. The program will offer to create a file called 'config' with a type of 'Xlaunch File'. That's fine: there's no need to change the default filename suggestion: just make sure to save it somewhere where you'll easily find the file again in the future. I tend to save mine to the Desktop! We'll come back to what to do with this file later (see Section 9 below): for now, just save it and end the setup process by then clicking the [Finish] button.
As you do so, Windows will pop up this screen:
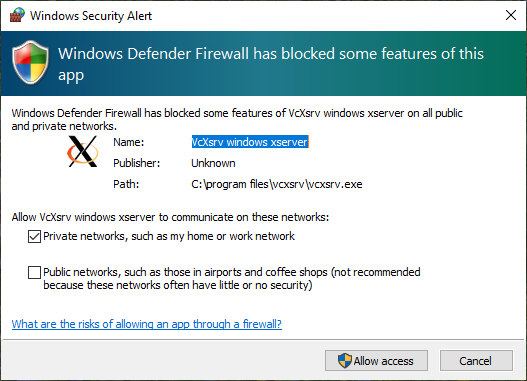
For a Linux program to communicate with your new Windows X Server, it needs to be able to pass its messages through the Windows firewall: you must therefore click the [Allow access] button here to make that possible. If you don't, things simply won't work properly! To make certain things work, I'd be sure to make sure both the Private and Public networks checkboxes are enabled before clicking the [Allow access] button. You can always correct the private/public settings later on using the Windows Defender Firewall settings tool, by clicking on the option to 'allow an app through the firewall', but it's simpler if you just set both options now.
Once you've opened up the firewall in this way, the installer will vanish and it will seem as though nothing really has happened. Check the system tray area, however, and you'll notice a new icon has appeared:
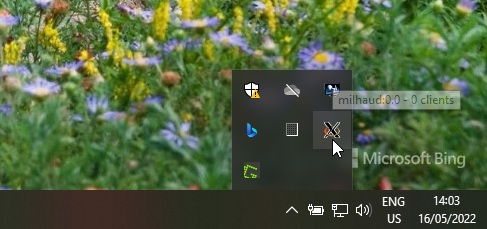
The 'X' symbol indicates that the X Server is actually running. Hovering over the icon also tells you that the X Server is known as 'milhaud:0.0'... that's my Windows PC's hostname, and the "0:0" bit is the 'screen identifier' the server is using to identify its work. You should make a note of this information, as we'll need it later on.
For now, then, the question is: does the fact that there's now an X Server running on my Windows PC make it possible for Linux programs to draw graphical things on my Windows desktop? Let's see:

That's me back inside my WSL2 Ubuntu window trying, several times, to launch the Xeyes program. You can see that it's still not working, despite the existence of the X Server, and even despite me using an 'export DISPLAY' command to try to explicitly tell Ubuntu how to talk to it (at that 'milhaud:0.0' identifier we identified earlier).
That DISPLAY command is nearly right, in fact: it's just that the word 'milhaud' doesn't mean anything to the Linux system as far as a specific IP address is concerned. The Ubuntu software doesn't know how to 'resolve' the name 'milhaud' into an IP address for your Windows PC, basically, and thus setting the DISPLAY to an unresolvable name hasn't helped.
The other issue is that even if we were to set up a mapping between the Windows PC name and a specific IP address ...what if the IP address changes in the future? I'm assuming you're doing this at home, where the use of DHCP means your PCs, tablets and laptops are assigned IP address dynamically, so there's the ever-present risk of them changing over time. If you hardcode a specific address into (for example) the /etc/hosts file, your configuration may well not work one day.
We need to get cleverer and subtler about it, basically!
6.0 Linux Configuration
In Linux, environment variables are set in a file called .bashrc (there are lots of possible ways of setting them, actually, and some distros do it differently from others... but on Ubuntu, the .bashrc file is the easiest one to deal with for now). Notice the file has a full-stop (or period) at the start of its name: that makes it a 'hidden' file, so it won't usually appear in file listings... but it still exists, even so. It is usually found in your home folder within the Linux system. To edit it, therefore, in an Ubuntu window, type this:
nano $HOME/.bashrc
We then need to append the following lines of text to the file, without altering anything that's already there:
export HOST_IP="$(ip route | awk '/^default/{print $3}')"
export DISPLAY=$(route.exe print | grep 0.0.0.0 | head -1 | awk '{print $4}'):0.0
I realise that can all look like hieroglyphics, but it's essentially just a little bit of coding magic to say 'your X server is over there, and this is how you contact it'. More importantly, it's determining the IP addresses of the Ubuntu environment and the Windows PC it's running on dynamically... so these lines of code should always result in the Linux environment being able to find and talk to the Windows one.
So: just type or copy/paste those lines to the end of the existing .bashrc and then press Ctrl+X to save (and 'y' + Enter to confirm).
To make the new bashrc actually take effect, we need to re-load it with this command:
source $HOME/.bashrc
...and then you can type this command to make sure one of the new variables has been set correctly:
echo $DISPLAY
...which should return you something like '192.168.0.167:0.0'... which is actually the IP address of your Windows PC, plus the '0:0' identifier you saw the X Server system tray icon displaying earlier.
So, with those new environment variables in force, let's try our graphical Linux program display test once more:

And bingo! There we have the xeyes "utility" displaying on a Windows desktop having been invoked from inside the Ubuntu environment. What's more, the eyes will follow your mouse pointer as it moves around the Windows desktop, even though it's being run in a command-line only Ubuntu environment! Clever stuff, indeed!
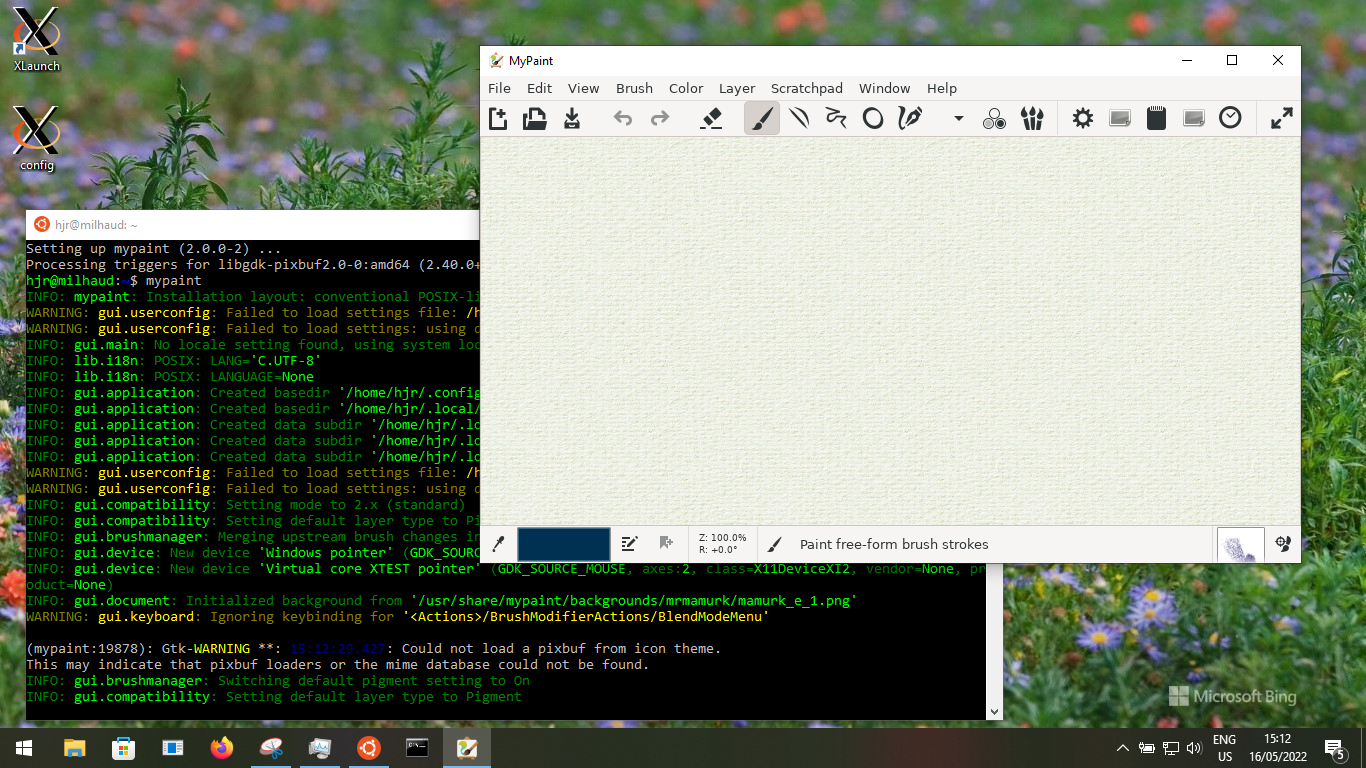
You can do this with any graphical Linux application -though there aren't many of them installed in WSL2's Ubuntu distro by default. You might like to add a fairly small one, just to make the point though:
sudo apt install mypaint
...followed by the command:
mypaint
...should result in you seeing a full-bore Linux painting program appear on your Windows desktop:
However you test it, the point is that Linux now knows how to 'draw stuff' on your Windows desktop. We're half-way there!
7.0 Install a Pulseaudio Server
Let's set up another test. Inside Ubuntu, issue this command:
sudo apt install ffmpeg
Ffmpeg is the Swiss Army Knife of video and audio players, so is a handy way to test whether a Linux distro can sound on the Windows desktop as well as draw on it. It's quite a hefty program, however, so that one command will trigger the installation of potentially hundreds of dependencies: be patient and let the install finish in its own time.
To test things out, you'll also need an audio file to play with, so issue this command too:
cd && wget https://absolutelybaching.com/musictest.mp3
Now try to play the music file, using this third command:
cd && ffmpeg -i musictest.mp3 -f pulse -
You should see something like this by way of a response:

As with the failed attempts to get xeyes drawing on the Windows desktop, here we see ffmpeg failing to 'sound' on the Windows desktop because it 'cannot connect context' -which is its way of saying, 'I don't know where to direct my sound output to'. The solution to this is also similar to what we did to get xeyes running: we need to install some sort of 'audio server' on Windows that our Linux programs know how to send their audio to.
That audio server is called 'PulseAudio' and you could download a copy of it for nothing from this website. Clicking that link will download a 'tar.gz' file, which is a compressed single file that needs to be uncompressed before you can access its contents. Since Windows cannot natively handle tar files, you'll need to download and install a program like 7-zip first. That does handle tar.gz files: just right-click the downloaded file and select 'Extract here':
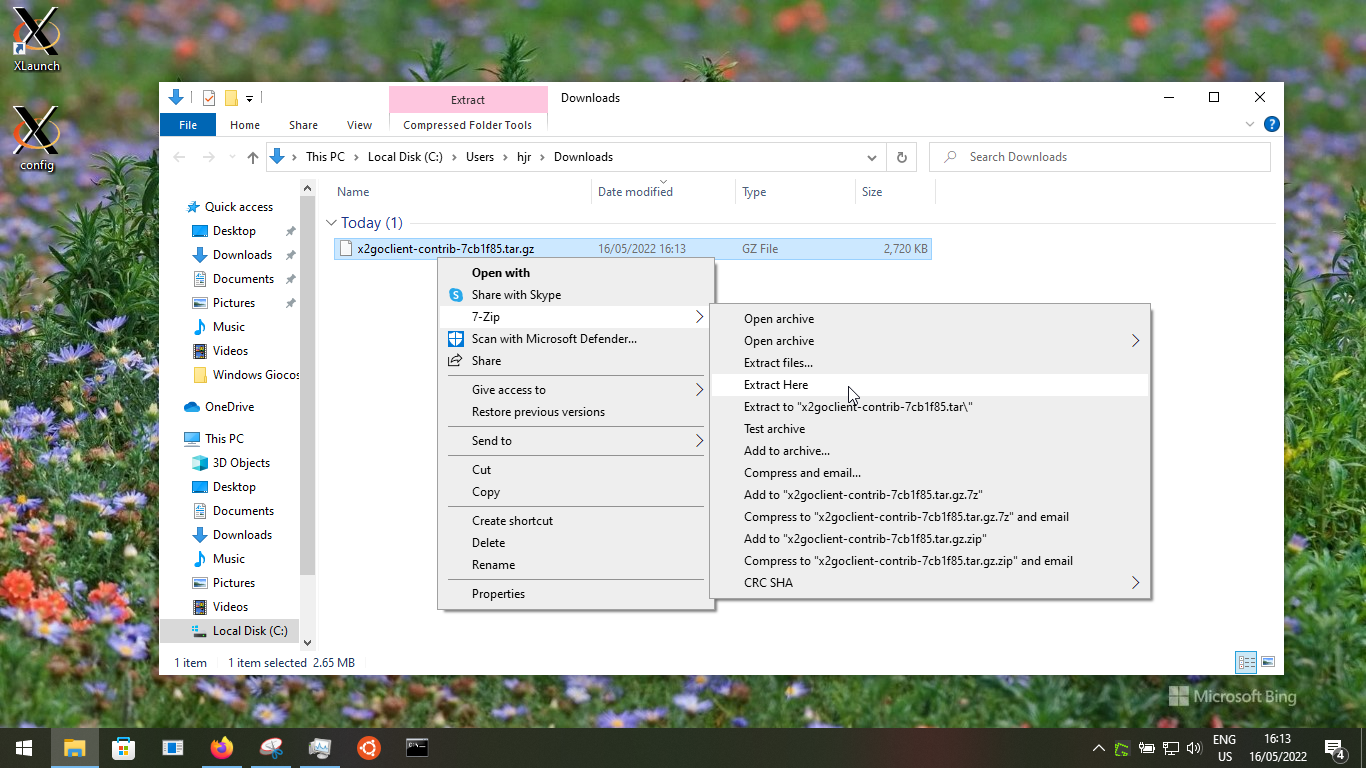
The extraction will create a tar file (i.e., identically-named as the original, but without the .gz bit of the extension). Right-click that file and 'extract here', too: this time, you'll end up with a folder called 'x2goclient-contrib...' (the numbers at the end of the folder name will depend on the version that's current at the time you do the downloading). Double-click that folder to enter it: you'll now you'll be looking at a bunch of DLLs and EXE files:

These, then, are the binary files which will run as an audio server on Windows... it's just that, right now, they're in an oddly-named folder and in a place no-one can usefully find them! So... back up out of the folder, right-click it and cut it, then navigate to the root of your C: drive and right-click and paste. Then, right-click the newly-pasted folder and select 'Rename' from the context menu. Change the folder name to 'pulse':
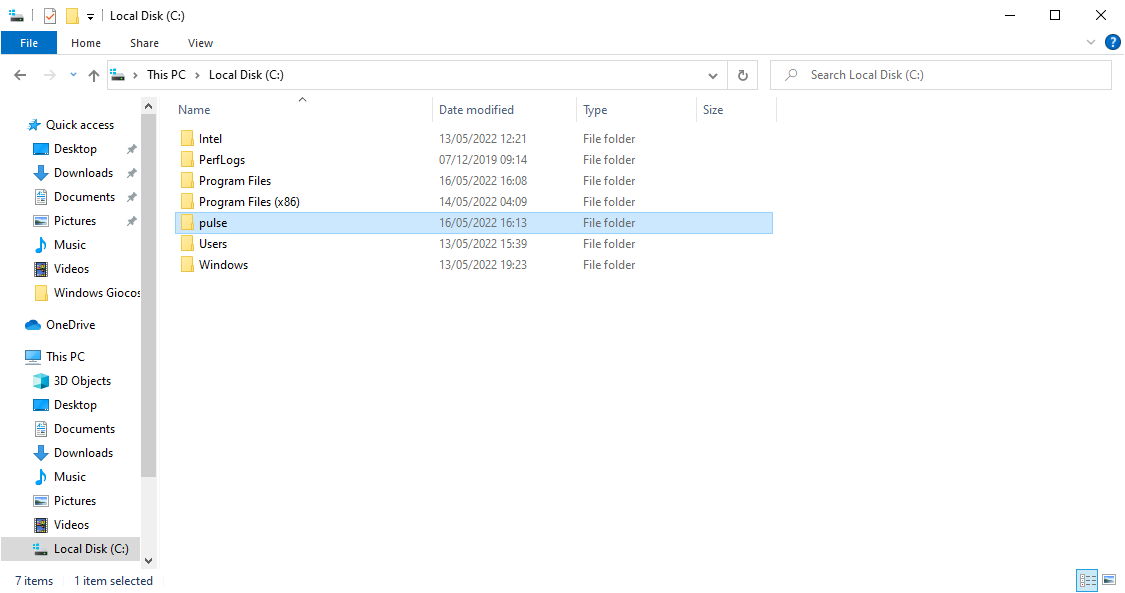
You should end up with the 'pulse' folder, with all its file contents, sitting at the base of your C: drive, as shown.
You now need to double-click the pulse folder to enter it once more. There, right-click in blank space and select New -> Text Document from the context menu that appears. Call the new file 'config.pa' and press [Enter] to confirm. Actually, because Windows is Windows and does stupid things at times, you'll just have created a file called config.pa.txt, but we'll sort that out in a moment.
For now, double-click the config file to open it in Notepad and paste these lines of text into it:
load-module module-native-protocol-tcp auth-anonymous=1
load-module module-esound-protocol-tcp auth-anonymous=1
load-module module-waveout sink_name=output source_name=input record=0
...and then save the modified file. These lines basically allow a Linux program to access the sound server without authorisation, once it's running.
Now to deal with that .txt extension, which you won't even be able to see (by default)! In the file manager, click the View menu option:

Switch on the 'File name extensions' option: now you can see that the file you've just edited is really called 'config.pa.txt'. Knowing that, you just right-click the file, select to 'rename' it and remove the '.txt' bit from the file name. Windows will complain that removing a file extension makes life hard for it:
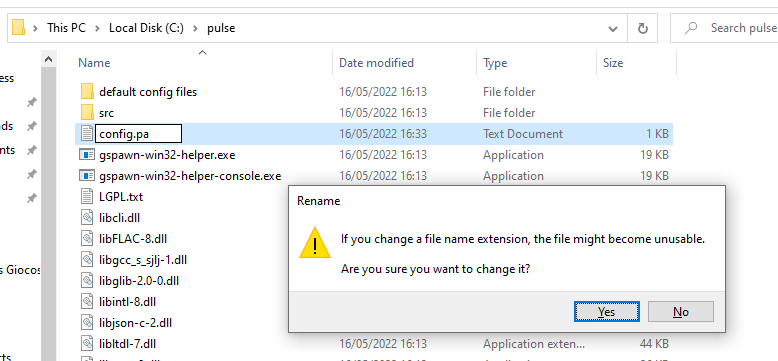
...but you should click 'Yes' to make the change take effect anyway.
So now it's time to run the audio server -but to do that, we need to launch it with arguments supplied on the command line. So open a Windows command prompt (with or without administrator rights: it doesn't matter at this stage) and type the command:
c:\pulse\pulseaudio.exe -F c:\pulse\config.pa --exit-idle-time=-1
Initially, this will cause Windows to pop up another 'Firewall access' dialog: as you did for the X Server, you should enable both private and public network access and then clicking the [Allow access] button, when it's displayed.
You will be left looking at a bunch of text output you don't need to worry about ...and then the thing will appear to just sit there, hanging. It's not actually hanging, of course: it's simply acting as a server, waiting for an audio client to attach to it... so we're half-way there! You can minimise this window, but don't close it: if you close it, the server will stop running and will need to be relaunched.
8.0 Linux Configuration (Part 2)
Now there's an audio server running on Windows waiting for clients to connect to it... which is fine, but we have the same problem we had with the X Server: how does Linux know where an audio server can be found? We have to tell it, so some new Linux configuration is required.
First, we need to install some PulseAudio files on Ubuntu. The simplest way of doing that is:
sudo apt install pulseaudio
You may find it's already installed (especially if you've installed vlc as I suggested you do earlier), but that's OK. The command will either install it, or tell you it's already installed: either way, it won't do any harm.
Next, we need to edit our .bashrc file once more, so issue the command:
nano $HOME/.bashrc
At the very bottom of the file, add this new line of text:
export PULSE_SERVER="tcp:$HOST_IP"
...then save the modified file (Ctrl+X, 'y', Enter). You then need the modification to take effect by issuing this command again:
source $HOME/.bashrc
Once that's done, try the ffmpeg test once more by re-issuing the command:
cd && ffmpeg -i musictest.mp3 -f pulse -
This time, the output should be dramatically different:
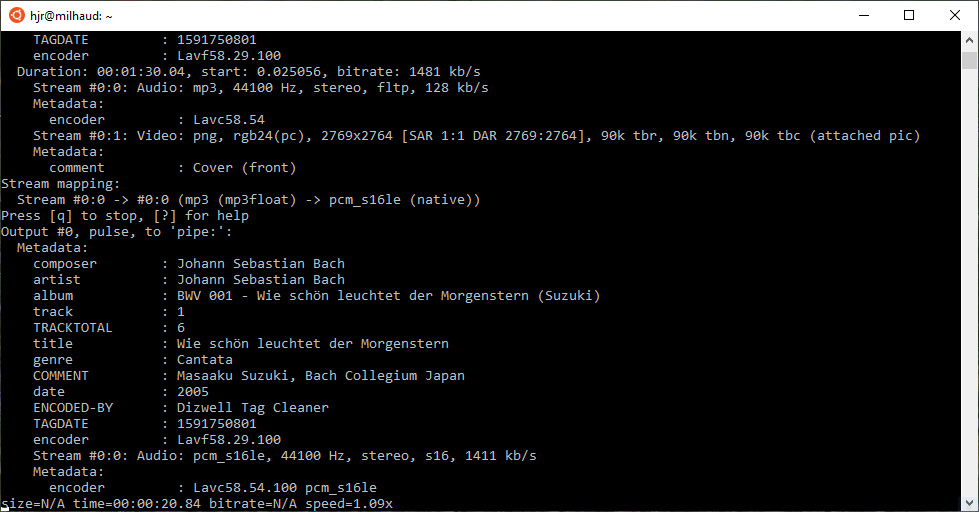
Now, obviously, that's a static screenshot, so you can't tell from just looking at it whether or not sound is playing on my Windows PC! But you can see that there are no more errors being displayed in red; you can also see (on the last line of text) that ffmpeg at least thinks it has played 20.84 seconds of the file... so that's some indication of success 🙂
But by way of more convincing proof that Ubuntu really was managing to output to Windows, here's video of the ffmpeg 'happening':
Not coincidentally: if you can get ffmpeg playing music from Ubuntu to Windows in this manner, you can definitely run Giocoso... because Giocoso uses ffmpeg to do its audio output!
9.0 Automating Server Startups
At this point, we have Linux integrated with Windows as far as graphics and audio are concerned, so running Giocoso is not going to be a drama. The only issue I can really see with this setup is that it's clunky. Specifically, if you were to reboot your Windows PC, you would discover that it comes back up without either the X or PulseAudio servers running automatically. That, of course, might be something you're perfectly happy with -but I suspect most people would like those two servers to auto-start at every boot, so that music can be played back via Giocoso without having to futz around with them by hand!
So here's how we get those two servers to auto-run.
9.1 Autostarting the X Server
You will remember (way back in Section 5) that I got you to save your XLaunch configuration file as a file cunningly named 'config.xlaunch'. I stuck mine on my desktop.
To get the X Server to auto-launch at every reboot, we just need to copy that to Windows' auto-start folder, which is located at: %HOME%\AppData\Roaming\Microsoft\Windows\Start Menu\Programs\Startup. By "%HOME%" I mean your own user's home folder, which is usually in c:\users\<your username>. The only issue with finding this horrendously long-named folder path is that AppData is a hidden folder, so in Explorer, you'll have to click View -> Hidden items to make it discoverable and clickable.
Here's me navigating to my personal version of that folder:
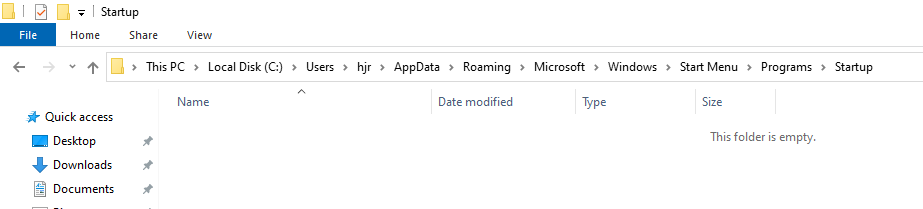
As you can see, the folder starts out empty... but anything you drop here will be executed automatically at boot-up. So, to get our X Server auto-starting, we simply have to move the config.xlaunch file here: a judicious bit of cut-and-paste is all that's required:

Once that's done, you can close Explorer down. The change won't take effect until you next reboot the PC, of course. You'll know it has worked if, after a reboot, you check the System Tray area and discover an 'X' logo there without you having to have done a thing.
9.2 Autostarting the PulseAudio Server
Autostarting the X Server is simply a matter of copying a config file to a special folder. Getting the PulseAudio server to auto-start is a bit more complex (though if you created a batch file that contained the relevant command and copied that to the Programs\Startup folder where the config.xlaunch file is now stored, that would probably work).
The nicest way to get autostarting of Pulse working, though, is to create a Windows Service for it. To do that, we first need to download a program called (and I kid you not): the Non-Sucking Service Manager or NSSM for short.
Download the 'Latest release' version of the program: it will come as a ZIP file. In my case, it was nssm-2.24.zip, though obviously the specific numbers will change over time as new releases are made. Bear that in mind if the numbers you see don't match the ones I'll be using in the text that follows.
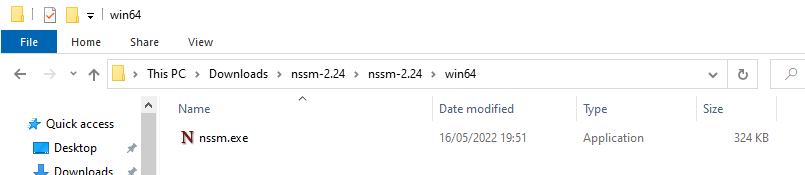
Save the download somewhere, then right-click it and select to 'Extract All' (if you're using the Windows built-in ZIP manager; if you're using 7-zip, an 'Extract here' will do, too). That will create a folder (called nssm-2.24), inside of which will be another folder called, er, nssm-2.24. Only inside this second folder will you find a folder called 'win64', and only inside that will you find the nssm.exe executable we actually need:
Cut-and-paste that executable to the C:\pulse folder we created earlier to store all the PulseAudio files in.
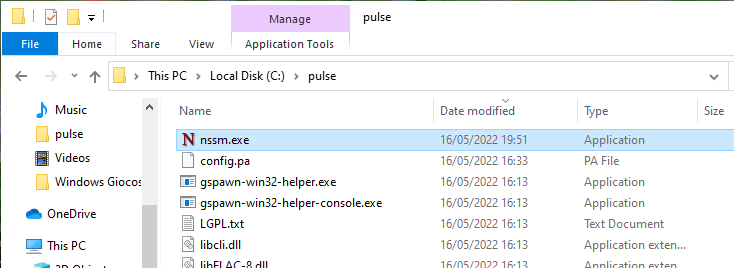
As you can see here, nssm.exe is now living inside my c:\pulse folder.
Now I need a new command prompt window, running with administrative privileges. As before, the simplest way to achieve that is to click Start, type 'command', and then click the 'Run as administrator' option that appears over on the right-hand side of the start menu. Once the command prompt window is running, 'cd' to the c:\pulse folder and issue the command:
nssm.exe install PulseAudio
That will cause a dialog box to appear, like so:
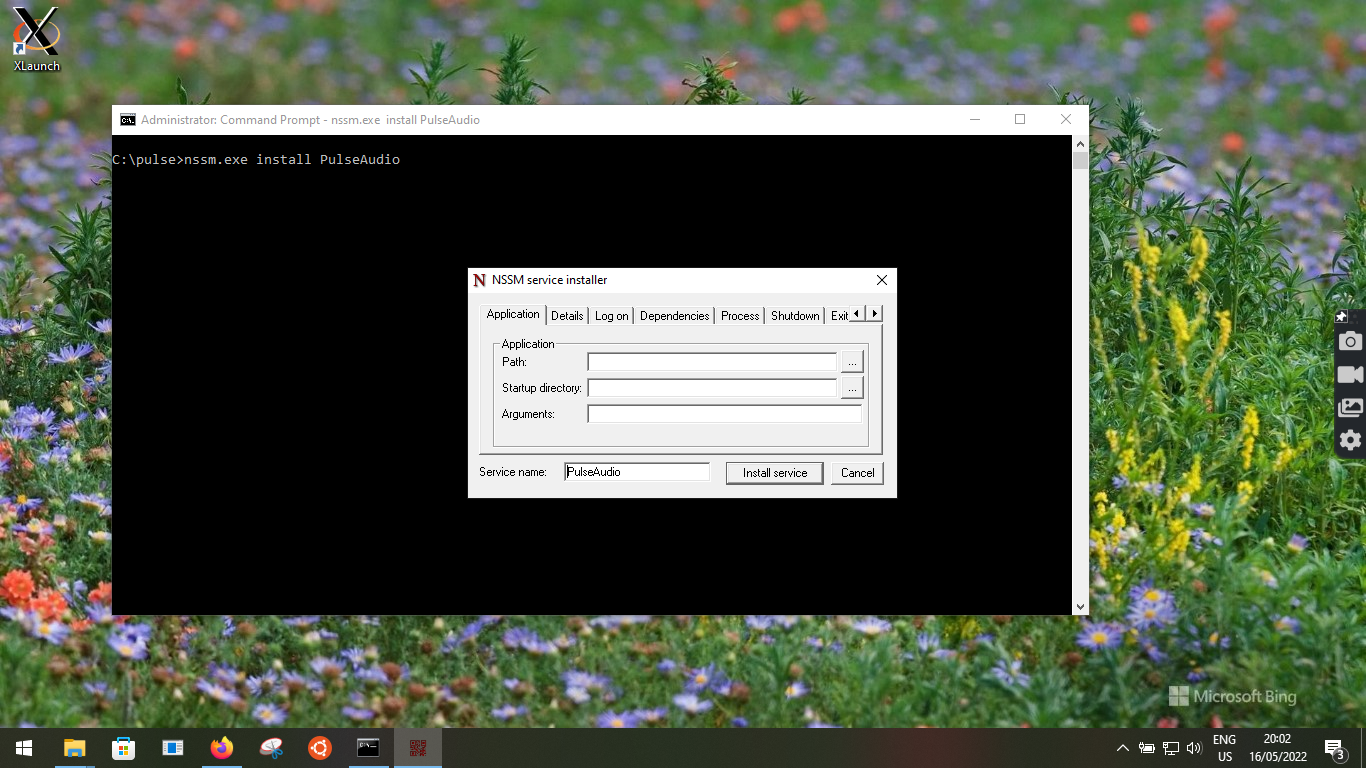
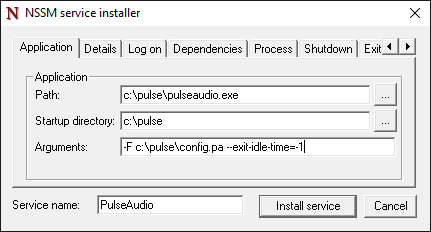
Your job now is to fill in the empty fields in this dialog box, so that you complete describe what executable is to be run, with what parameters, and so on. For the most part, I think it's pretty obvious which things go where: you've already mastered the art of running PulseAudio manually with a long command. This just formalises the exact same command. You should end up with the dialog box looking like this:
Once that's all in-place correctly, click on the 'Details' tab:
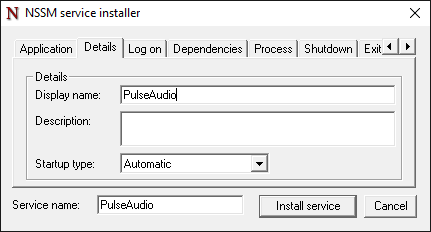
Here, you give a name to the service you're about to create in the 'Display name' field. I've gone for 'PulseAudio', but the specific name you decide on here doesn't really matter that much. It is important, however, that 'Startup type' is set to 'Automatic' (which it should be by default, but set it that way if it isn't for some reason).
With that done, you can click the [Install service] button to complete the process. You'll get a message telling you the service has been created successfully; you can click [OK] to dismiss it, and then close the command prompt window you used to launch nssm.
To see if the new service is actually running or not, you can right-click the task bar and select to run the Task Manager from the context menu that appears. If all you see at that point is a relatively small window displaying, at the bottom, the words 'More details', click that option. If not, you should already be able to see a tab called 'Services', which we need to click on now:
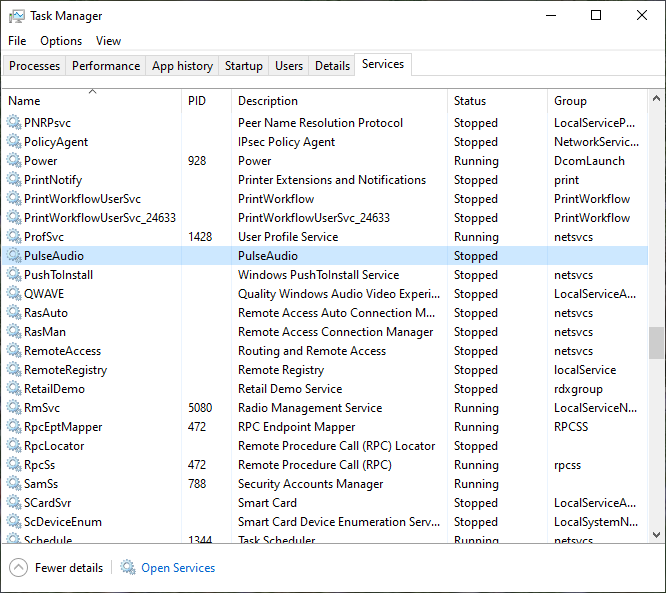
As you can see, services tend to get created in the 'stopped' state, even though they are also created in the 'autostart' mode! You could fix this by rebooting your PC, of course: the autostart-ness of the service will kick in at boot-up time and ensure the service ends up running. But we don't need to be quite that drastic as yet: simply click on the service to highlight it, then right-click and select 'Start' from the context menu:
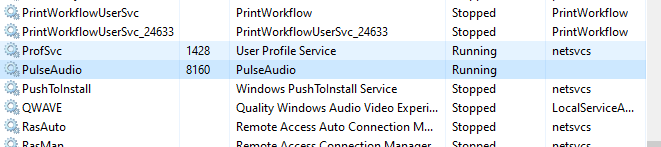
When you see 'Running' in the status column as you do here, then you know that the PulseAudio server is working correctly -and will work correctly no matter how often you reboot your PC in the future.
Once you know that your X and PulseAudio servers start automatically at every reboot, you can finally (!) move on to the business of actually installing and running Giocoso.
10.0 Installing Giocoso
It's been a long article to get to this point, I realise! Funnily enough, installing and running Giocoso is the least problematic part of proceedings, since if you've successfully got this far in the article, Giocoso is certain to install and work exactly as described for the Ubuntu operating system. I shan't therefore repeat all those details here, but will merely give the basic instructions required to get Giocoso functioning!
10.1 Installation
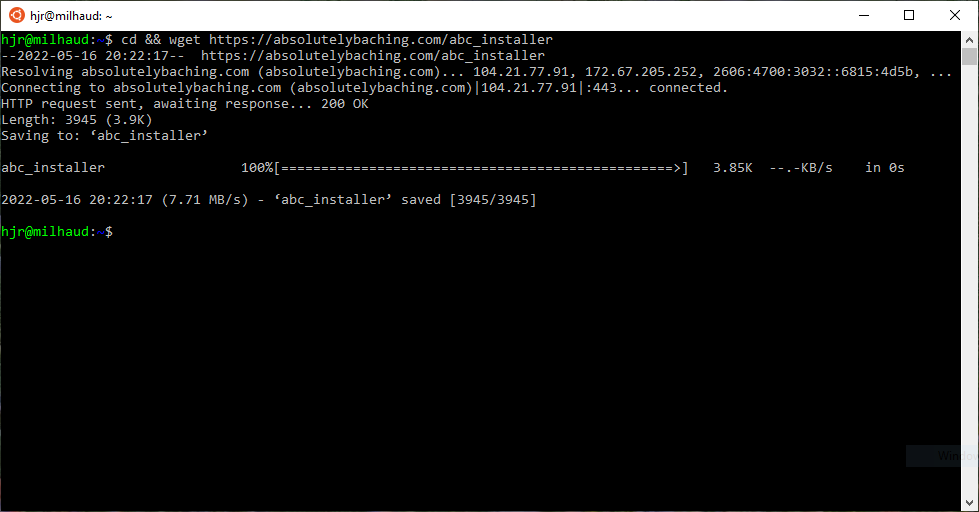
Giocoso is installed by downloading an installation script and then running it with the instruction to fetch and install the Giocoso program. So, within a WSL2 Ubuntu window, you first type the command:
cd && wget https://absolutelybaching.com/abc_installer
That fetches the installation script:
Next, you run the script with the following command:
bash abc_installer --giocoso
...which downloads the Giocoso program script and installs it:
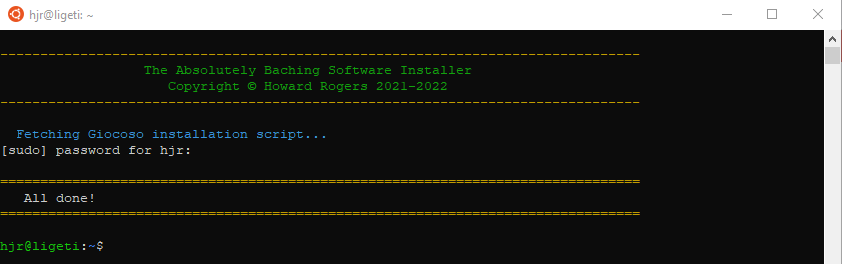
As you can see, the installation at one point asks for the sudo password. You just type in your Linux username's password at that point.
And that's it. That's all it takes to install Giocoso. Download one script, run it with --giocoso specified as a run-time parameter. Supply your password when prompted. Job done.
10.2 Running Giocoso
Once the installation is complete, you just type the word 'giocoso' (all in lower-case: Linux and Ubuntu are case-sensitive) to launch the program itself. There will be a few bumps along the way before it actually runs successfully, however!
Here's the first run of the program after typing 'giocoso' in the WSL2 Ubuntu terminal window:

Giocoso at this point clearly knows it's running in Ubuntu (since it has prompted to install extra software with an 'apt install' command). It has also done a bit of a software inventory and discovered that there are several key software dependencies which need to be fulfilled before it can itself run successfully. The command to install the missing bits and pieces is there in the blue text -but it's been split over several lines. You need to somehow contrive to submit everything you see in blue as a single line command. Whether you do that by typing everything out by hand, or by careful copy-and-pasting the various bits and pieces onto a single command line is up to you.
I went for the copy-and-paste-several-times-until-everything-is-on-one-line approach:

As you can see, submitting the command triggers quite a lot of on-screen activity, finally resulting in this:
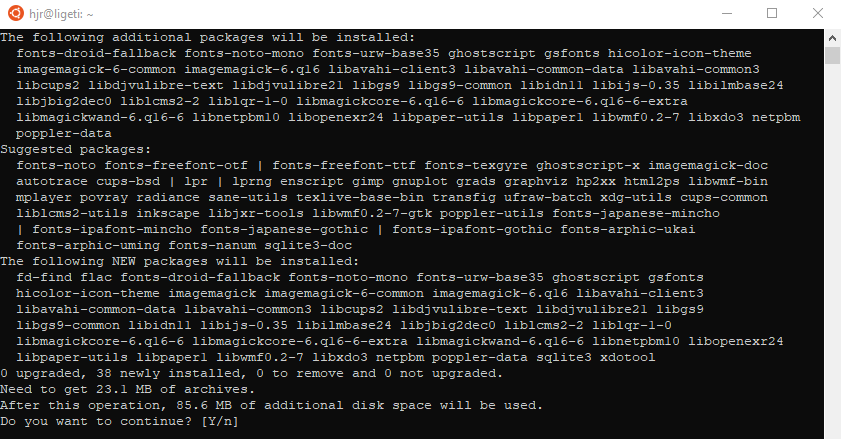
Note that you are asked to confirm (by typing 'y' and [Enter]... or just pressing [Enter], since 'y' is the default anyway) before any software is actually installed. You can also see from that last screenshot that we're talking about downloading around 23MB of software... so, it's not exactly going to take a lot of time!
Once the software prereqeuisites have been installed, you can try to re-run Giocoso again, by once more typing the plain command giocoso:
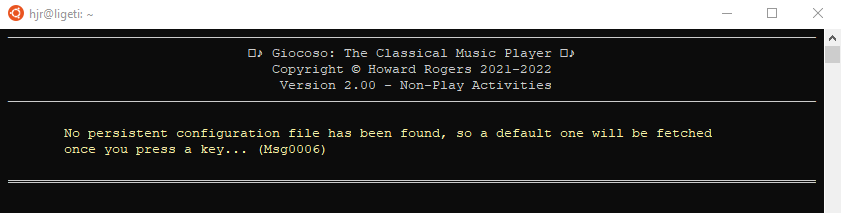
That message only appears the first time Giocoso is run with all software prerequisites satisfied: a persistent configuration file is expected to be found in the $HOME/.local/share/giocoso folder, and when one can't be (as will always be the case on the very first run of the program), Giocoso will download a 'default' configuration file from the absolutelybaching servers and store it in that folder. You just press any key at this point in order to proceed. As soon as the default configuration file is downloaded, the screen will end up displaying something similar to this:
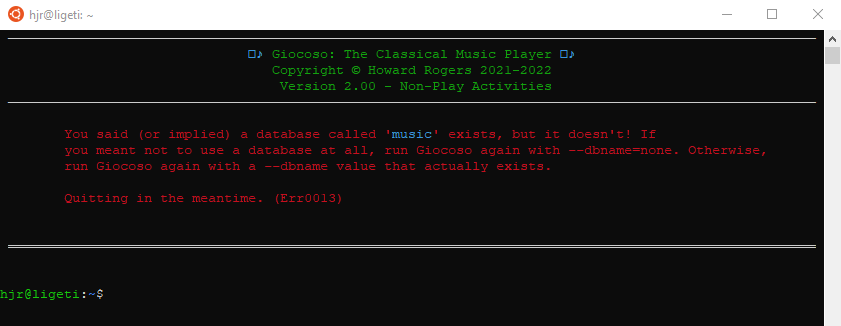
That wall of red error message text doesn't look too promising, does it?! In fact, however, it means Giocoso is running fine. The only thing happening at this point is that you are trying to run Giocoso in its default mode without there being a database to use to find music to play (because you haven't created it yet!), or without telling it explicitly not to use a database. This is described in more detail in the sections of this manual about Direct Play Mode and Database Play Mode. For now, the problem is easily corrected by appending a runtime parameter to the basic 'giocoso' command to formally instruct the program not to use a database for now:
giocoso --dbname=none
But if you type that command into the terminal now, you'll encounter another error:

Again, the red error text can look intimidating, but all Giocoso is saying here is: when you run me without a database, I must either be physically in a folder of music files I can play, or you must direct me to where such files can be found.
This might surprise, however, because earlier in this article, I had you download a musictest file, and that should still be present in your $HOME folder:

Sure enough, the musictest file is still there... but it's an MP3 file, not a FLAC one... and Giocoso only ever plays FLACs!
So you first need to obtain a FLAC from somewhere to test with. Click here to download a small one or issue this command within your WSL2/Ubuntu environment:
wget https://absolutelybaching.com/musictest.flac
Now you can verify the existence of a FLAC present in your HOME folder:

And now, fourth time really will be the charm, I promise!
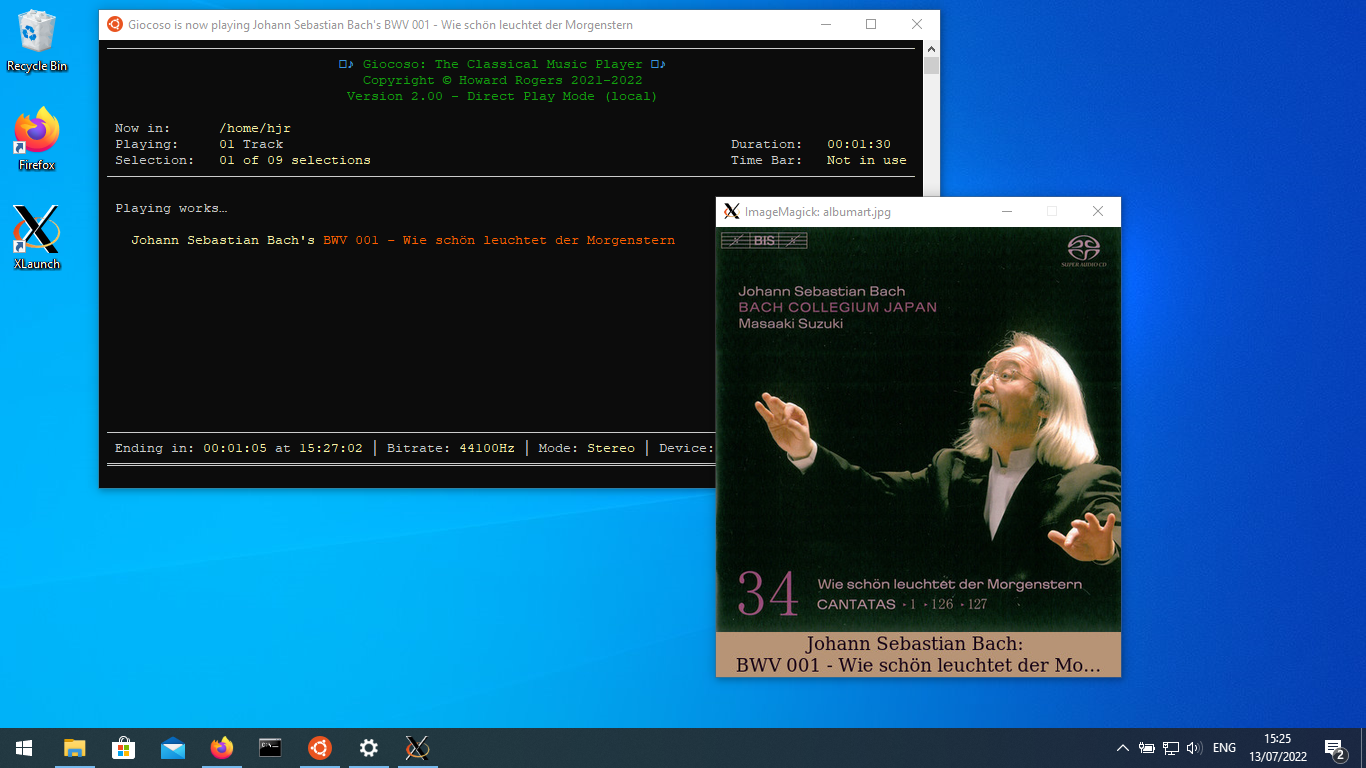
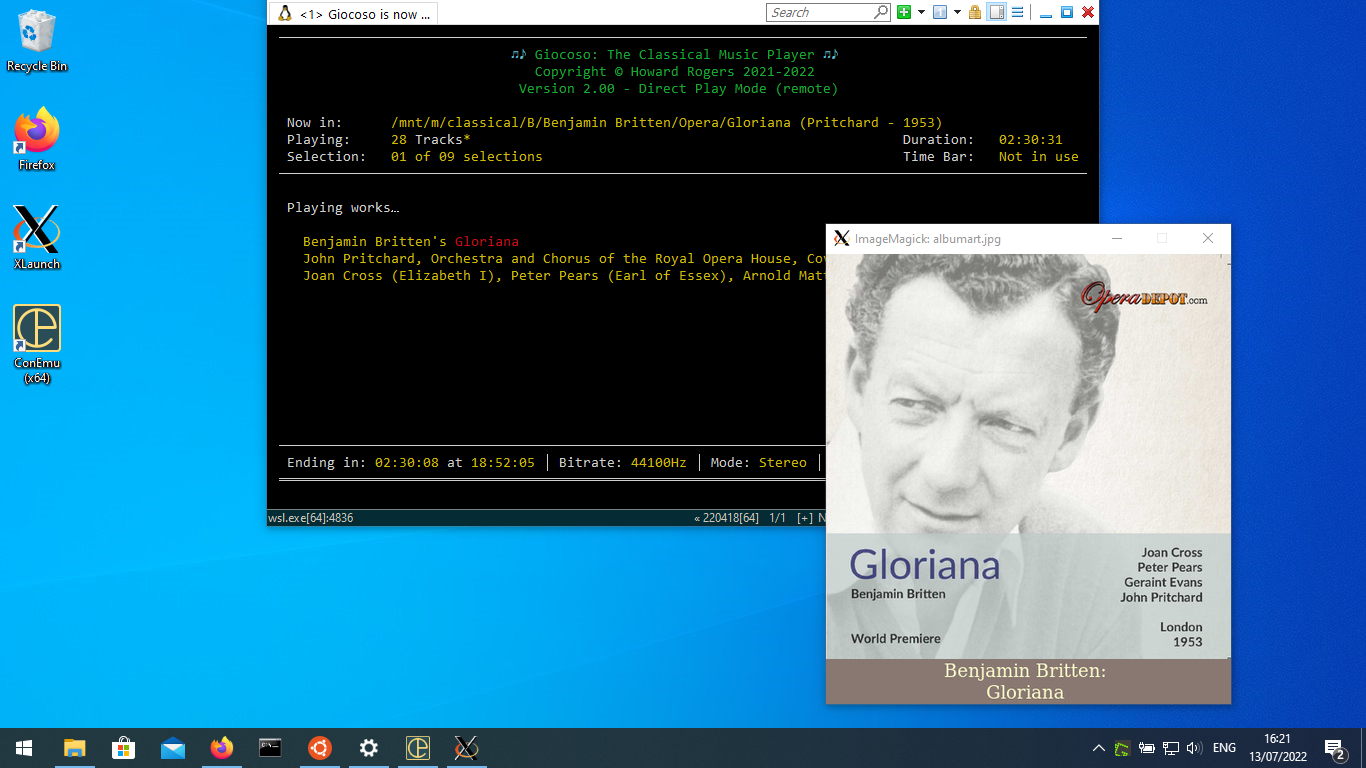
Finally, here you see Giocoso playing music in the background window (which I promise you I can hear perfectly), thanks to the PulseAudio Server running as a service; and in the foreground, Giocoso has displayed the album art associated with this recording, courtesy of the X Server we installed and got auto-starting at every Windows PC reboot.
I think I've made it sound more complicated than it actually is to get Giocoso running just fine, so let me summarise:
- Run one: fails because of missing software - fixed by installing the missing packages
- Run two: fails because of default desire to run with a database called 'music' -fixed by adding dbname=none to the Giocoso launch command
- Run three: fails because there has to be a FLAC file present in the folder you run Giocoso from, unless you're in database mode (which we aren't). The fix is to find a FLAC file to play and stick it in the relevant folder
- Run four: finally works!
10.3 Improving the Looks
10.3.1 Fonts
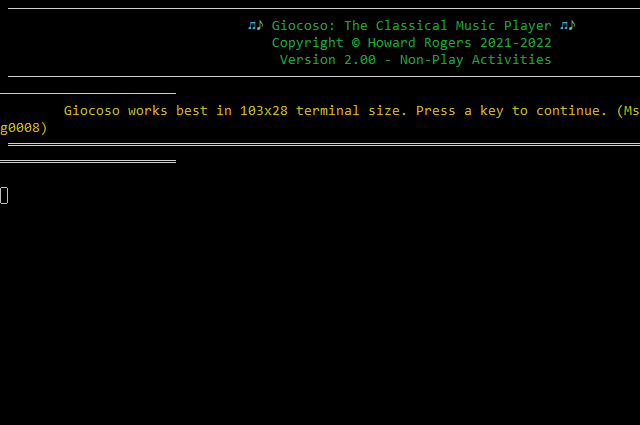
So, Giocoso works... but if you have a keen eye, you may notice a little problem in the header of the main play window:

The square symbol next to the blue musical note on the first line there is not supposed to be a square! It's only displaying that way because Linux expects fonts to be able to handle what's called 'Unicode fallback encodings' for characters to display... and Windows doesn't do that. Confronted with a special Unicode character, the Windows font being used to display the Ubuntu terminal gives up and resorts to drawing squares!
Unfortunately, because it's a technical Windows thing, there are zero TrueType fonts installed in Windows 10 by default which won't suffer from the same problem. Your only real fix is therefore to download and install a new font which is known to handle Unicode 'properly'.
Happily, such fonts are readily available for zero cost. One such, for example, is 'Dejavu Mono Sans', which can be downloaded as a ZIP file here. Save it somewhere, then right-click the downloaded file and select the 'Extract All' option from the context menu: that creates a folder called dejavu-fonts-ttf-x.xx (where the 'x.xx' will be specific version numbers that may change over time). Inside that folder, there'll be another folder of the same name, then inside that, there'll be a bunch of files and folders -one of which will be called ttf.
Entering the ttf folder, you'll see the entire family of Dejavu fonts and you can install all of them if you wish: just right-click a .ttf file and select 'Install' from the context menu. The one we're interested in particular, however, is called DejavuSansMono.ttf
Right-click and Install that one, then you can switch back to your Ubuntu command window. Click the little Ubuntu 'roundel' icon in the left of the title bar and select Properties:

As you can see, a dialog pops up in which there is a 'Fonts' tab. Click on that, then locate the new font in the list shown in the middle of the dialog. I don't think you'll particularly need to alter the font size, but you can do so if you wish. Click [OK] when you're ready:

There you have it: the empty blue squares have gone, to be replaced by correctly-displayed blue semi-quavers!
Well... it's solved temporarily. You only set the properties of the currently-running Ubuntu command prompt. If you want to set them for all future Ubuntu command prompt windows, you need to right-click the Ubuntu 'roundel' once more, but this time select Defaults. Make exactly the same alterations to the Fonts tab as before, and now you're genuinely set to use good-looking fonts that understand Unicode correctly.
10.2.2 Terminal Widths
Giocoso expects the terminal in which it is run to be at least 103 columns wide and 28 rows deep. Windows' default terminal sizes are much larger than that, however. If you want to fix that, you again need to click on the Ubuntu roundel, select Properties (for a one-time fix of the current window) and/or Defaults (for a permanent fix of all future windows). This time, instead of the 'Fonts' tab, you need to select the 'Layout' one.
Be careful not to change the 'Screen Buffer Size' section: the one that alters what we need altering is labelled 'Window Size': change those settings to 103 and 28 respectively:

10.2.3 Hidden Playback Windows
This next section is entirely optional, but I thought I'd document it as, on the rare occasions I use Windows these days, it's a feature I rather like in many different contexts, Giocoso being one. It's the ability to make a terminal window disappear, whilst keeping it running whatever it was running -and then bringing it back to full visibility when needed.
Windows 10 actually has a fairly new 'Windows Terminal' program (freely available from the Windows Store) which has this capability baked in, but it stubbornly insists on being the complete width of your screen, and you can't alter that in any way, so I tend not to use it.
Instead, I download and install a free program called ConEmu. The download link on that page takes you to a second page where you can select to download various forms of the program: I'd suggest the Preview+Alpha, Installer one. That downloads a 'ConEmuSetup.exe' program, which you double-click and install as you would any other Windows program. Select to install the x64 (i.e., the 64-bit version) when prompted:

After that, just click your way through the installer wizard as normal, accepting all the defaults unless you know what you're doing and decide otherwise! You'll end up with a program launcher icon on your desktop, as well as launch item in the Start menu. When you first launch ConEmu, you'll see this 'fast configuration' dialog:
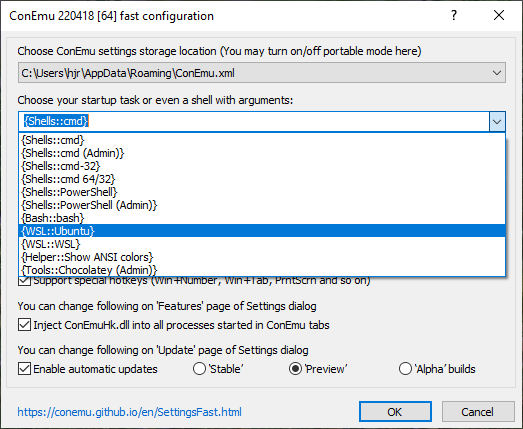
The main thing here to note is that ConEmu acts as a way to run multiple 'shells' or environments. By default, it's configured to run the 'cmd shell', which is just the standard Windows Command Prompt window. As you can see above, however, you can click on the 'startup task' drop-down menu and ask ConEmu to start other shells by default: in particular, you can see me asking it to always begin by running the 'WSL Ubuntu' environment.
Once you've selected your default 'shell', there are two other items of configuration that are of particular note:
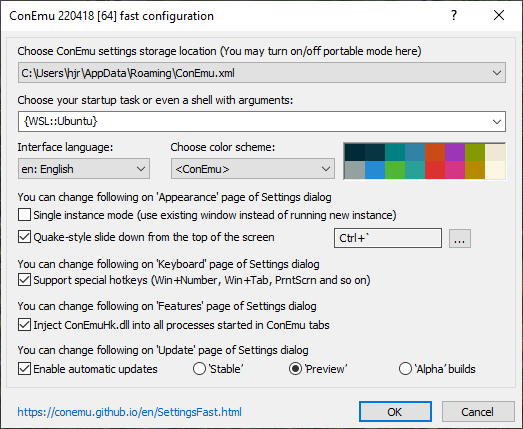
First, I've switched on the 'Quake-style slide down' option: it's not on by default. This turns ConEmu into a 'hidden program' that only appears when you invoke a special key combination: in this case, Ctrl+` are the default 'hot key combo', and I'm happy to run with that.
Second, though I've left the default colour scheme set to its default, you can click that pull-down selector and choose something else according to taste (Cobalt2 is quite a nice colour scheme, by the way).
With those selections made, click [OK]. As soon as you do, this happens:
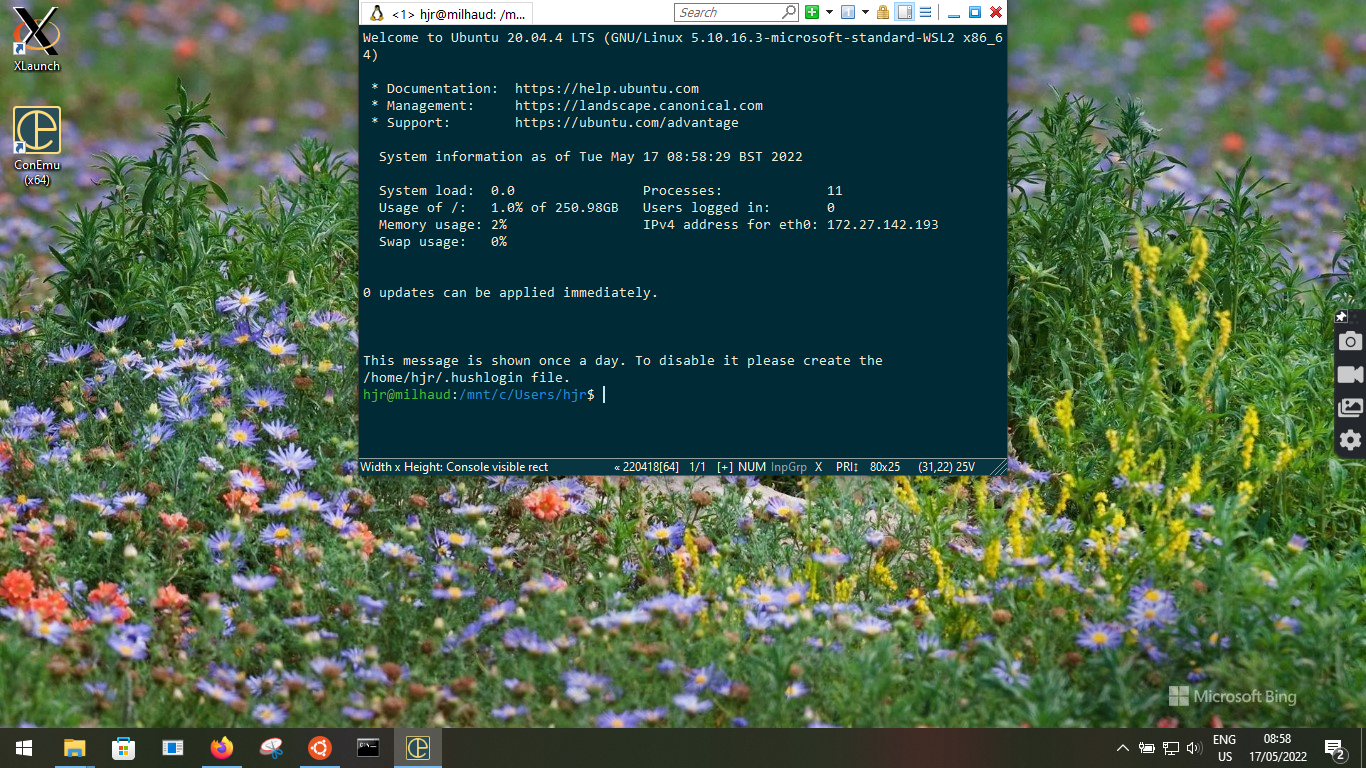
It's difficult to convey what's happening here, dynamically, in a static screenshot, but basically ConEmu has launched itself as a drop-down window originating from the top of my screen and (as you can tell from all the text that has appeared in that window) has gone on to initiate and launch a WSL2/Ubuntu session. If I hit my 'hot key combo' of Ctrl+`, the window will disappear; hit those keys again, it will come back into view, and so on.
Basically, ConEmu gives you a nice 'disappearing terminal', in which you can launch Giocoso and then tuck it out of the way, freeing up desktop real estate for other programs. Your music playing program can thus run in the background without forcing itself into being the centre of attention.
There are just a couple of extra things to worry about, though, before everything works entirely as planned. This screenshot will give you a hint as to one of them!
As you can see here, the ConEmu terminal defaults to being just 80 columns wide, so Giocoso's display is garbled from the outset. A second issue that won't be visible in that screenshot is that ConEmu defaults to launching its Ubuntu terminal in the /mnt/c/Users/hjr folder -that is, my home folder on the Windows PC, as mounted within the Linux environment. I generally would prefer to start in /home/hjr, my home folder within the Linux environment.
Both these issues are fixable if you click the hamburger menu (the three horizontal lines, next to the minimise/maximise and close buttons), and then select the Settings option from the resulting menu:
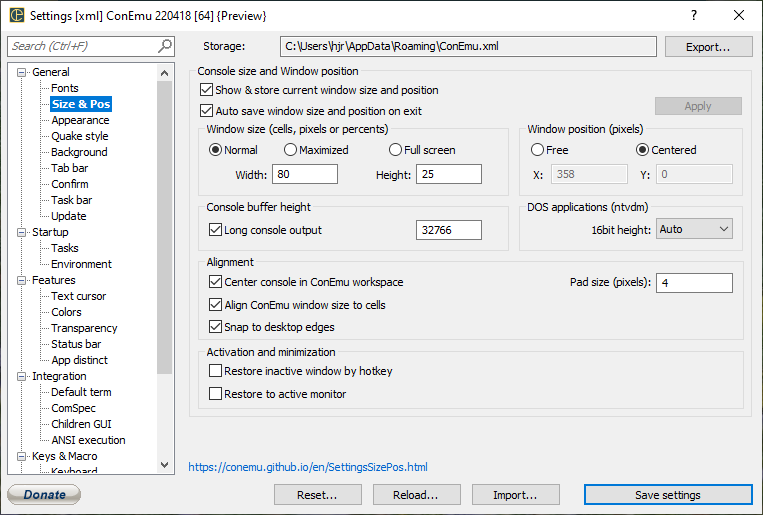
In the options 'tree' down the left-hand edge of this dialog, click on 'Size & Pos' and you'll be able to change the Window size from its default 80x25 to a more Giocoso-friendly 103x28.
The problem concerning the initial 'start' folder is fixed by clicking on the 'Startup -> Tasks' options in the left-hand 'tree':
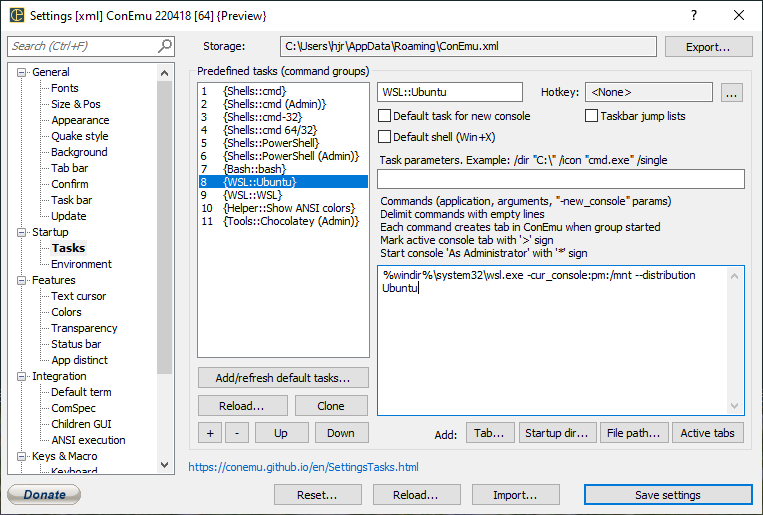
As you can see, the big panel over on the right-hand part of the screen says what 'tasks' should be run when this shell or environment is launched... and by default it's a lot of gibberish that, nevertheless, fairly clearly says to do something to the /mnt folder. If we replace that with this alternative set of gibberish:
wsl.exe -cur_console:pm/mnt ~
...so that the screen ends up looking like this:

...then click [Save settings], when ConEmu is then shut down and re-launched, you'll find you get dropped into your Ubuntu home folder by default, not some weird /mnt subfolder.
10.2.4 File Access
I thought I'd conclude this very long article by a quick look at how you 'map network drives' inside a WSL2/Ubuntu environment -simply because I myself never store my music on my main PC, but instead access it over the home network. Thus any Windows PC running WSL2/Ubuntu won't have any local FLAC files to play and will instead need to find them on a remote server.
More fundamentally, the question is 'how does the Ubuntu environment see what the Windows PC knows about' (and a related question is how you can see the Ubuntu environment's folders from Windows)?
10.2.4.1 Local Files
Let's start with the simplest case: how can you see your Windows PC's C: drive from within the Ubuntu environment? That one's easy: it's accessible from Ubuntu's /mnt/c folder:
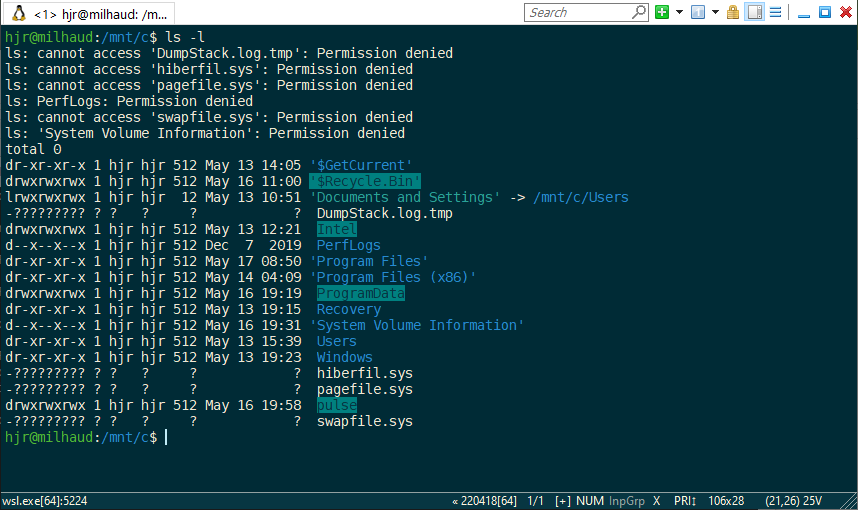
Ignore for the moment the various 'permission denied' errors in that lot of output: take a look instead at the list of folders displayed there. Do they look in the least bit familiar? How about now:
And hopefully you will be able to recognise that the listing of /mnt/c in the Ubuntu environment exactly corresponds to the contents of your C: drive on Windows.
If you wanted Giocoso to play some music you had stored in your Music folder on Windows, therefore, you'd simply navigate inside Ubuntu to /mnt/c/Users/hjr/Music. (Though, obviously, if your username isn't 'hjr', you'd replace that bit with whatever is more relevant to you!)
For the record, you can do the same thing in reverse: if you open Windows Explorer (i.e., the File Manager) and type \\wsl$ in the address bar, you'd be able to navigate your way through the Ubuntu file system using a purely Windows tool:
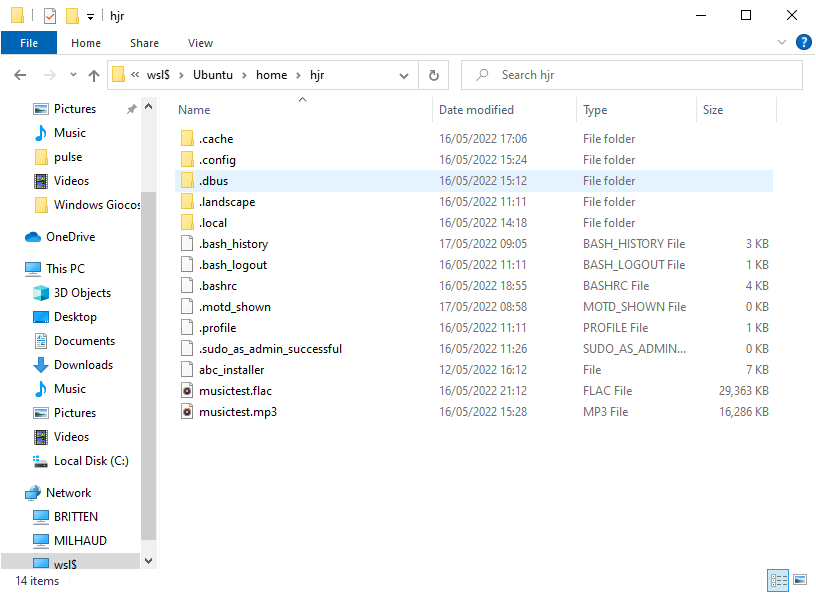
Hopefully, you recognise the contents of the main panel there as being what you'd expect to find in the /home/hjr folder inside my Ubuntu environment!
The point is that whilst we have two separate operating system environments -one Windows, one Linux running 'inside' Windows-, they both share the same file system and each can 'see' the other, though they remain distinct within their own folder structures. If you store all your music files on the C: drive, therefore, it's not going to be hard to get Giocoso to 'see' them: you just tell it to play the contents of the /mnt/c/username/Music folder (or wherever is actually applicable).
10.2.4.2 Remote Files
What do you do, however, if your music files are stored on a remote server and you've mapped that 'share' to your Windows PC's M: drive, like this:

Here, I have a server called 'jsb' which I've mapped to my M: drive. All my music is thus accessible in Windows by visiting the M: drive and its various sub-folders. How can I get Giocoso running in the WSL2/Ubuntu environment to see that M: drive? If you try visiting /mnt/m inside Ubuntu, for example, you'll find that doesn't work.
Well, the quick fix (which won't persist between reboots) is to issue this command from within the Ubuntu environment:
sudo mkdir /mnt/m && sudo mount -t drvfs M: /mnt/m

Here you see me first listing the contents of the /mnt folder inside the Ubuntu environment: the C: drive mapping is listed (along with a 'wsl' one, which is of no interest), but there's no M: drive. So I issue the above command... and all of sudden, a new listing of /mnt does show an M: drive, and I can 'cd' into it and list its contents, too.
The command is actually in two parts: the 'mkdir' makes a new /mnt/m folder permanently... but it will be merely an empty placeholder at this stage. The second part then mounts or maps the Windows' M: drive to the empty placeholder folder -and thus makes it appear to contain the same contents as the Windows' drive.
As I say, this will grant you temporary access to a mapped network drive. Reboot your PC or restart your WSL2 environment and though the /mnt/m mount point will still be there, its contents won't be.
The persistent fix, therefore, is to issue this command from within your WSL2/Ubuntu environment:
sudo nano /etc/fstab
...and then add this line to the end of the existing file:
M: /mnt/m drvfs defaults 0 0
...which is simply another way of saying 'please make my Windows M: drive appear at the /mnt/m mountpoint I created earlier'. Because that request is in the fstab file, however, it will be re-executed automatically every time the Ubuntu system re-initialises: your /mnt/m folder will therefore automatically and always contain the contents of your Windows' M: drive.
Once the Ubuntu environment can 'see' your network files, it becomes possible to issue this sort of command:
![]()
That is, invoking Giocoso with the dbname=none runtime parameter from before, but now directing it to play the contents of a specific folder without having to 'cd' to it first, by using the --musicdir runtime parameter, too.
Note that in my case, I'm pointing Giocoso to the /mnt/m... folder, so it's going to be playing a music file that is actually stored on my Windows' M: drive, which -as we know- is itself really a mapped network drive. The music is going to be coming from my server in the loft, therefore, not from my Windows' own hard drives. You'll also have spotted that since I have spaces within my folder names (for example, 'Benjamin Britten' and 'Gloriana (Pritchard)'), I need to enclose the entire path within double-quotes. But that minor issue aside, Giocoso now has no problem playing remote files from an Ubuntu environment running 'inside' Windows:
11. Conclusion!
This has been a long article and it is accordingly easy to get overwhelmed by it and think it's way too hard to get Giocoso working on Windows. Appearances are deceptive, though! The process is really quite straightforward:
- Install WSL2
- Configure an X and PulseAudio Server to run on Windows
- Configure the X and PulseAudio Servers to automatically re-start on Windows
- Configure Ubuntu to know where its X and PulseAudio outputs should be sent to
- Install Giocoso and associated package dependencies
- Get some decent terminal fonts, so Giocoso's output isn't garbled
- Know how to access Windows' local and networked files from inside Ubuntu
- Maybe use ConEmu to make the terminal window in which Giocoso runs hide-able
So yes, it's a long article because there are a quite a number of steps you either have or might want to do, but none of them are particularly difficult, if you're careful with your typing!
A key point I just want to end with, however, is that after all this, you're not really running Giocoso on Windows at all: it's actually just Giocoso on Linux, piping its outputs through to Windows. The new WSL2 features in Windows 10 certainly make it easy to keep all of that running on a single PC -but technically, there's nothing stopping you from making a real and separate physical Linux box from doing the same thing to a real, physical Windows PC. The client-server architecture Giocoso is exploiting here works whether the Ubuntu 'server' is running inside WSL2's virtual environment or on a real piece of hardware.
Whether you explore the possibilities that fact makes possible, the other underlying point is that Giocoso is Giocoso, whether you're running it in a Windows environment or a Linux or macOS one. In this article, I've only touched lightly on Giocoso's actual functionality, in favour of describing the business of getting it working on a Windows PC in the first place. However, there's a huge amount of functionality I've not described here ...because I describe it completely in the Linux-specific documentation for Giocoso.
In short, now you've got Giocoso running on Windows, please go and read the full Giocoso documentation for Linux, for it applies completely to the setup you've just created.
[Back to Front Page]|[Giocoso on Windows 10 Distilled]|[Giocoso on Windows 11]|[Giocoso on Linux]|[Giocoso on Raspberry Pi]|[Giocoso on macOS]