1.0 Introduction
I find myself in a bit of a dilemma as far as running Semplice on Windows 11, because I lack any hardware that is capable of running it in a supported fashion... yet, I do run it on a vintage 2012 spare laptop and Semplice runs on it perfectly well. It remains, however, a problem to offer support for doing something on a platform that remains, for me, technically unsupported! Therefore, I won't: if you want to run Semplice on Windows 11, I'll give you instructions which have worked for me, but I cannot vouch for them in the long-run and I won't offer support for it. You're on your own, basically! Of course, if you are a well-off classical music enthusiast who loves using Windows and wants to donate Windows 11-supported hardware on which I can continue to develop Semplice for Windows 11 in a properly supported manner, do please get in touch!
Those preliminaries out of the way: whilst Semplice itself merely sips PC hardware resources, the Windows Subsystem for Linux version 2 (WSL2) that makes it possible to run Semplice at all is a bit of a resource hog. It works, fundamentally, by co-hosting a virtual Linux PC alongside and simultaneously with the running Windows one. That sort of virtualisation immediately demands a 64-bit operating system and reasonable quantities of memory and CPU grunt -though we are not in ludicrously-overspecc'd monster gaming PC territory! I mentioned my 2012-vintage HP Folio13 onto which I've managed to crow-bar a working version of Windows 11, despite its ancient and unsupported hardware: it manages on 8GB RAM, a 500GB solid state hard disk and a 2nd generation Intel i5, 2-core CPU running at a sedate 1.6GHz. That seems at least adequate.
2.0 Installing WSL2
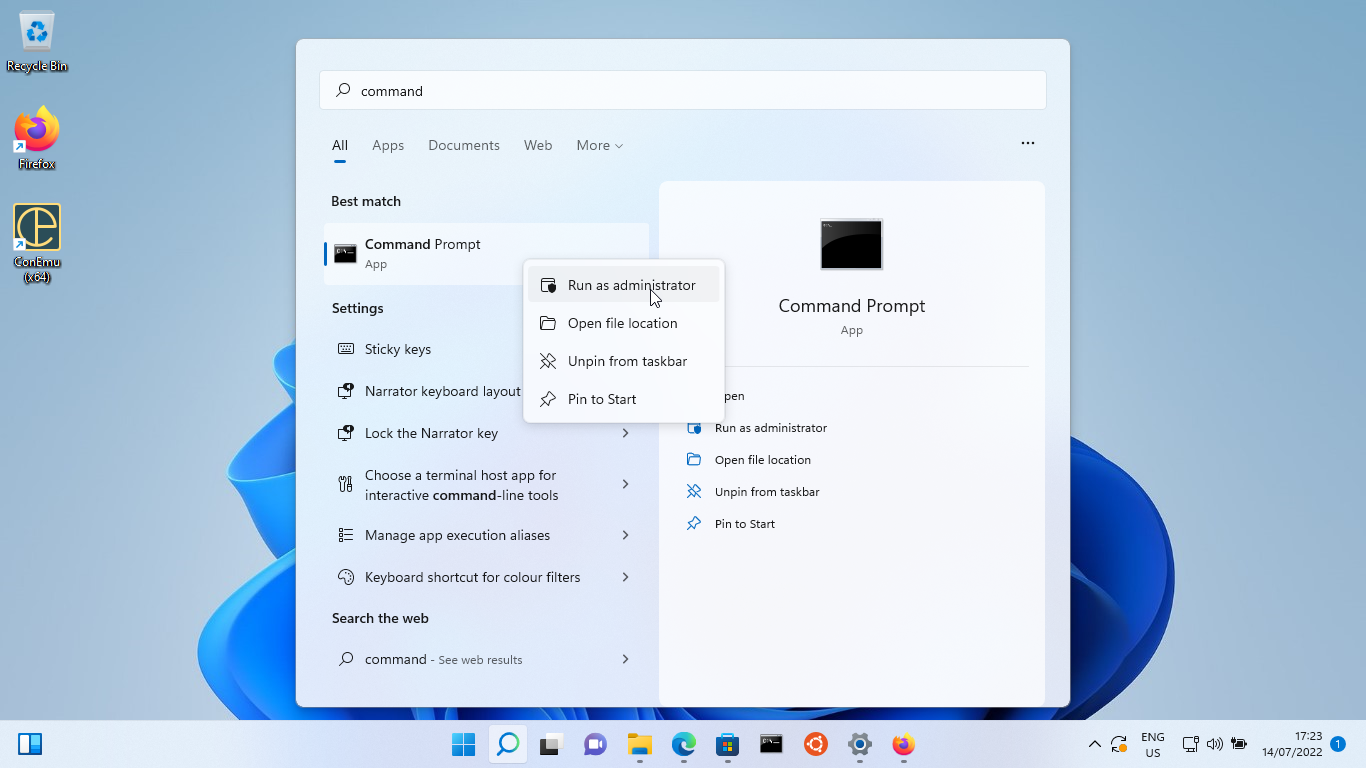
Before you can even think about running Semplice on Windows 11 then, you have to first install the Windows Subsystem for Linux itself. Fortunately, Microsoft has made this a walk in the park these days! Just open a command prompt window with Administrator privileges (so, click Start, search for 'command', then right-click the Command Prompt item and select Run as administrator):
In the command window that then appears, type the command:
wsl --install
This triggers quite a lot of activity, including downloading a complete copy of Ubuntu:

Note in particular the mention of 'GUI App Support has been installed': it's this message which tells you that you're actually installing WSL2g, where the 'g' indicates baked-in support for graphical and audio Linux apps to run in a Windows environment.
Once the Ubuntu download is complete, you'll see a message that reads, "The requested operation is successful. Changes will not be effective until the system is rebooted." So, reboot your PC when you're ready.
When you log in after the reboot, "things" start happening automatically! To begin with, you'll find a command-prompt-lookalike window appears, though it's got an Ubuntu roundell as its logo in the title bar and task bar:

This installation process takes a few minutes and ends with you being prompted to create a new UNIX account (note to Microsoft: Linux isn't actually UNIX, so there's a terminological inexactitude at this point, but whatever...):
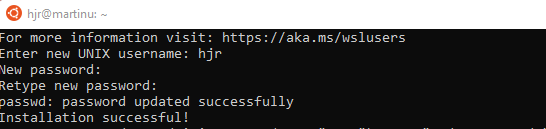
The account you create at this point doesn't have to match or be the same as your Windows' username/password combo... but I usually make them the same anyway, for ease of remembering things! Once the password has been accepted, you will find yourself staring at a full-blown Linux command prompt, where you can type all sorts of Linux-y things:
![]()
...by which you will swiftly learn that though this is 'proper' Ubuntu, it's using a special 'Microsoft WSL2' kernel. It's a technical detail which needn't detain us now, but it's interesting.
3.0 Post-WSL2-Install Steps
Once you've installed WSL2, you need to update it. At the Ubuntu command prompt, therefore, type:
sudo apt update && sudo apt upgrade
A lot of software download will then take place, followed by a long process of updating hundreds of packages. Give it time and let it complete.
Once it does, I would also take this opportunity to issue this command:
sudo apt install x11-apps pulseaudio
...swiftly followed by:
xeyes
...which will appear to pause for quite a few seconds before displaying this sort of thing:
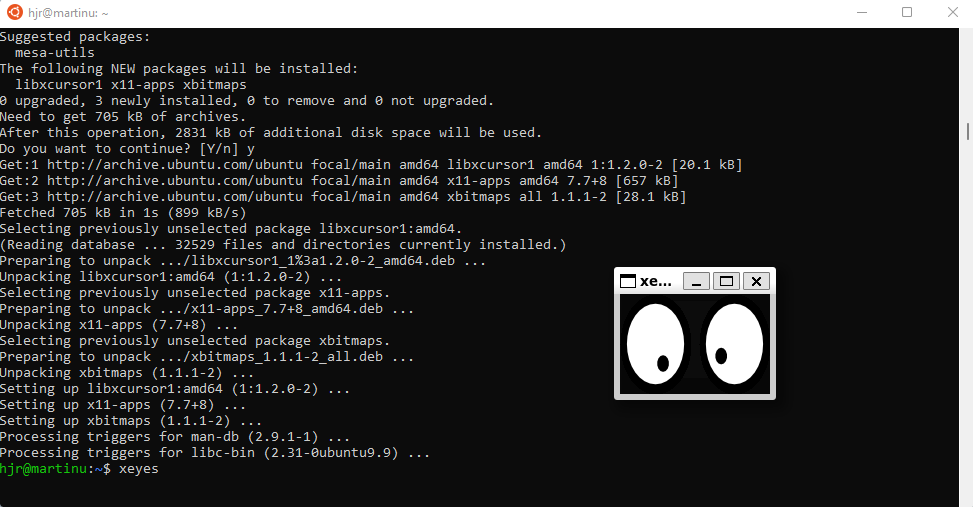
The pair of eyes is a Linux program running on the Windows desktop and, incidentally, interacting with the movements of your mouse around the Windows desktop: it's clever stuff, basically! Close the eyes when you're done proving that Linux graphical apps appear on the Windows desktop without you having to install third-party X servers.
Now, you should reboot your Ubuntu 'virtual environment' so that the software updates we applied earlier actually take full effect... but you can't reboot WSL2 by typing 'reboot' at the Ubuntu command prompt! You'll get an error message about 'System has not been booted with systemd...' if you try! Instead, to reboot a WSL2 virtual environment, you open a Windows command prompt window (administrator rights are not required) and type:
wsl.exe --shutdown
To then simulate powering on your Ubuntu PC once more, you simply click Start -> Ubuntu, and that will re-open the Ubuntu command prompt window afresh.
4.0 Installing Semplice
At your freshly-rebooted Ubuntu command prompt, type this command:
wget https://absolutelybaching.com/abc_installer
That quickly fetches a tiny (3KB) text file from this website's servers. You then run it as follows:
bash abc_installer --semplice
That will trigger a further software download and a prompt for your password to grant sudo privileges:
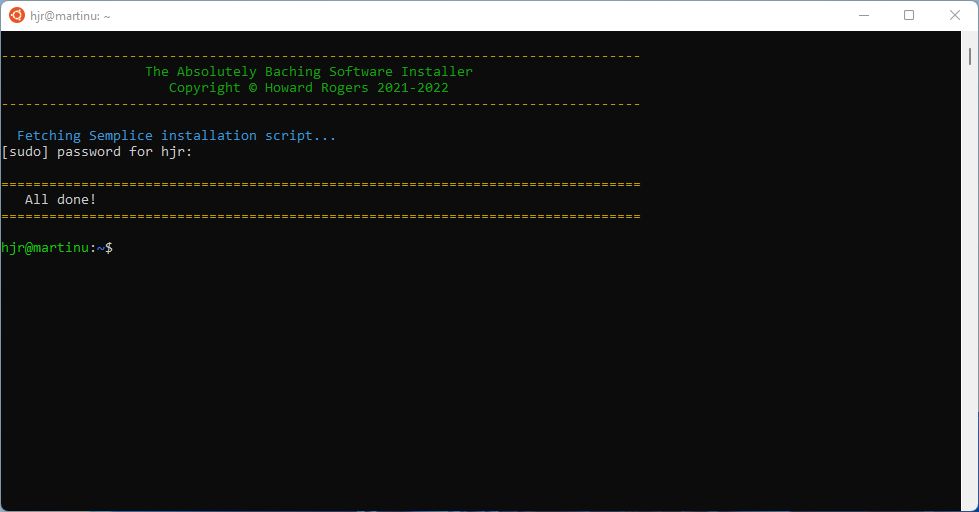
And that's really all that's required to install Semplice! Next, we have to launch it and navigate one or two extra steps to get it running!
5.0 Running Semplice for the first time
To run Semplice for the first time, just type the command:
semplice
This will trigger the appearance of a rather fierce-looking wall of red error message text:
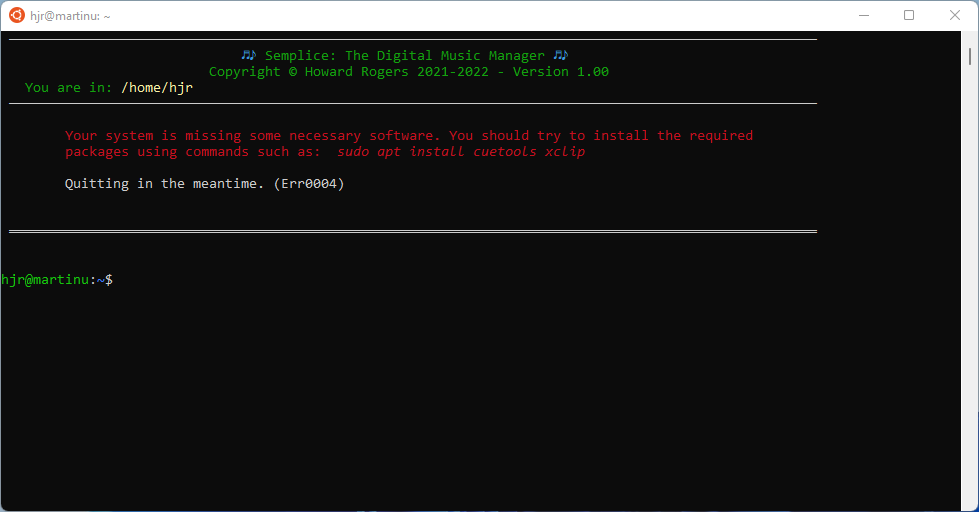
On its first run, Semplice does a software inventory of whatever Linux environment you're running in and has concluded that your newly-minted Ubuntu environment is missing a couple packages that it will need. The precise nature and number of the list of 'missing' packages will depend on what other software you already have installed in your WSL2 environment. The above screenshot, for example, only lists two packages -but I've previously installed Giocoso in this WSL2 environment, and meeting Giocoso's software dependencies meant I installed a ton of audio- and media-related software already. So, mileage will potentially vary... but in any case, even at its worst, the extra software required to be downloaded and installed will be mere tens of megabytes big, not hundreds or even thousands!
Note that Semplice displays the command needed to install the missing dependencies for you, in italics. If the list of missing packages is long, the command will break over multiple lines: you cannot just copy and paste those lines to execute the command, since that will introduce line breaks into the proceedings. For the installation command to work, it needs to be submitted as a single command, with no line breaks. You can achieve that by carefully copying-and-pasting each line of displayed red text onto the next command prompt separately, until an entire single-line command has been created from it. Or, you could just type the whole thing out afresh as a single-line command.
However you choose to do it, issue that installation instruction as a single-line command:

Here, I just typed the red italic text afresh onto the next functional command prompt. Press [Enter] to submit it and Ubuntu works out where to fetch the software from and how big it will be to download (in my case, about 429KB -so not exactly Internet-breaking quantities of data!). You'll be prompted to continue; you may also be prompted to supply your sudo password, depending on how recently you supplied it to install Semplice, back in Section 4.
Once the software dependencies have been installed, you can run Semplice once again (with the bare command semplice, of course):
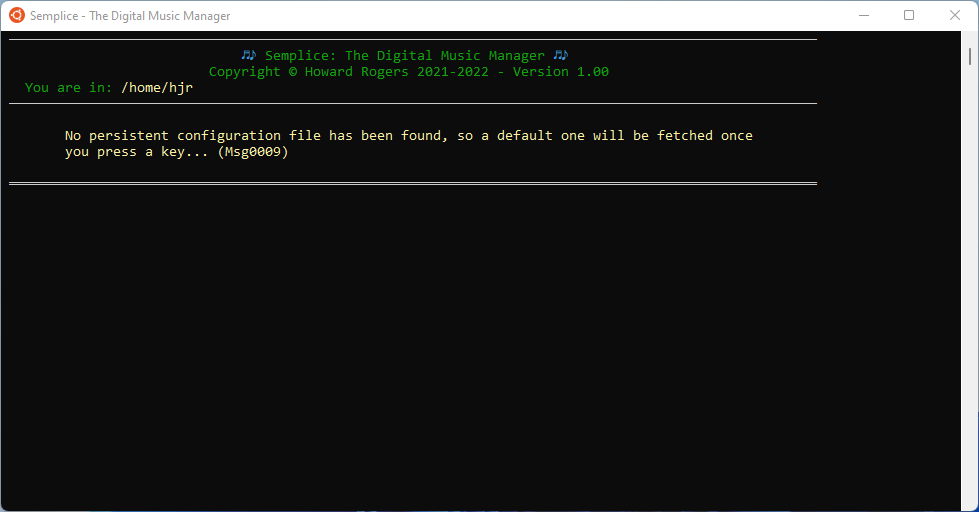
At this point you are met with a yellow warning message to say that a required 'persistent configuration file is missing': this is not a surprise, as the abc_installer program doesn't create one! So, the first time you run Semplice after the software dependencies are met, the lack of a persistent configuration file will prompt Semplice to simply download a generic, default one from this website's servers. You just press a key to make the download happen (which takes fractions of a second to complete, because the plain text file is tiny). As soon as the configuration file has been downloaded, the screen will change to show this:

...and that's Semplice running in all its glory in a Linux environment running within a Windows 11 operating system.
6.0 Visual Tweaks
You might notice from that last screenshot that the Semplice main menu doesn't really fill the terminal window very well: there's lots of empty space off to the right... and there seems to be an extra dollop of wasted space underneath Semplice's final double underline.
You can, of course, also suffer from the opposite problem:
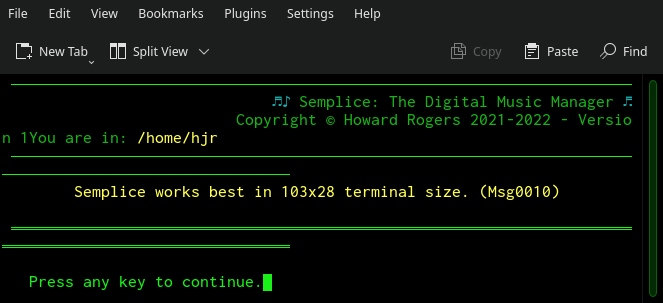
If your terminal window is too small, then the program display will be badly mangled: horizontal lines will wrap onto multiple lines and text will similarly wrap, unintelligibly, onto multiple lines. As you can see, however, if the terminal is too small, at least Semplice will warn you about it: the message is only in yellow, so it's not a fatal error and if you just press a key, the program will continue to run (probably unintelligibly and definitely looking very ugly... but it will run!).
Ideally, however, to avoid problems of wasted space because the terminal is too big, or garbled text because it is too small, you should set your terminal size to the dimensions mentioned in that yellow warning message: 103 characters wide, by 28 lines tall. In Windows, you can achieve this by right-clicking the little Ubuntu roundel that appears in the very top-left corner of your Linux/Bash terminal window and selecting 'Defaults' from the context menu that appears. Switch to the Layout tab when the Console Windows Properties dialog box then appears:
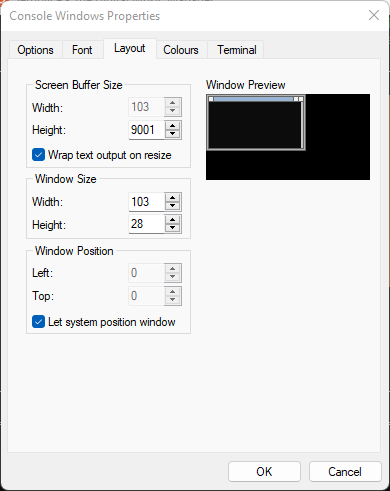
Here, I'm setting the 'Windows Size' numbers to be 103 and 28 for Width and Height respectively. If you want to change colours, fonts, windows positioning and so on: these are also things you can fiddle with at this point, by clicking around and seeing what settings are available. When you're done, click [OK] and then any future Console windows you open will adopt the new settings as their own. Here, for example, is Semplice running in a new Console window after setting the 103x28 dimensions:
...and hopefully you can see that it's now much more nicely displayed, with no spare space to the right or below. As mentioned, Semplice will quite happily run in a console window of any size, but smaller than 103x28 and things will wrap horribly, whilst larger than those sizes will just waste space.
7.0 File Access
I thought I'd conclude this very long article by a quick look at how you 'map network drives' inside a WSL2/Ubuntu environment -simply because I myself never store my music on my main PC, but instead access it over the home network. Thus any Windows PC running WSL2/Ubuntu won't have any local FLAC files to play and will instead need to find them on a remote server.
More fundamentally, the question is 'how does the Ubuntu environment see what the Windows PC knows about' (and a related question is how you can see the Ubuntu environment's folders from Windows)?
7.1 Local Files
Let's start with the simplest case: how can you see your Windows PC's C: drive from within the Ubuntu environment? That one's easy: it's accessible from Ubuntu's /mnt/c folder:
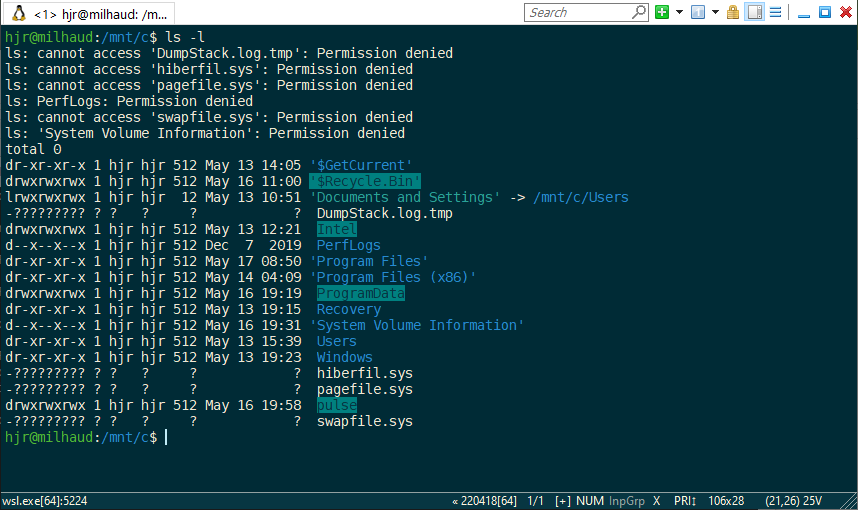
Ignore for the moment the various 'permission denied' errors in that lot of output: take a look instead at the list of folders displayed there. Do they look in the least bit familiar? How about now:
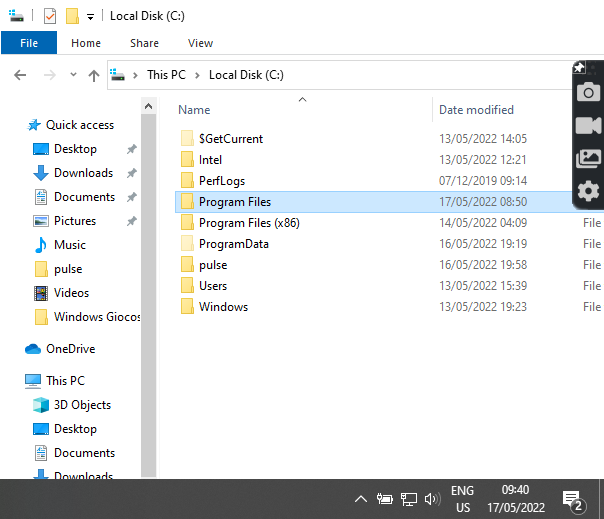
And hopefully you will be able to recognise that the listing of /mnt/c in the Ubuntu environment exactly corresponds to the contents of your C: drive on Windows.
If you wanted Semplice to process some music you had stored in your Music folder on Windows, therefore, you'd simply navigate inside Ubuntu to /mnt/c/Users/hjr/Music. (Though, obviously, if your username isn't 'hjr', you'd replace that bit with whatever is more relevant to you!)
For the record, you can do the same thing in reverse: if you open Windows Explorer (i.e., the File Manager) and type \\wsl$ in the address bar, you'd be able to navigate your way through the Ubuntu file system using a purely Windows tool:
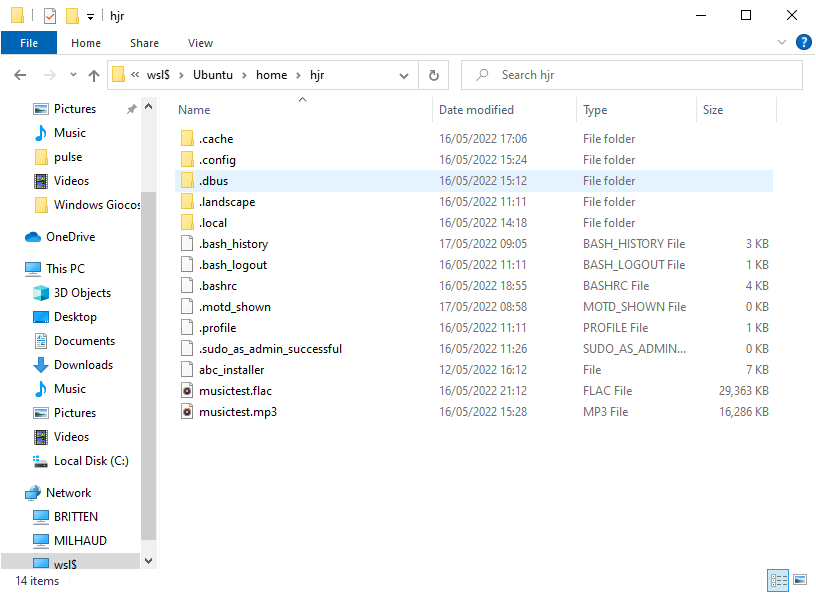
Hopefully, you recognise the contents of the main panel there as being what you'd expect to find in the /home/hjr folder inside my Ubuntu environment!
The point is that whilst we have two separate operating system environments -one Windows, one Linux running 'inside' Windows-, they both share the same file system and each can 'see' the other, though they remain distinct within their own folder structures. If you store all your music files on the C: drive, therefore, it's not going to be hard to get Semplice to 'see' them: you just tell it to play the contents of the /mnt/c/username/Music folder (or wherever is actually applicable).
7.2 Remote Files
What do you do, however, if your music files are stored on a remote server and you've mapped that 'share' to your Windows PC's M: drive, like this:

Here, I have a server called 'jsb' which I've mapped to my M: drive. All my music is thus accessible in Windows by visiting the M: drive and its various sub-folders. How can I get Semplice running in the WSL2/Ubuntu environment to see that M: drive? If you try visiting /mnt/m inside Ubuntu, for example, you'll find that doesn't work.
Well, the quick fix (which won't persist between reboots) is to issue this command from within the Ubuntu environment:
sudo mkdir /mnt/m && sudo mount -t drvfs M: /mnt/m

Here you see me first listing the contents of the /mnt folder inside the Ubuntu environment: the C: drive mapping is listed (along with a 'wsl' one, which is of no interest), but there's no M: drive. So I issue the above command... and all of sudden, a new listing of /mnt does show an M: drive, and I can 'cd' into it and list its contents, too.
The command is actually in two parts: the 'mkdir' makes a new /mnt/m folder permanently... but it will be merely an empty placeholder at this stage. The second part then mounts or maps the Windows' M: drive to the empty placeholder folder -and thus makes it appear to contain the same contents as the Windows' drive.
As I say, this will grant you temporary access to a mapped network drive. Reboot your PC or restart your WSL2 environment and though the /mnt/m mount point will still be there as a folder, its contents won't be.
The persistent fix, therefore, is to issue this command from within your WSL2/Ubuntu environment:
sudo nano /etc/fstab
...and then add this line to the end of the existing file:
M: /mnt/m drvfs defaults 0 0
...which is simply another way of saying 'please make my Windows M: drive appear at the /mnt/m mountpoint I created earlier'. Because that request is in the fstab file, however, it will be re-executed automatically every time the Ubuntu system re-initialises: your /mnt/m folder will therefore automatically and always contain the contents of your Windows' M: drive.
8.0 Next Steps
Once you've got Semplice installed and displaying itself correctly in a window of the appropriate size, you will probably want to test it out and see what it's capable of. For that, you'll need to 'cd' to a folder containing at least one FLAC file, and then start taking any of the numbered menu options on display. It's important that at least one FLAC file is present when you start taking Semplice menu options, because if there's nothing to tag, volume boost, combine into a SuperFLAC or split out into per-track FLACs, Semplice really has nothing to do! It will warn you of this fact, too:
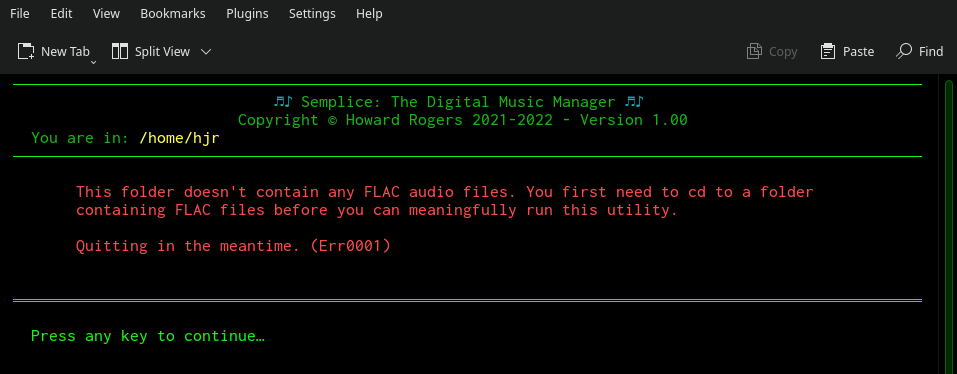
That's me trying to tag some music with a Composer tag by taking Semplice menu option #1... and clearly the program has spotted that there's nothing much to tag! When you press a key when prompted, you'll be dumped back out to a command prompt, from where you can issue appropriate 'cd' commands to navigate to a folder-full of FLACs.
9.0 Conclusion
Summarising all of the above, then:
- The Windows Subsystem for Linux (WSL2) on Windows 11 means you don't have to worry about installing third-party audio or graphical servers on Windows for a Linux virtual machine to talk to: it's all baked-in and ready to run by default (unlike on most Windows 10 installations at the time of writing, for example)
- Installing WSL2 is a simple one-line command: wsl --install
- Semplice is then installed within Ubuntu by downloading the abc_installer script and running it with the --semplice runtime parameter
- On first run, Semplice will prompt for installation of extra software within the Ubuntu environment
- On second run, Semplice will download a persistent configuration parameter file when you press a key at the relevant prompt message
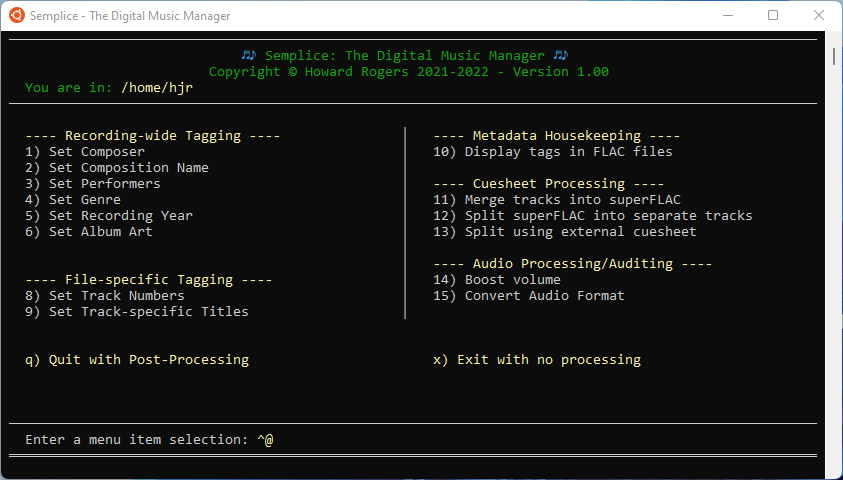
- Once the configuration file is successfully downloaded, Semplice will display its 16-numbered options main menu -ideally in a console window that has been sized to 103x28 (width x height)
- Semplice cannot, however, actually do anything useful unless the folder it's launched from contains one or more FLAC files
- Anything that's stored locally on your Windows PC is accessible directly from within the Ubuntu environment at the /mnt/<drive letter> folder