 1.0 Introduction
Manual tagging with Semplice Version 2 means using five distinct menu options to achieve in five separate actions what the auto-tagging option performs in a single walk-through of five sequential wizard screens. You would choose to do things this way, rather than step through the auto-tagging wizard, when you know precisely what specific adjustment to tags you want to make, or when the auto-tagging wizard would make (or has made) an incorrect automated choice for you. For example: if you wanted to edit the contents of the Recording Year tag because you'd got it wrong earlier, it would be a bit daft to go through five pages of a wizard to make the one, very specific, correction: instead, you'd take Tagging menu, Option 2 and adjust the one tag directly, job done. Or consider the case where the auto-tagging wizard has just numbered all the tracks on the second CD of an opera set from 1 onwards: you really want CD 2's tracks to be numbered from 18 onwards, so they follow on seamlessly from the first 17 ripped from CD 1. The auto-tuning wizard always numbers from 1 onwards, but starting from 18 (or any other number) is precisely what taking the Tagging menu, Option 4 will let you do. Similarly, whilst auto-tagging will automatically embed album art if it's present in the same folder as the FLACs being tagged, Tagging menu Option 5 will let you point to a piece of cover art found anywhere on your hard disk: the manual tagging equivalent has just a bit more optionality and customisability than its auto-equivalent.
The main organising principle to grasp when dealing with the multitude of manual tagging options is: does the tag you're about to set apply to all tracks at once, or are they track-specific. Things like the name of the recording ("Symphony No. 7 (Bernstein - 1967)" for example) would obviously apply equally to all four tracks that are part of that symphony. But "Allegro con brio" or "Adagio" would be track-specific titles. Likewise, track numbers affect each FLAC in a folder differently, whereas embedding album art means all FLACs in a folder get 'hit' with the same artwork at the same time!
Here, I'll step through each of the manual tagging options in turn and explain what each does. Note that you need to be physically in, or to have actively selected, a 'working folder' before any of these options will work correctly. That means either cd-ing to a folder full of FLACs and launching Semplice from there, or to tap 'W' and use the resulting folder navigation dialogs to choose a working folder that contains some FLACs. Do one or other before attempting to tag things which Semplice cannot actually 'see', please!
2.0 Set Recording-Wide Tags
When you take Tagging menu, Option 2, you'll first be prompted with this message:
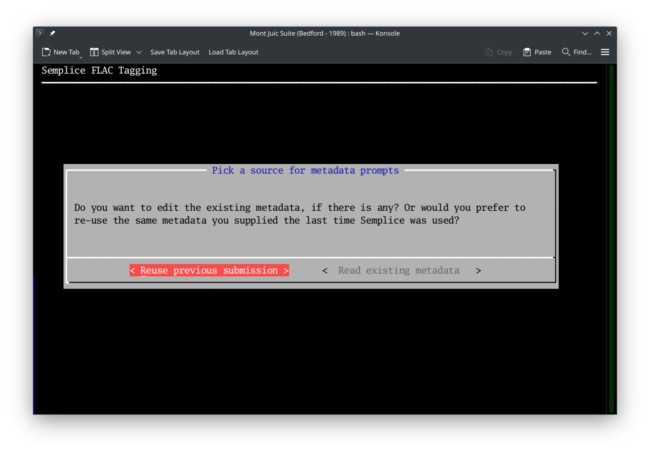 You are asked to choose whether the next screen should display metadata read from the first of the FLACs in the working folder, or if the metadata you supplied when last using Semplice should be displayed instead. You'd select the 'Reuse previous submission' option if you were, for example, tagging the second symphony ripped from a CD: you've probably already spent time carefully tagging the first one and nearly all the details for that first symphony would apply unchanged to the second, so it would make sense to re-use that first symphony's metadata as a template or model for this second symphony. By contrast, you'd use the 'Read existing metadata' if your previous Semplice session had been spent tagging up, say, an opera that had no relationship at all with the new string quartet you're now moving on to tag: the previous session's metadata would be useless for the new recording, and the new recording may have some usable metadata already in it (depending on where you bought it from, I guess!). Pick one of these options and press [Enter]: for the sake of demonstration, I'll choose the 'read existing metadata' option:
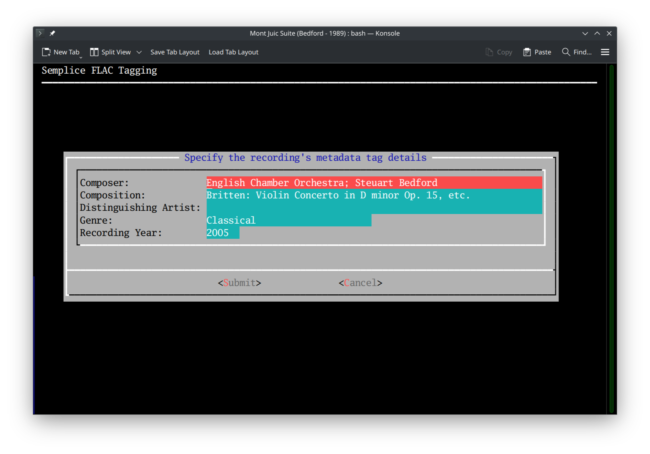 Now you see the point of making that earlier choice. The form displays five 'canonical' tags that you need to supply appropriate data for ...and the fields have been filled in with data that may or may not be useful to you: the source of that data is what you previously chose. In this case, Naxos or Prestoclassical have embedded some metadata of their own devising in my FLACs and thus the 'read existing metadata' option has populated as many of the fields as it can by reading it from the first of the FLACs in the folder.
Note that if the 'from existing metadata' option is taken and there is literally no metadata available in the FLACs to read, then Semplice will invent some, if possible, from the physical folder name. Remembering from Axiom 17 that your physical folder names should in some way mirror the logical structure of your music collection, Semplice assumes that the name of the working folder currently in use will at least approximate the Composition name, so will fill that field in for you from that. If your physical folder name happens also to contain the other components of the extended composition name (i.e., distinguishing artist surname and recording year), then those two bits of information will be extracted and displayed in the relevant data entry fields, too. The presence of actual metadata for any of these fields, however, stops Semplice's game of 'let's guess from the folder name' in its tracks!
You will note that none of the existing metadata makes much sense, however! The 'Composer' field has been filled with details about the orchestra and conductor performing this piece. The 'Composition' field has been filled in with a hopelessly vague description of the main work on the source CD which happens to be precisely not the work being tagged! (The actual work name is shown in the previous screenshot at its very top, in the title bar of the Semplice window: Mont Juic Suite). This is, unfortunately, likely to be the case for any freshly-bought FLACs, because record companies don't understand how to tag classical music properly! The 'Composer' field for Semplice is the same as the ARTIST tag: and, clearly, Naxos or Prestoclassical think that the ARTIST tag is where the names of the performing artists on the recording should go. That's really a consequence of my Axioms of Classical Music Tagging, in which Axiom 2 says that the COMPOSER tag and the ARTIST tag should be identical for classical music: clearly, Naxos isn't a fan of that idea, but that's how Semplice was written. Fair enough: we can disagree on that nuance... but there's really no excuse for tagging this music with the meaningless genre of 'Classical' and getting the recording year wrong (whenever it was re-packaged, it was recorded in 1989)!
Anyway: we tried! We got Semplice to display the existing metadata in the hope that it would be at least partially useful... but it isn't. There's nothing for it than to use Ctrl+U to clear each field in turn and type in fresh metadata from scratch:
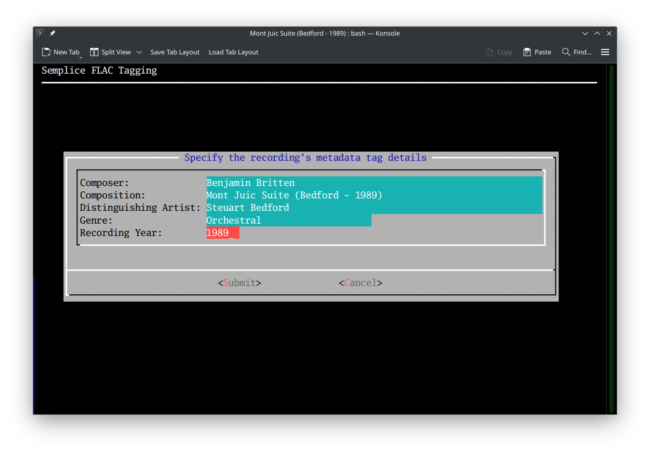 The one data entry field that might puzzle you here, I think, is the 'Composition' one: if it's a recording of the Mont Juic suite, why has it got 'Bedford' and '1989' in brackets after it? Well: this is an example of the extended composition name, as explained in Axiom 5. I might have many recordings of the Mont Juic suite: how do I tell this recording of it apart from any of the others? The answer is to say who is conducting (or performing) in this recording, which is likely to be distinct from those other recordings. Steuart Bedford is thus the performing artist that distinguishes this recording from any other -which makes 'Bedford' the surname of the "distinguishing artist". In different contexts, however, even the conductor's name doesn't make things unique: Karajan recorded Beethoven's 5th at least three times, so how to tell each of his recordings apart from each other? The year in which they were recorded is the uniquely-identifying factor there... and hence the extended composition name takes the form "regular composition name + bracket + distinguish artist surname + hyphen + recording year + bracket", exactly as you see it here.
Other than that, just note that though the various fields are quite short to look at, they'll accept practically indefinite entries: each can be up to 4GB in size, technically!
You can up- and down-arrow to move between fields as you feel the need; you use right- and left-arrows to move within the text visible in any field. I've already mentioned Ctrl+U to wipe out the entire contents of a field; you can also use the [Delete] and [Backspace] keys to delete individual characters within a data value. Press the [Tab] key to move between the data entry area and the Submit/Cancel buttons area. Press [Enter] when either the Submit or Cancel button is highlighted in red to perform the appropriate action -though note you can actually mouse-click either button to achieve the same outcome, too.
If you click Cancel, your data entry up to that point is lost and nothing is written to the FLAC files: you are returned to Semplice's Tagging menu without any file alterations having been made at all. If you click the Submit option, however, then your data is saved to memory -but not yet written to the FLACs themselves (so, if you accidentally press [Submit], you can then press Ctrl+C to terminate Semplice entirely, and your FLACs will still not have been altered).
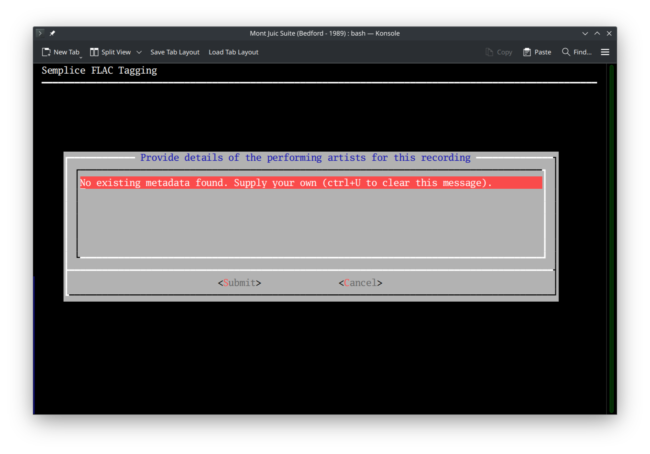
The Submit option does, however, trigger the display of this new screen:
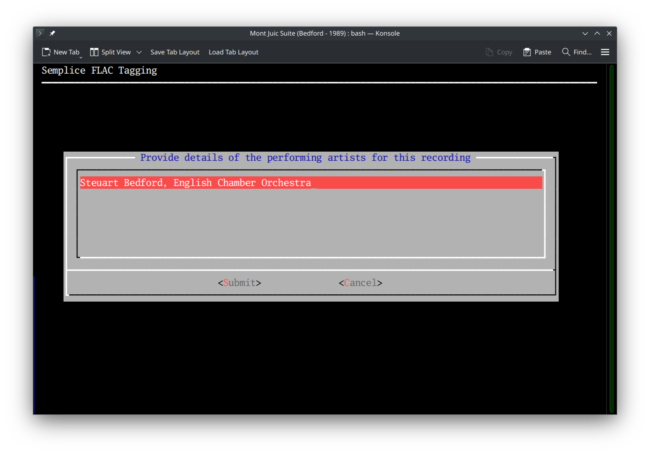
If the FLAC had contained metadata in the COMMENT tag, that would be displayed to you here. In my case, no such metadata was found to pre-exist, so a message to that effect is displayed instead. As it says, press Ctrl+U to clear that message out and start typing new metadata from scratch. As the dialog itself says, you should supply performing artist details here, in accordance with the provisions of Axiom 3. Ideally, this means you type in conductor, orchestra, choir and soloists in that order as a comma-separated list, missing any of those components when not appropriate. If there is no choir, for example, leave it out; if there are no soloists worth mentioning, don't mention them:
Again, the text you enter can be up to 4GB in size. It can, though is not recommended, to contain carriage returns (i.e., forced new lines) and blank lines. You can arrow left and right through the text to make edits at any time; the delete and backspace keys can be used as needed. Tab round to the Submit/Cancel area and if you click Cancel, your entire data entry up to this point (i.e., on both the five-fields screen and this one) will be lost and your FLAC files will be completely unchanged. Click Submit at this point, however, and all that data will be written at once to your FLACs, irreversibly.
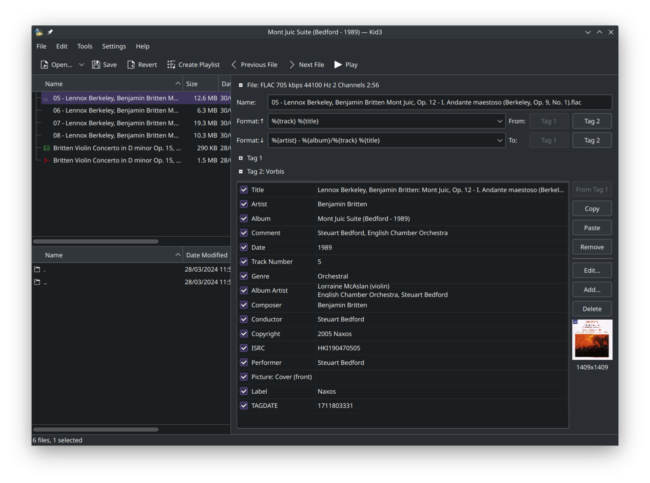
Here's the state of my metadata for this composition before I press Submit on the above form, therefore:
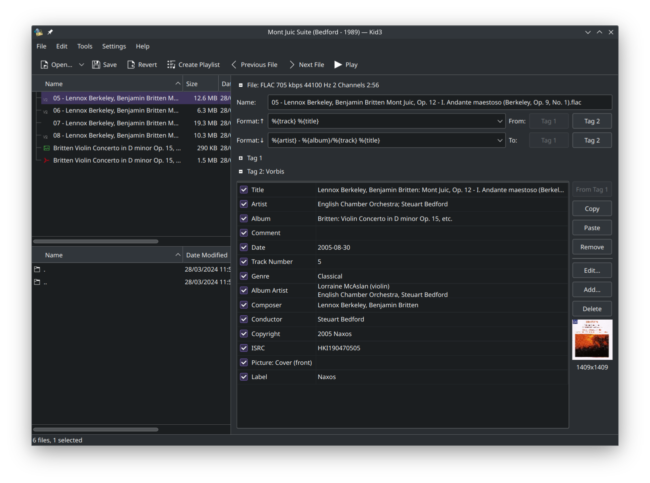 You'll notice that ARTIST still says 'English Chamber Orchestra' (instead of Benjamin Britten) and the recording year is still a full day/month/year in 2005, rather than a simple 4-digit year, corrected to be 1989: so you can see that nothing has yet been written to these files. Let me now click Submit on the previous Semplice screenshot, therefore:
Now, you can see that ARTIST is 'Benjamin Britten'; DATE is '1989', GENRE is 'Orchestral' and COMMENT is the 'Steuart Bedford, English Chamber Orchestra' entry I made on the second of the recording-wide tag entry screens above. We see evidence, therefore, that the new metadata has been written to these FLACs -though you might note, in the top left-hand corner, that the file names have not been touched and, specifically, the files start with numbers 5, 6, 7 and so on. You can also see that TRACK NUMBER is set to 5 for the first of these files: supplying recording-wide tag data does not change anything about the FLACs or their metadata beyond what you were prompted to supply, in other words.
3.0 Set Track Titles
As per Axiom 8, the only track-specific metadata that should be supplied are track number and track title. In the context of classical music, track titles are tempo indications or, in an opera or oratorio, a brief recitation of the opening words of the track. When you take Tagging menu, Option 3 Semplice will count the number of FLACs in a folder and present a data entry field for each one:
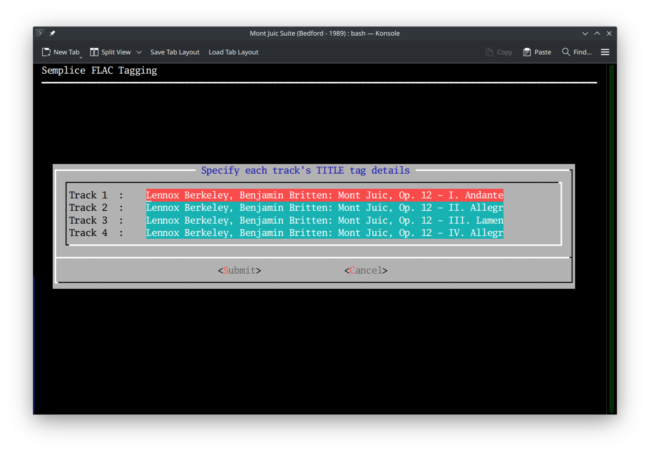 Once again, Semplice reads the metadata (if any exists) from each of the FLACs it finds in the working folder and presents it to you to be edited or otherwise knocked into shape. Note that there is no option to 'reuse a previous session's entry' at this point: Semplice considers the likelihood of it being useful to re-use a prior tagging session's track-specific data to be so low as to not bother with!
Data entry is as usual: Ctrl+U to wipe an entire entry field; right- and left-arrows to navigate within an entry; backspace or delete to remove individual characters from an entry; up- and down-arrow to move between data entry fields; tab key to switch between the data entry fields and the submit/cancel buttons. Your job is to make TITLE tags that conform to the precepts of Axioms 8 and 10:
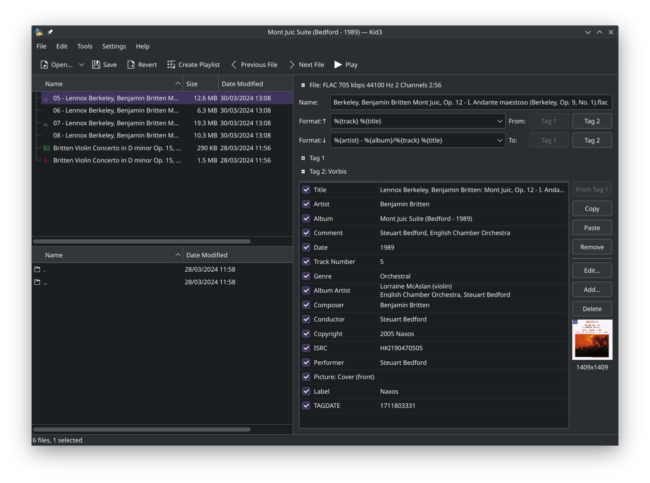
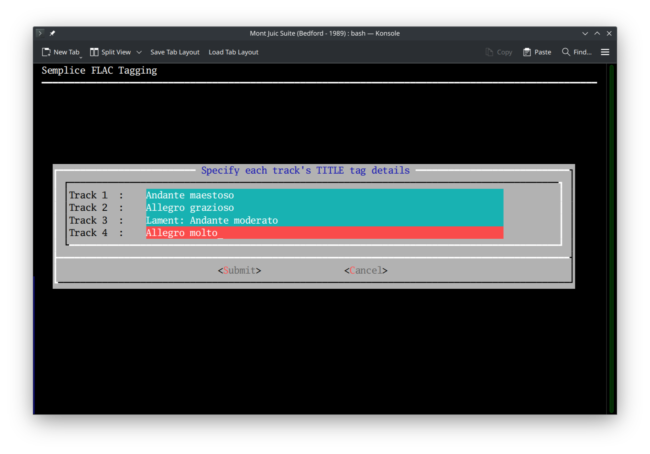 Just the musical facts, no movement numbers, no mention of data which is more properly thought of as 'recording-wide', such as composer names or performer details, and so on. If you click Cancel at this point, you'd be returned to Semplice's Tagging menu and no data would have been written to your FLACs. Click Submit, however, and some significant data modifications to your FLACs are made. Here are the files and their metadata before I click Submit:
 And here's what things look like after I click Submit:
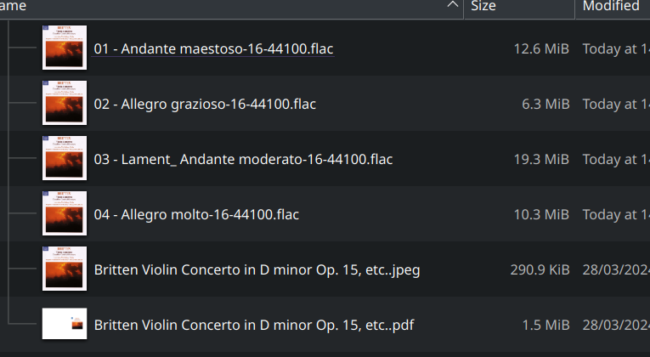
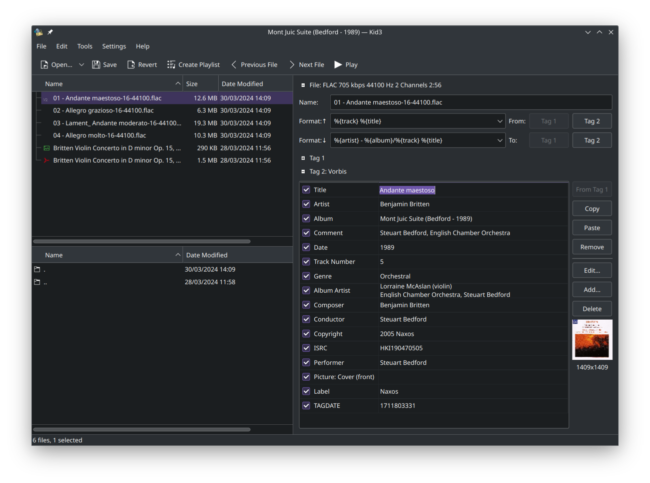 There are a couple of things to note here. Firstly, the TITLE tag is now a lot shorter than it was originally. Clearly, the 'minimal musical facts' that I entered on the per-track tagging form has now indeed been applied to the physical FLAC files. Secondly, however, look in the top left-hand corner of the screenshots: whereas before I was dealing with files called things like '05 - Lennox Berkeley, Benjamin Britten M...', I'm now working with files called '01 - Andante maestoso-16-44100.flac'. Writing TITLE tags triggers Semplice, in other words, to apply the TITLE to the physical file name itself ...and to start numbering the files in the folder from zero-padded 1 (that is, the first file here used to be called 05... but is now 01...).
You might notice, however, that this causes a bit of a problem, in that file 01 - Andante maestoso is still tagged as having TRACK NUMBER 5: that's because it was indeed the fifth track on the original CD. Semplice follows the precepts of Axiom 9, however, and insists that every recording's first file should be numbered from 1 onwards. We'll have to sort out the physical file number v. track number tag discrepancy later on (see Section 4 below).
Where did the '-16-44100' bits of the new file name come from? Well: it's optional, but when editing the Semplice configuration file (Miscellaneous menu, Option 1), you'll see a prompt for the question: Force filenames to display bitdepth/sample rate. By default, that parameter is set to 'no'... but if it's set to yes, then Semplice adds the technical characteristics of the audio signal contained within the FLAC onto that FLAC's file name. A standard audio CD contains an audio signal that is sampled 44,100 times a second, and each sample is represented by a numeric value that can be stored within 16 digital bits of data. Hence, standard audio CD is 16-bit, 44100 samples/sec. If your FLAC was ripped from a standard audio CD, it took will have a 16/44100 audio signal -and that's what Semplice has discovered and included in my file name for me. If I'd been dealing with a high resolution audio signal ripped from an SACD, on the other hand, I might well see '-24-88200' or even '24-192000' in the file names, since those sorts of sources sample their audio at much higher rates and store the sample value in 24-bit data. It's a good idea to set bitdepth and sample rate on for filenames, I think, for it then allows you to determine the source of your FLACs simply by looking to see if they are high resolution FLACs or not ...but the decision is ultimately yours.
4.0 Renumber Tracks
We just saw that physical files might well end up numbered from 1 onwards, whilst their internal, logical TRACK NUMBER tag is set to 5 or more (for example). This obviously needs fixing -and Semplice's Tagging menu, Option 4 lets you assign sequential numbers to your FLACs, starting from any arbitrary point. Once a new TRACK NUMBER tag has been applied, Semplice will bring the physical file name into agreement with it. Using this option is pretty straightfoward:
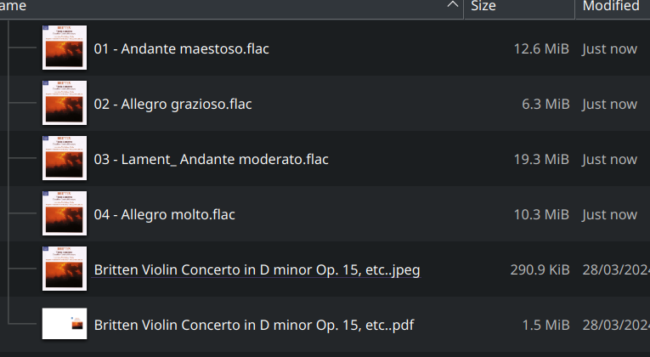
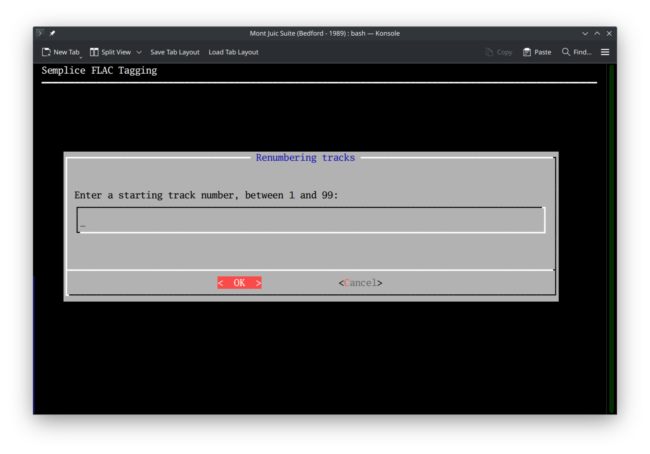 You are asked to type in a starting number: Semplice will increment it as many times as needed to get to the end of the FLACs in the working folder, and in each case (a) write the new number into the TRACK NUMBER tag; and (b) rename the physical file so that its name also reflects its new track number. If you leave the field blank and just click [OK] (or press [Enter]) without having entered a number where prompted, the number '1' is assumed. But you can explicitly type '1', as well. Or you can type any other number you like. Here's the situation before I press [OK] here:
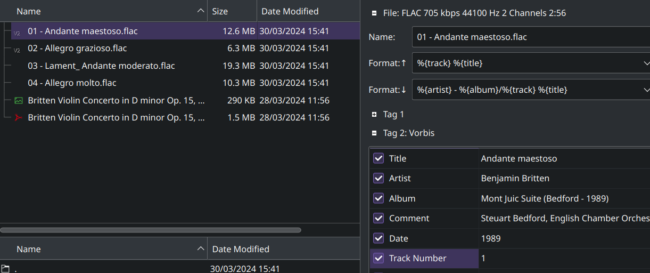
The file names are already 1, 2, 3 and 4...something-or-other, but as we saw at the end of Section 3 above, the internal TRACK NUMBER tags are still 5, 6, 7, and 8:
 So, I'm going to just clock [OK] on the new Semplice prompt and see what happens:
Well: these look identical to before, so the new numbering hasn't altered the physical file names at all, as they already were named starting at 1... though you might notice that the 'Modified' column in my file manager display now says 'Just now...' against each FLAC, rather than at some point 'Today'. That indicates that the files have undergone some sort of update or modification very recently. An inspection of the tags inside the files reveals what that modification was:
Now we see that the file names 01... has, indeed, a TRACK NUMBER tag of '1', too.
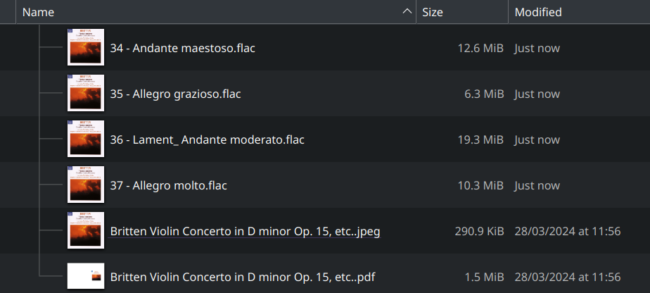
If I re-run this track numbering routine, this time I'll type something into the prompt:
 ...and now we see the new consequences:
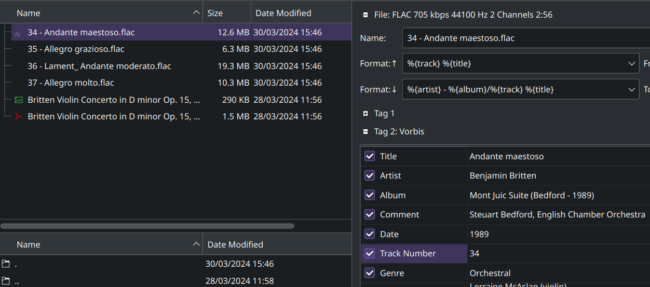
And internally, we see:
Again, we see that track numbering means the physical file name and the internal TRACK NUMBER tag are kept in sync. That's rather different to the Tagging menu, Option 3 which sets track titles. That does change physical file names to match the TITLE tags supplied and numbers files from 1 upwards, but changing the TITLE does not alter the TRACK NUMBER.
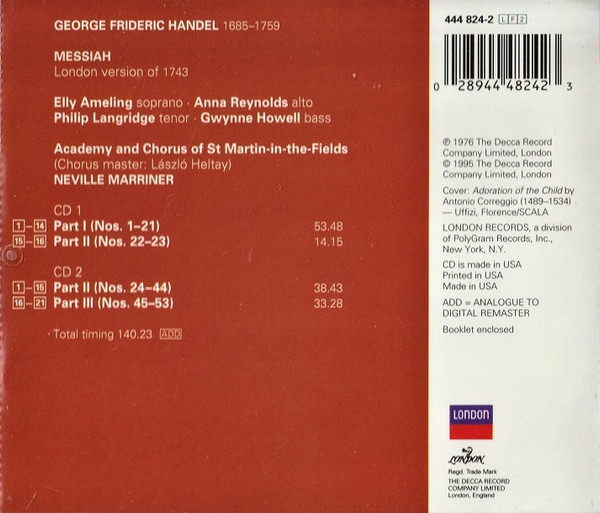
The ability of this menu option to number tracks from any arbitrary starting number onwards is important when you're ripping multi-CD recordings. On this recording of Handel's Messiah, for example:
...you'll note that CD1 contains tracks 1 to 16, and CD2 contains a further 21 tracks. If you used Semplice's auto-tagging option to tag up each CD in turn, you'd end up with a folder containing the first CD's FLACs with everything numbered from 1 to 16, which is fine. But the second CD would also be numbered 1 to 21 ...when, in fact, if the two sets of tracks are to share the same folder (because they're from the same composition and recording), the second lot need to be numbered 17 onwards. Only by using Semplice's Tagging menu, Option 4 can you assign track (and hence file) numbers 17, 18, 19 and so on. Tagging this CD would therefore be a multi-pronged exercise:
- Rip CD 1 into one folder
- Rip CD 2 into a second folder
- Auto-tag CD 1, using the 'read existing metadata' option
- Auto tag CD 2, using the 're-use prior session's metadata' option
- Correct the track numbers in CD 2's folder using Option 4's Renumber Tracks capability
- Move FLACs from CD 2's folder into CD 1's folder
And at that point, you'd have a single folder containing the whole of Messiah, with files which don't overlap each other and track number tags that don't repeat. Option 4's ability to renumber from arbitrary starting points is thus fairly important when it comes to cataloguing any multi-CD recording correctly.
5.0 Embed Album Art
Axiom 16 says that album art is important, should be large, good quality and embedded within the FLAC file it describes. Semplice's Tagging menu, Option 5 seeks to help make all that a possibility by letting you point to some piece of album (or cover) art in JPG or PNG format and writing that into the FLAC file itself. As part of that embedding process, too, Semplice will 'square up' artwork and resize it to be either 500x500 pixels in size, 900x900 pixels or 1400x1400 pixels, depending on the original size. If the original size is smaller than 500x500, then the image is simply squared up to whatever the largest dimension is (so, a 380x420 pixel image would become a 420x420 one).
Squaring the image means Semplice will distort it, because it doesn't preserve the image's aspect ratio, so it's best if the original imagery is square or nearly-square to start with. Take this real-life example:
It's clearly a good-quality but highly rectangular image: let Semplice do it's embedding tricks on this and it will end up as this:
...and to get it square, the image has been stretched in the vertical and compressed in the horizontal directions. This is probably the worst example I could think of coming from my own music collection, but generally, if you start with album art that's nearly square anyway, Semplice's adjustments are not going to be very noticeable.
Semplice only embeds JPGs or PNGs -but JPGs can have .jpg or .jpeg extensions: Semplice doesn't care either way.
If the Delete album art after embedding configuration parameter is set to yes, then the source image will be automatically deleted after the resized version of it has been embedded into your FLACs. That parameter is set to 'no' by default, however, so it won't happen unless you explicitly switch it on.
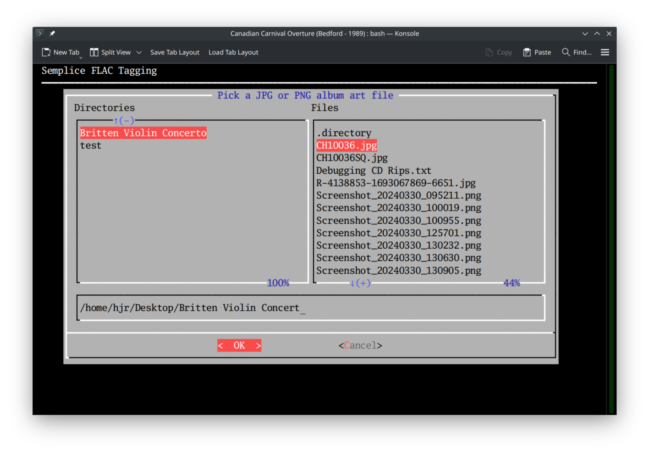
Once you take the Tagging menu, Option 5, you'll be presented with this screen:
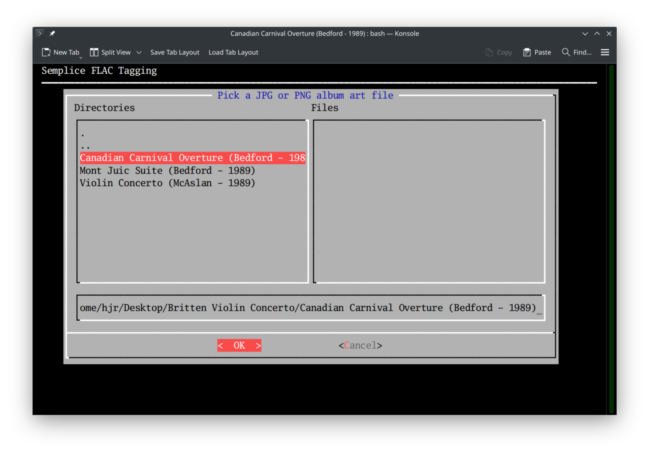 It's a fairly standard file-and-folder selection dialog, which always starts at whatever your working folder is currently set to. At the top, you have two panels: the left panel shows you folders, the right shows you files within folders. You can use the arrow keys to move up and down listed items in either panel. Use the [Tab] key to move between panels and the other components on the screen. When a folder is highlighted in the left panel, press [Spacebar] to select it and 'go into' it. If you need to back up out of a folder, it's simplest to just click in the long, horizontal panel of text that spells out the current folder and its full path and start deleting: the upper panels will dynamically change to reflect what the path in that horizontal area is displaying. Here, for instance, I have deleted the 'o' from the word 'Concerto', and the left-panel is therefore displaying the sub-folders of the /home/hjr/Desktop folder:
Anyway, by whatever combination of key-presses and typing you prefer, your job is to use the dialog to navigate to somewhere where you can point to a JPG or PNG image, which can be anywhere on your hard disk:
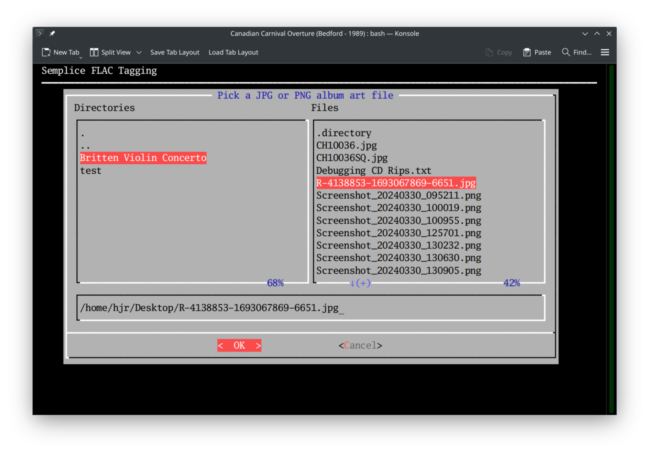 Make sure you actually press [Spacebar] when the JPG or PNG is highlighted in the right-hand panel: you want the horizontal panel's text to specify the complete path and filename of the image you're selecting. Here, you see 'R-413...jpg' does appear, spelled out, in the horizontal panel, so I'm good to click [OK] (or press [Enter]). If I were to click [Cancel] (or select it with arrow keys and [Tab] presses and then press [Enter]) I would be returned to the Semplice Tagging menu, with nothing having been written to the FLACs in my working folder.
As soon as you have selected a valid PNG or JPG image and pressed [OK], it is physically written into every single FLAC in the current working folder in turn. If the 'delete album art after embedding' configuration option has been turned on, the source image is deleted off your hard disk automatically, no matter where it resides on that disk. Once all writes to FLAC have completed, you are returned to the Semplice Tagging menu.
The key difference between manually tagging FLACs with artwork using this Tagging menu, Option 5 and doing it via auto-tagging (Option 1) is that Option 5 lets you point to artwork stored anywhere on your PC's locally-attached storage: auto-tagging only uses artwork stored within the working folder itself.
6.0 Set Custom Tags
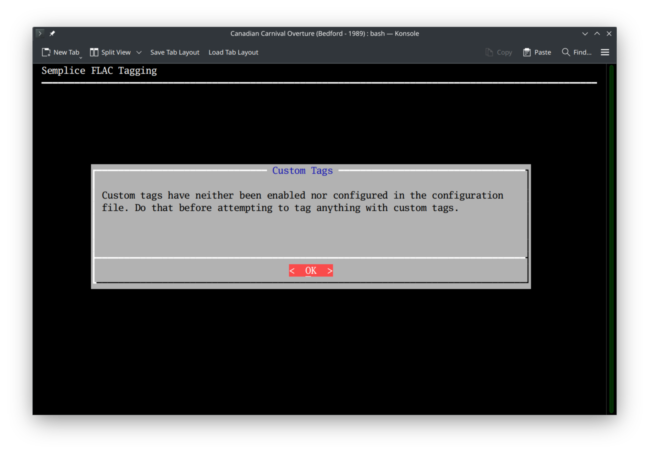
As I mention in my Axioms of Classical Music Tagging article, I strongly discourage the use of custom tags (i.e., up to nine 'non-canonical' tags used to store data that you find useful but which no-one else on the face of the planet is!), and the Tagging menu, Option 6 will, when taken, usually only display this message:
This tells you that (a) you have to enable the use of custom tags in the first place; and (b) you have to configure what custom tags you want to use before you can actually use them. Click [OK] here to return to the main menu.
Configuring Custom Tags is done in the Miscellaneous menu, Option 1: Edit Configuration File:
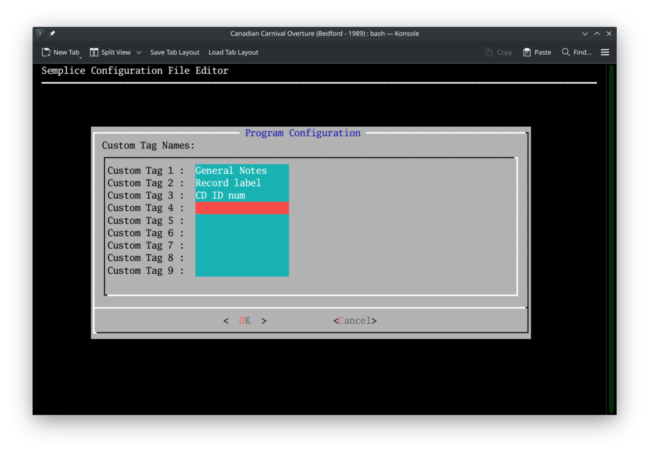
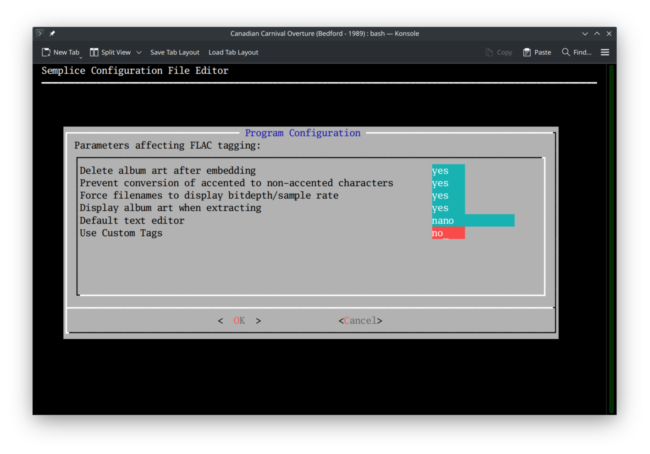 At the end of the second page of configuration options, you'll see the last item is simply labelled 'Use Custom Tags', to which you answer yes or no. The default is 'no', so you need to deliberately change that here before pressing [Enter]. Do so, however, and you'll immediately be taken to this screen:
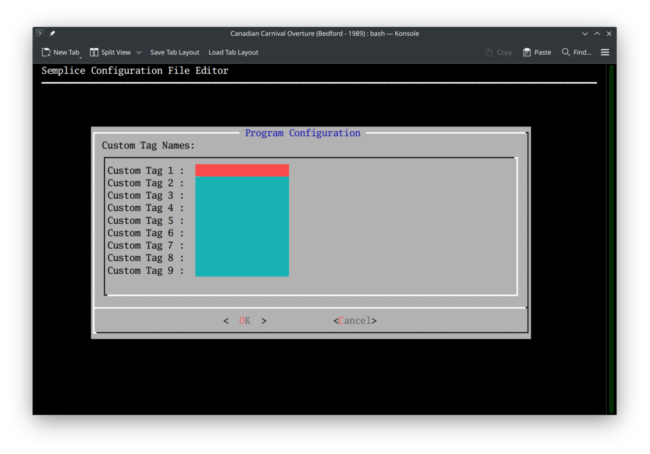 Here, you set up the names you want to see used for your custom tags. These names need to be short (ideally less than 15 characters) and space-less: if you enter one called 'General Notes', for example, Semplice will automatically convert that to be GENERAL_NOTES, all in upper-case and with an underscore replacing spaces. You might, for example, type things in like this:
Submit that lot (by pressing [Enter]) and then complete the rest of the configuration wizard, when you finally get back to taking the Tagging menu, Option 6, this time you'll see this sort of thing:
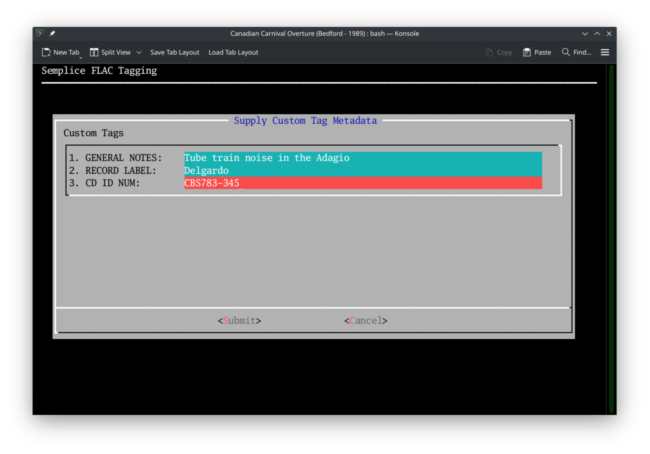 ...and now you see the 'labels' that you created in the configuration wizard are now presented as upper-case prompts, for each of which you can supply a value. Click [Submit] and those values are written back to the FLACs in the current working folder, in the usual way. An inspection of the tags inside a FLAC (using a tool such as kid3) will reveal this sort of thing:
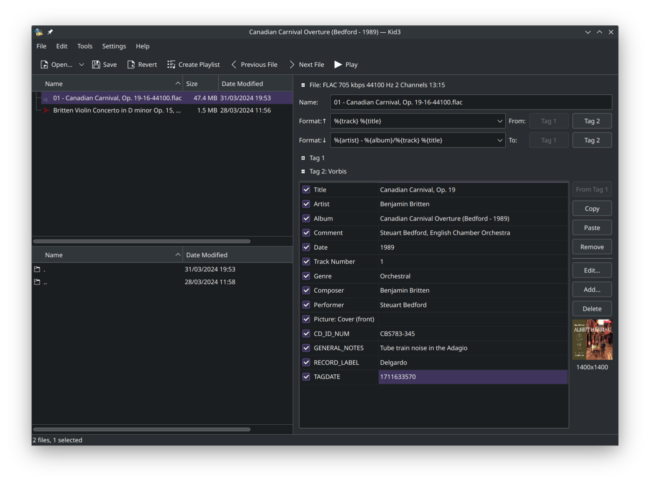 Here's where you see that, though Semplice displays the custom tag prompts with spaces, in reality they are embedded within the FLAC with underscores (look at 'CD ID NUM', for example, and see how it is stored as CD_ID_NUM). Similarly, where I had originally said 'General Notes' in mixed case when editing the configuration file, you can see from above how it has been stored as GENERAL_NOTES, all in upper case.
Whereas the names of the custom tags you want to create need to be kept short and sweet, the values you can assign to each of them can be up to 4GB of text ...which is about 1000 times the amount of text in the complete works of Shakespeare, so you shouldn't lack for anything in that regard!
There are several warnings to be made about using custom tags, though. Firstly, once they are set to be on, you shouldn't unset them -not without accepting that data loss will result. In other words, when Semplice 'tag cleans', it eradicates tags it thinks shouldn't be associated with a FLAC. If the 'Use Custom Tags' configuration setting is 'yes', then Semplice will not clean out tags which are part of the set of configured custom tags. But if you set 'Use Custom Tags' to 'no', then Semplice will regard previously-configured custom tags to be now 'not acceptable' and will wipe them from your FLACs the next time they are cleaned by it.
Secondly, if you configure 'Custom Tag 1' to be 'General Notes', it's important to never change that to mean 'Key signature' or something equally custom! Changing the tag name or prompt doesn't change the content of the data associated with that tag, but will mean old data is vulnerable to permanent loss and will become at least temporarily invisible to boot. For example:
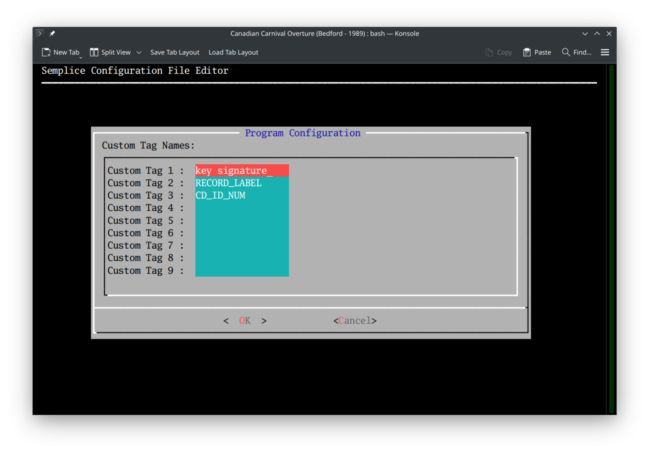 This is me deciding to re-configure my earlier custom tags: I'm changing the 'label' associated with Custom Tag 1 so that it now prompts for 'key signature' not 'General Notes'. When I take Tagging menu, Option 6 after completing this configuration change, I see this:
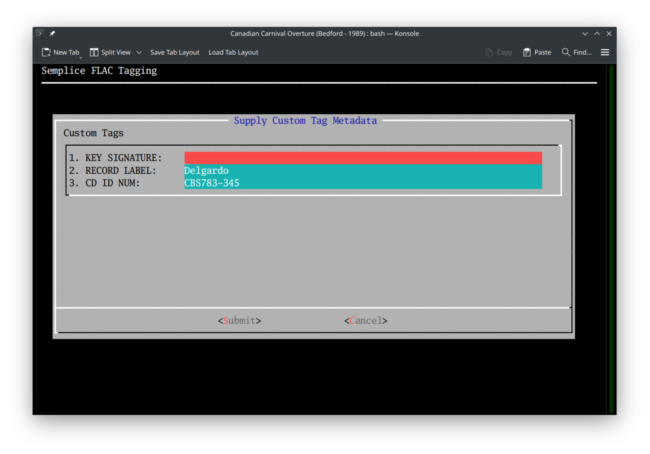 Where have my 'general notes' gone?! They are no longer visible on this screen, though they would be visible to anyone inspecting the FLAC's metadata at exactly this time:
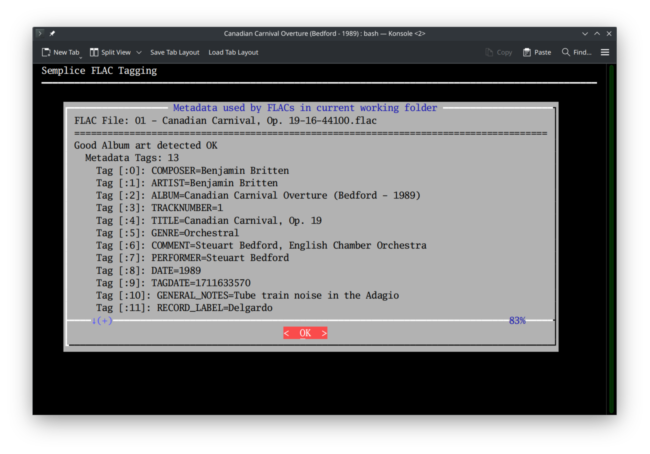 Note that 'Tag 10 GENERAL_NOTES' is still there, safe and sound... it's just that the Custom Tag editing form cannot display it, since 'General Notes' is no longer a configured tag. Worse, if I were to clean the metadata associated with this music now (by pressing the K button) and then re-inspect the surviving metadata, I would see:
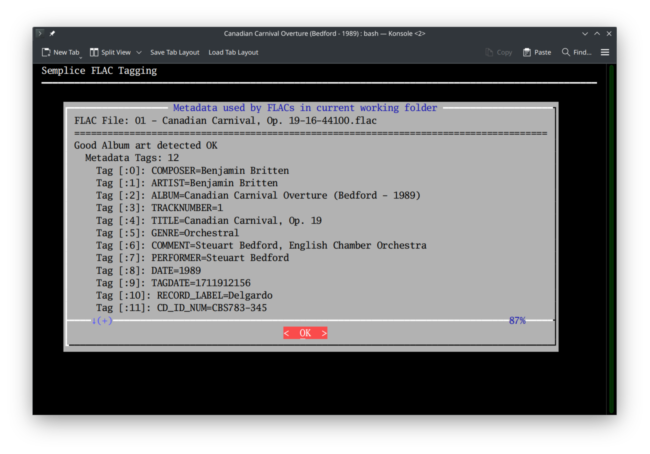 Since GENERAL_NOTES is no longer a configured custom tag, Semplice's tag cleaning procedures don't regard it as having 'protected status' ...and therefore simply deletes the data associated with it, permanently and without possibility of recovery.
The short version is, therefore: if you insist on using custom tags, configure them ahead of time and then don't touch them again. Changing their name will trigger eventual data loss, should Semplice's tag cleaning procedure ever be deployed against parts of your music collection in future.
7.0 Conclusion
In this section of the Semplice User Manual, you've seen how five separate menu options gives you access to functions that allow you to provide recording-wide or track-specific tags. You can take any or all of those options, in any order, to achieve overall tagging of your FLACs to the standards set out in my Axioms of Classical Music Tagging article. Obviously, if you don't agree with the basic thrust of those axioms, you aren't going to find Semplice's manual tagging options very useful, but they've worked for me for a quarter of a century, so I figure they might be useful to you, too!
Fundamentally, the five manual tagging menu options only do what a single, complete pass through the auto-tagging wizard (Tagging menu, Option 1) achieves -but they do provide at least two new key pieces of functionality: the ability to renumber tracks starting from something other than 1; and the ability to apply album cover art using art files stored anywhere on your PC's local storage drives. The album art functionality is a convenience; the ability to renumber from something other than 1 becomes pretty important when ripping a multi-CD work that you hope to treat as a single entity in the end, since overlapping track sequence numbers would make that an impossibility.
The auto- and manual-tagging approaches are complementary, not mutually exclusive. That is, you can use auto-tagging to get things "mostly right" and then use any of the manual tagging options to fine-tune things. If I was ripping the second CD of an opera, for example, I'd auto-tag it (meaning its tracks start from 1) and then use Tagging menu, Option 4 to 'correct' the track numbers so that they followed in sequence from where the tracks on CD1 ended. Similarly, I might forget to put a downloaded bit of cover art into the working folder before launching the auto-tagging wizard; not a problem if, after the auto-tagging, I were to take Tagging menu, Option 5 to finally point to where I'd downloaded it. Use the two mechanisms interchangeably, therefore: think of auto-tagging as the broad brush approach, with manual tagging options as the fall-back, fine-adjustment mechanism.
|[Back to Front Page]|[Tagging Home]|[Ripping Standard CDs]|[Ripping SACDs]|[All About SuperFLACs]|[Volume Boosting]|[Audio Codec Conversions]|
