1.0 Introduction
 SACDs were invented around the turn of the Millenium: they were meant to be the next big thing in home audio, with multichannel support and 'high resolution' audio data, far surpassing the 44,100Hz sampling rate and 16-bit depth of the original ('standard') audio CD. Unfortunately, the Internet came along, everyone started streaming their music and SACDs promptly stopped being made in quantity around 2009. They clung on in classical music circles, however, and today new classical releases on SACD are not rare.
Without getting into audiophile arguments, I'm just going to state that no human ear is actually capable of telling the difference between a standard audio CD and the exact same recording in SACD high resolution: if you are very young or very exceptional, you might be able to hear signals with frequencies higher than the maximum 20,000Hz of standard CDs, but it's vanishingly unlikely... especially given the median age of classical music listeners, whose high frequencies will have left them by their thirties at least. However, when record companies were producing classical music SACDs, they would often re-master their old recordings -and if you compare an old standard CD recording to its re-mastered SACD equivalent, then you very likely will hear a big improvement. It's not the extra bits of samples of the SACD audio signal you are hearing, but the efforts of the recording engineers who are re-working their old recordings. Obviously, if you are into multi-channel audio (I'm not: I've only got two ears!) then that aspect of SACDs will make them attractive to you, in their own right, too.
What I'm trying to say, briefly, is: there is no reason for an audiophile to choose SACD over CD if the masterings are identical. But if you want multi-channel or if you want to obtain the latest re-mastering of an old recording, then SACD may well be something you are interested in.
Ripping SACD data from a physical SACD disk is, however, not trivially easy as it is for standard CDs: specialist hardware and software is needed. In particular, you can only read the SACD layer of an SACD disk in a special player that has an appropriate laser pickup: these days, we call them Blu-ray players. So you'll need one of those ...and it can't be just any old Blu-ray player, either. It has to be one of a certain select group of models that are known to permit SACD ripping. Once you own the right Blu-ray player, you need to obtain special software to put it into 'server' mode, whereby it can share the contents of its disk tray over the home network. Getting the player to use that software in the right way and actually act as a server... well, that's a battle all by itself! But if you manage it, then you need some software running on a 'client' PC that talks to the Blu-ray player and rips the data off its disk, over the network, onto your PC's hard disk. It's only this last point that Semplice Version 2 can help with: it provides a simple interface that lets you 'point' to a suitable Blu-ray player and do the audio-grabbing. All the other stuff that has to happen before SACDs can be ripped is something you have to do for yourself and get right before Semplice can cover the last mile.
Accordingly, you should read my independent article on ripping SACDs before you go any further. It explains the sorts of Blu-ray players that will work; it talks you through the preparation of a USB drive with special software that will make the player act as a server; it walks you through the networking shenanigans needed to make a laptop or PC able to talk to the player. It then goes on to talk about the sacd_extract software that can be used to grab the SACD data off the player, over the network: it's only this last part of the process that Semplice Version 2 puts lipstick on, providing a friendly wrapper around what otherwise would be a command-line horror show!
This part of the Semplice Version 2 user manual therefore assumes that you have a suitable Blu-ray player, suitably configured and connectable over the network. You should be comfortable with the various operations and keypresses you need to do on the Blu-ray player side of things to put the player into 'server mode'. If you've done all of that, read on!
2.0 The Semplice SACD Ripper Interface
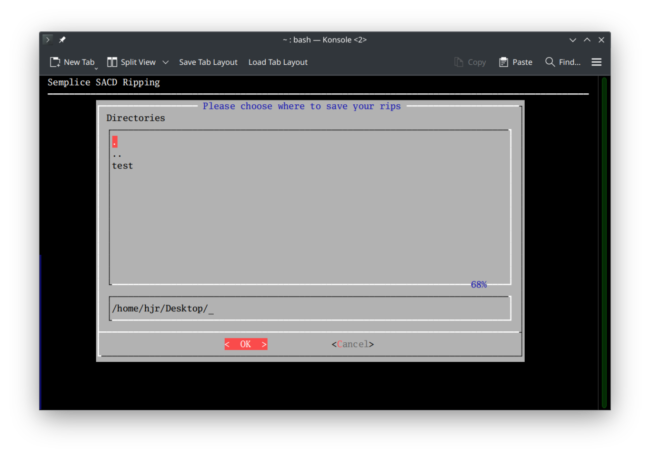
When you take Semplice's Ripping menu Option 4, you are first prompted to point to a folder which will store the ripped SACD data when it eventually comes across the network:
Here, I've navigated my way through to my Desktop folder. You can do that by typing the path out in full in the lower, horizontal panel you see directly above the [OK] button. You can also use the upper panel to point at folders and press the [Spacebar] to select them, repeatedly, until you end up at the right location: the lower panel will automatically update to display the path of the folders you've selected to date. Use whichever of the two folder traversal mechanisms you are most comfortable with. However you do it, the selected folder will be where Semplice creates a sub-folder, into which the SACD rip will be saved. Press [OK] when you're ready to proceed:
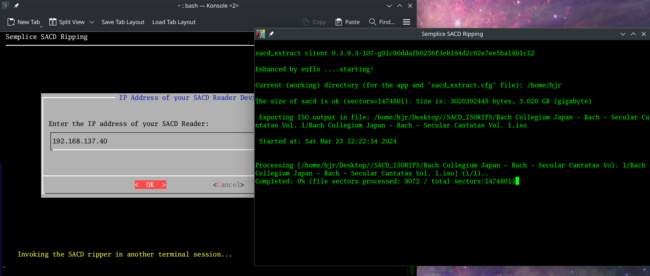
 You are now asked to type in the IP address of the SACD player. Semplice does some basic checks on what you've typed when you press [OK]. If you've typed a completely invalid IP address (for example, 192.168.137.500), the input box will be cleared and you'll be given another chance to type in something that's valid. If you've typed a valid IP address but it's not an address that's actually in use by anything, there'll be a bit of a pause as Semplice tries to contact the given address, but eventually you'll see this response:
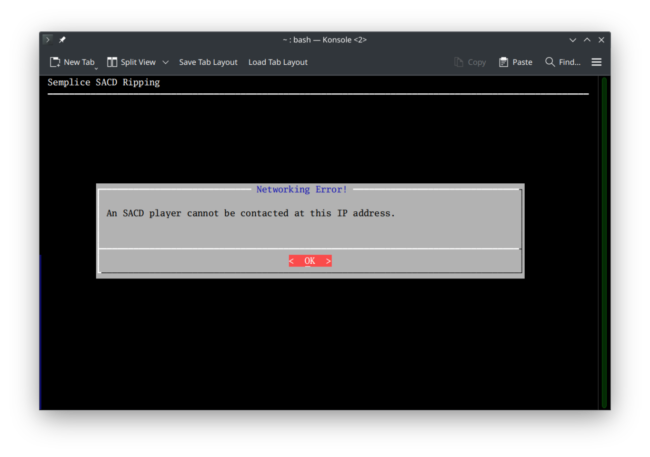 Click OK here and you'll simply be returned to the main Semplice program menu. Only if you type in an IP address that is valid and contactable and which belongs to an SACD player that is sitting there, SACD inserted, ready to serve across the network, will you see this:
In the background here, you'll see the Semplice program running with a message displayed in yellow: "Invoking the SACD ripper in another terminal session'. On the right and in the foreground, you can see that other terminal session has made contact with the SACD player and is busy pulling data across the network from it.
Semplice creates a sub-folder called SACD_ISORIPS within the folder you previously specified, and the SACD data being ripped is stored within that, like so:
Here, you see that I specified /home/hjr/Desktop; Semplice has created a /home/hjr/Desktop/SACD_ISORIPS sub-folder, and within that sub-folder, a 'Bach Collegium Japan...' sub-sub-folder has been created. That sub-sub-folder name is dependent on the SACD being ripped: they all come with metadata about the artist and composer (usually very poorly and inconsistently done!) and Semplice just uses that to create a folder whose name matches the disk being ripped.
You'll note that, regardless of the folder name, the SACD data is being stored as a single file, ending in the .iso extension. As I explain at length in my full SACD ripping article, SACDs can be ripped either into multiple per-track DSF files or into a single per-disk ISO file and there is precisely zero difference between them in terms of the amount or quality of the audio data that they end up containing. If you desperately want separate DSF files, you can manually perform the steps I outline in that full article. Semplice has, however, chosen to output to the per-disk ISO format and there's no altering that. It is also true that Semplice has been hard-coded only to extract the two-channel stereo signal from an SACD. If you want multi-channel, you should again use the manual way of ripping SACDs explained in my full ripping article.
For now, however, we're done: when the rip reaches 100%, the new terminal session that was opened will close automatically and you'll be returned to the Semplice main menu.
3.0 Post-Rip Processing
Some media players can play SACD ISOs directly. I don't know any that do personally, but I've read reports that DeadBeef can do so. On Windows, allegedly Foobar2000 with appropriate plugins can play them, too. If your music player of choice can cope with playing ISOs, you can skip this next step! For the rest of us however -and, particularly for me using my own Giocoso music player, which definitely cannot play back anything other than FLACs- there's going to be a need to 'translate' the SACD ISO rip into a more conventional audio format. Semplice can help with that, using features in its Audio Processing menu, Option 2 ("Convert between audio formats").
Before taking that option, however, press W to change the working folder, to be the one where the ISO was ripped to:
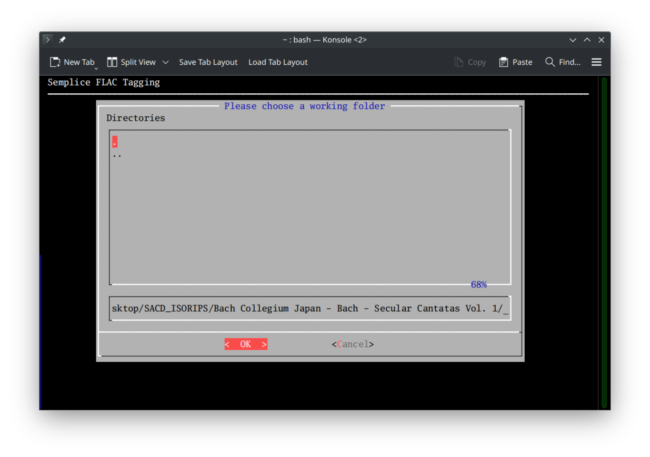 Here, you see me having navigated my way right down to the 'Bach Collegium Japan...' sub-folder that we know was the location for the ISO file to be stored. When I press [OK], that sub-folder will now be my 'working folder'. You'll see this reflected in the header-area of the main Semplice program display:
The yellow text there tells me that my 'Working folder' is now, indeed, the Bach Collegium Japan sub-folder created by the ripping process, so I know I'm in business. Once an appropriate working folder has been selected, I can then take the Audio Processing menu, Option 2:
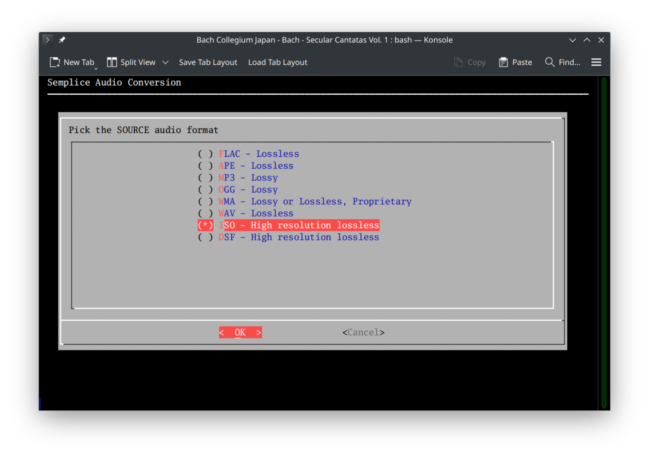 Semplice can handle eight different audio formats as inputs. Your job is simply to arrow down to the 'ISO - High resolution lossless' item and press the [Spacebar] when you are sitting on it: that puts an asterisk in the brackets next to it which indicates the ISO format has now been selected. Click [OK] to proceed:
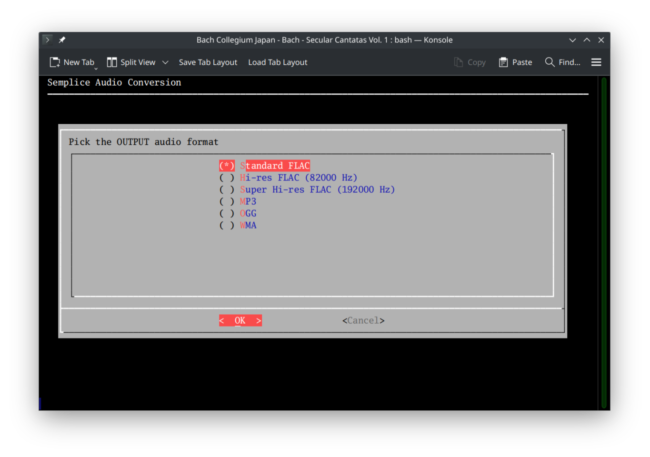 Now you are presented with a similar list of the six audio formats Semplice can output to. The top three in this list are all FLACs, just with different sampling rates and bit depths. The bottom three are all lossy formats: good for writing small files onto space-constrained devices for listening in environments where perfect quality isn't a requirement, such as a train, plane or car journey, perhaps. In my case, I'd probably convert my ISO to 'Standard FLAC': that's the same FLAC an ordinary audio CD would output to, using a sample rate of 44,100Hz and a bit-depth of 16 bits. I'd choose that option because it creates perfect sound at relatively small disk space cost. Audiophiles will, of course, want the 24-bit 'high resolution' audio outputs. The 'Hi-res FLAC' option will produce 88.2KHz sample rate, 24-bit FLACs: they'll be about four times the size of a standard FLAC, with no audible improvement in audio quality for 99.99% of mere mortals. The 'Super Hi-res FLAC' option outputs 192KHz FLACs at 24-bit: they'll be eight times the size of a standard FLAC, and will again contain nothing that ordinary ears will ever be able to discern differently from the standard FLAC option. So, if you have 'golden ears', feel free to output to one or other of these higher resolution options; people of my age will do perfectly fine with standard FLACs! Remember: the point of ripping from an SACD was to get to the re-mastered audio, rather than the ordinary CD data, which was probably lifted from an old mastering. Whether you now output to standard, high or bonkers resolution FLAC will make no difference to you hearing that re-mastered version. It's purely a matter of how much disk space you want to throw away on the enterprise.
For the record, most SACDs claim to be mastered to the DSD64 standard, and though it's difficult to be precise about it because the technologies are so different, that's generally thought to be equivalent to 88.2KHz FLACs. If you are ripping an SACD that claims to be DSD128, DSD256 or DSD512, then those are usually thought to be best represented by 192KHz FLACs.
Anyway: my snarky comments about audiophiles aside, you pick whatever flavour of FLAC you feel happiest with: Semplice can handle all three output formats with equal ease. But for me, I'm sticking to the standard FLAC output, so I press [Spacebar] when that option is highlighted and an asterisk appears next to it, to indicate it's been selected. I then press [OK]. A short message appears saying to 'press any key to start' ...and when I do press a key, this happens:
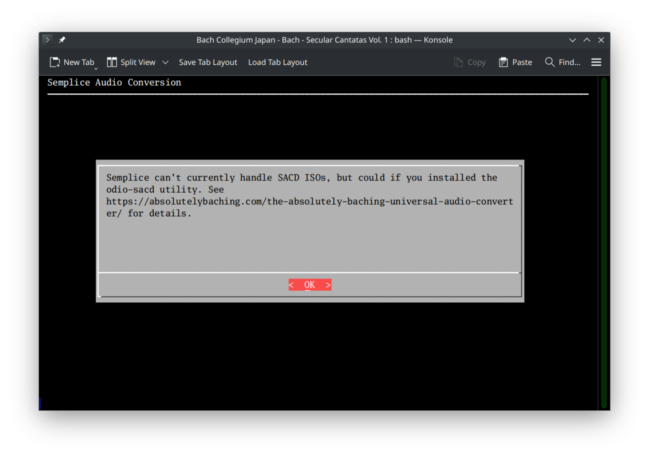 If you see this message, it's because you're missing an important piece of necessary software, installation instructions for which I'll discuss separately in Section 4 below. The software is called sacd and is something that Semplice usually automates the installation of during its own installation process. So, if you see this message, something went wrong with Semplice's cunning attempts to install sacd for you: you'll then need to install it yourself, if you want this ISO conversion capability to work. As I say, see Section 4 below for instructions on how to do that. For now, I'm going to assume Semplice has successfully installed sacd during its own installation process and, if that's the case, when you pressed that 'any key to start', this would have happened instead:
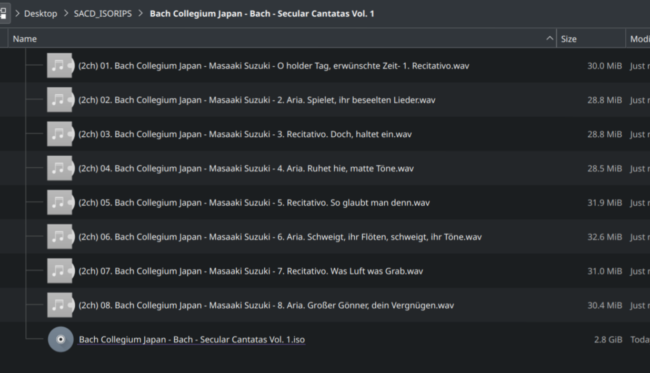
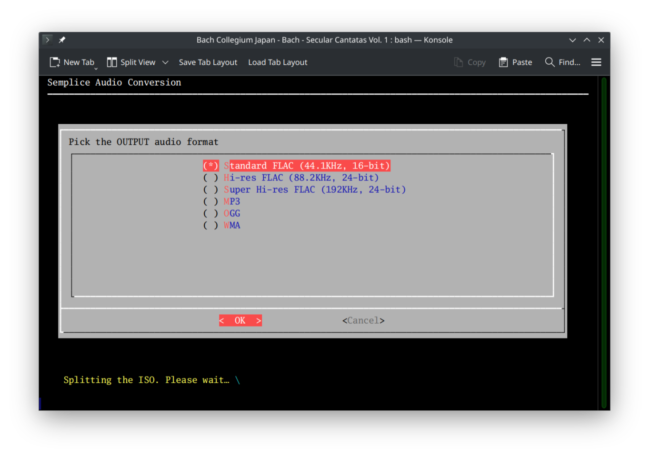 First, you get a little message in yellow at the bottom of the screen to say that the ISO is being split. Were you to visit the rip folder in your file manager as this is going on, you'd see something like this:
You'll see in this screenshot that the ISO file is still there, all 2.8GB of it... but it's now accompanied by a bunch of WAV files. These are lossless per-track files that are being extracted out of the ISO. That process can take quite a while, so be patient. When it's complete, the Semplice program display will change to this:
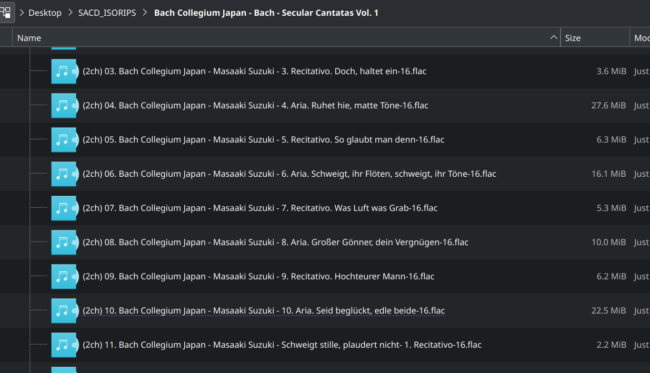
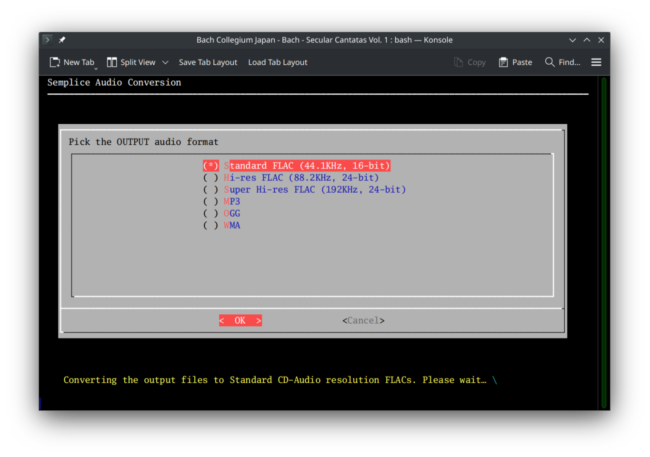 ...which again tells you in yellow, at the bottom of the screen, that the WAVS are being converted into whatever flavour of output FLAC you previously selected (in my case, standard ones). That can also take a minute or more to complete, but once it has you'd see this back in the original rip folder:
Now you see all the files are 16-bit FLACs (if you'd picked a higher resolution output, there would be a '-24' embedded in the file names). You'll notice that the WAVs have all been deleted: this happens entirely automatically and is behaviour you cannot alter. They were merely intermediate files, produced as a necessity whilst the transition from per-CD ISO to per-track FLACs was being made. They serve no purpose once the FLACs are in existence and so are deleted immediately the conversion process ends. However, though the screenshot above does not show this, the original ISO is not deleted. It is 'the source of truth' for this audio, of course, and so it is left there on disk, in case you decide to convert to a higher resolution FLAC after all, or in case you just want to keep the ISO around as well as the FLACs.
Anyway: at this point, you now have FLACs produced from an SACD, playable by pretty much any and every music-playing software in existence! Of course, those FLACs won't have any meaningful metadata within them, so the next step into getting these new FLACs into a catalogue-able and listen-able state is to tag them up with the best metadata you can muster: but that's something I'll cover in the tagging section of this manual.
4.0 Installing Sacd
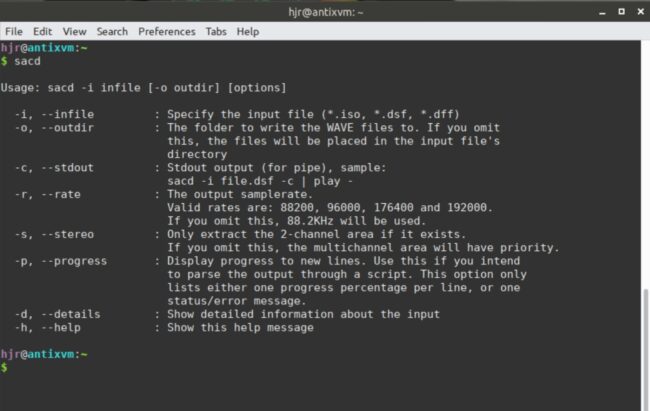
Semplice Version 2 makes an effort to install all its software dependencies automatically, including the sacd program that is needed to convert ISO files ripped from SACDs into WAV files (which Semplice can then convert into other audio formats, of course). Unfortunately, sacd is seldom in the standard software repositories for most Linux distros ...and even when it is, it's often the wrong one, so installing it is better handled as a matter of downloading its source code and then, literally, compiling that into a usable binary executable. That sounds troublesome -and it can certainly be a messy sort of operation if you're not used to it! That's why Semplice tries to automate this compilation process during its own initial installation. You can test whether Semplice's efforts worked by simply opening a command prompt and typing the command: sacd. You should see a response similar to this:
If you see that sort of usage help text, it means sacd is installed correctly and functioning properly: you need read no further in this section, therefore!
Try as it might, however, Semplice cannot guarantee that its sacd installation efforts will succeed. If they don't for one reason or another, you will have seen above (Section 3) that subsequent attempts to use Semplice to convert an ISO ripped from an SACD will fail with a warning message about sacd not being available on your PC. If that happens to you and you want to correct it, these are the steps you'd need to take, though the required steps will depend on the distro you're using:
Arch-based Distros
On Arch, Endeavour, Manjaro, Garuda and similar distros, you can install sacd from the Arch User Repository (AUR), using a command such as:
yay -S sacd
If you're using pamac or another front-end to the AUR, substitute in an equivalent command as appropriate. Obviously, you will have needed to install all the software necessary to compile packages when installing yay or pamac, so that shouldn't be an issue for you now.
Other Distros
Other distros will first need to be made into platforms that can compile source code into executable binaries. The commands will be distro-dependent, but these usually do the trick:
- Debian: sudo apt install git cmake binutils pkg-config build-essential python3 python3-dev
- Ubuntu: sudo apt install git cmake binutils pkg-config build-essential python3 python3-dev
- Fedora: sudo apt install git cmake binutils pkg-config gcc kernel-devel python python-devel
- OpenSuse: sudo zypper install -t pattern devel_basis ....followed by.... sudo zypper install cmake python python-devel git
Be aware that some distros seem not to know of a package called 'python3-dev', but will install the necessary software if you substitute in the name 'python3-is-dev' instead. Assuming you get this bunch of software installed, you can move on to downloading the sacd software itself and compiling and installing it, with the following commands:
cd
git clone https://github.com/Sound-Linux-More/sacd.git
cd sacd
make
sudo make install
The first 'cd' command is simply there to make sure that all this stuff happens inside your own $HOME folder. The sacd software should be downloaded to a sub-folder called 'sacd' by the second command listed here. You then simply move into that sub-folder (with the second 'cd' command) and issue the 'make' command to compile the software. The final command copies the compiled executable into the /usr/bin folder, so sudo privileges are required at that point.
And that should be that: once sacd has been installed, you can clear up the debris left behind from this entire build process by issuing the commands:
cd
rm -rf sacd
These commands merely remove the source code folder, not the installed, compiled executables. If you type the command sacd at this point, you should see the display of advice on how to run the program properly shown in the first screenshot of this section.
Note that on Ubuntu 22.10, I then had to issue one extra command to make the operating system aware of where, precisely, all the shared files that sacd depends on were actually copied to: that distro seems to build things into /usr/lib64 rather than vanilla /usr/lib, and that makes sacd itself think the files it depends on are missing. A simple sudo ldconfig /usr/lib64 issued before you issue the first 'make' command will fix that problem, however. Any distro in the Ubuntu family is likely to be affected by the same problem, of course (and fixed by the same fix!)
If this all seems a lot of a palaver to go through for just getting to listen to some classical music, remember: you wanted to swim in the sea of SACD! If you don't do SACD ripping, you don't need to do any of this... and if you do, you only have to do this once!
|[Back to Front Page]|[Ripping Standard CDs]|[Semplice Tagging Model]|[All About SuperFLACs]|[Volume Boosting]|[Audio Codec Conversions]|
